Documentation Index
Fetch the complete documentation index at: https://signatureapi-daf4ee54.mintlify.app/llms.txt
Use this file to discover all available pages before exploring further.
Overview
This tutorial shows you how to automatically save signed documents to SharePoint and send email notifications using SignatureAPI and Microsoft Power Automate. When a document is signed through SignatureAPI, your flow will retrieve the completed deliverable, store it in the correct SharePoint folder, and notify the responsible team by email through Outlook. This tutorial targets SharePoint Online, but you can adapt the same approach for OneDrive, Azure Blob Storage, or other file storage services.What You’ll Learn
- How to trigger a Power Automate flow using a SignatureAPI webhook event.
- How to retrieve a signed deliverable from SignatureAPI using dynamic content.
- How to save the signed document to a specific SharePoint Online folder.
- How to send an email notification with the signed document attached using the Outlook connector.
- How to test and verify the complete end-to-end workflow.
The Problem
In HR departments, it is common to send important documents (employment contracts, policy acknowledgements, tax forms) for electronic signature. However, manual handling of signed documents introduces several challenges:- Delayed awareness - there is no immediate way to know when a document has been completed, which slows down follow-up actions.
- Misfiled documents - signed documents are not always saved in the correct SharePoint folder, making them difficult to locate later.
- Compliance gaps - when these issues go unnoticed, HR teams face delays in onboarding, auditing, and regulatory compliance processes.
How Automation Helps
Automation helps HR teams stay on top of signed documents by:- Monitoring signature completion status in real time through SignatureAPI webhooks.
- Automatically saving the signed document to the correct SharePoint folder as soon as it is available.
- Instantly notifying the responsible team via email through Outlook when the document is completed and filed.
- Reducing manual follow-ups and eliminating delays in onboarding or compliance workflows.
Requirements
Before starting, make sure you have:- Power Automate - To build the automated workflow.
- SignatureAPI account - For electronic signatures and webhook triggers.
- SharePoint Online - To store the signed documents in a designated folder.
- Microsoft Outlook account - To send email notifications to the target department.
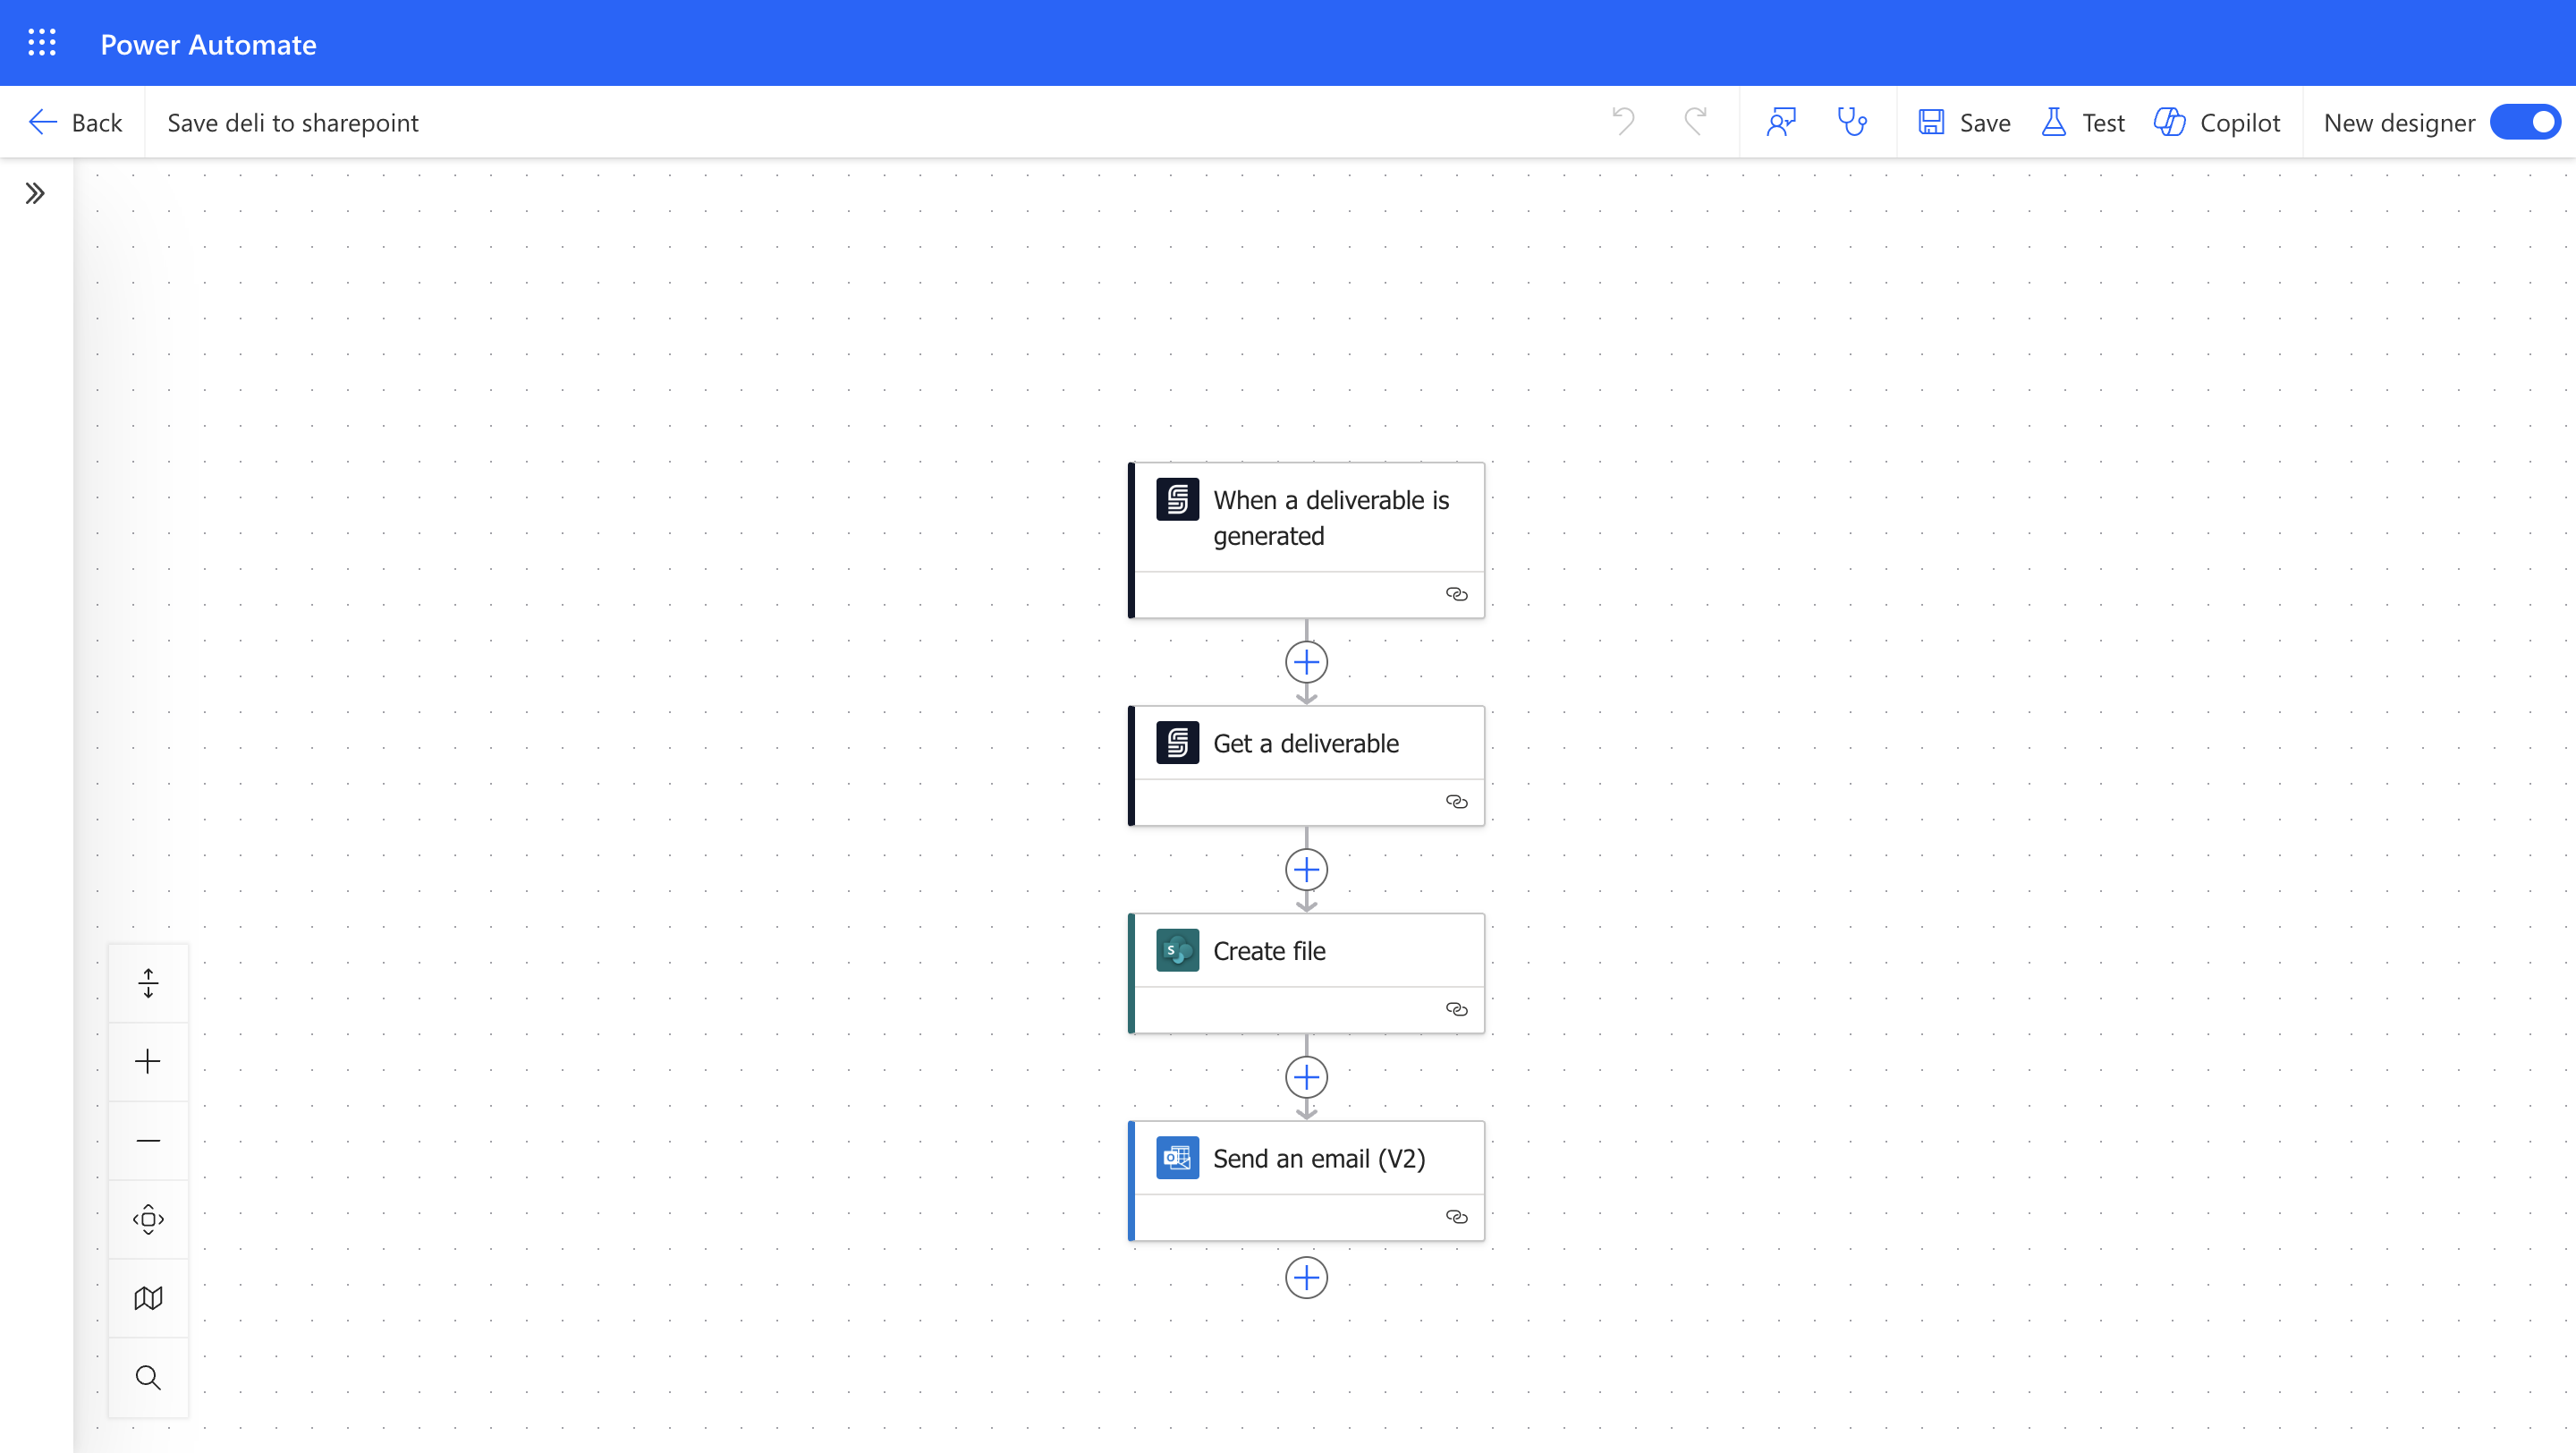
Flow Overview
The automation process follows these steps:- Trigger: A SignatureAPI webhook fires when a deliverable is generated (a signed document becomes available).
- Retrieve: The flow fetches the signed deliverable from SignatureAPI.
- Save to SharePoint: The signed document is saved to the designated SharePoint folder.
- Notify: An email notification with the document details is sent to the responsible team through Outlook.
Step-by-Step Tutorial
Follow these steps to build the automation that saves signed documents to SharePoint and notifies your team via Outlook.Step 1: Set Up the Power Automate Flow
Create the automated workflow in Power Automate, triggered by a SignatureAPI event.1.1 Configure the Trigger
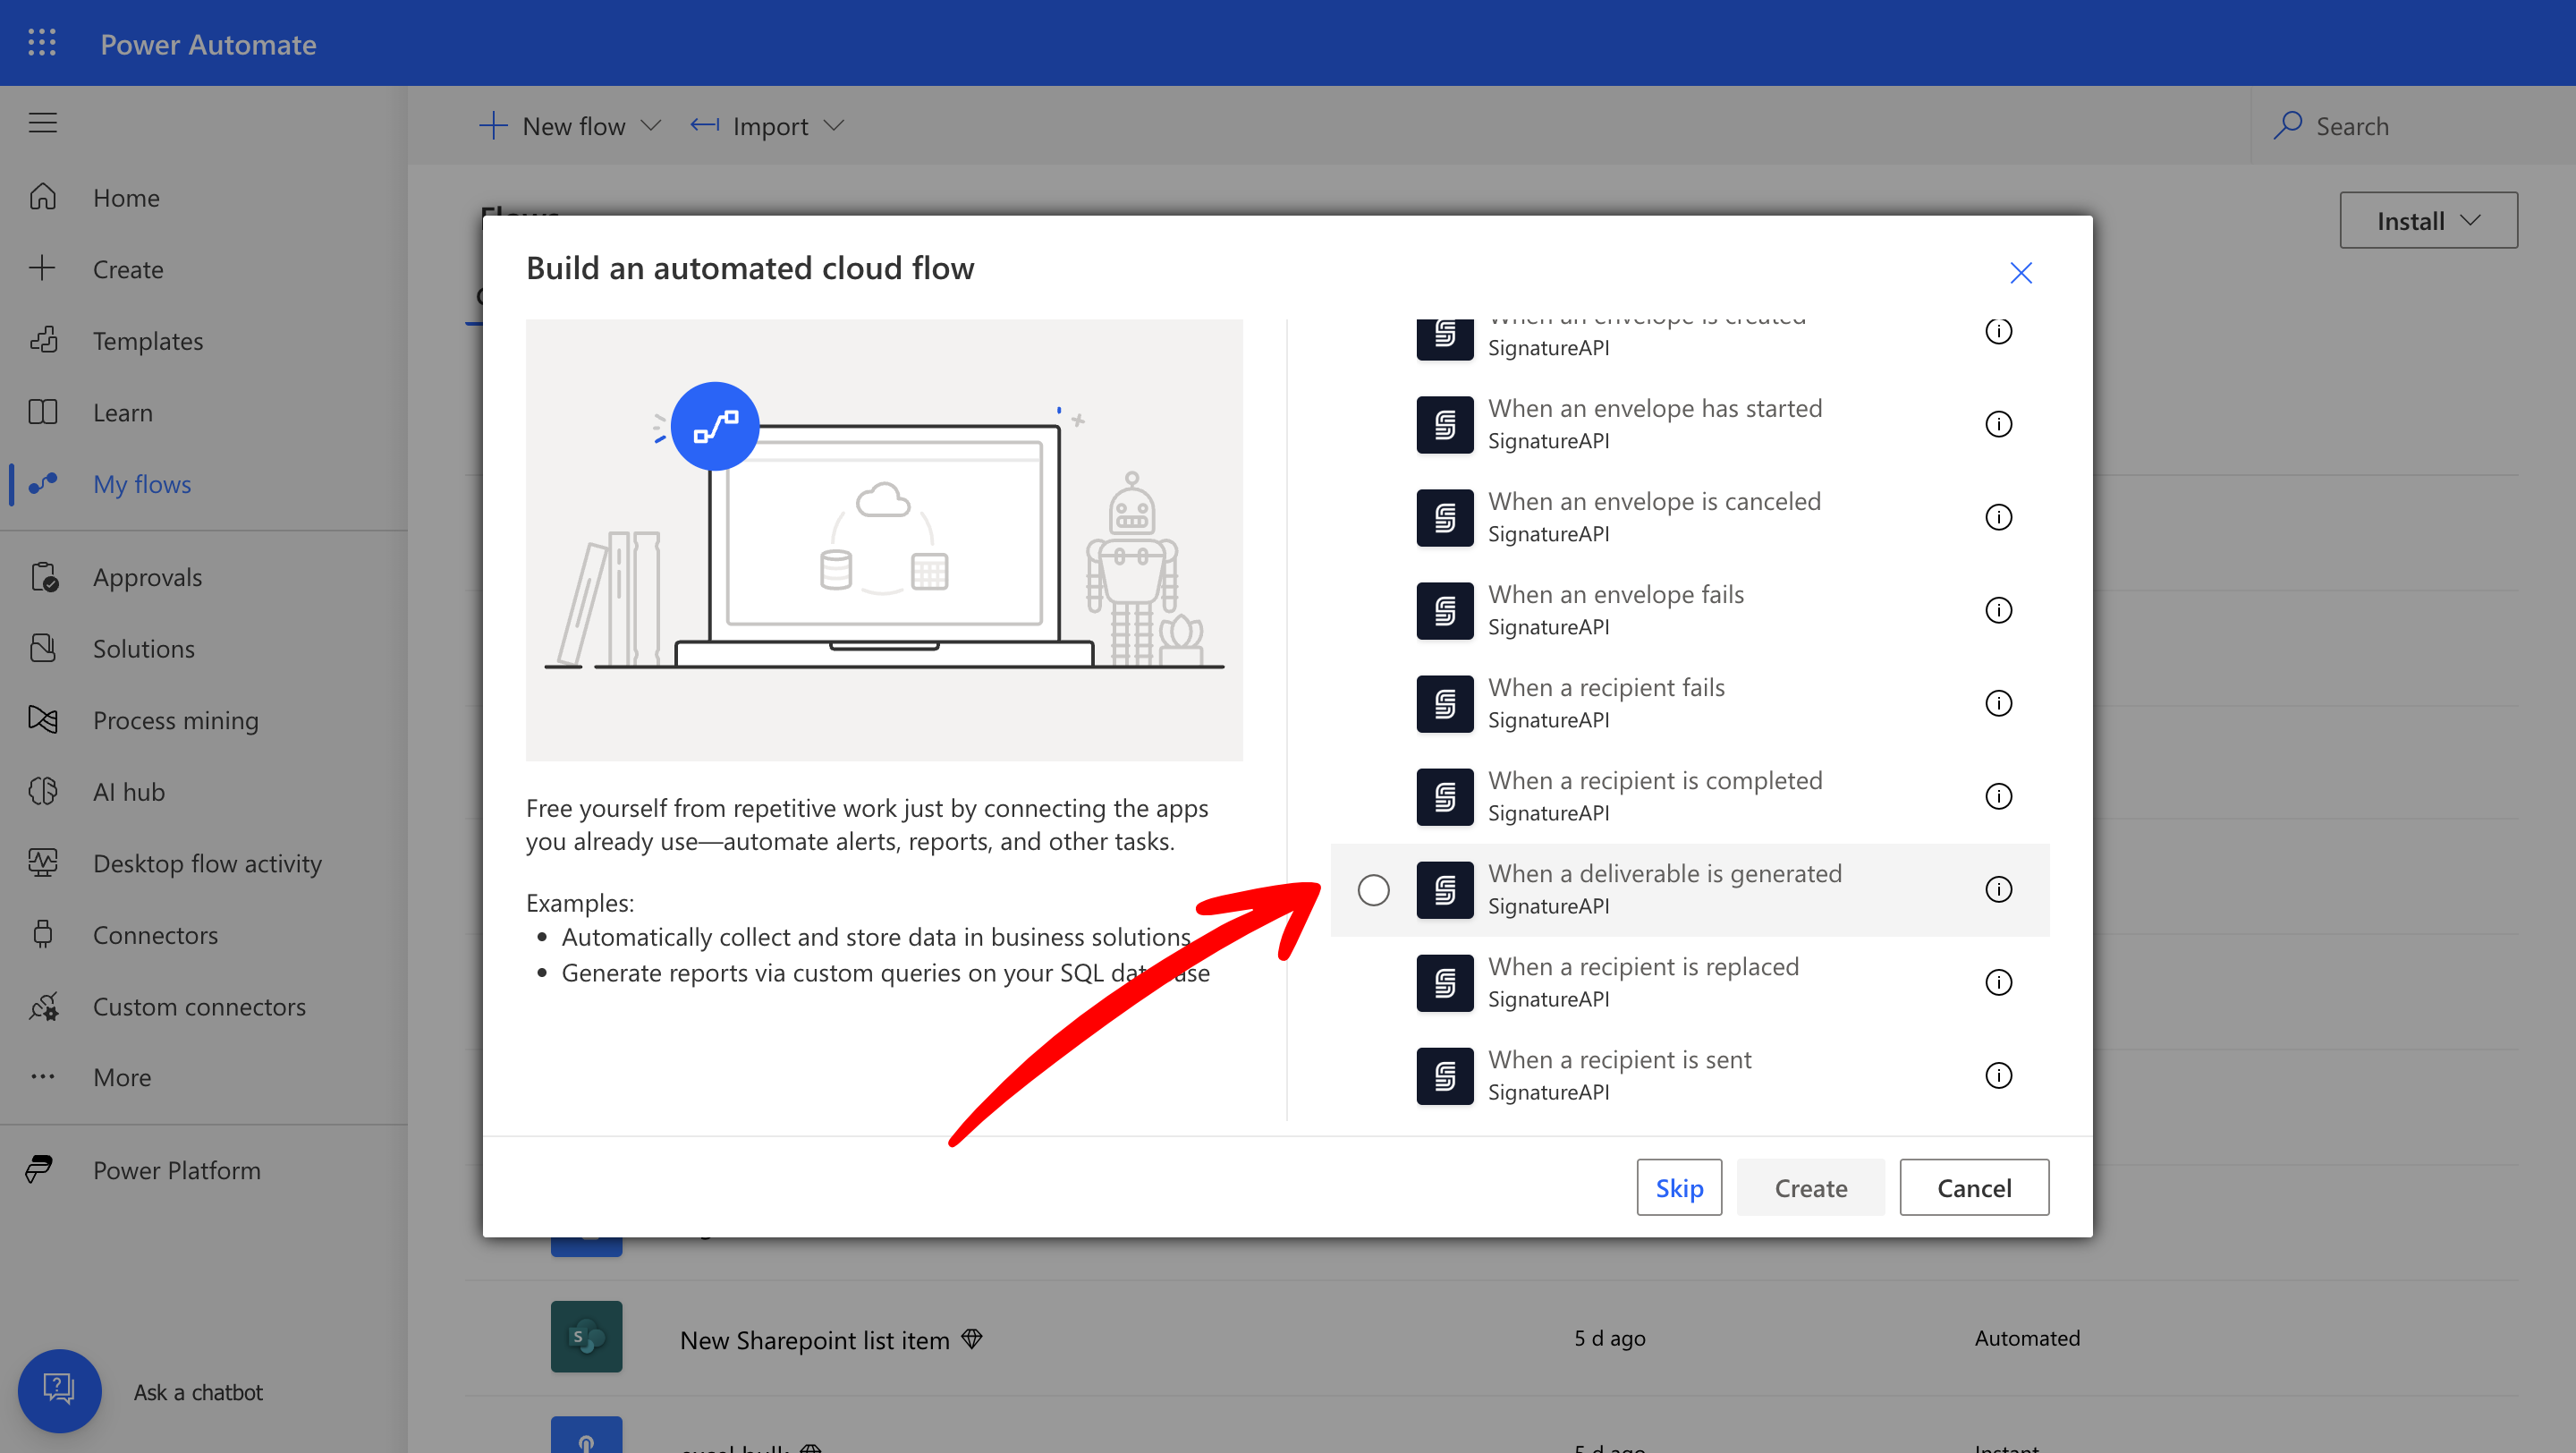
Set the flow trigger to fire when SignatureAPI generates a deliverable (the signed document).- Go to Power Automate and select Automated Cloud Flow.
- Name your flow (for example, “Save Signed Docs to SharePoint”).
- Choose the trigger “When a deliverable is generated” from the SignatureAPI connector.
1.2 Retrieve the Signed Document
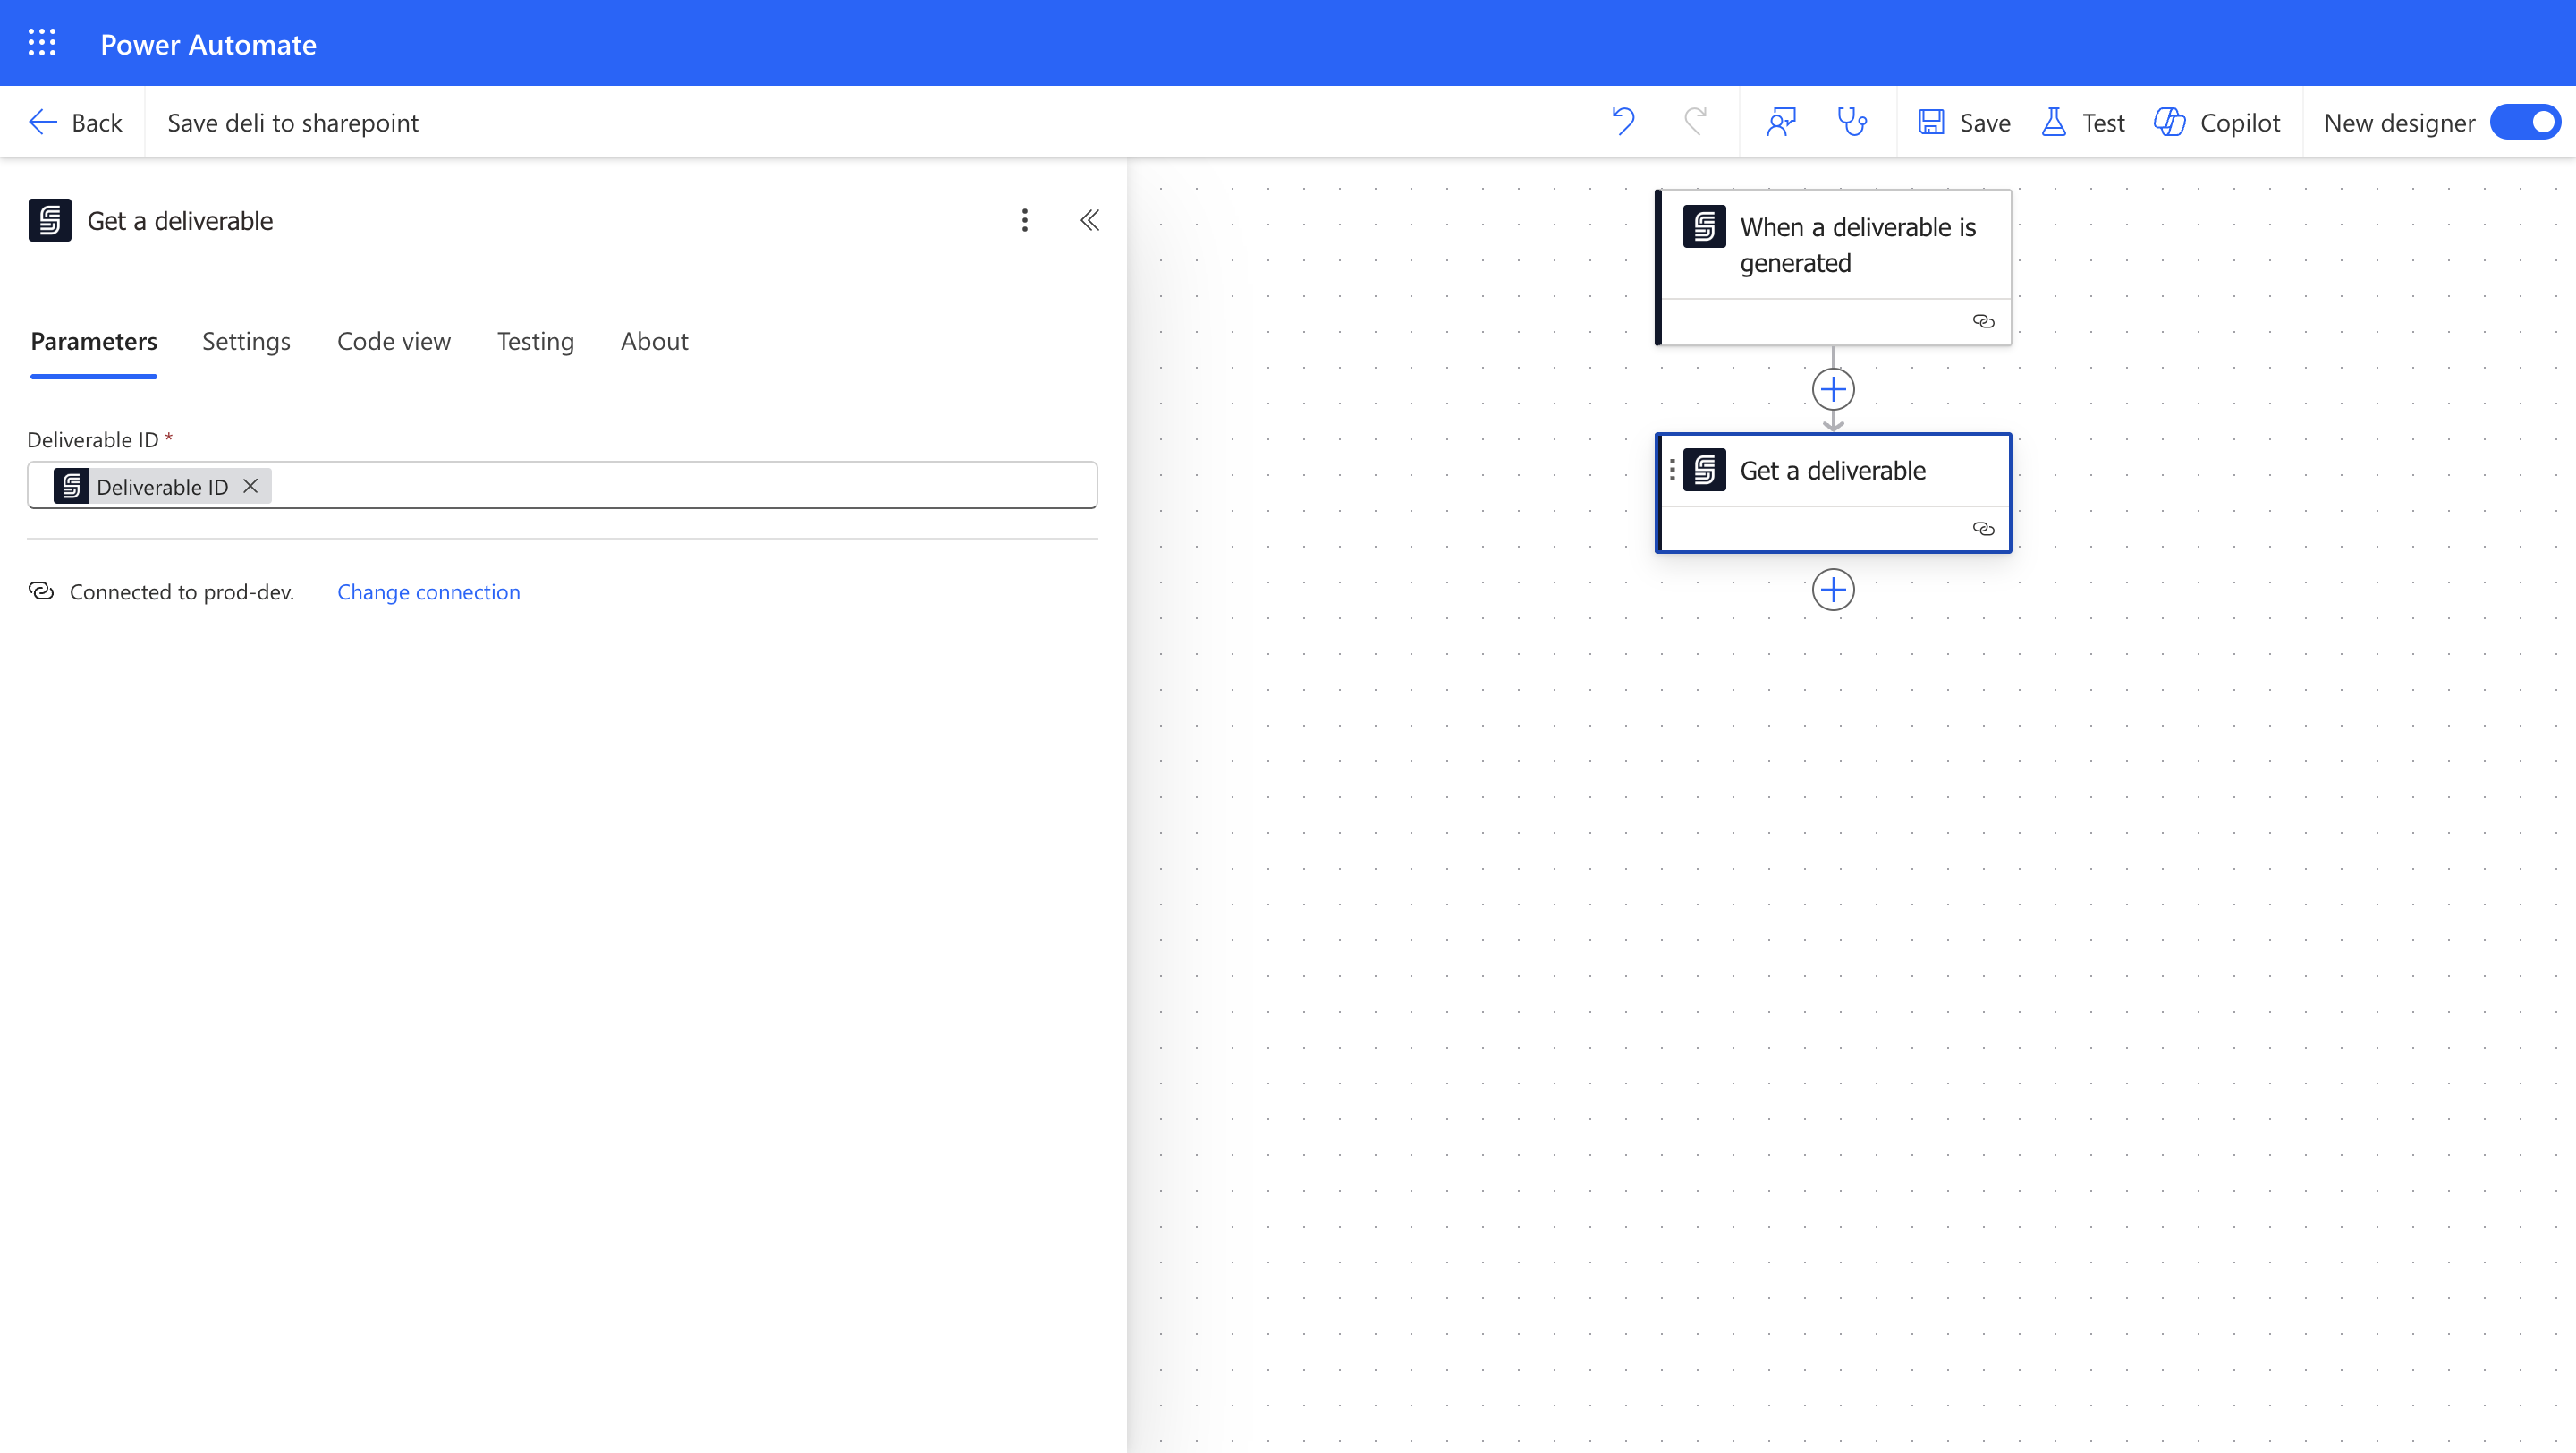
Add an action to retrieve the completed document from SignatureAPI.- Add the “Get a Deliverable” action from the SignatureAPI connector.
- In the Deliverable ID field, select the deliverable ID from the trigger’s dynamic content.
1.3 Save the Signed Document to SharePoint
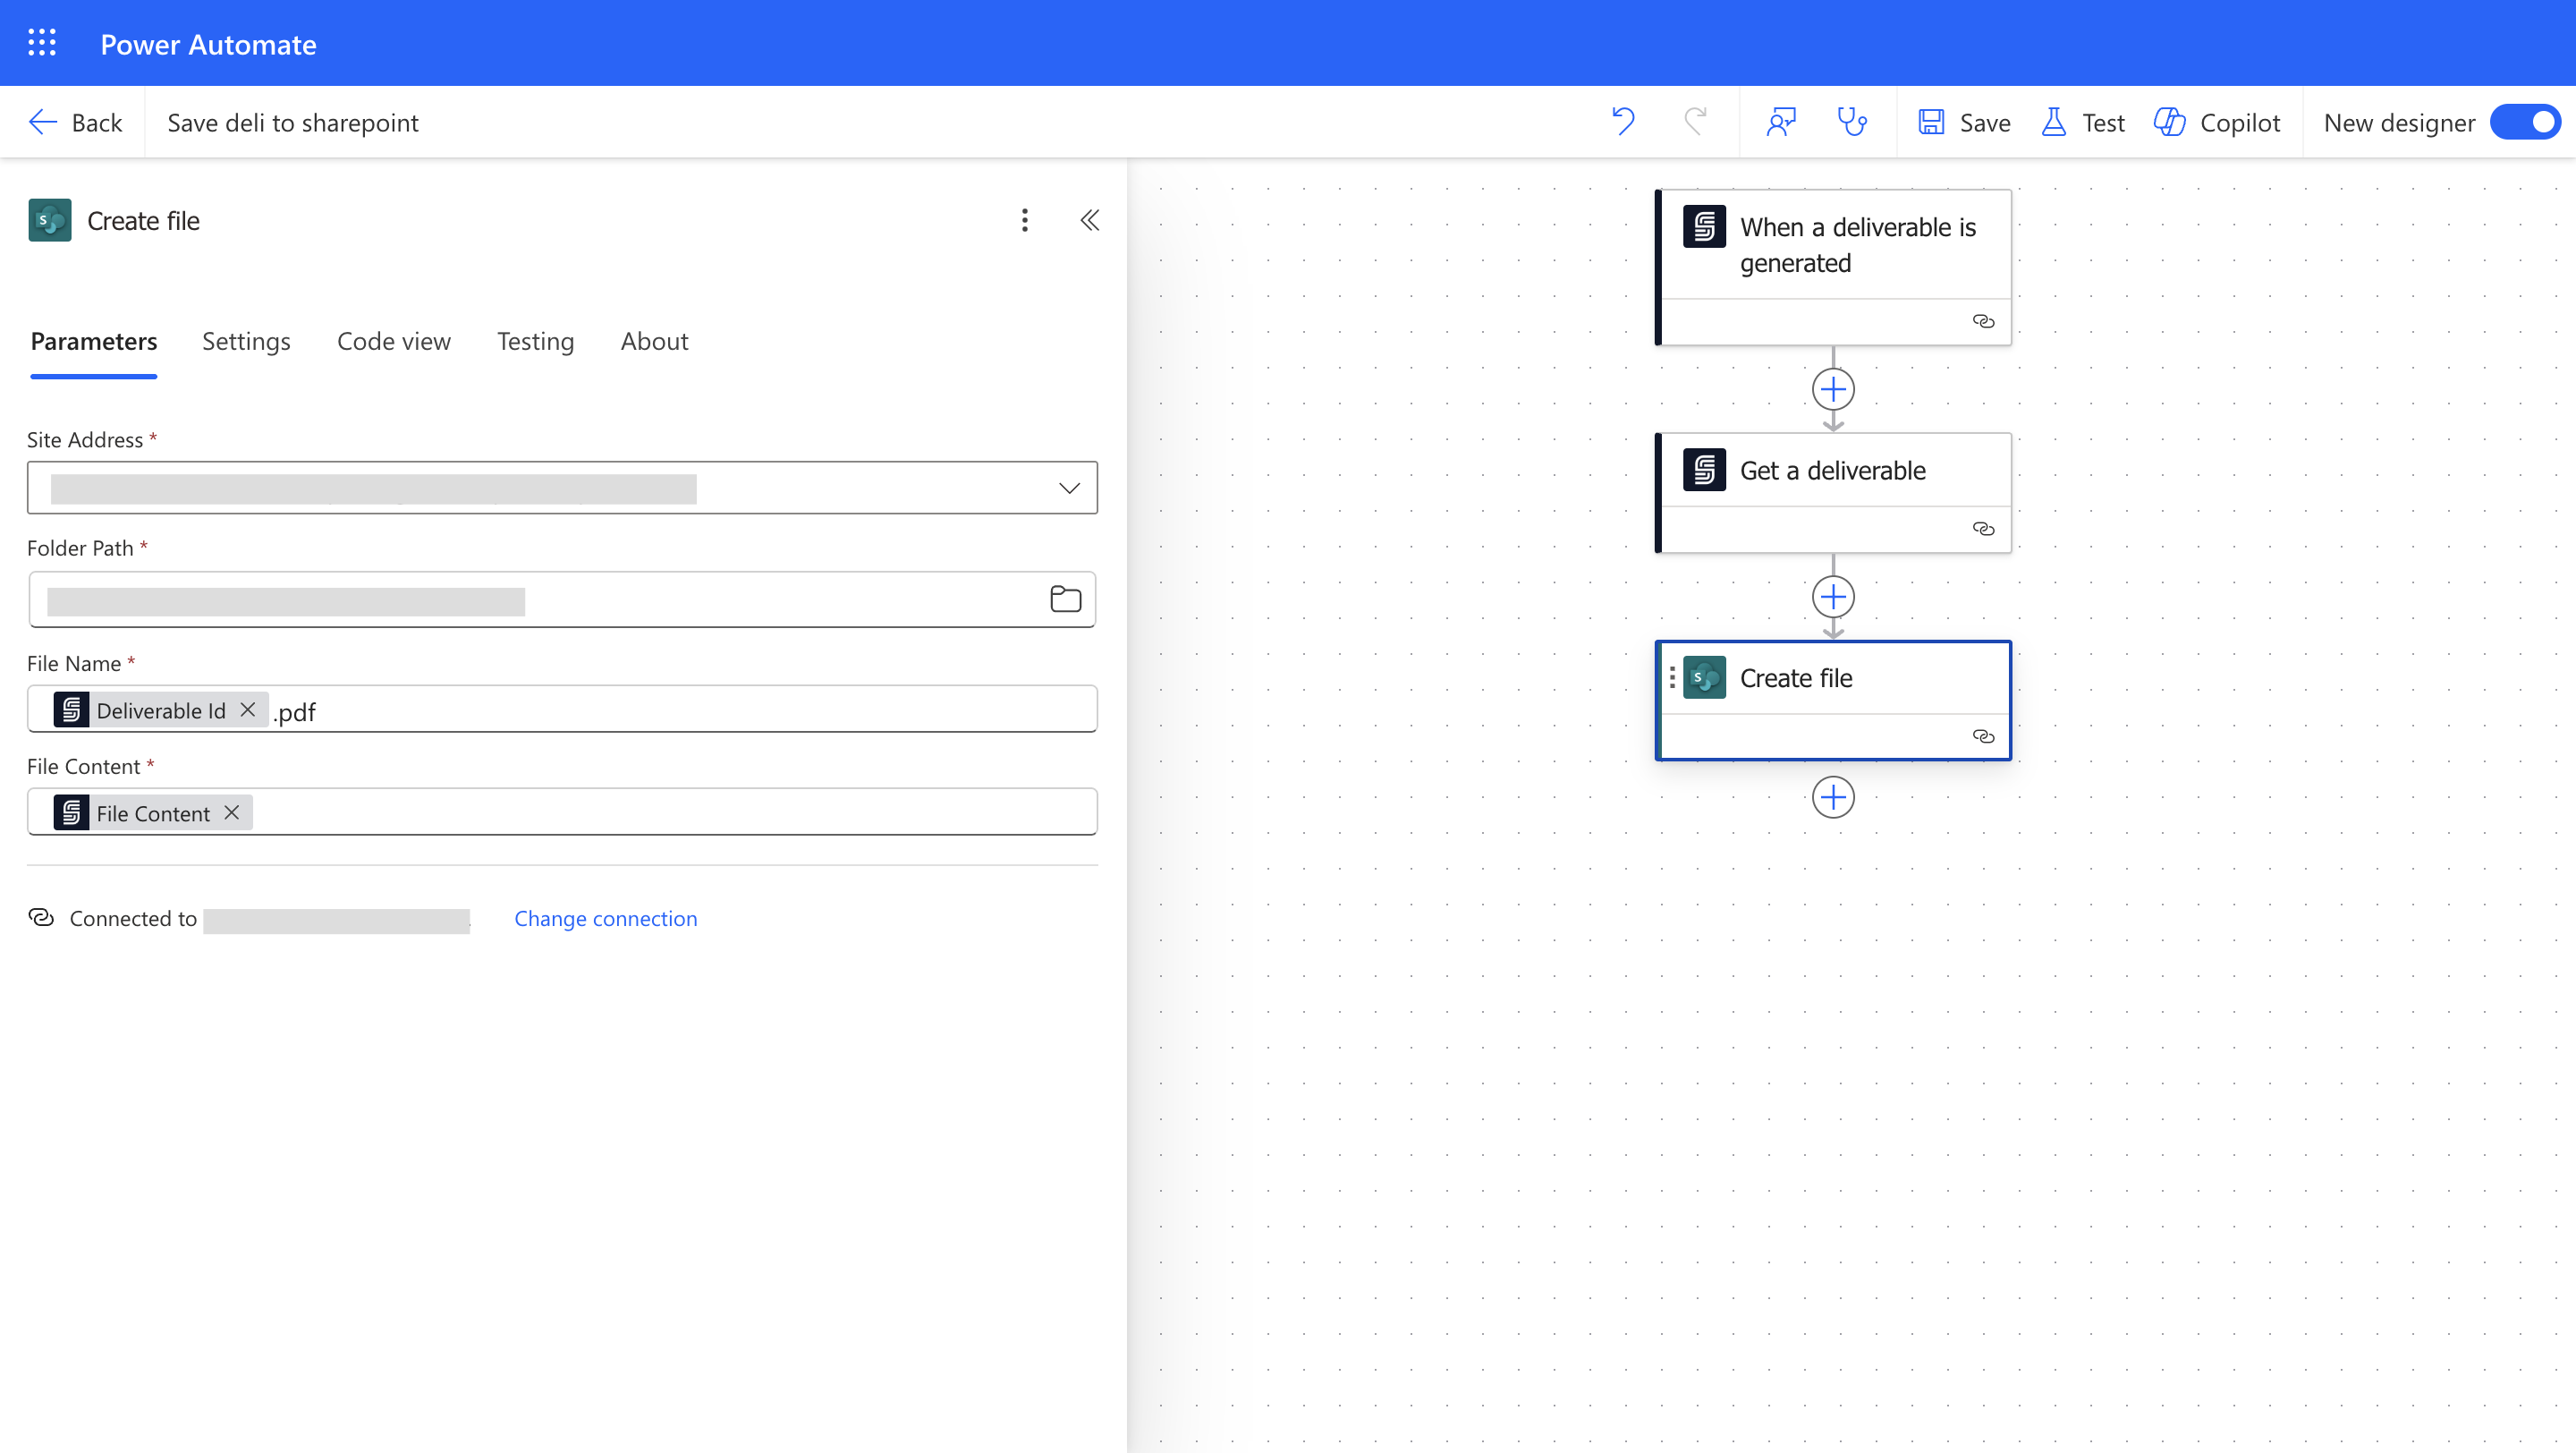
Save the signed document to your designated SharePoint folder for record-keeping.- Add the “Create File” action from the SharePoint connector.
- Select the Site Address for your SharePoint site.
- Set the Folder Path to the location where signed documents should be stored.
- Set the File Name using dynamic content (make sure it ends in
.pdf). - Map the File Content field to the file content from the “Get a Deliverable” action.
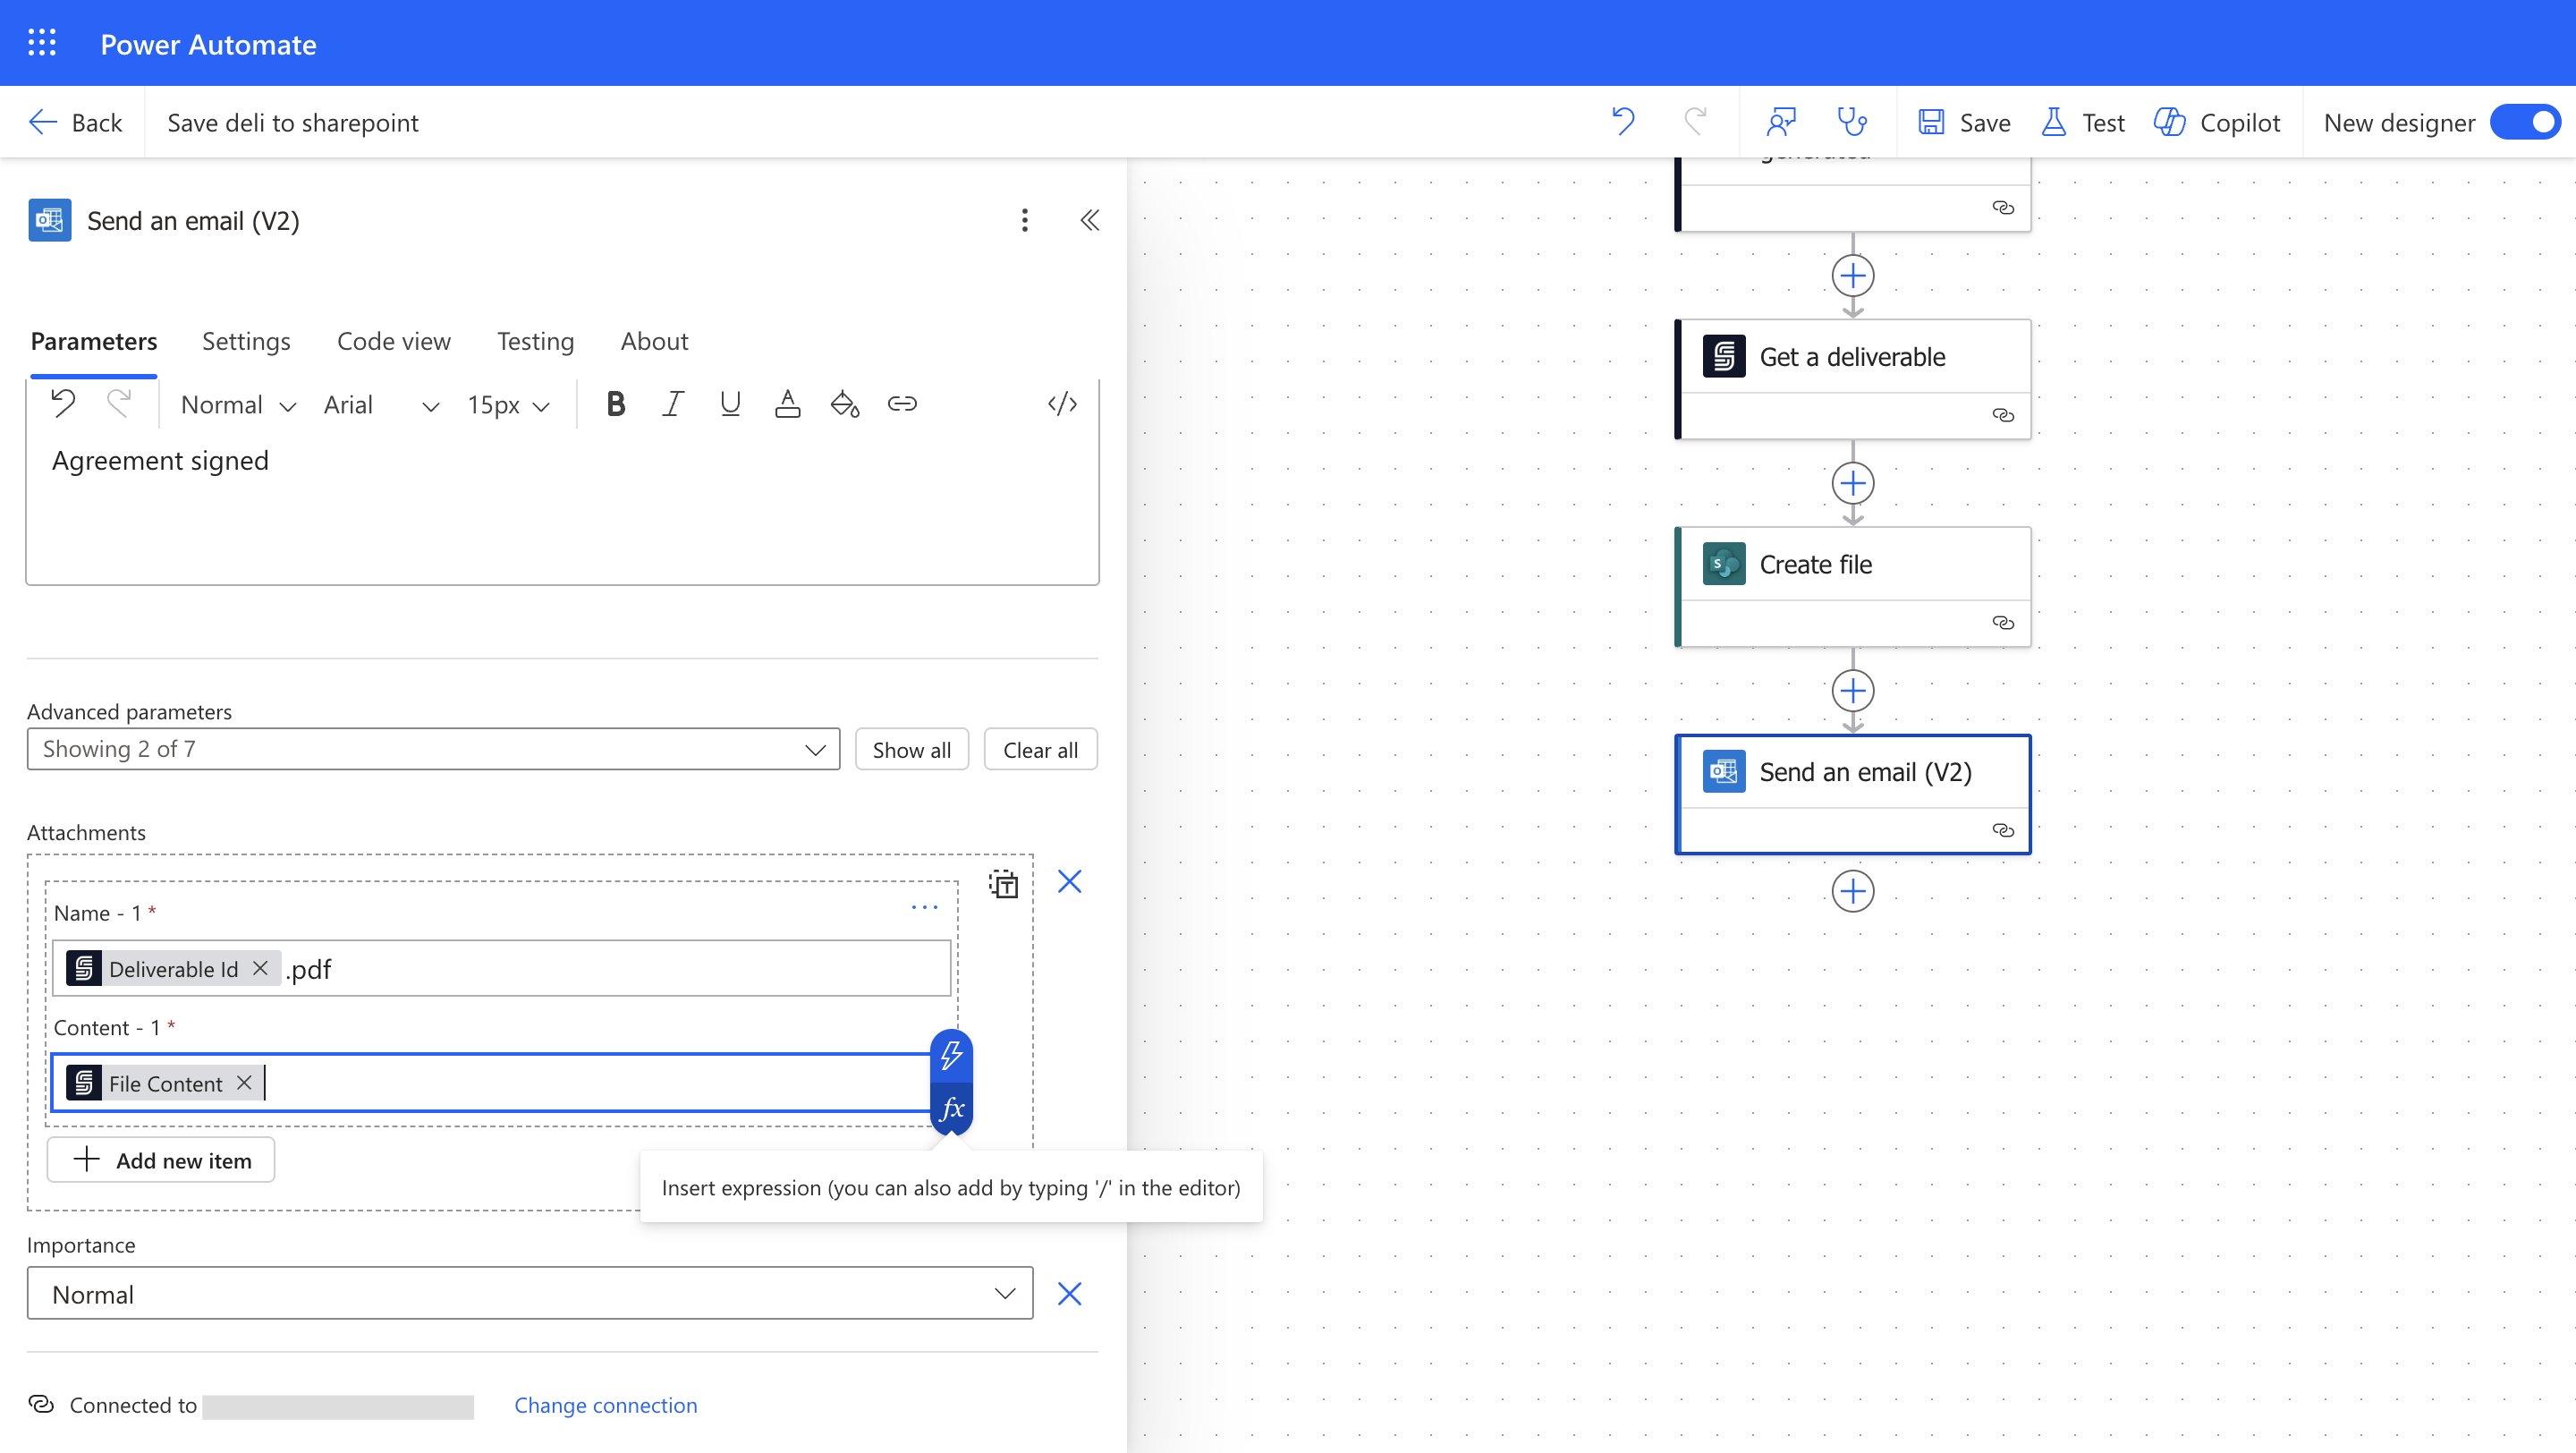
1.4 Send an Email Notification
Send an email notification to the responsible department so they know the signed document has been saved.- Add the “Send an email (V2)” action from the Microsoft Outlook connector.
- In the To field, enter the email address of the department or team that should receive the notification.
- Set a descriptive Subject line (for example, “Signed Document Ready: [document name]”).
- In the Body, include relevant details such as the document name and SharePoint location.
- Optionally, attach the signed document by using the File Content from the “Get a Deliverable” action and setting the filename (ending in
.pdf).
Step 2: Test Your Automation
Test the entire process end-to-end to confirm everything works correctly.- Save your Power Automate flow.
- Create a new envelope in SignatureAPI and start the signing process.
- Sign the document to trigger the deliverable generation event.
- Verify the following:
- The signed document appears in the correct SharePoint folder.
- The email notification is received by the designated department.
- The email contains the correct document details and attachment.
- Signed document is saved in the correct SharePoint folder.
- Email notification is received by the designated department.
- Attachment in the email matches the signed document.
Troubleshooting & FAQ
Common Issues:
- API Key Errors: Ensure your SignatureAPI key is correct and properly authenticated in the Power Automate connector. If you recently rotated your key, update it in the connector settings.
- SharePoint Permissions: Verify that the Power Automate connection has write access to the target SharePoint site and folder. If the “Create File” action fails, check the site permissions for the connected account.
- Email Not Received: Confirm that the email address in the To field of the Outlook action is correct. Also check the recipient’s spam or junk folder, and verify that the Outlook connector is properly authenticated.
Frequently Asked Questions:
- What if the email notification is not received? Check that the Outlook connector is authenticated and that the recipient email address is correct. Review the flow run history in Power Automate to see if the “Send an email” action completed successfully or returned an error.
- Can I save deliverables to OneDrive instead of SharePoint? Yes. Replace the SharePoint “Create File” action with the equivalent OneDrive “Create File” action. The rest of the flow remains the same.
- Can I notify multiple departments? Yes. You can add multiple “Send an email” actions with different recipients, or use a distribution list in the To field to reach several people at once.
Best Practices & Security
- Always store API keys securely and avoid hardcoding them in flow expressions. Use Power Automate’s built-in connection management.
- Regularly review flow run history in Power Automate to catch and resolve errors early.
- Document any changes to your flow or SharePoint folder structure so your team can maintain the automation over time.
Additional Resources
- SignatureAPI Documentation
- SharePoint Documentation
- Microsoft Outlook Connector Reference
- Power Automate Community