> ## Documentation Index
> Fetch the complete documentation index at: https://signatureapi-daf4ee54.mintlify.site/llms.txt
> Use this file to discover all available pages before exploring further.
# Power Automate Quickstart
> Create a consent form from a DOCX template and send it for signature in Power Automate
## Overview
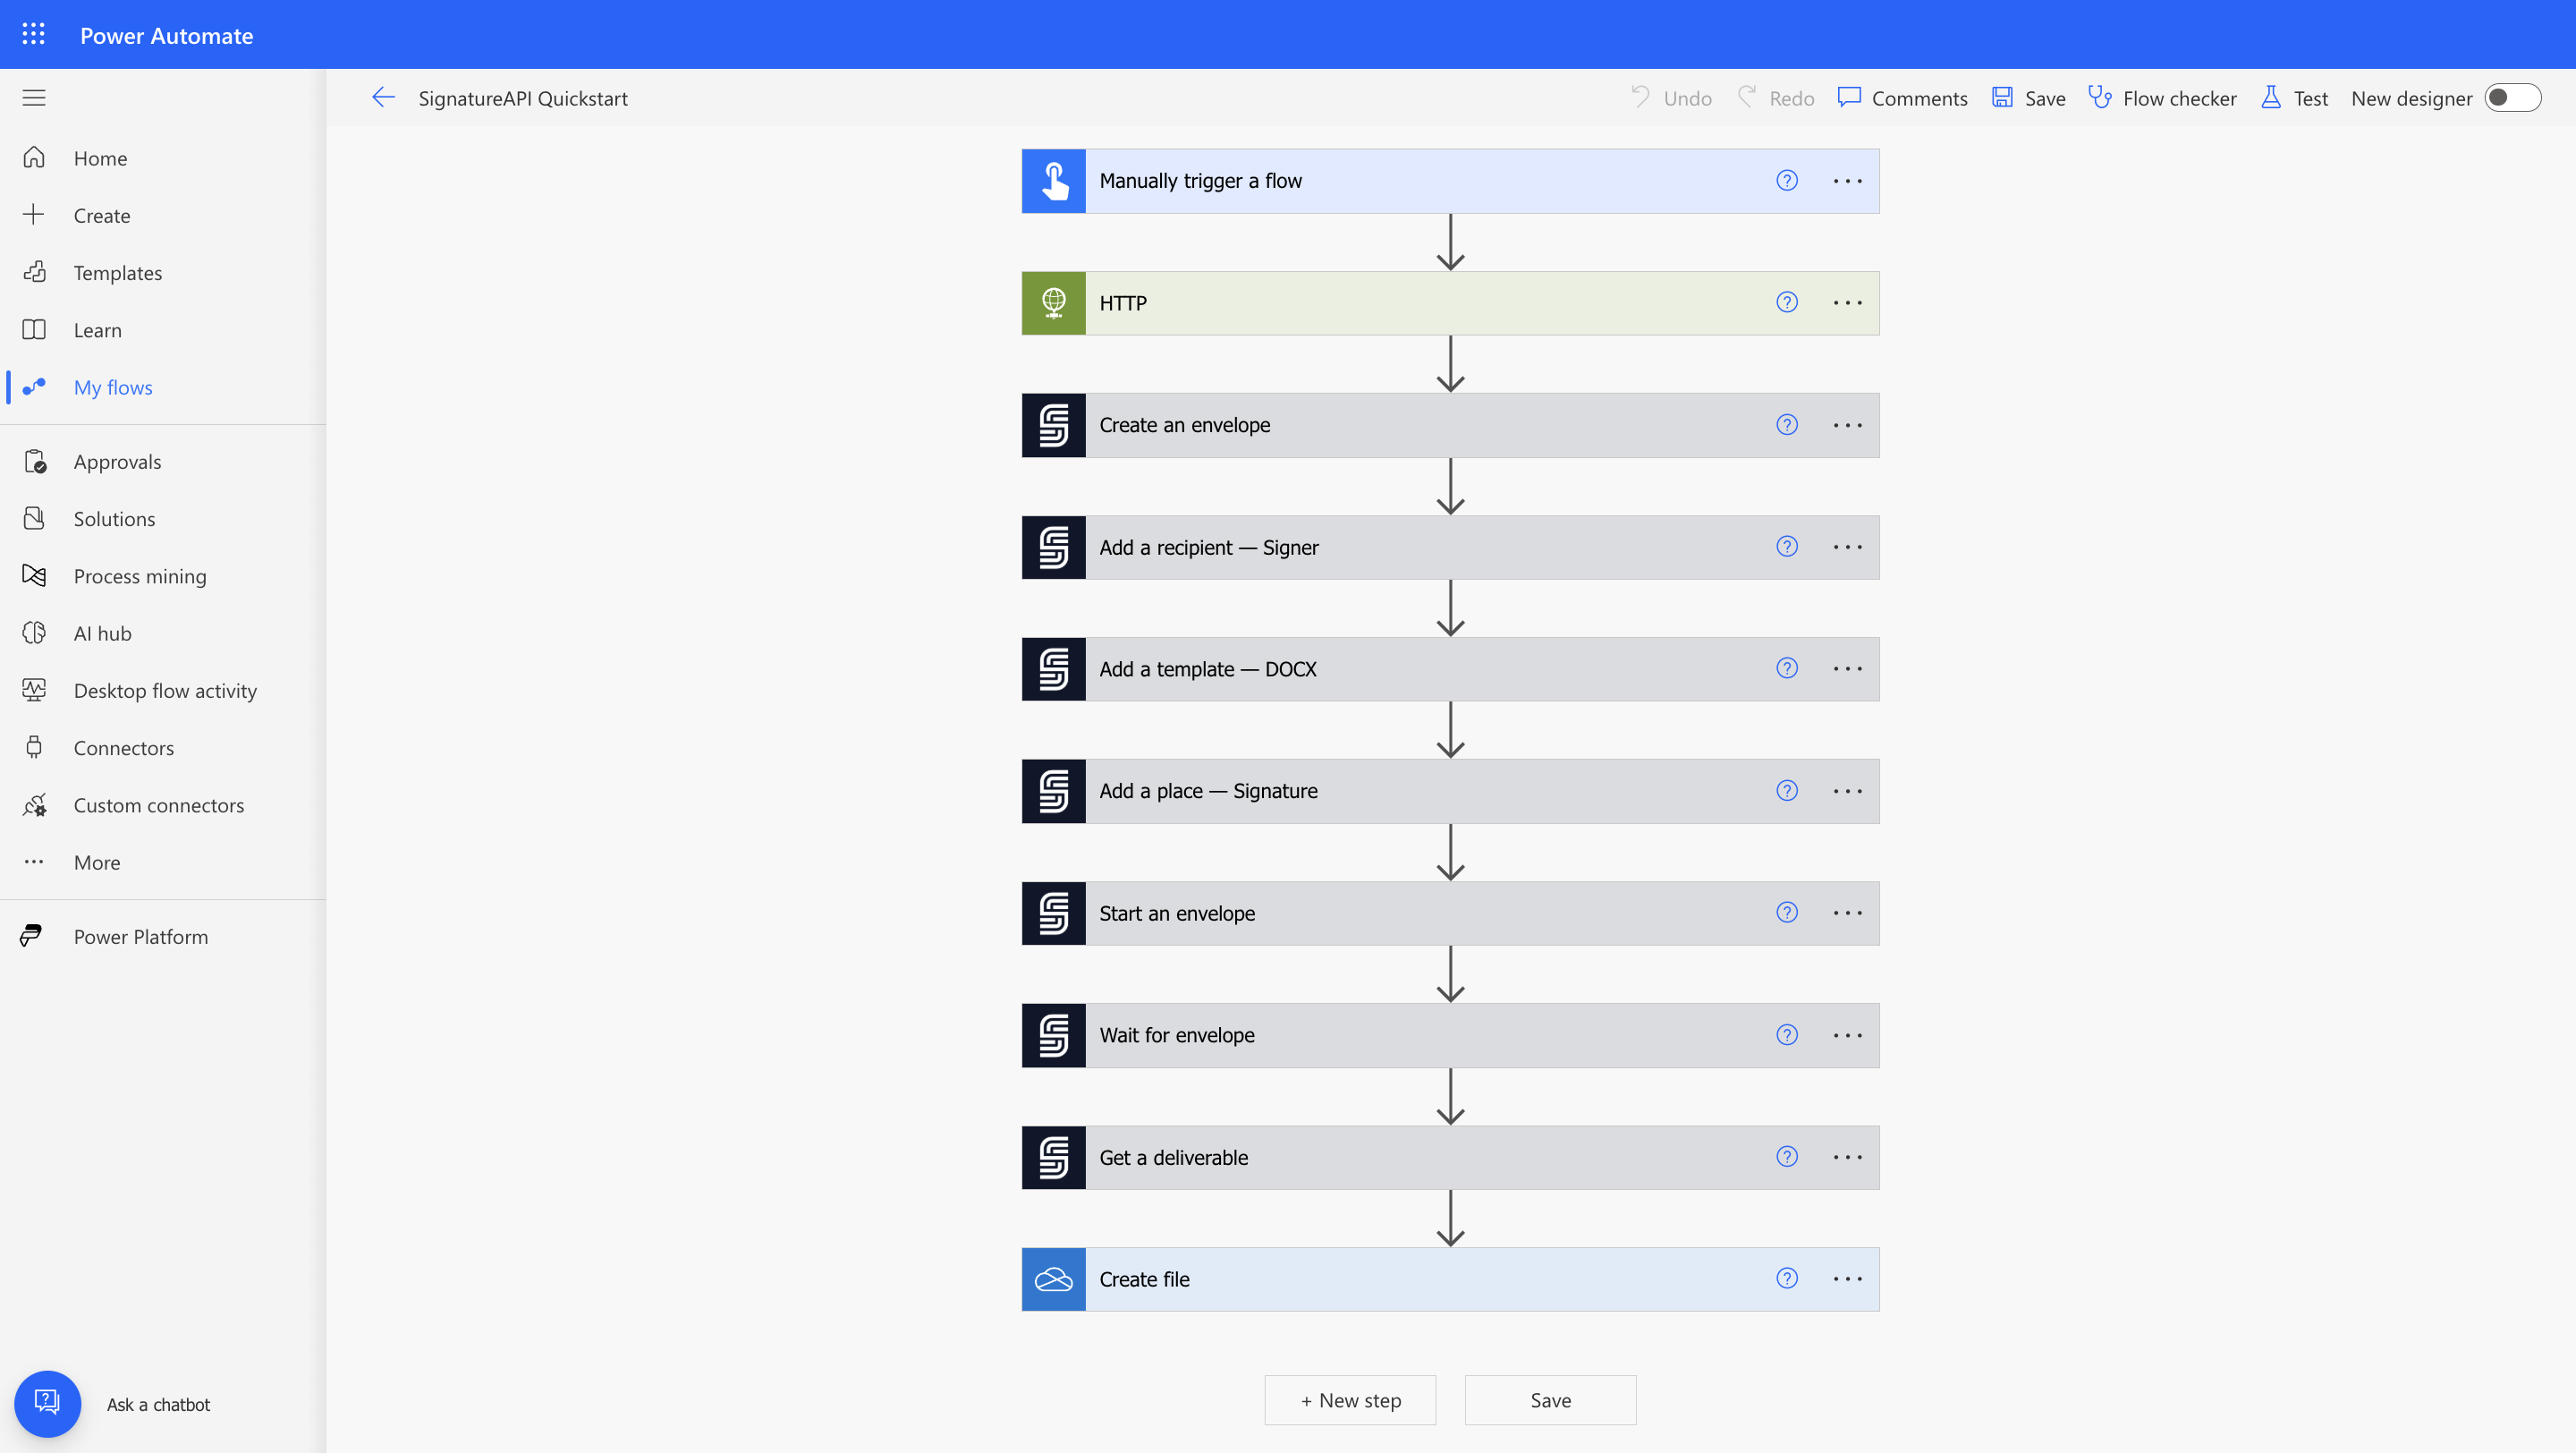
In this quickstart, we'll create a Dummy Consent form from a docx template and send it to a recipient for signature using Power Automate and SignatureAPI.
 ### What you'll learn
* How to fill a document template with data using SignatureAPI.
* How to send documents for signature and track their status.
* How to retrieve the signed document and save it.
* How to use the Dashboard to read emails while in test mode.
* What the signing experience looks like.
## Getting Everything Ready
Before building the Power Automate flow, let's make sure we have everything ready.
### Get Your Test API key
Sign up for a free account to get your test API key. Use it to generate non-binding envelopes and test your integration with SignatureAPI.
To get started, sign up for a free test [API key](/docs/integrations/power-automate/authentication). Test API keys let you create test envelopes, great for trying out your workflows. Envelopes in test mode:
* Don’t send emails to recipients, but you can see them in the Email area of your dashboard.
* Are not legally-binding, so no legal obligations arise during testing.
* Are free.
Learn more about [test API keys](/docs/integrations/power-automate/authentication#test-vs-live-mode).
### Prepare the Template
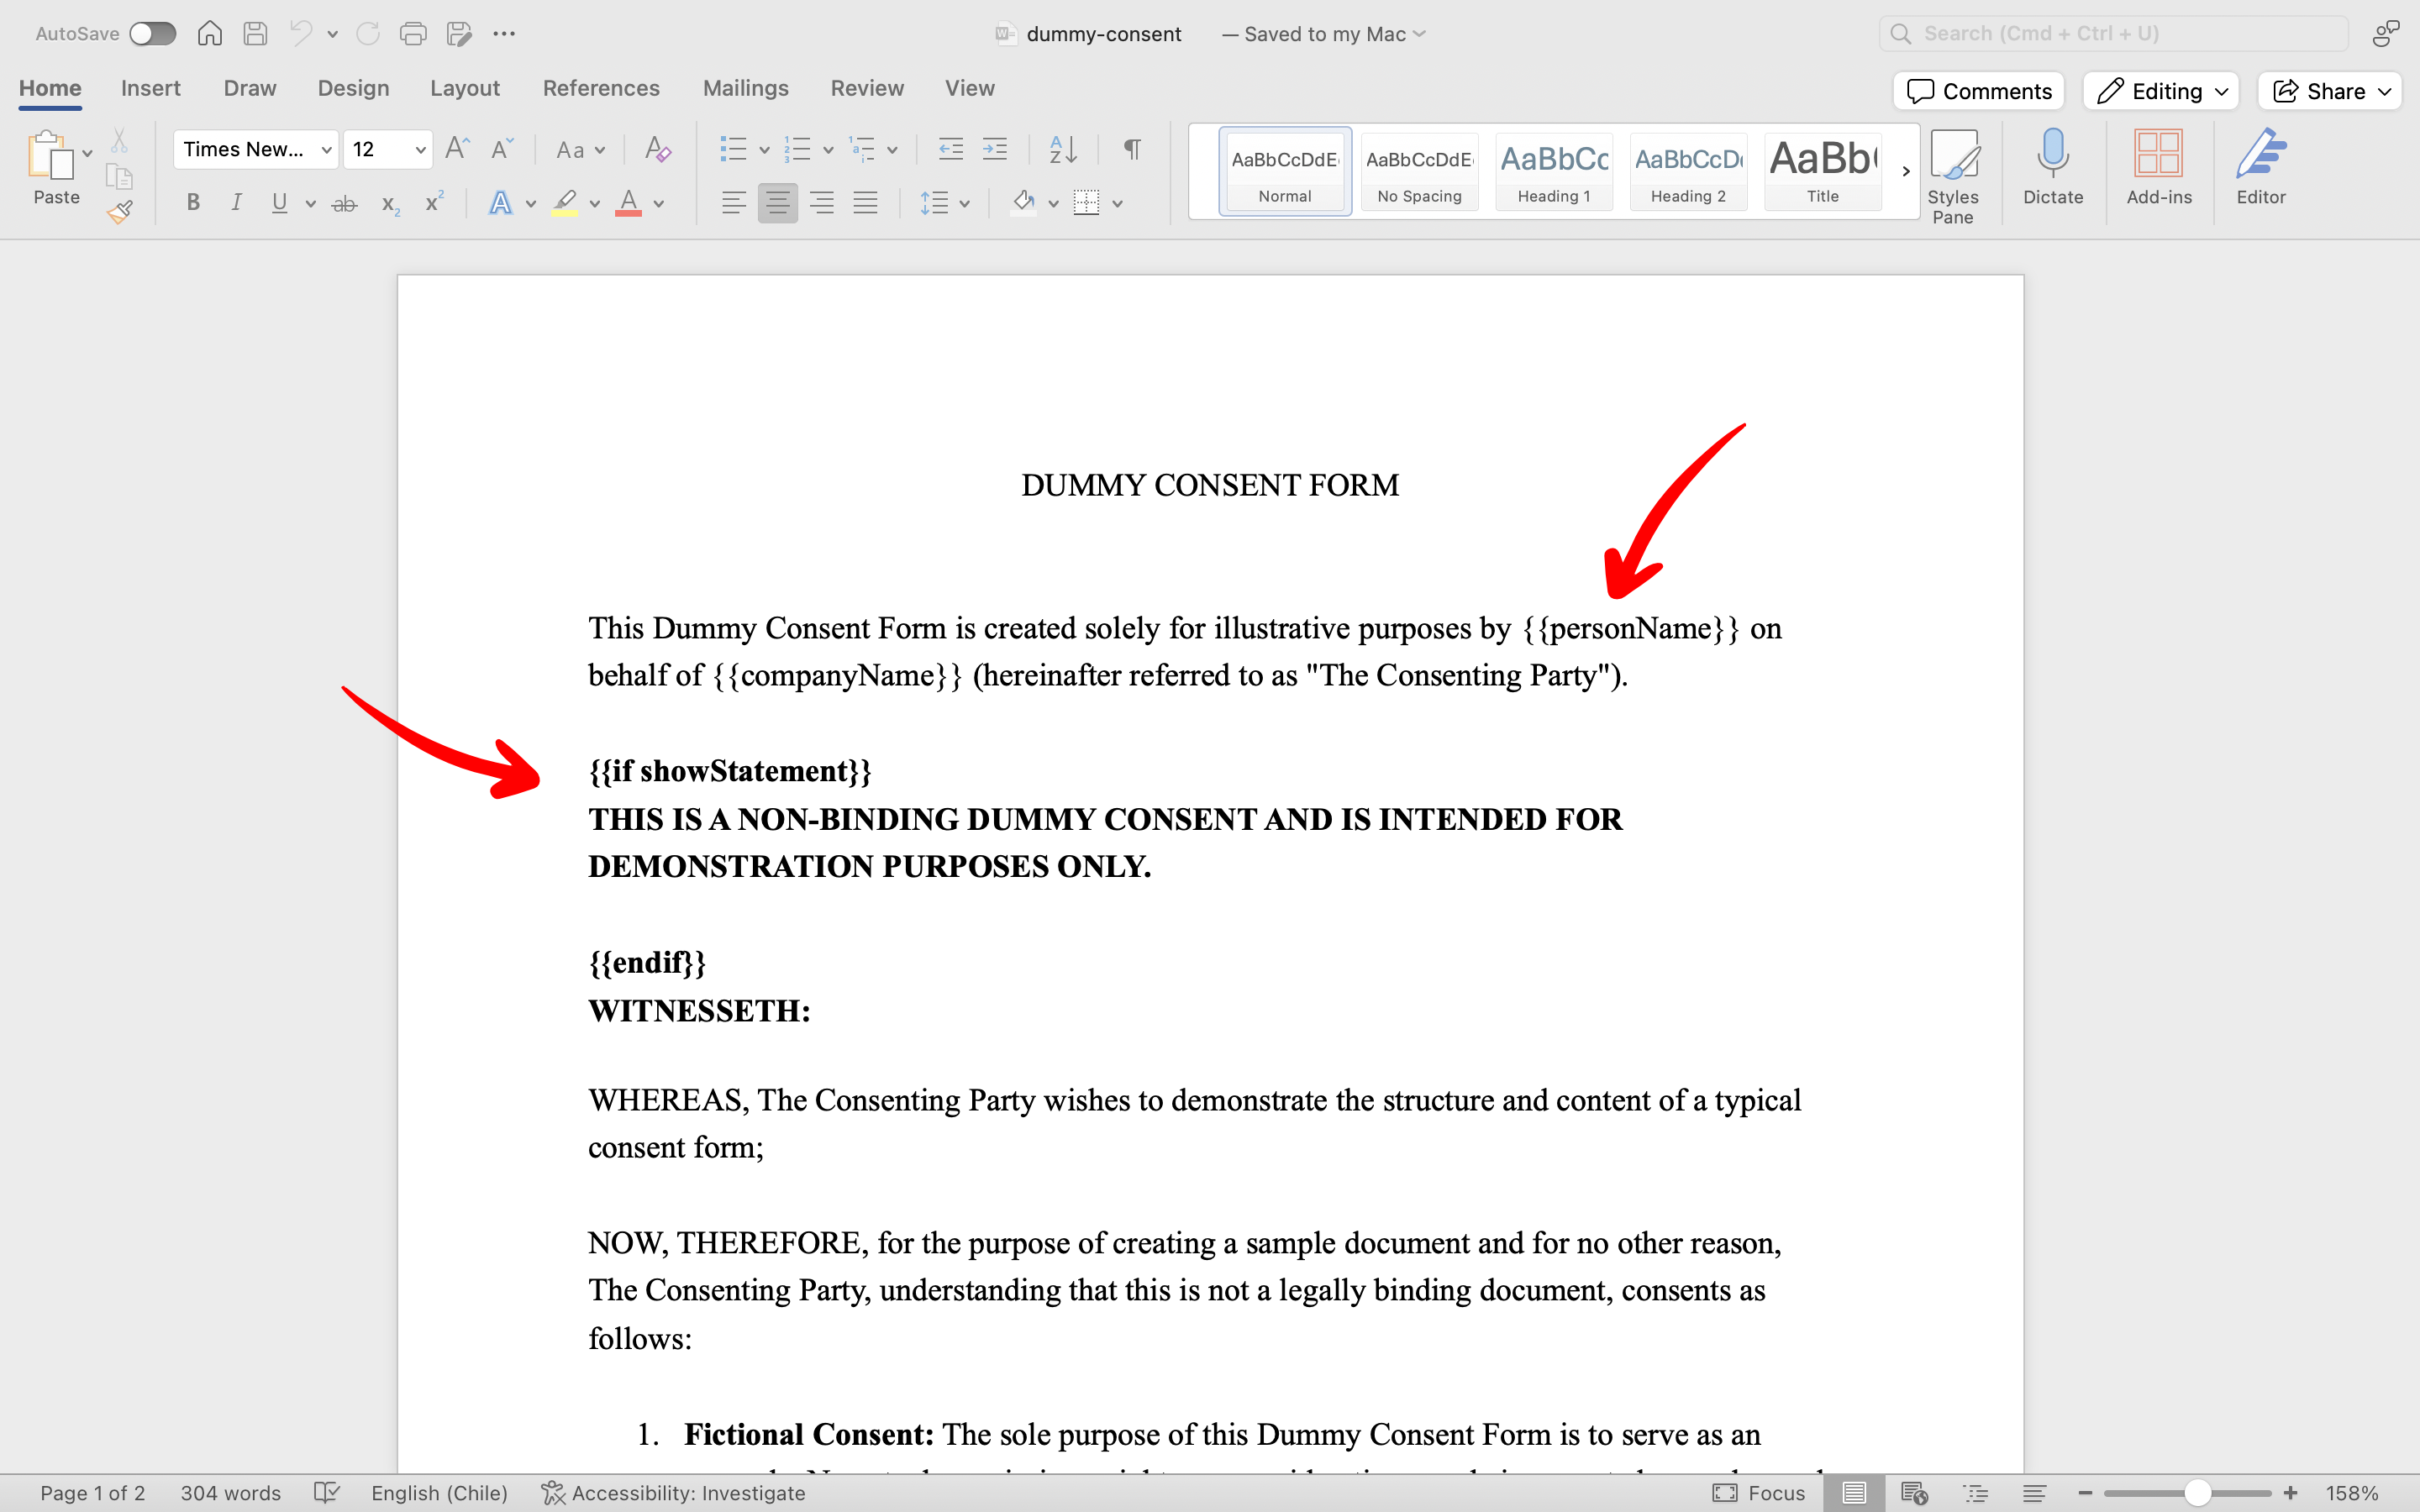
Before building the Power Automate flow, let's look at the DOCX document we'll use as our template. You can [download it here](https://pub-9cb75390636c4a8a83a6f76da33d7f45.r2.dev/dummy-consent.docx) and open it in Microsoft Word.
In the document, we've added fields like `{{personName}}` and `{{companyName}}`. These placeholders will be replaced with actual data when the document is generated.
We've also included a conditional statement `{{if showStatement}}` that will insert the text "THIS IS A NON-BINDING..." only if the `showStatement` value is set to `true`.
### What you'll learn
* How to fill a document template with data using SignatureAPI.
* How to send documents for signature and track their status.
* How to retrieve the signed document and save it.
* How to use the Dashboard to read emails while in test mode.
* What the signing experience looks like.
## Getting Everything Ready
Before building the Power Automate flow, let's make sure we have everything ready.
### Get Your Test API key
Sign up for a free account to get your test API key. Use it to generate non-binding envelopes and test your integration with SignatureAPI.
To get started, sign up for a free test [API key](/docs/integrations/power-automate/authentication). Test API keys let you create test envelopes, great for trying out your workflows. Envelopes in test mode:
* Don’t send emails to recipients, but you can see them in the Email area of your dashboard.
* Are not legally-binding, so no legal obligations arise during testing.
* Are free.
Learn more about [test API keys](/docs/integrations/power-automate/authentication#test-vs-live-mode).
### Prepare the Template
Before building the Power Automate flow, let's look at the DOCX document we'll use as our template. You can [download it here](https://pub-9cb75390636c4a8a83a6f76da33d7f45.r2.dev/dummy-consent.docx) and open it in Microsoft Word.
In the document, we've added fields like `{{personName}}` and `{{companyName}}`. These placeholders will be replaced with actual data when the document is generated.
We've also included a conditional statement `{{if showStatement}}` that will insert the text "THIS IS A NON-BINDING..." only if the `showStatement` value is set to `true`.
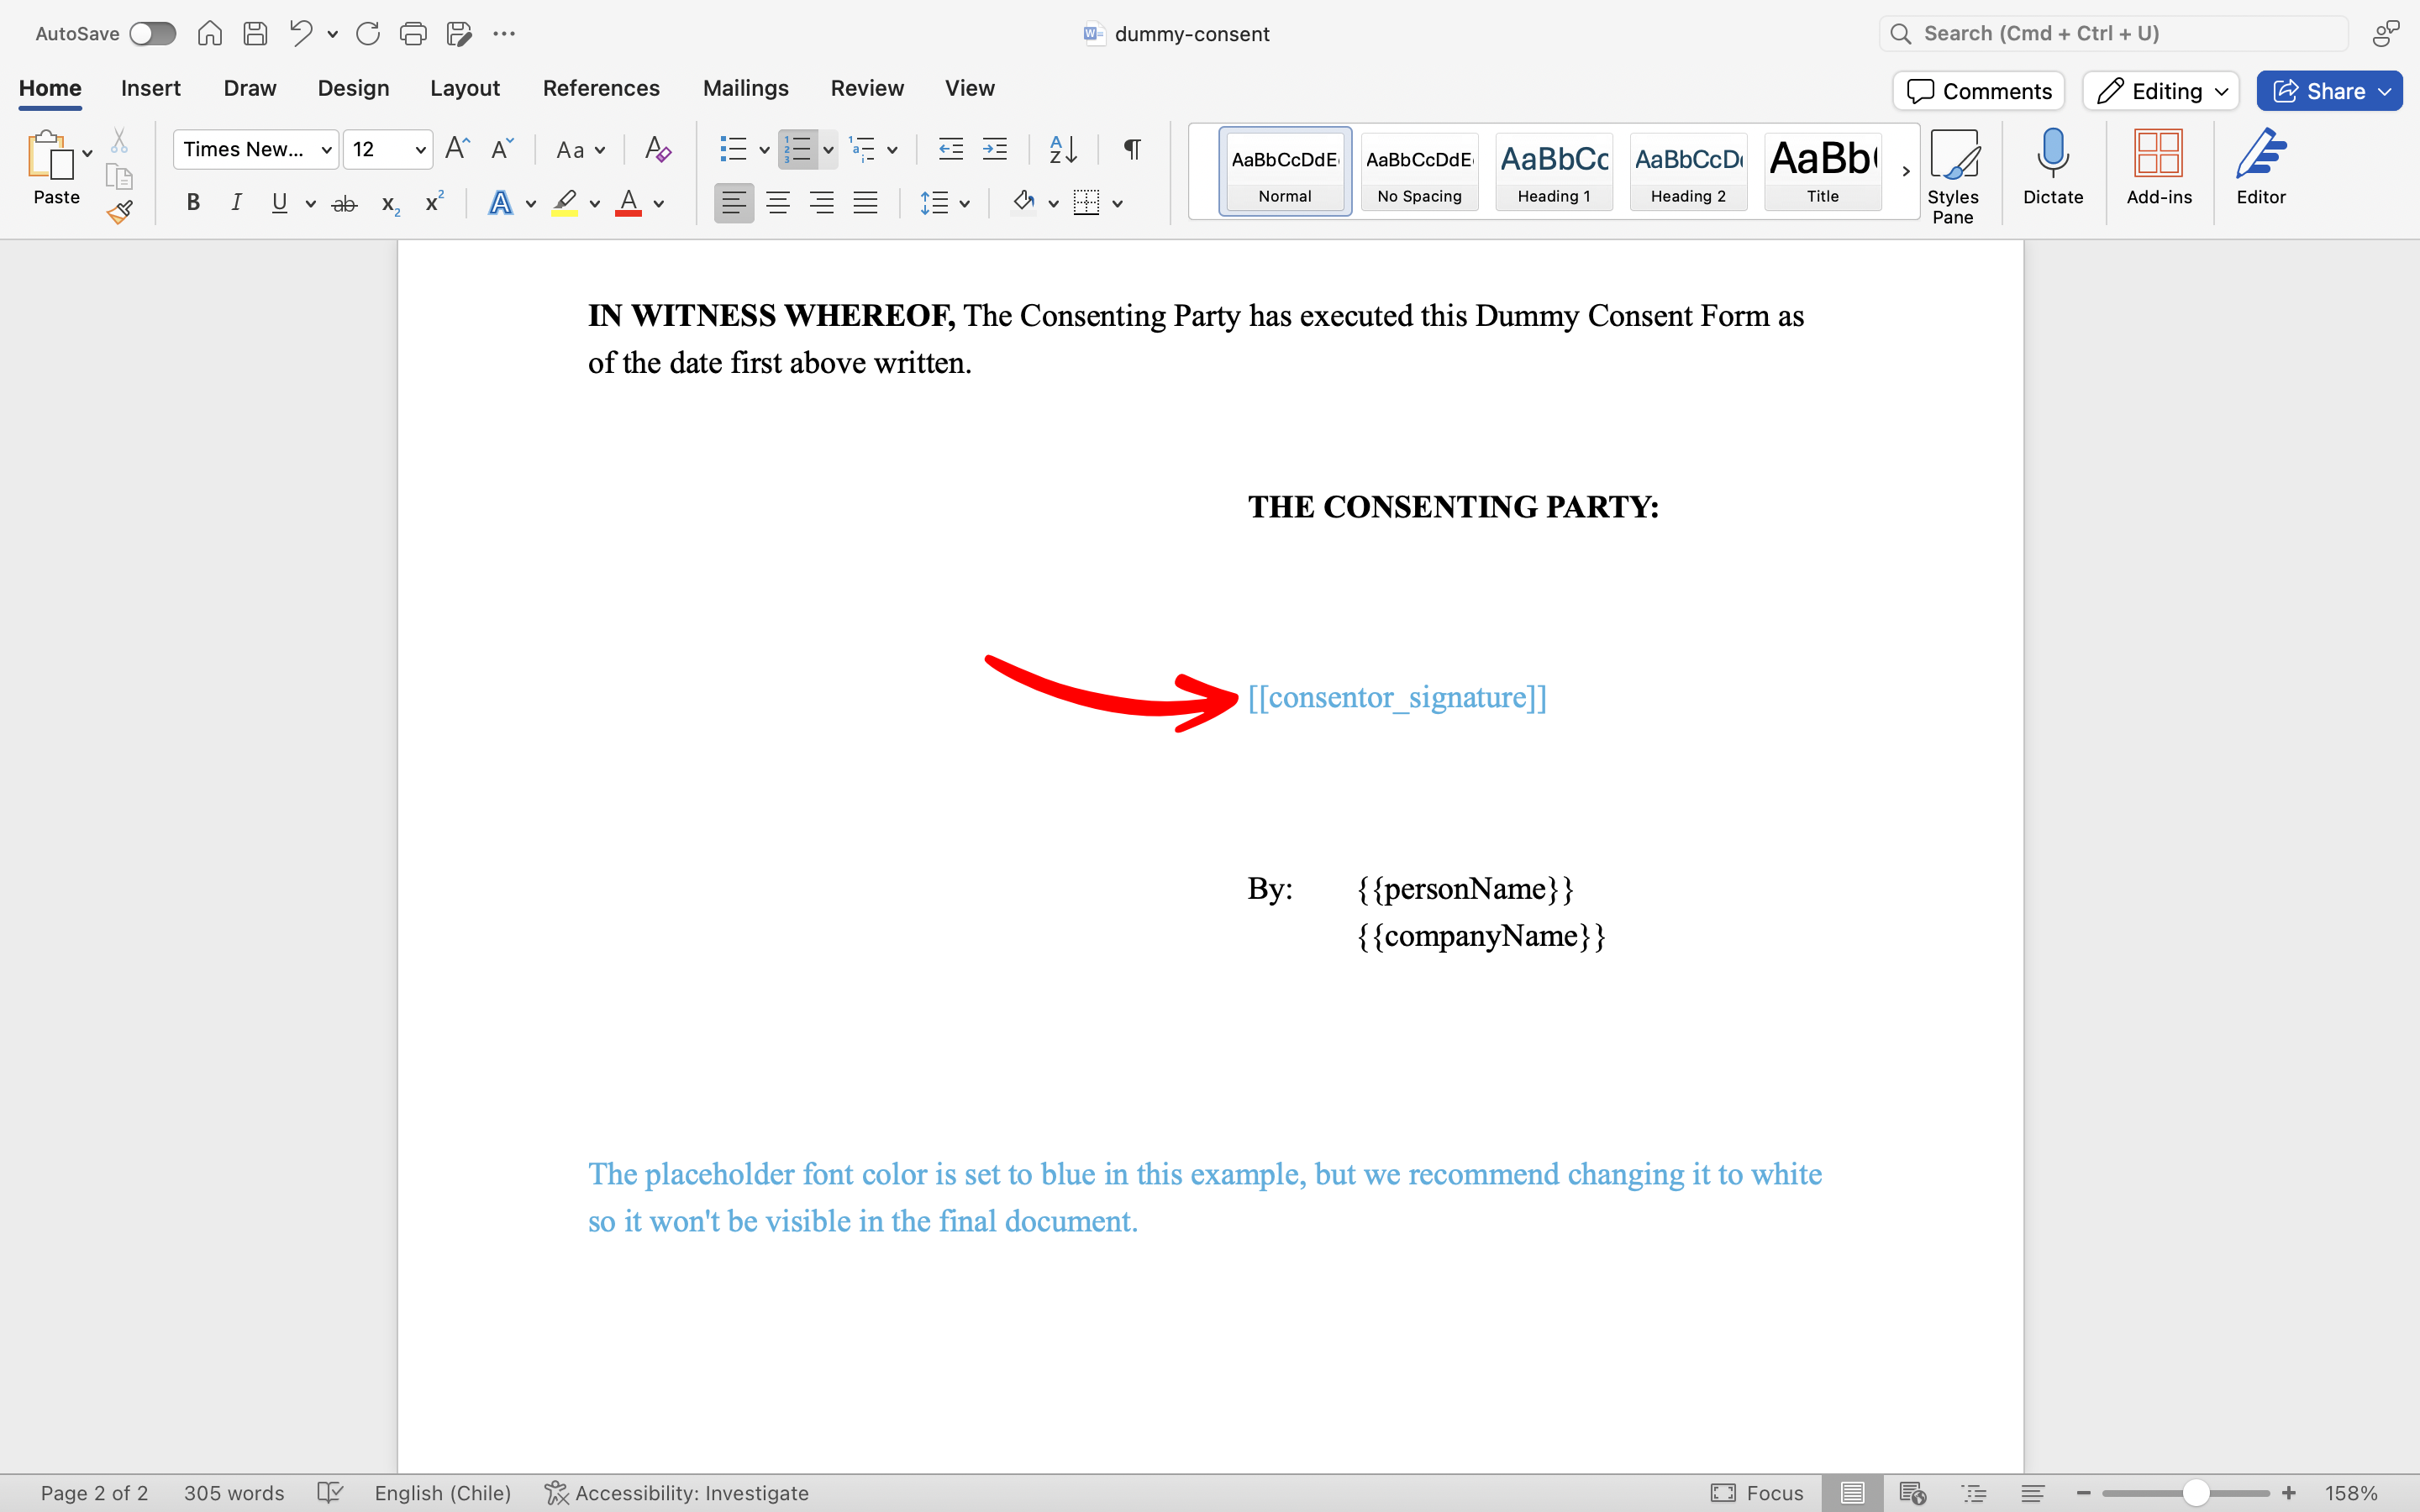
 On the second page, we've added a signature placeholder `[[consentor_signature]]` for the recipient's signature (we'll refer to the recipient as "Consentor" in this example).
For visibility, we've made the placeholder font blue in this example, but we recommend setting the font color to white so it remains hidden in the final document.
On the second page, we've added a signature placeholder `[[consentor_signature]]` for the recipient's signature (we'll refer to the recipient as "Consentor" in this example).
For visibility, we've made the placeholder font blue in this example, but we recommend setting the font color to white so it remains hidden in the final document.
 ## Building the Power Automate Flow
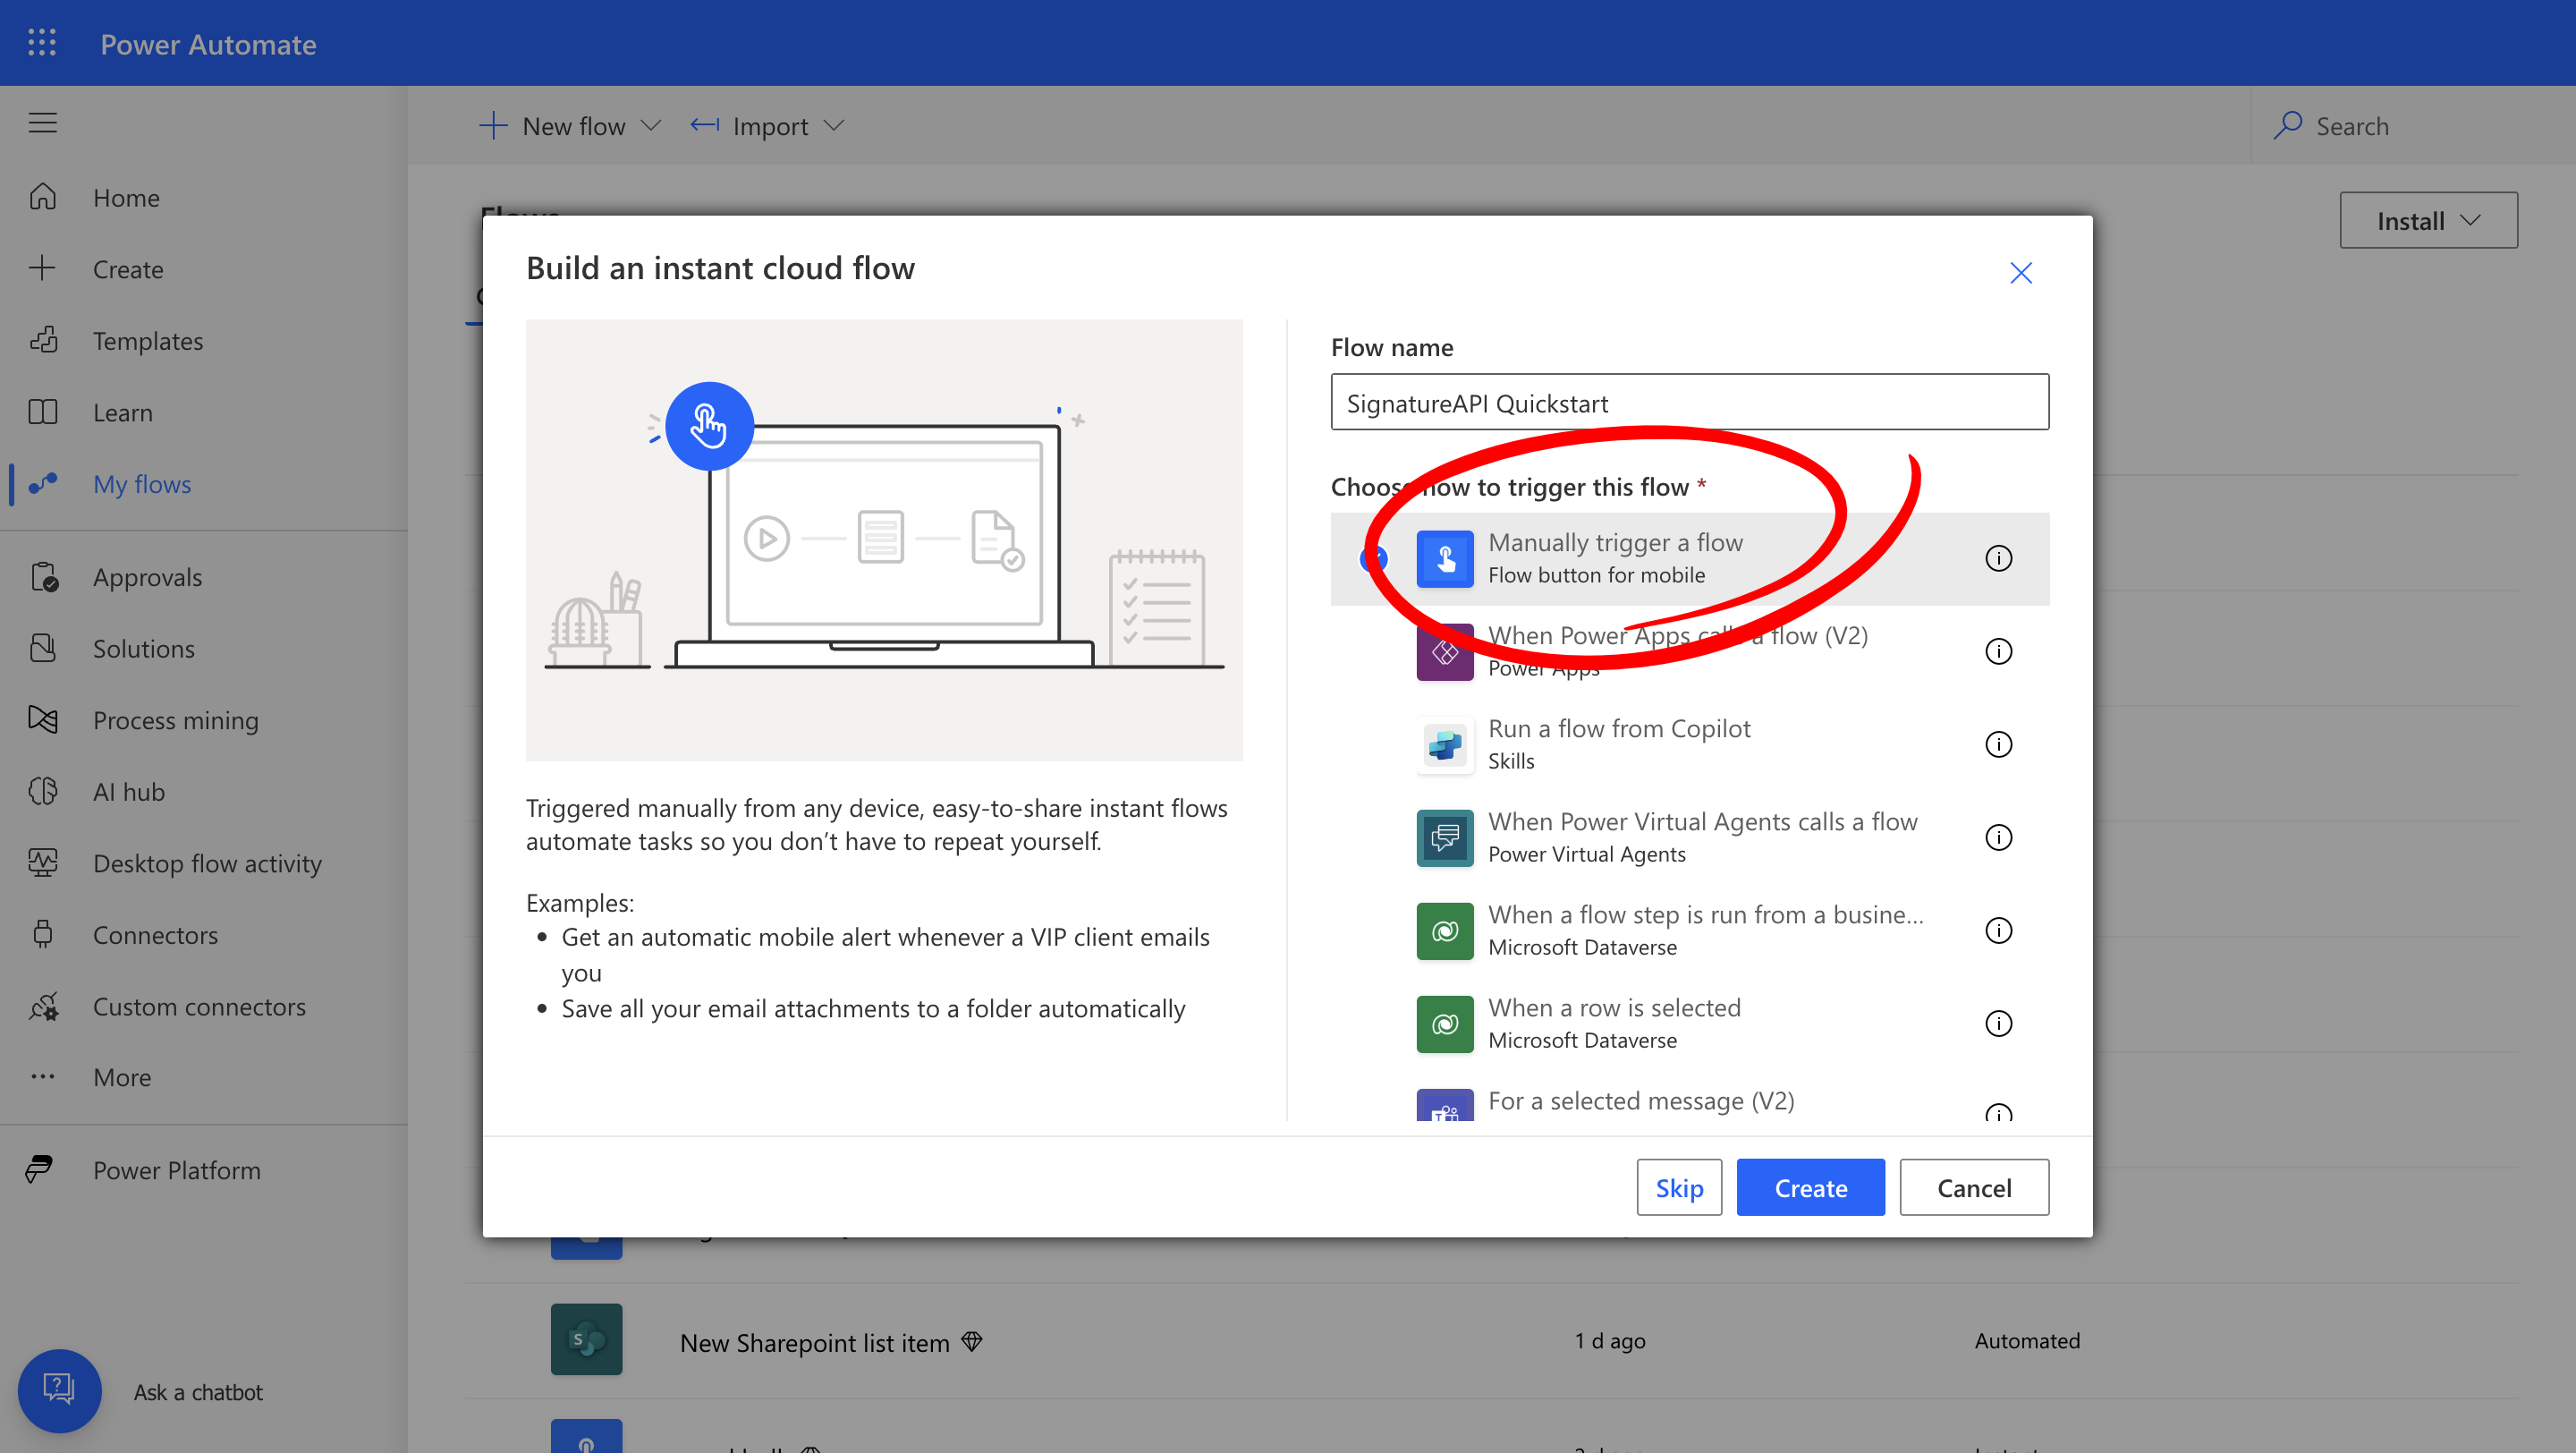
In Power Automate, create a new **Instant cloud flow**. Give it a name and choose **Manually trigger a flow** as the trigger.
## Building the Power Automate Flow
In Power Automate, create a new **Instant cloud flow**. Give it a name and choose **Manually trigger a flow** as the trigger.
 ### Download the Template
We'll use Power Automate's HTTP action to download the template from a URL. Alternatively, you can store and retrieve the template from OneDrive, Dropbox, or another file source.
* Add a new **HTTP** action to your flow.
* Set the **Method** to `GET`.
* In the **URI** field, enter `https://pub-9cb75390636c4a8a83a6f76da33d7f45.r2.dev/dummy-consent.docx`.
### Download the Template
We'll use Power Automate's HTTP action to download the template from a URL. Alternatively, you can store and retrieve the template from OneDrive, Dropbox, or another file source.
* Add a new **HTTP** action to your flow.
* Set the **Method** to `GET`.
* In the **URI** field, enter `https://pub-9cb75390636c4a8a83a6f76da33d7f45.r2.dev/dummy-consent.docx`.
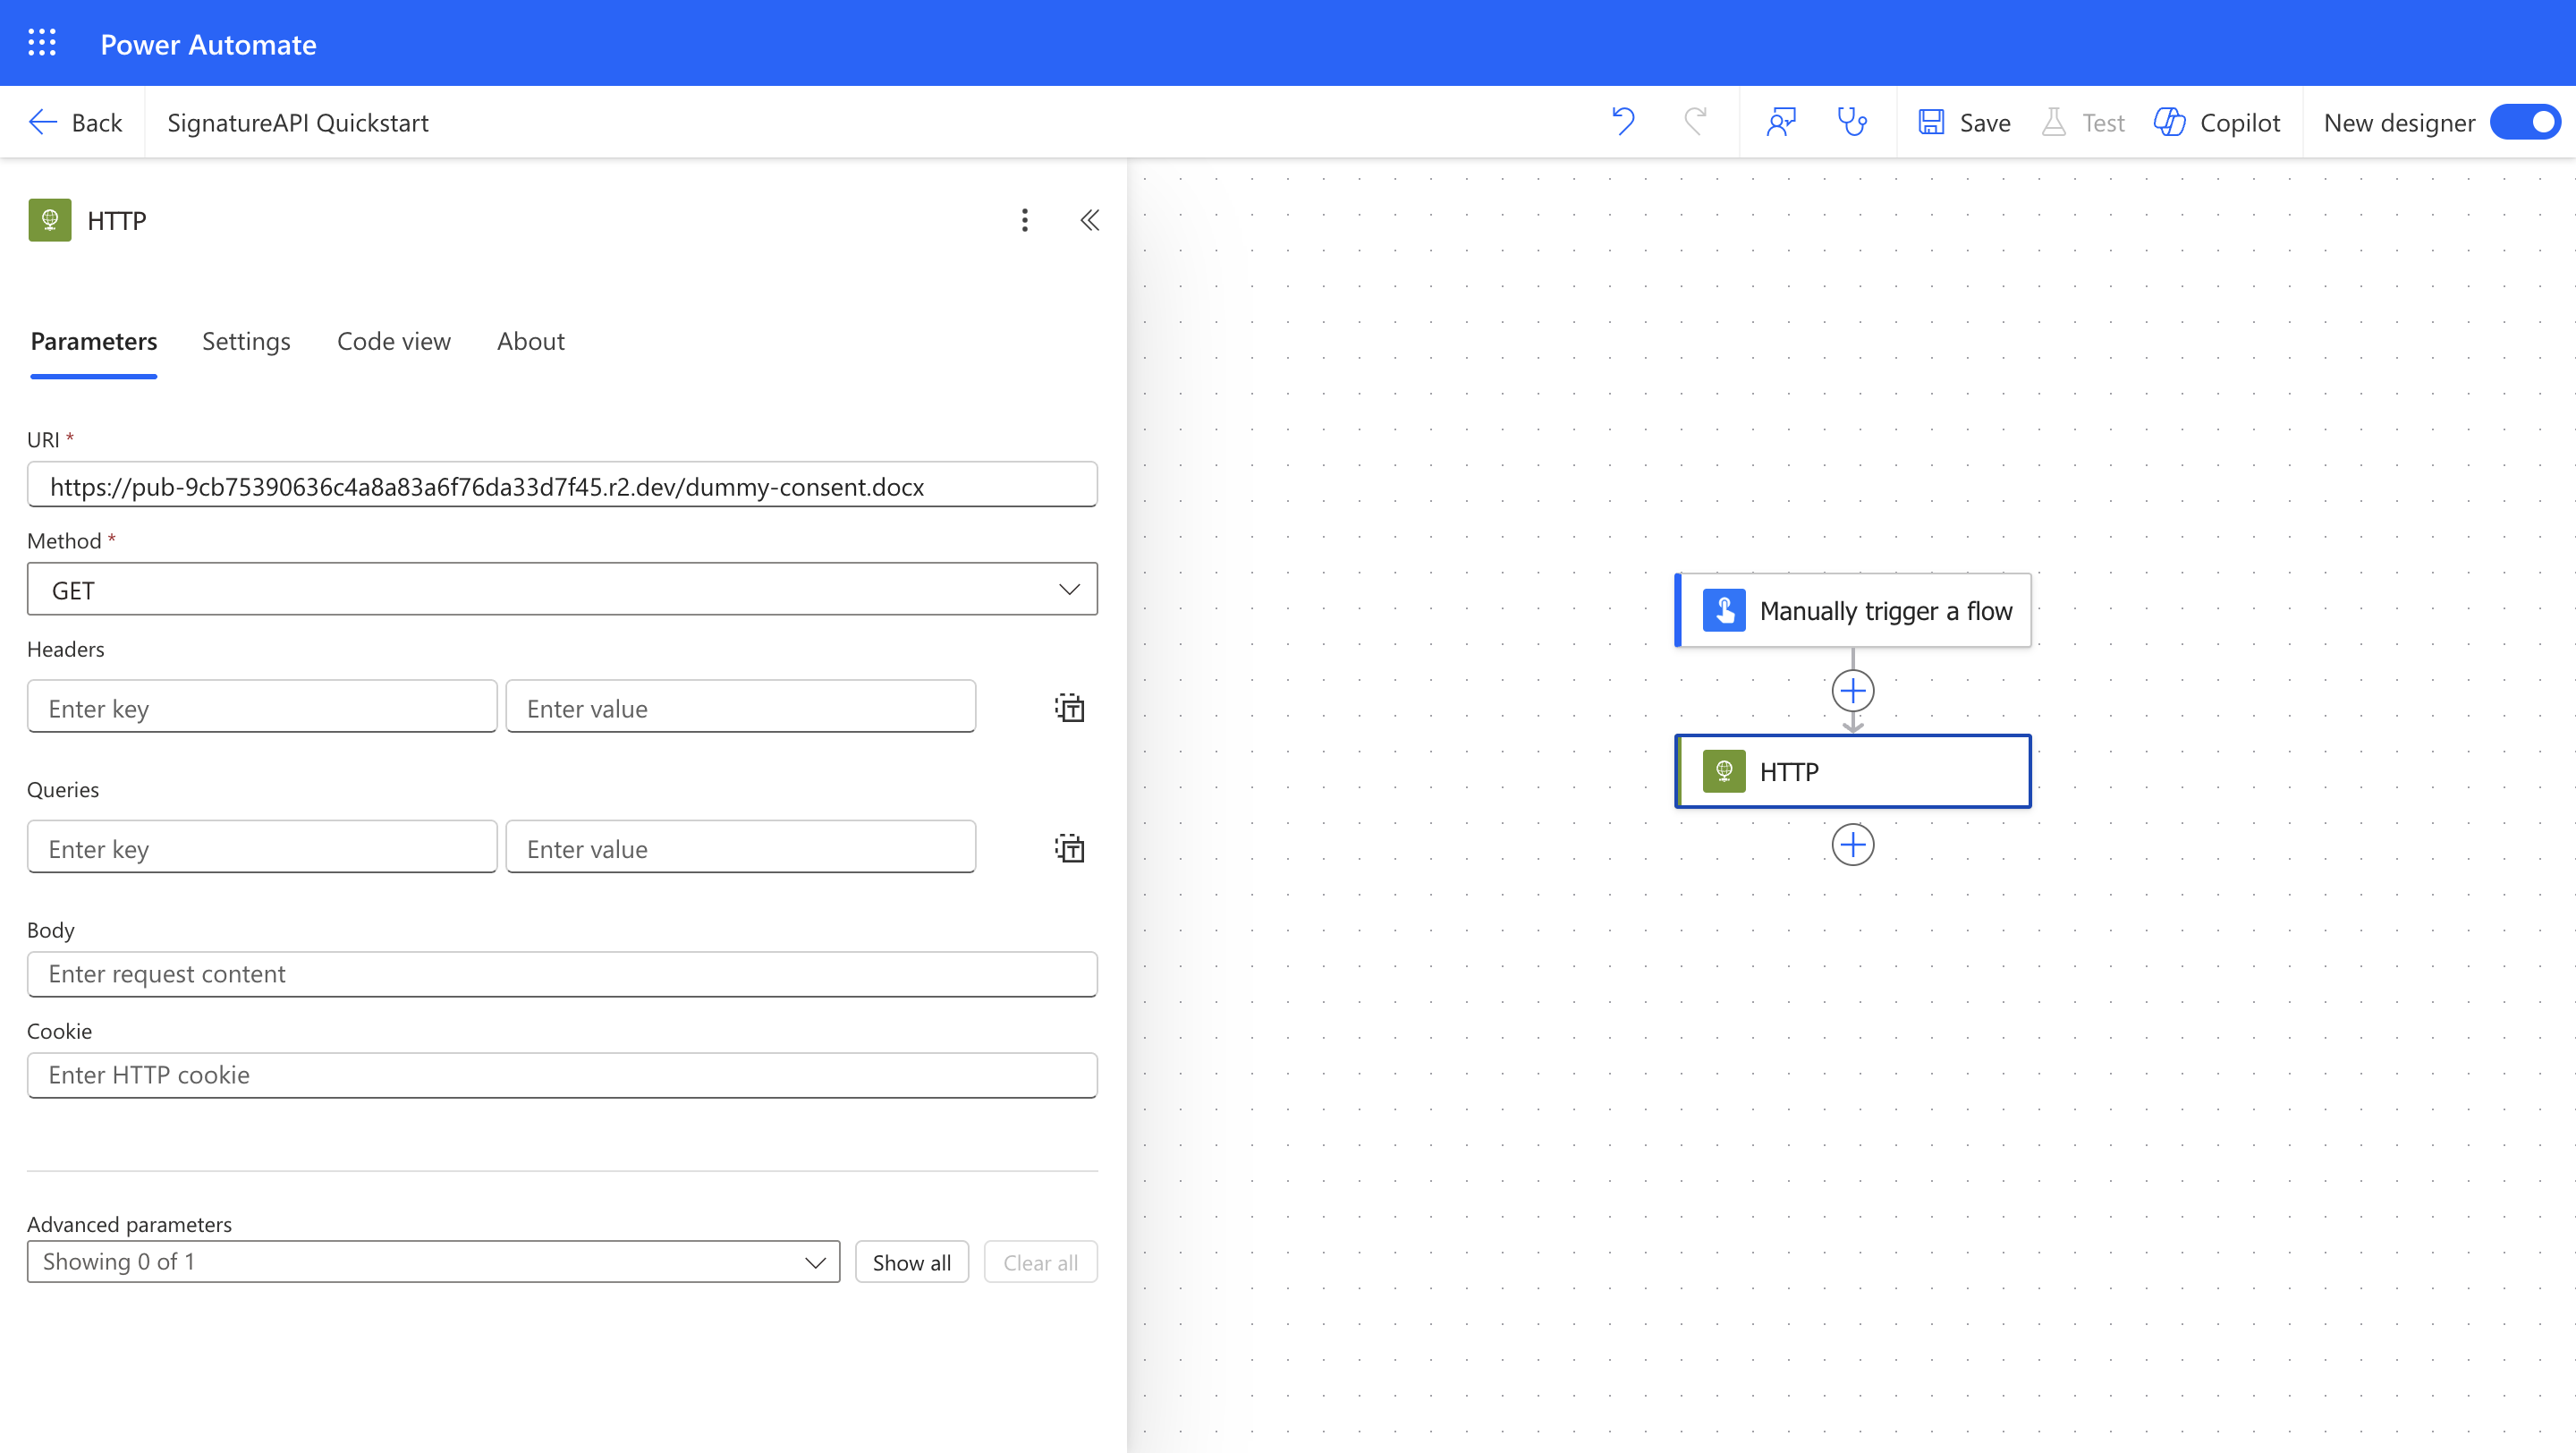 This action will download the template file, which we'll use later when adding a template to the envelope.
### Create an Envelope
Next, we'll create an envelope using SignatureAPI. An envelope is a container for the documents and recipients involved in the signing process.
* Add the **Create an envelope** action from SignatureAPI to your flow.
This action will download the template file, which we'll use later when adding a template to the envelope.
### Create an Envelope
Next, we'll create an envelope using SignatureAPI. An envelope is a container for the documents and recipients involved in the signing process.
* Add the **Create an envelope** action from SignatureAPI to your flow.
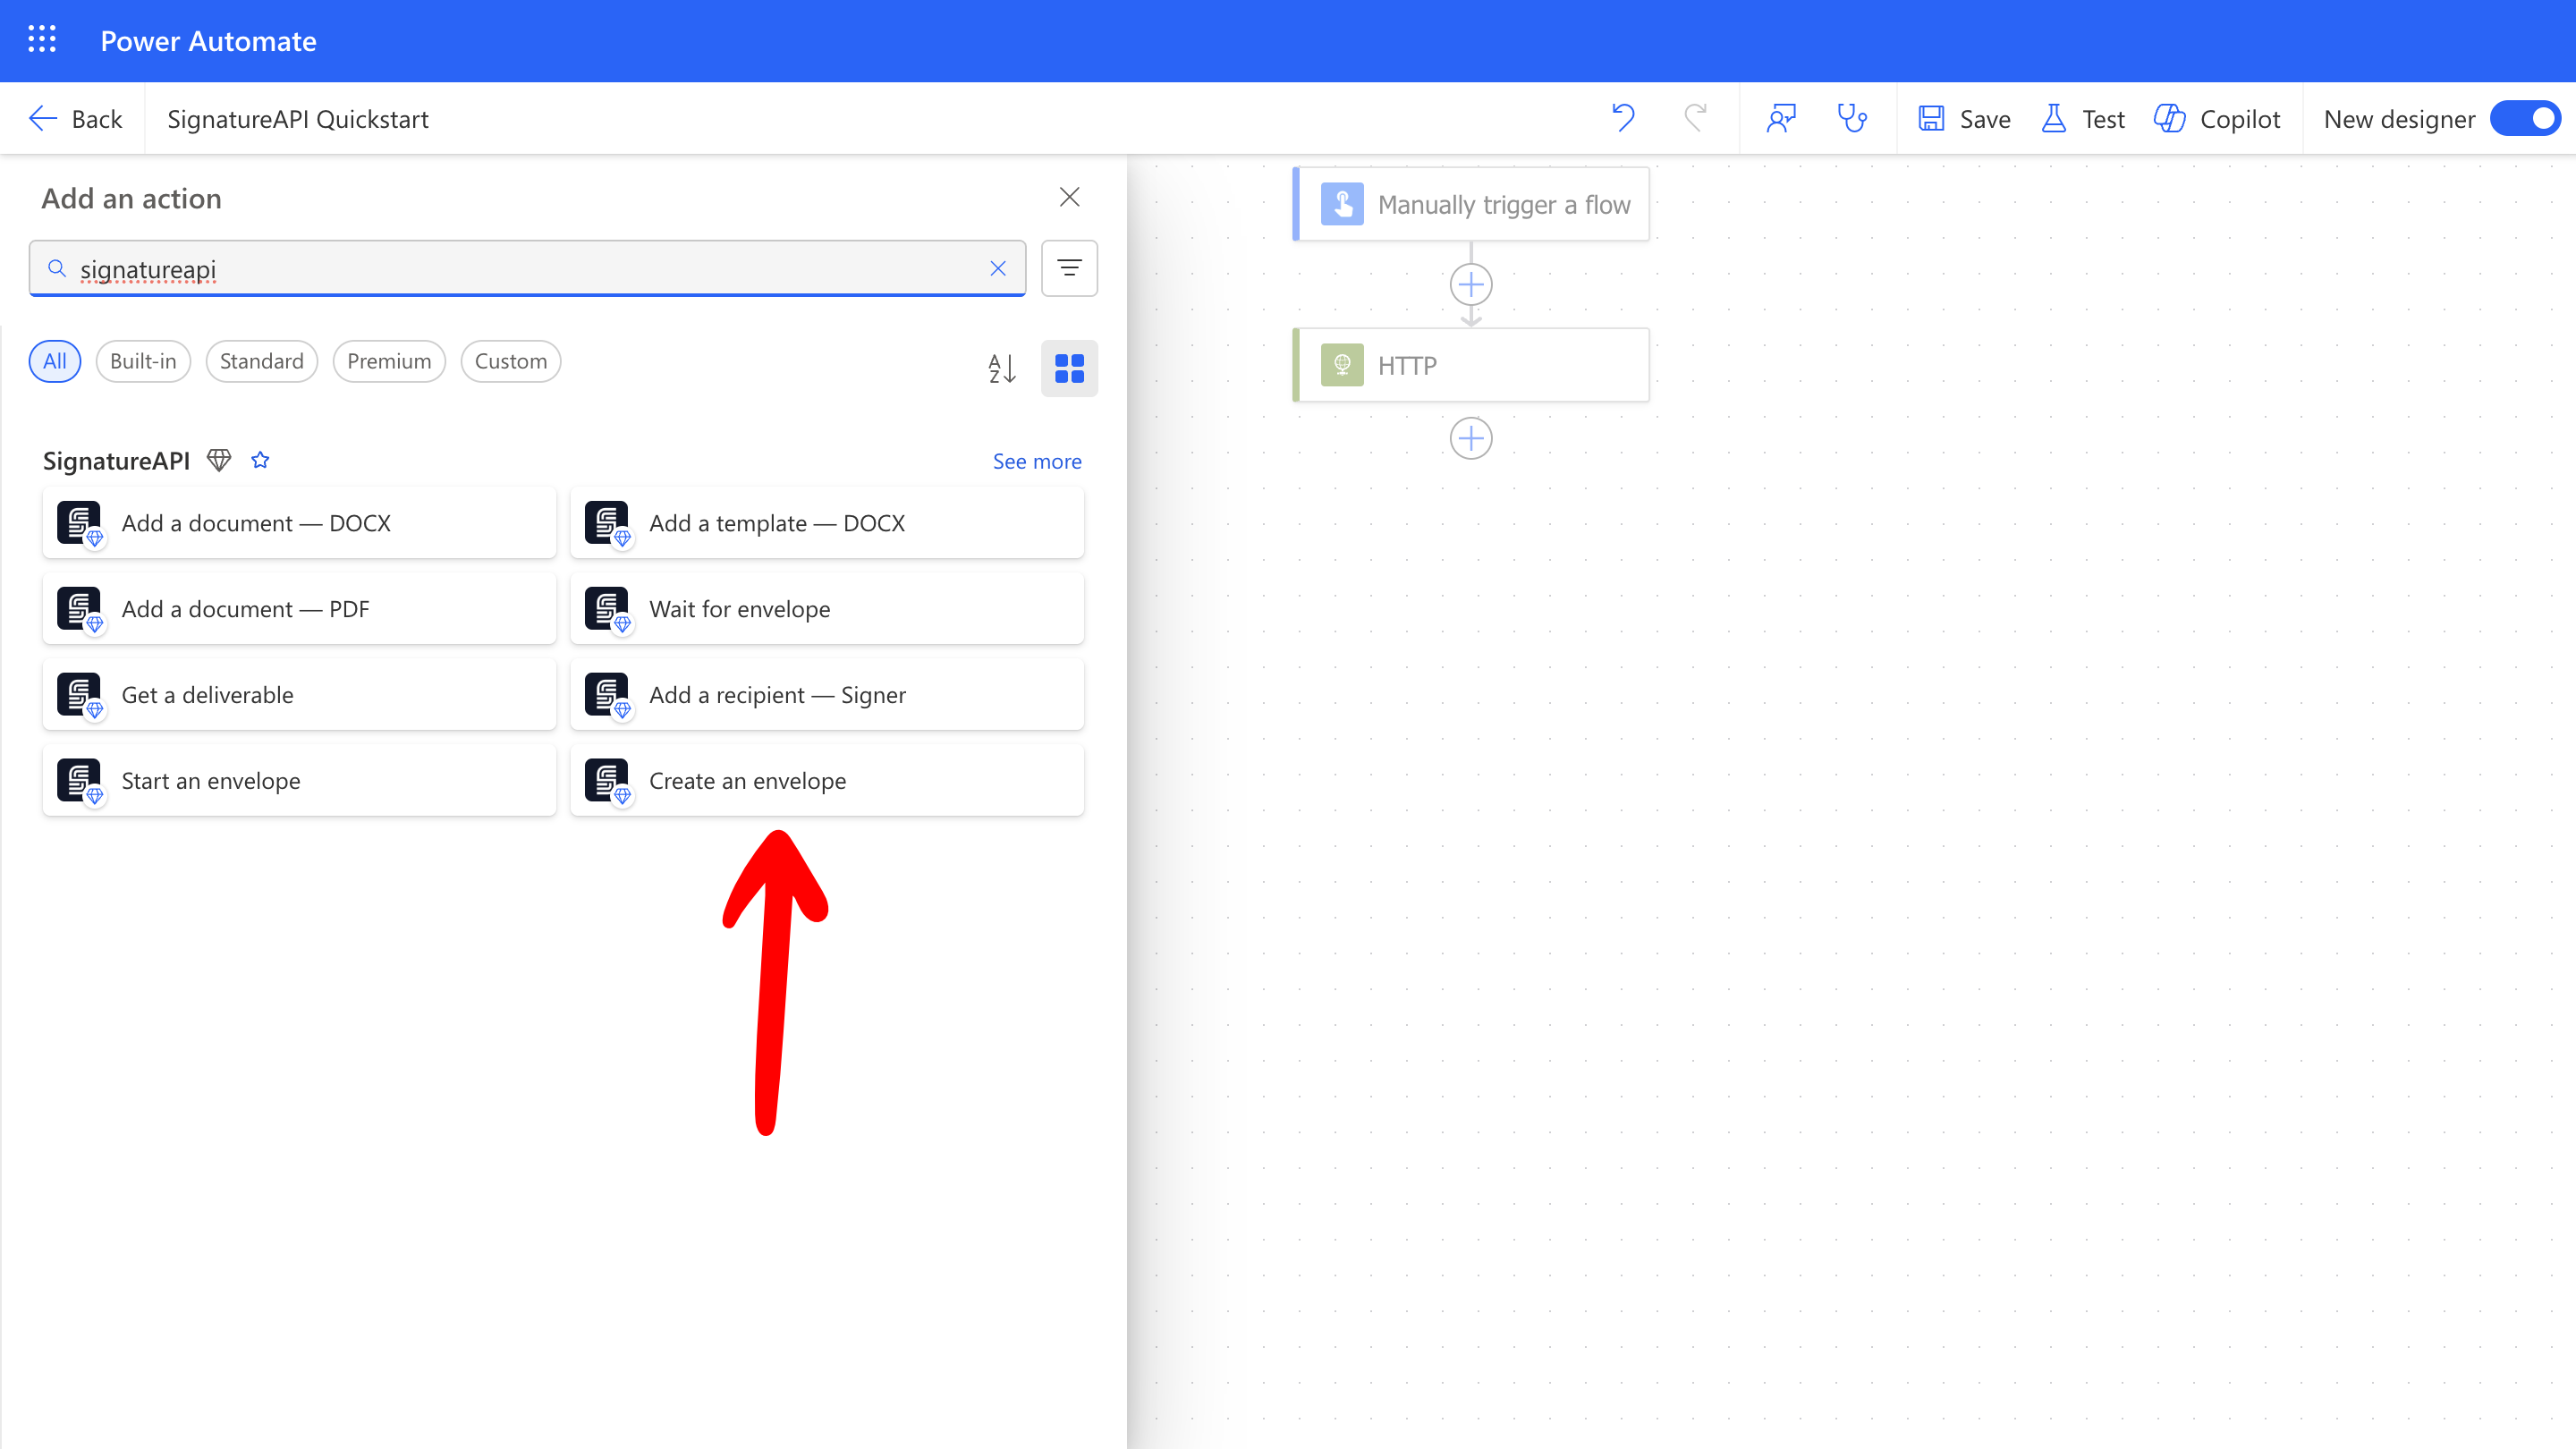 * If you're using SignatureAPI for the first time, you'll need to create a new connection:
* For **Connection Name**, use any name you prefer (e.g., **SignatureAPITest**).
* In **API Key**, enter your SignatureAPI key, which you can find in the SignatureAPI Dashboard under **Settings > API Keys**.
* If you're using SignatureAPI for the first time, you'll need to create a new connection:
* For **Connection Name**, use any name you prefer (e.g., **SignatureAPITest**).
* In **API Key**, enter your SignatureAPI key, which you can find in the SignatureAPI Dashboard under **Settings > API Keys**.
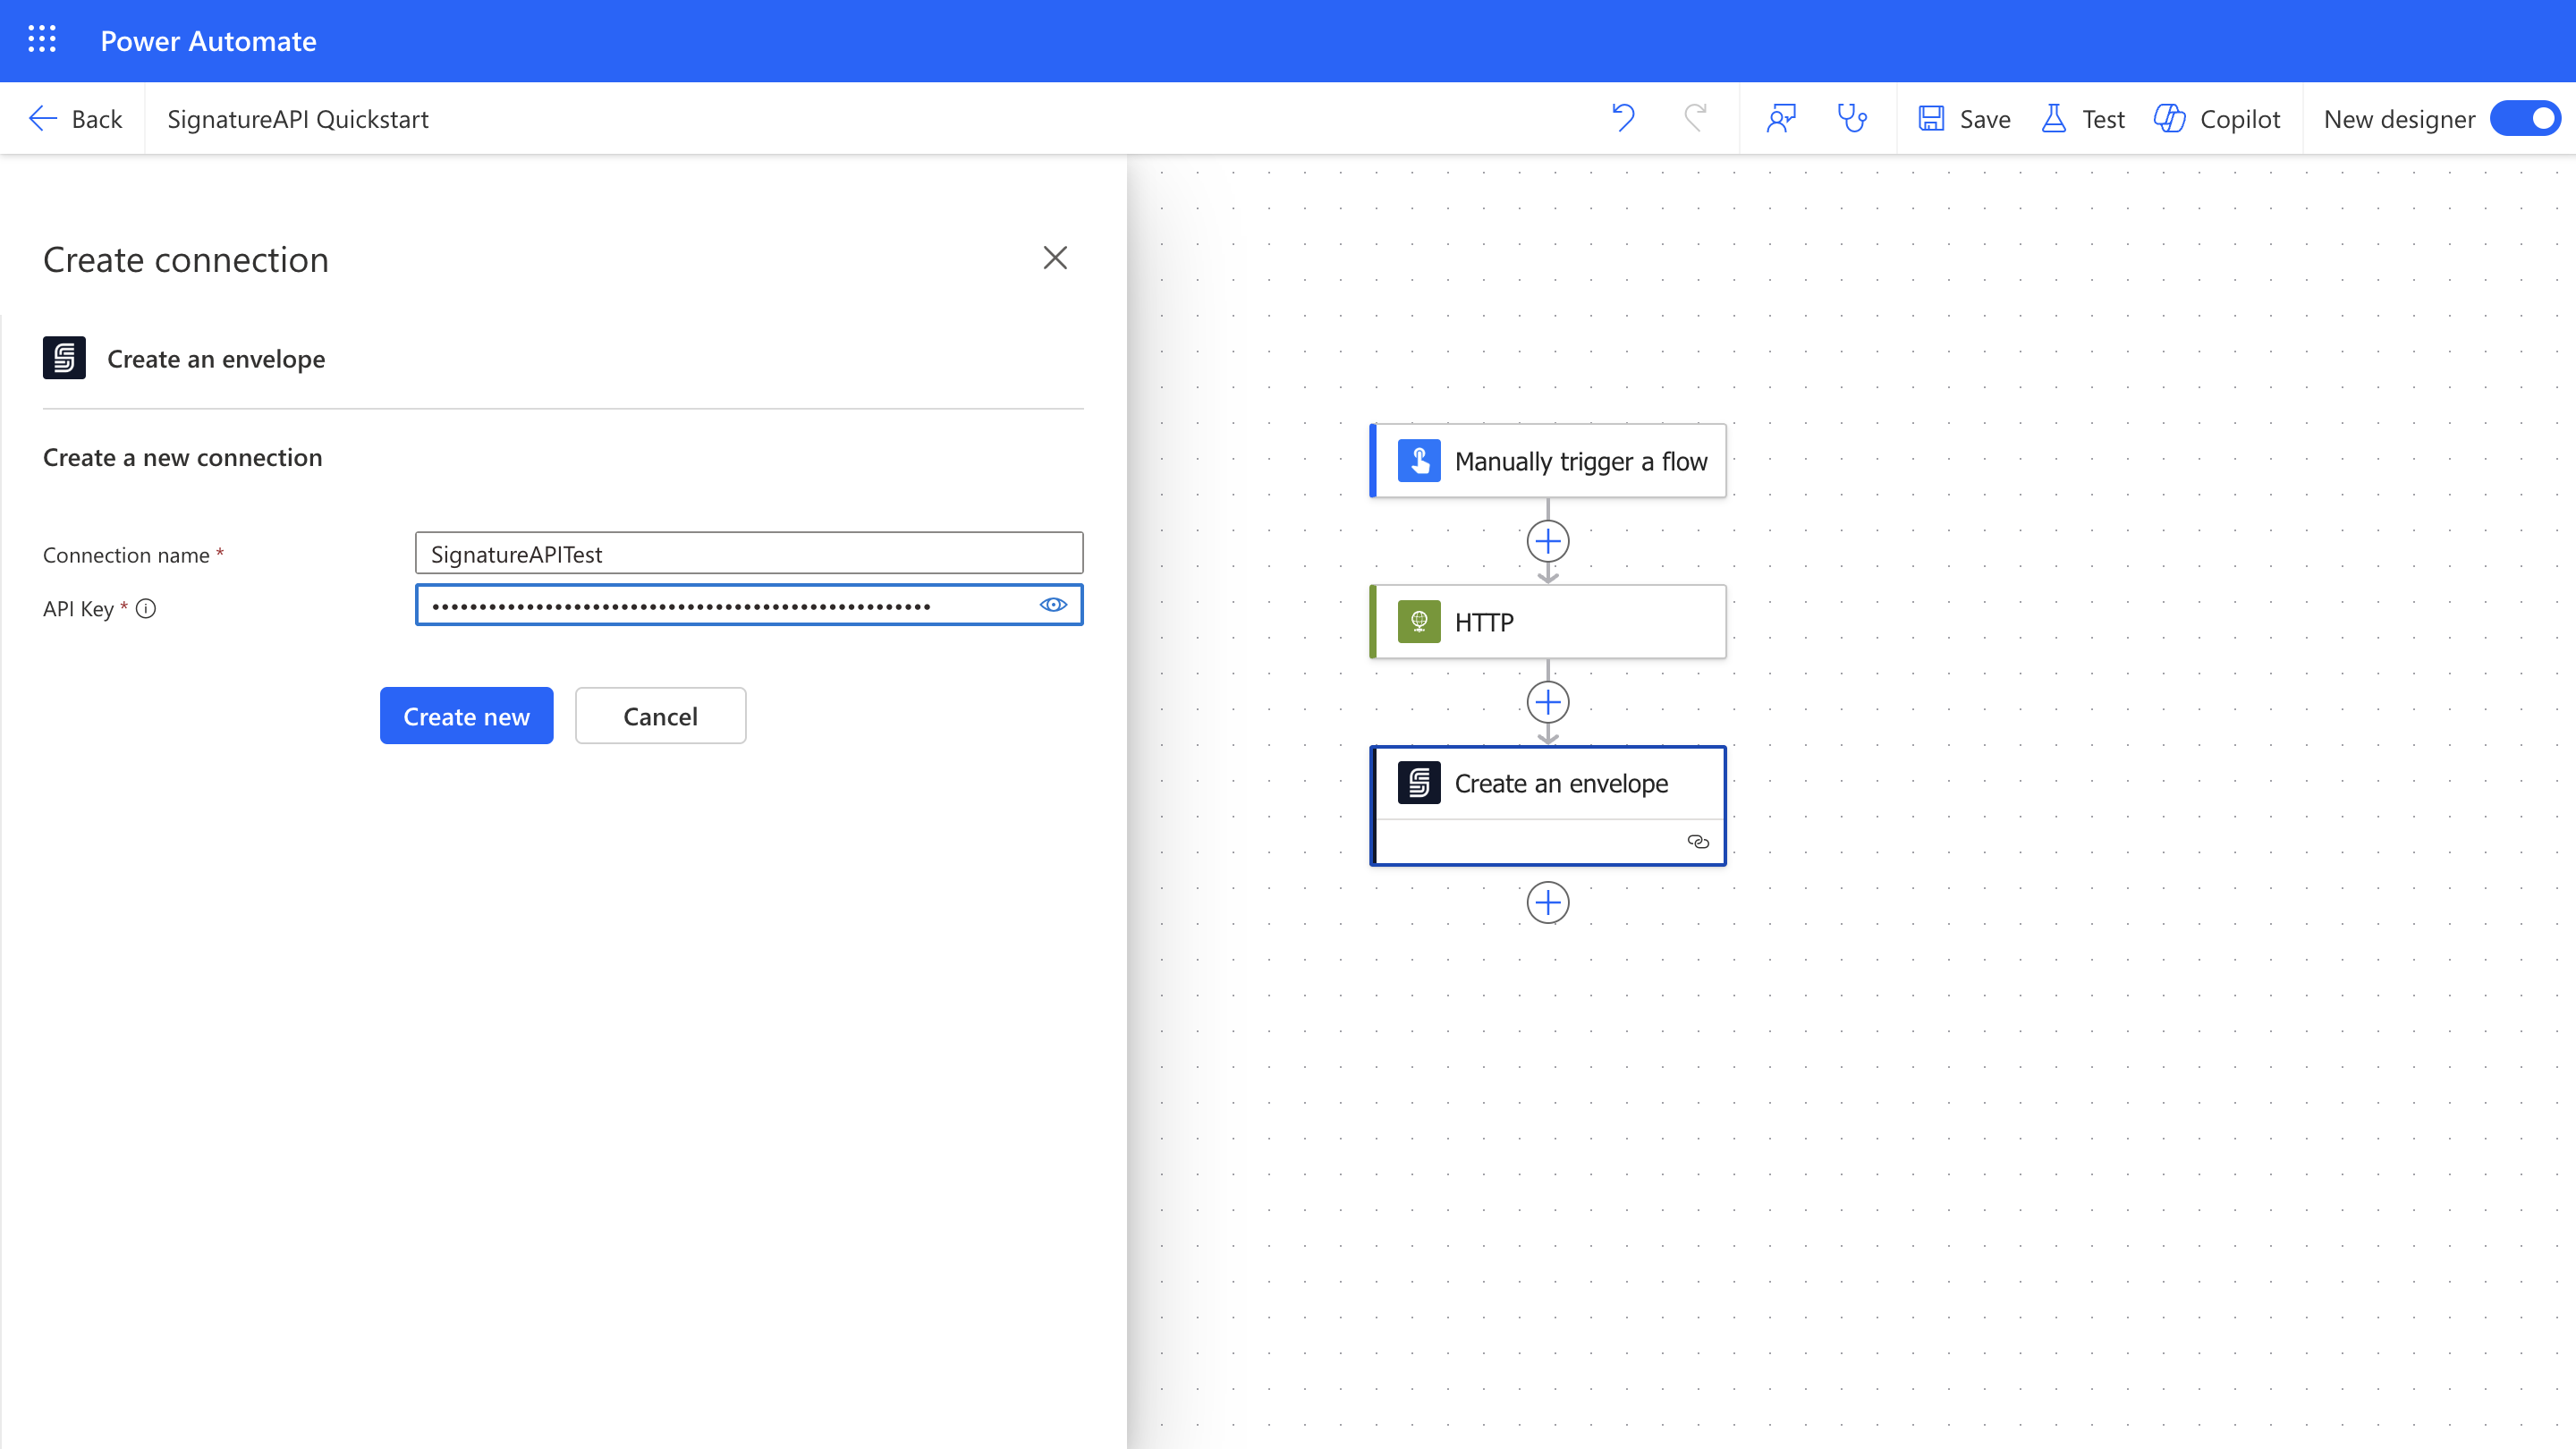 Once connected, configure the **Create an envelope** action:
* Set the **Envelope title** and **Envelope message**. These will be visible to the recipient.
* In the **Advanced Options**, you can set localization settings (language, time formats, time zones) and other advanced features.
Once connected, configure the **Create an envelope** action:
* Set the **Envelope title** and **Envelope message**. These will be visible to the recipient.
* In the **Advanced Options**, you can set localization settings (language, time formats, time zones) and other advanced features.
 ### Add a Recipient - Signer
Now, we'll add the signer recipient to the envelope.
* Add the **Add a recipient - Signer** action from SignatureAPI to your flow.
### Add a Recipient - Signer
Now, we'll add the signer recipient to the envelope.
* Add the **Add a recipient - Signer** action from SignatureAPI to your flow.
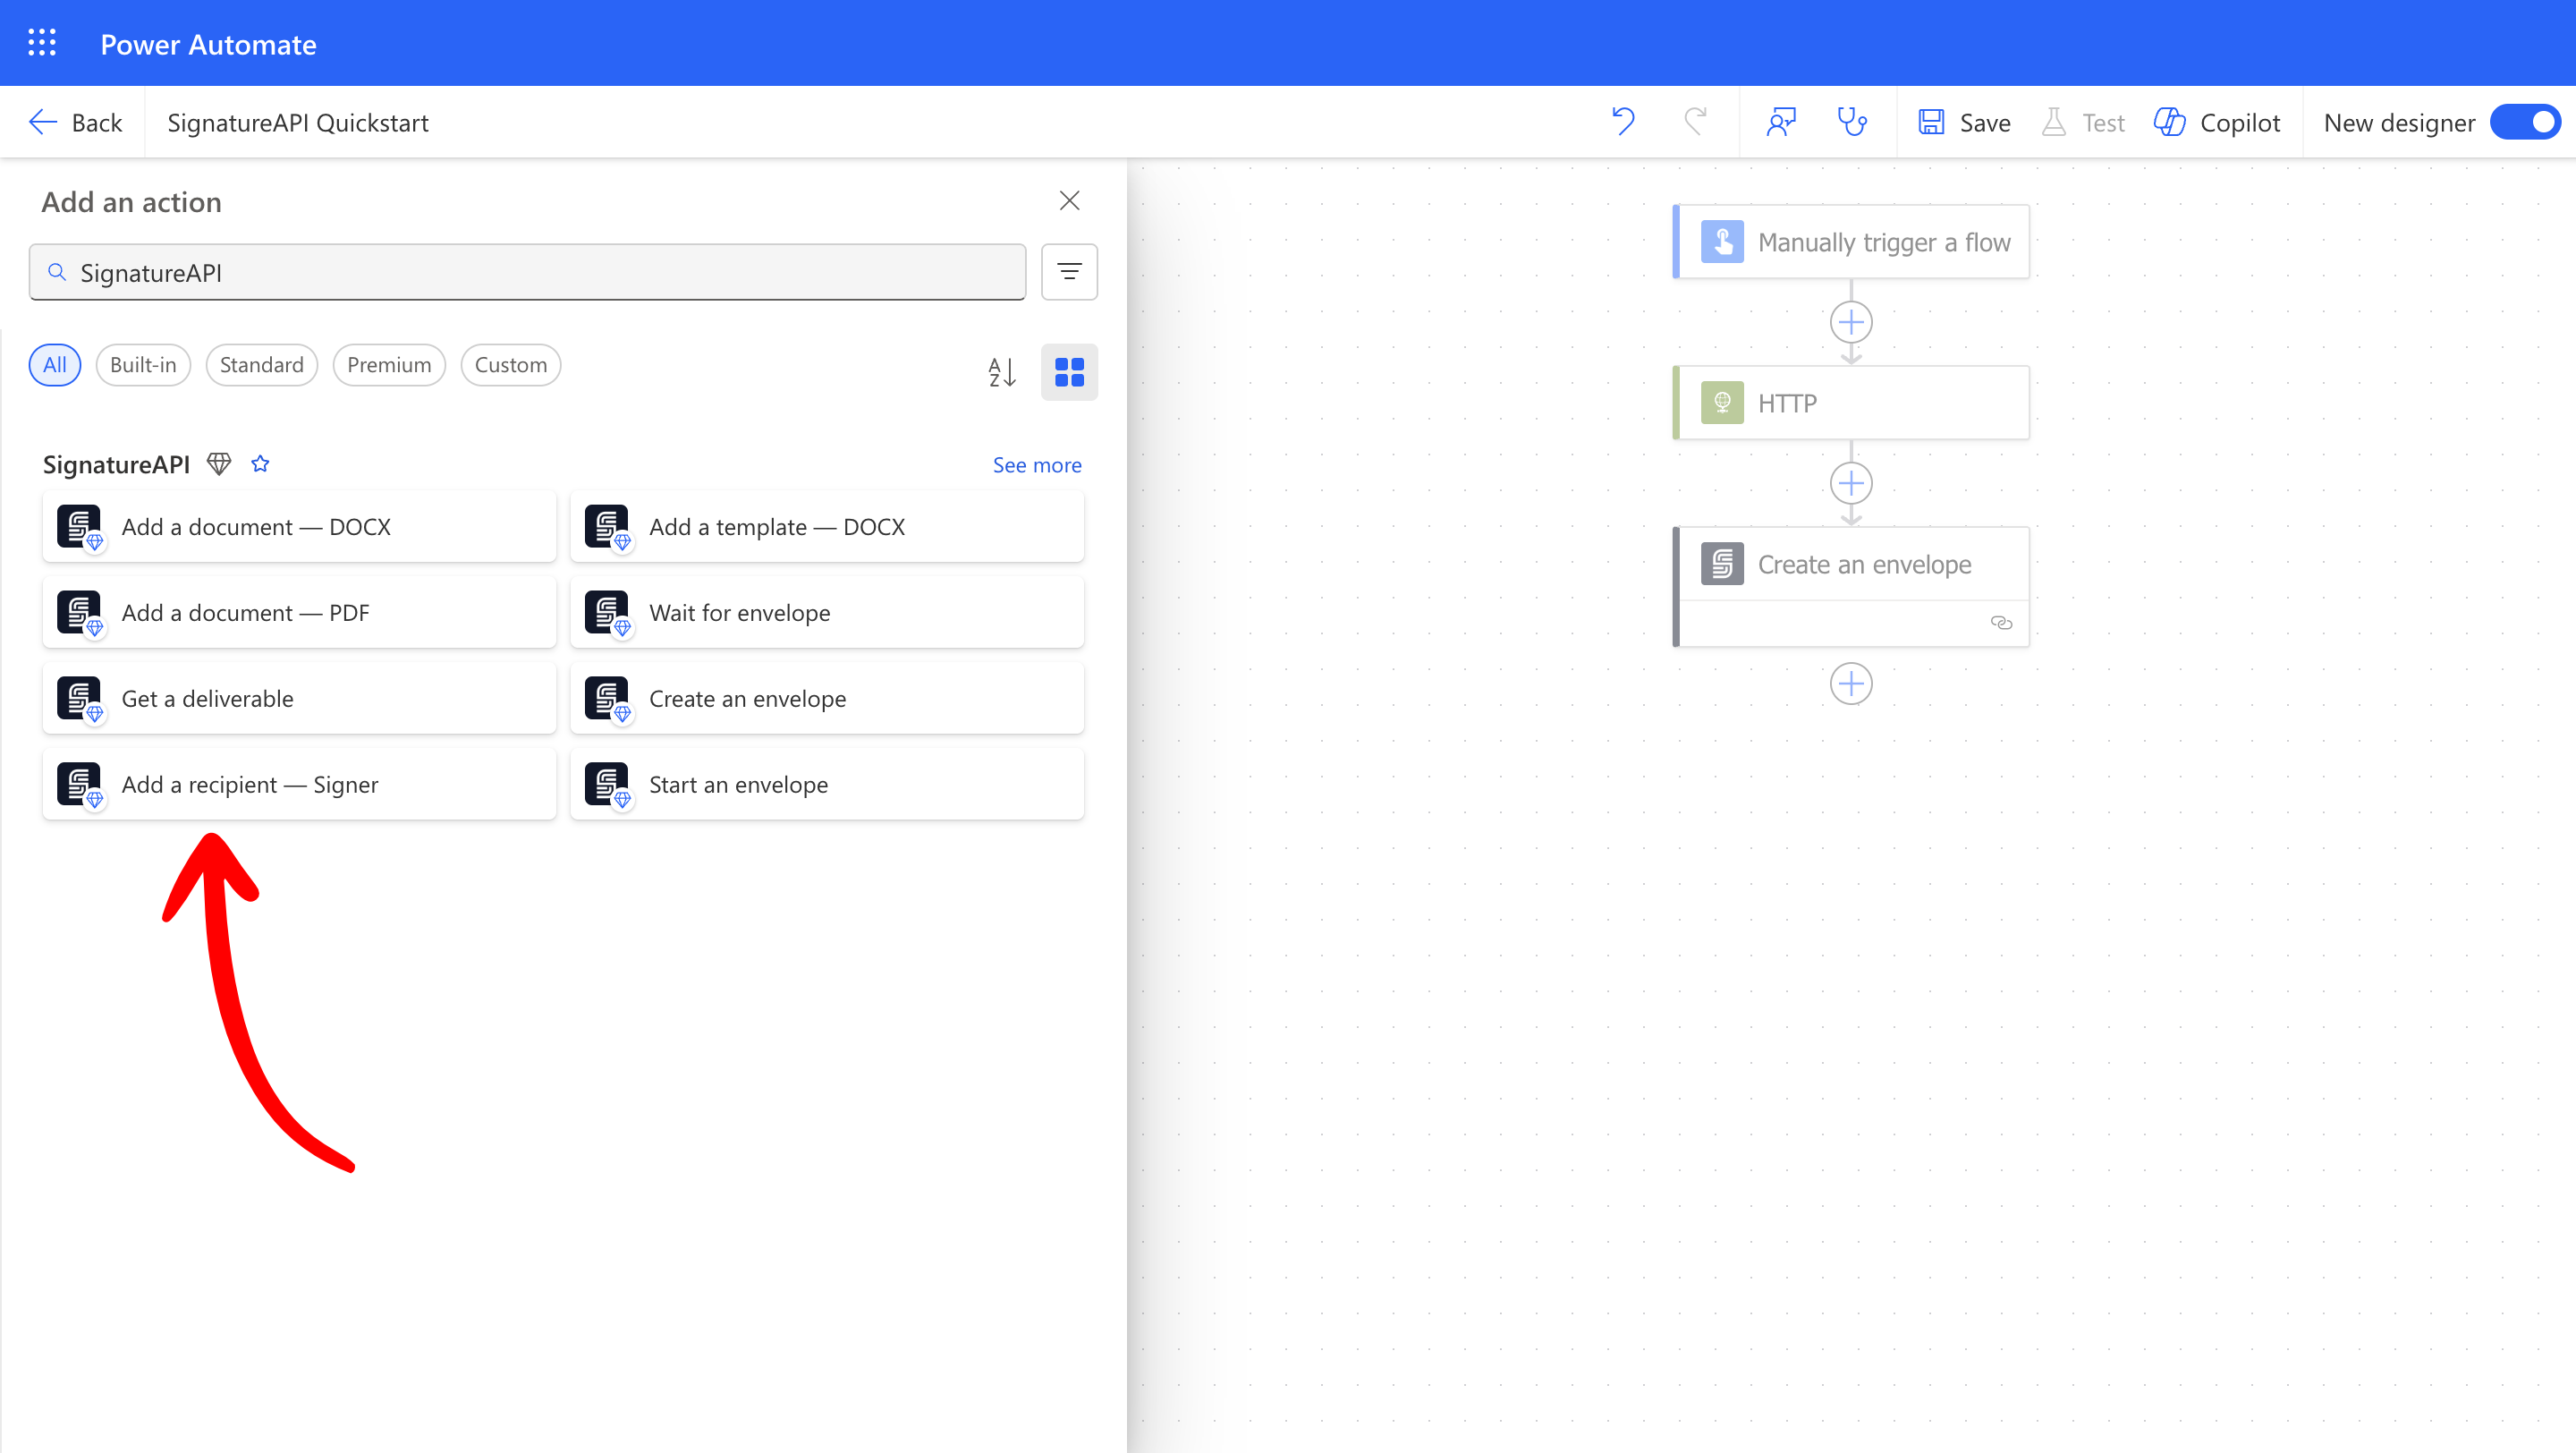 Configure the **Add a recipient - Signer** action:
* **Recipient Name**: Enter the recipient's name (e.g., `John Doe`).
* **Recipient Email**: Enter the recipient's email address (e.g., `john@example.com`).
* **Recipient Key**: Use the same key you used in the signature placeholder in your template (in this case, `consentor`).
* **Envelope ID**: Select the **Envelope ID** output from the **Create an envelope** action.
Configure the **Add a recipient - Signer** action:
* **Recipient Name**: Enter the recipient's name (e.g., `John Doe`).
* **Recipient Email**: Enter the recipient's email address (e.g., `john@example.com`).
* **Recipient Key**: Use the same key you used in the signature placeholder in your template (in this case, `consentor`).
* **Envelope ID**: Select the **Envelope ID** output from the **Create an envelope** action.
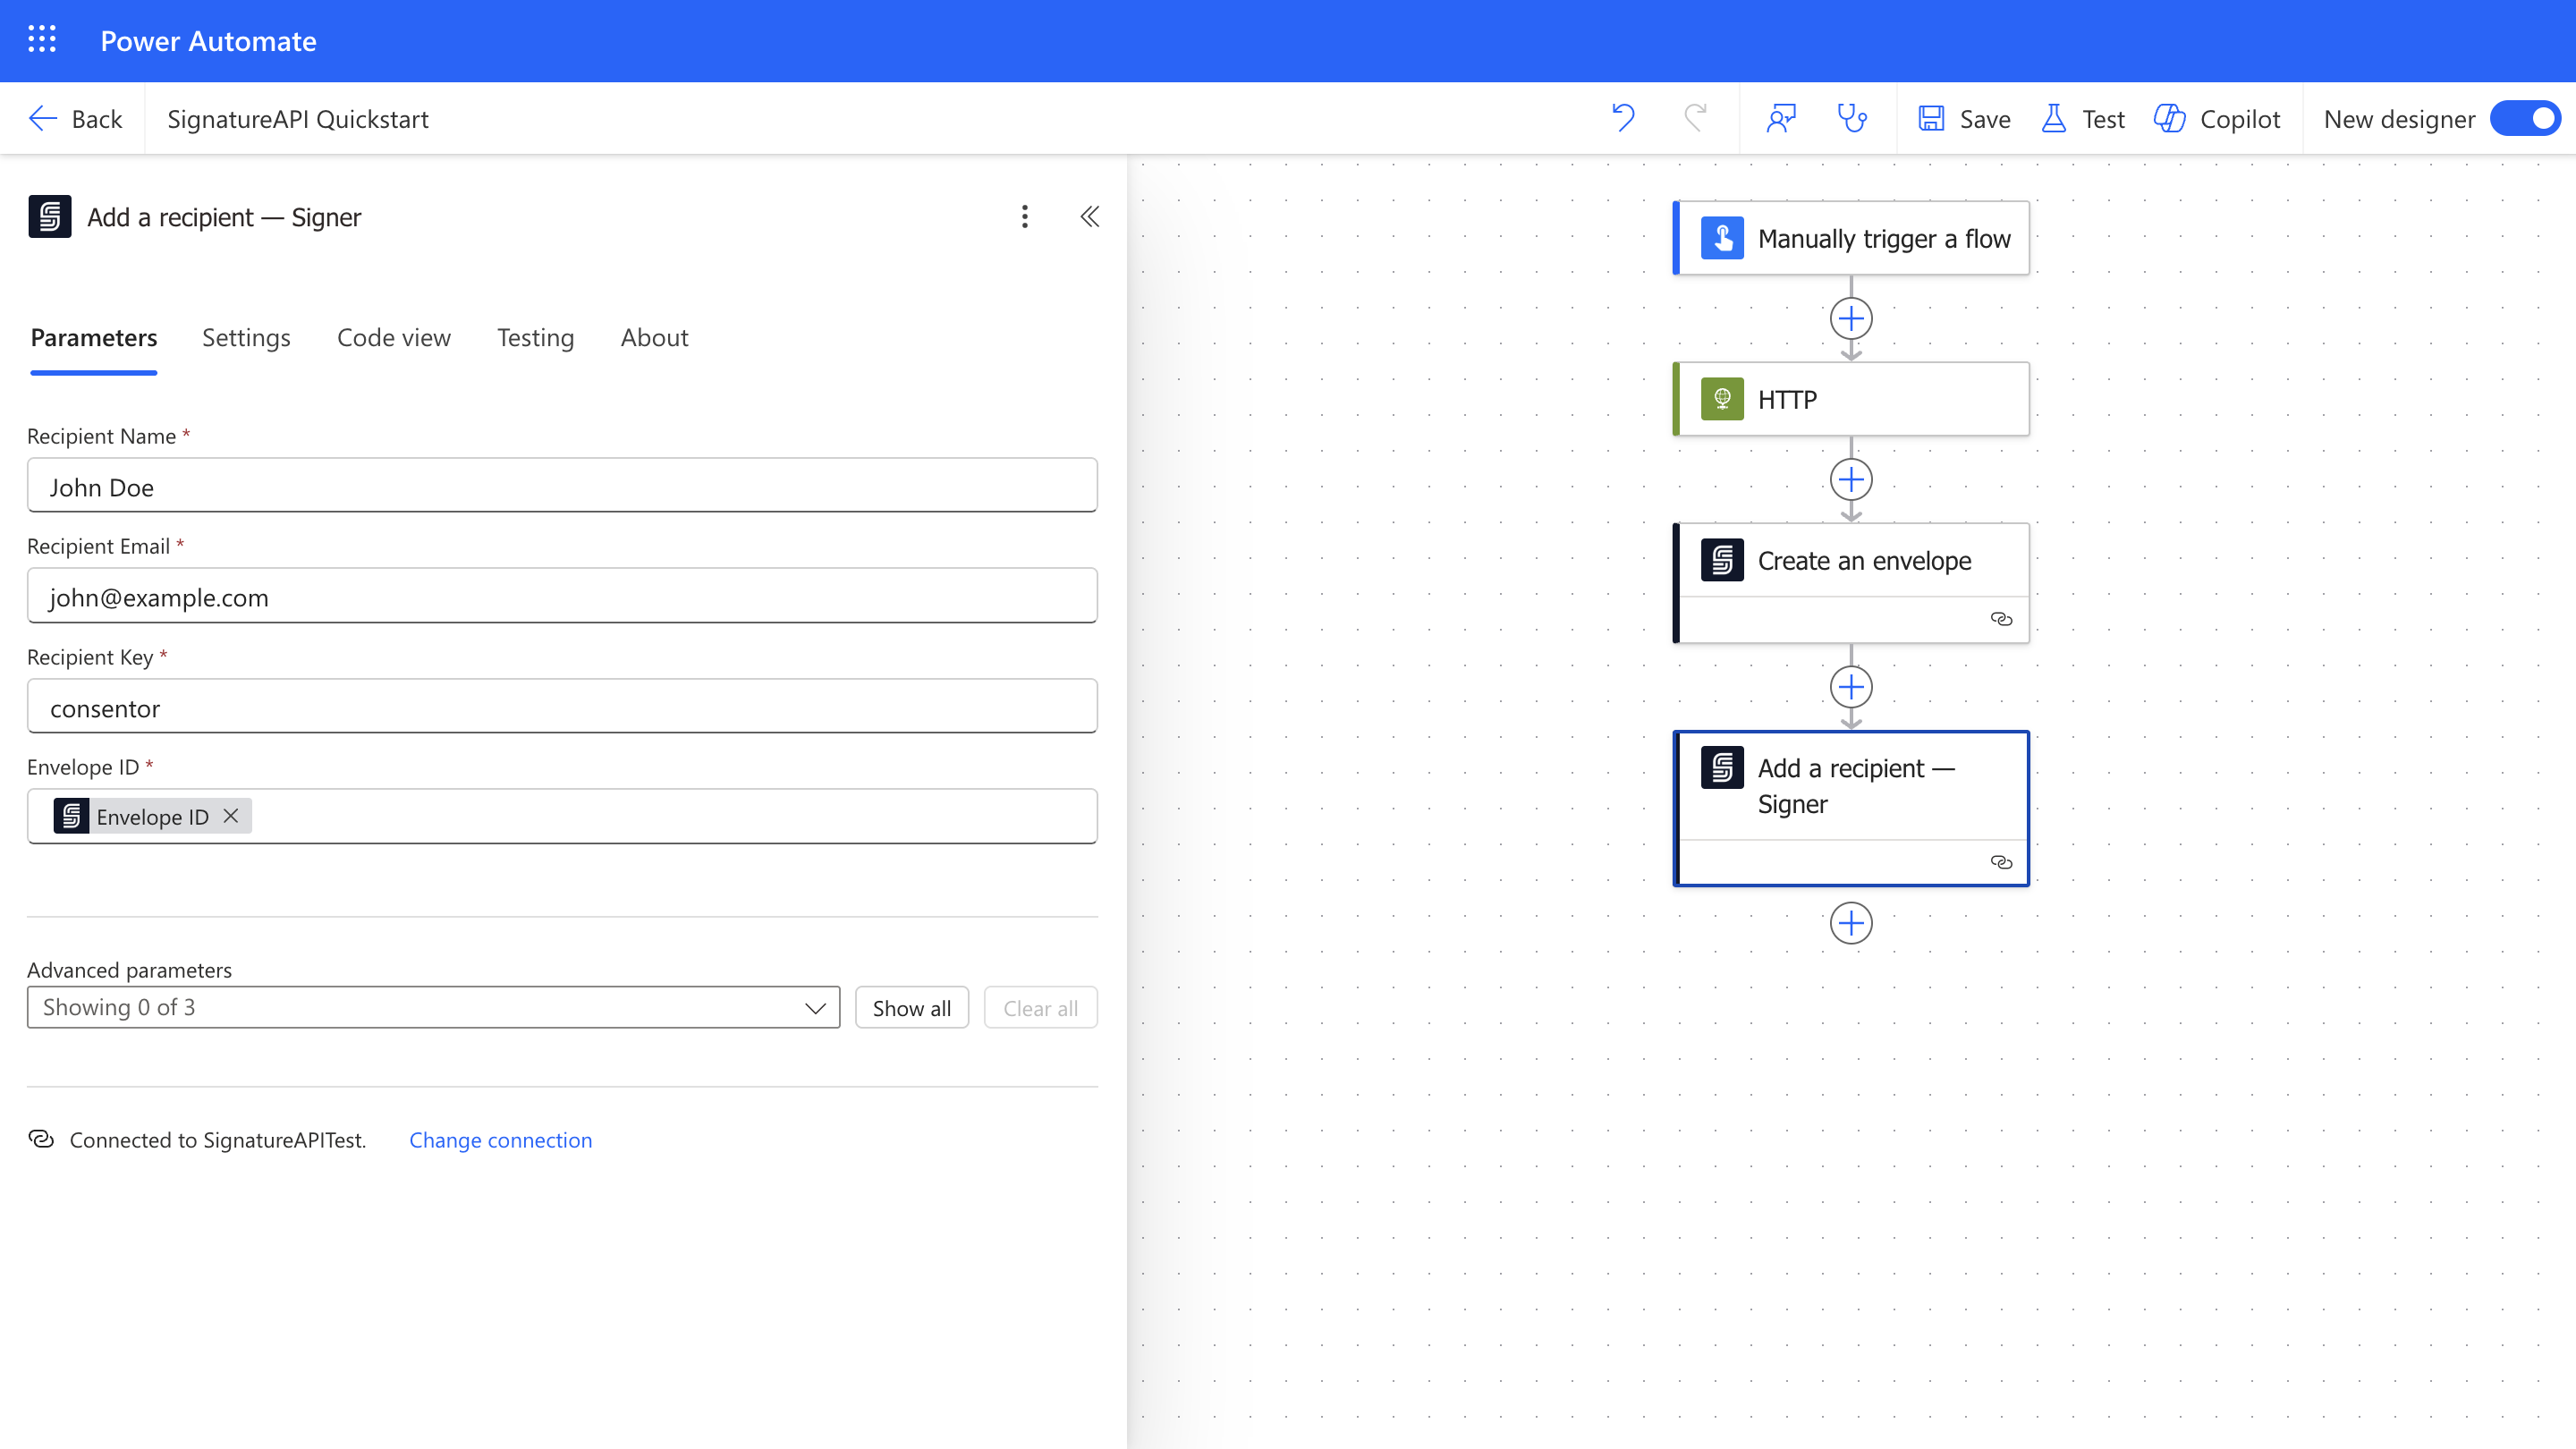 ### Add the Template to the Envelope
We'll now add the DOCX template to the envelope.
* Add the **Add a template - DOCX** action from SignatureAPI to your flow.
### Add the Template to the Envelope
We'll now add the DOCX template to the envelope.
* Add the **Add a template - DOCX** action from SignatureAPI to your flow.
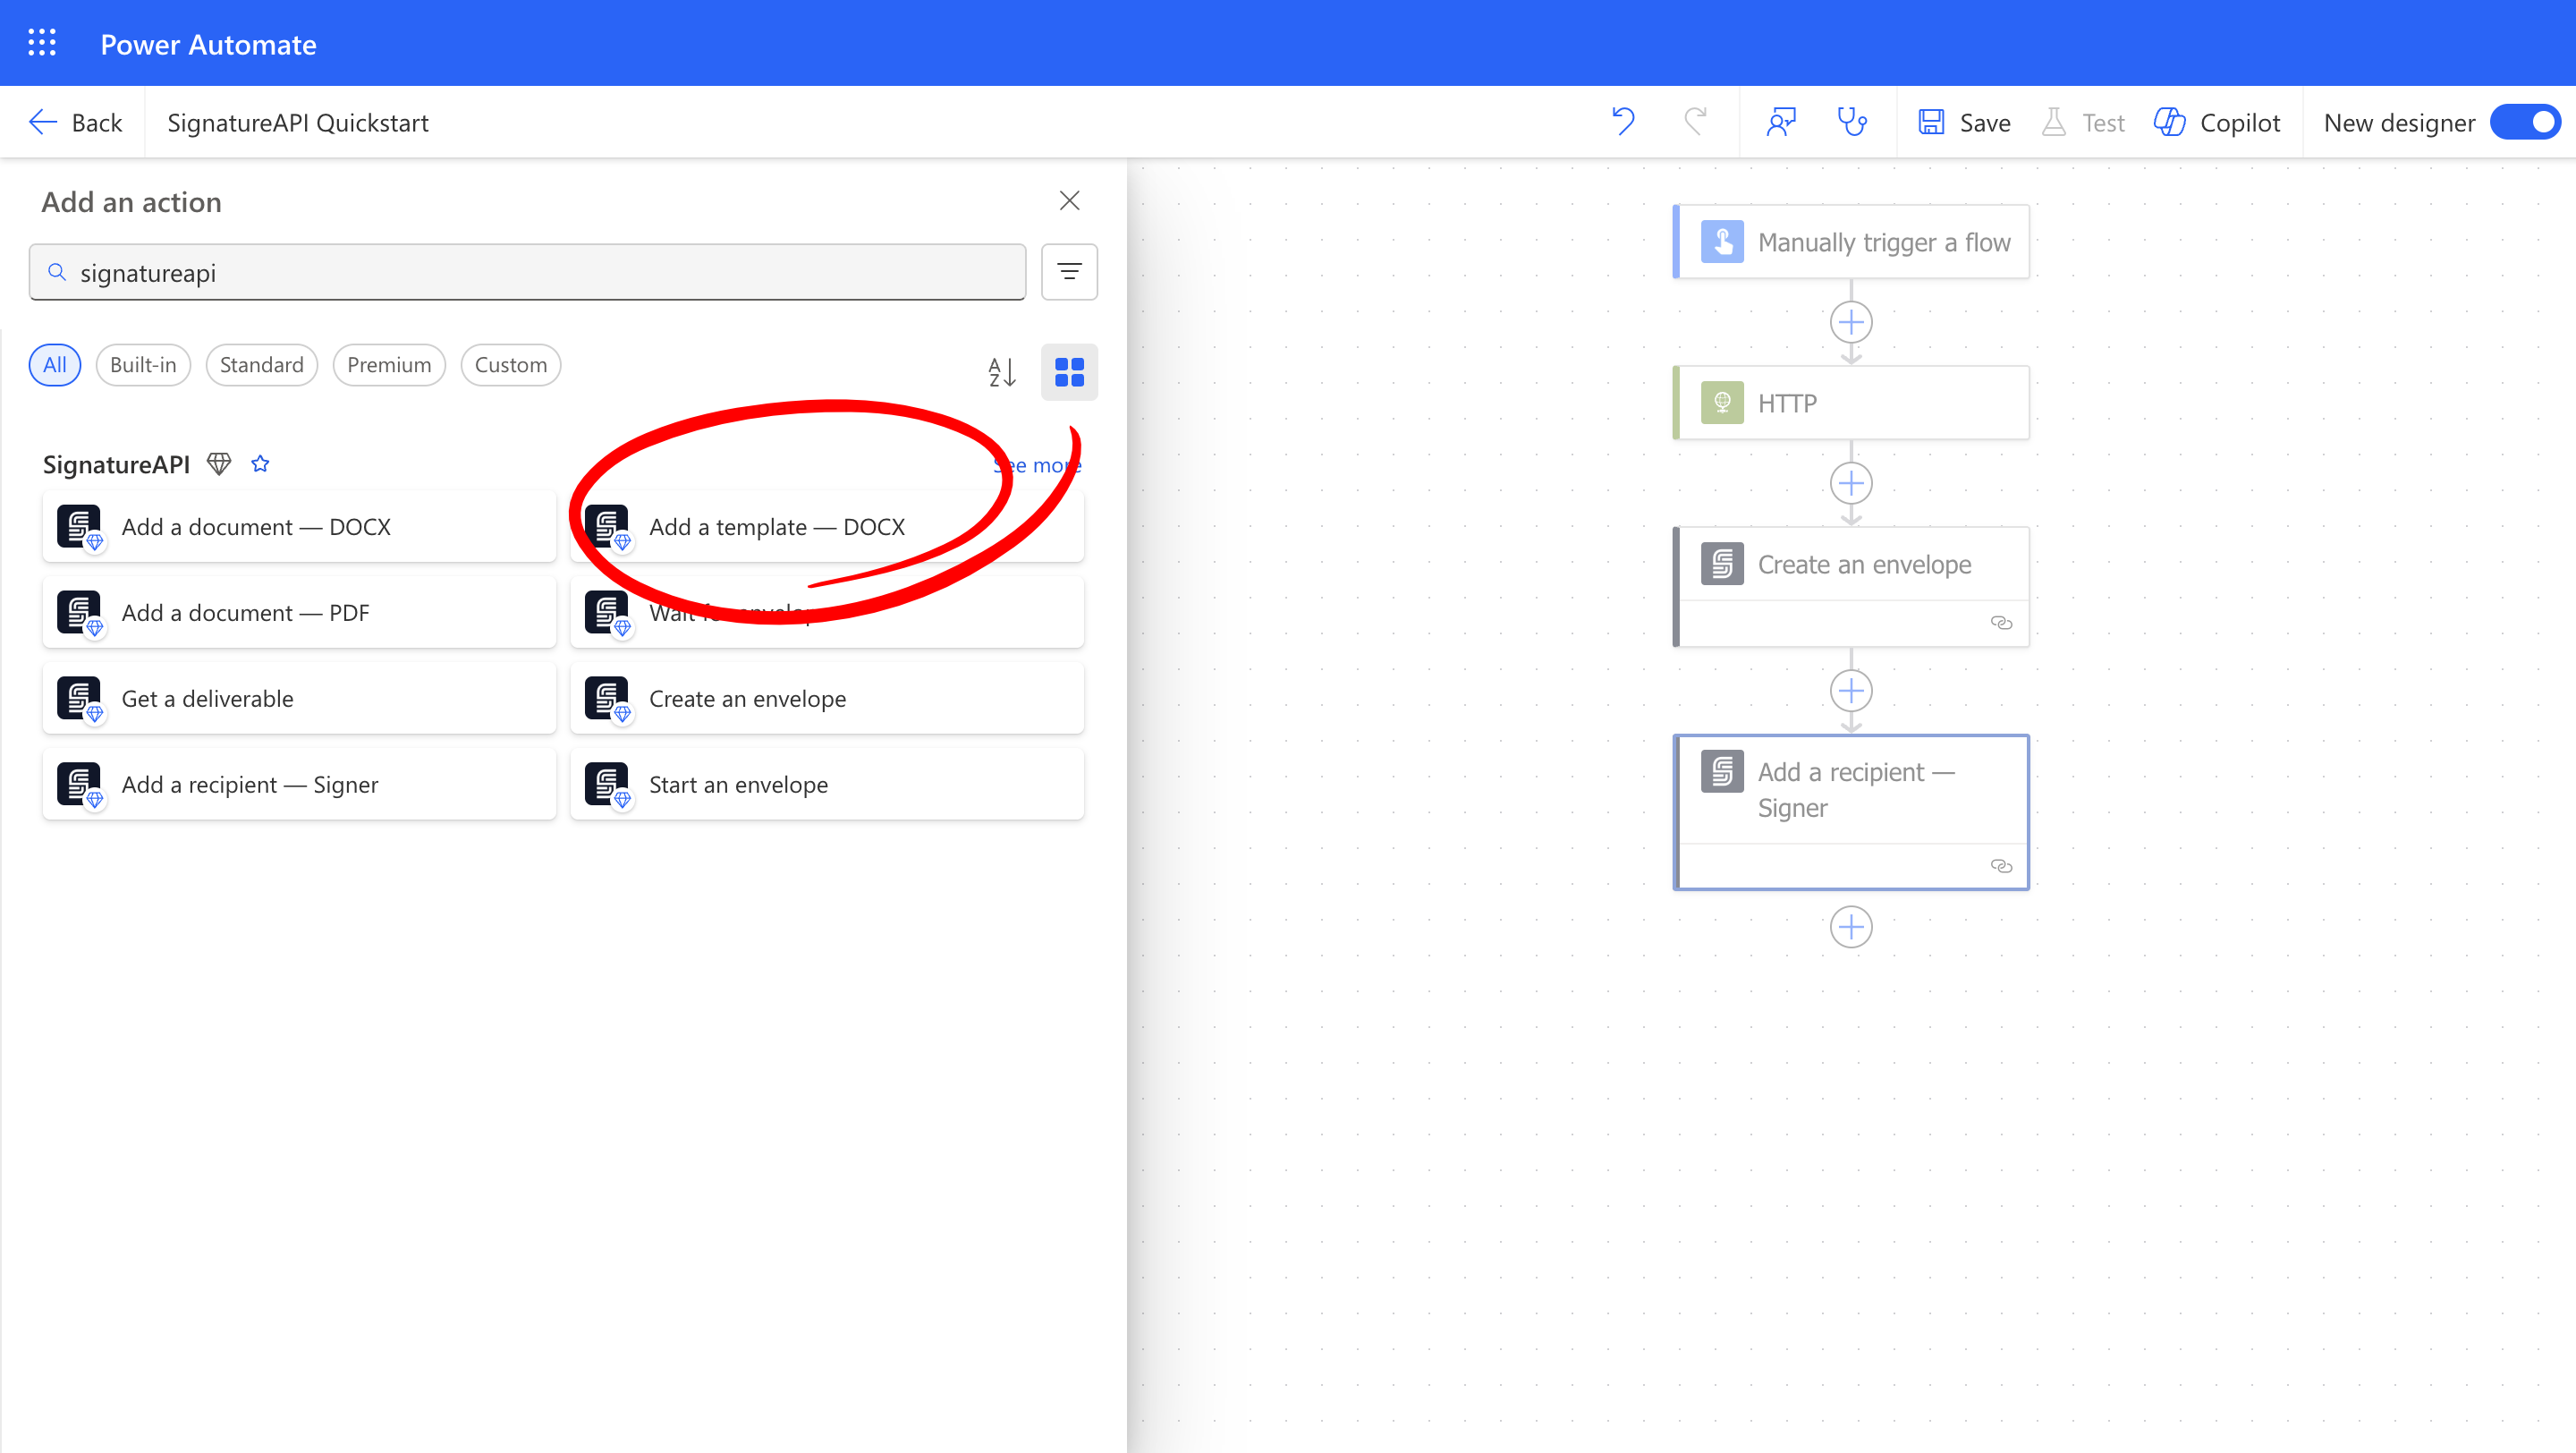 Configure the **Add a template - DOCX** action:
* **File Content**: Set this to the **Body** output of the **HTTP** action we used to download the template.
* **Envelope ID**: Select the **Envelope ID** output from the **Create an envelope** action.
* **File Format**: Keep this as `docx`.
* **Template Data**: For each field or conditional in your template, add a new **Template Data Item** as a `Key: Value` pair in the **Template Data**. The **Key** being the field name (without the `{{ }}`) and the **Value** being the data you want to insert. This will be used to populate the template.
* To fill the `personName` field with `John Doe`, add the following item: `personName: John Doe`
* To fill the `companyName` field with `Doe Enterprises, LLC`, add the following item: `companyName: Doe Enterprises, LLC`.
* To set the conditional `showStatement` to `true`, add the following item: `showStatement: true`.
Configure the **Add a template - DOCX** action:
* **File Content**: Set this to the **Body** output of the **HTTP** action we used to download the template.
* **Envelope ID**: Select the **Envelope ID** output from the **Create an envelope** action.
* **File Format**: Keep this as `docx`.
* **Template Data**: For each field or conditional in your template, add a new **Template Data Item** as a `Key: Value` pair in the **Template Data**. The **Key** being the field name (without the `{{ }}`) and the **Value** being the data you want to insert. This will be used to populate the template.
* To fill the `personName` field with `John Doe`, add the following item: `personName: John Doe`
* To fill the `companyName` field with `Doe Enterprises, LLC`, add the following item: `companyName: Doe Enterprises, LLC`.
* To set the conditional `showStatement` to `true`, add the following item: `showStatement: true`.
 * For the `companyName` field, set the **Value** to `Doe Enterprises, LLC`.
* For the conditional `showStatement`, set the **Value** to `true`.
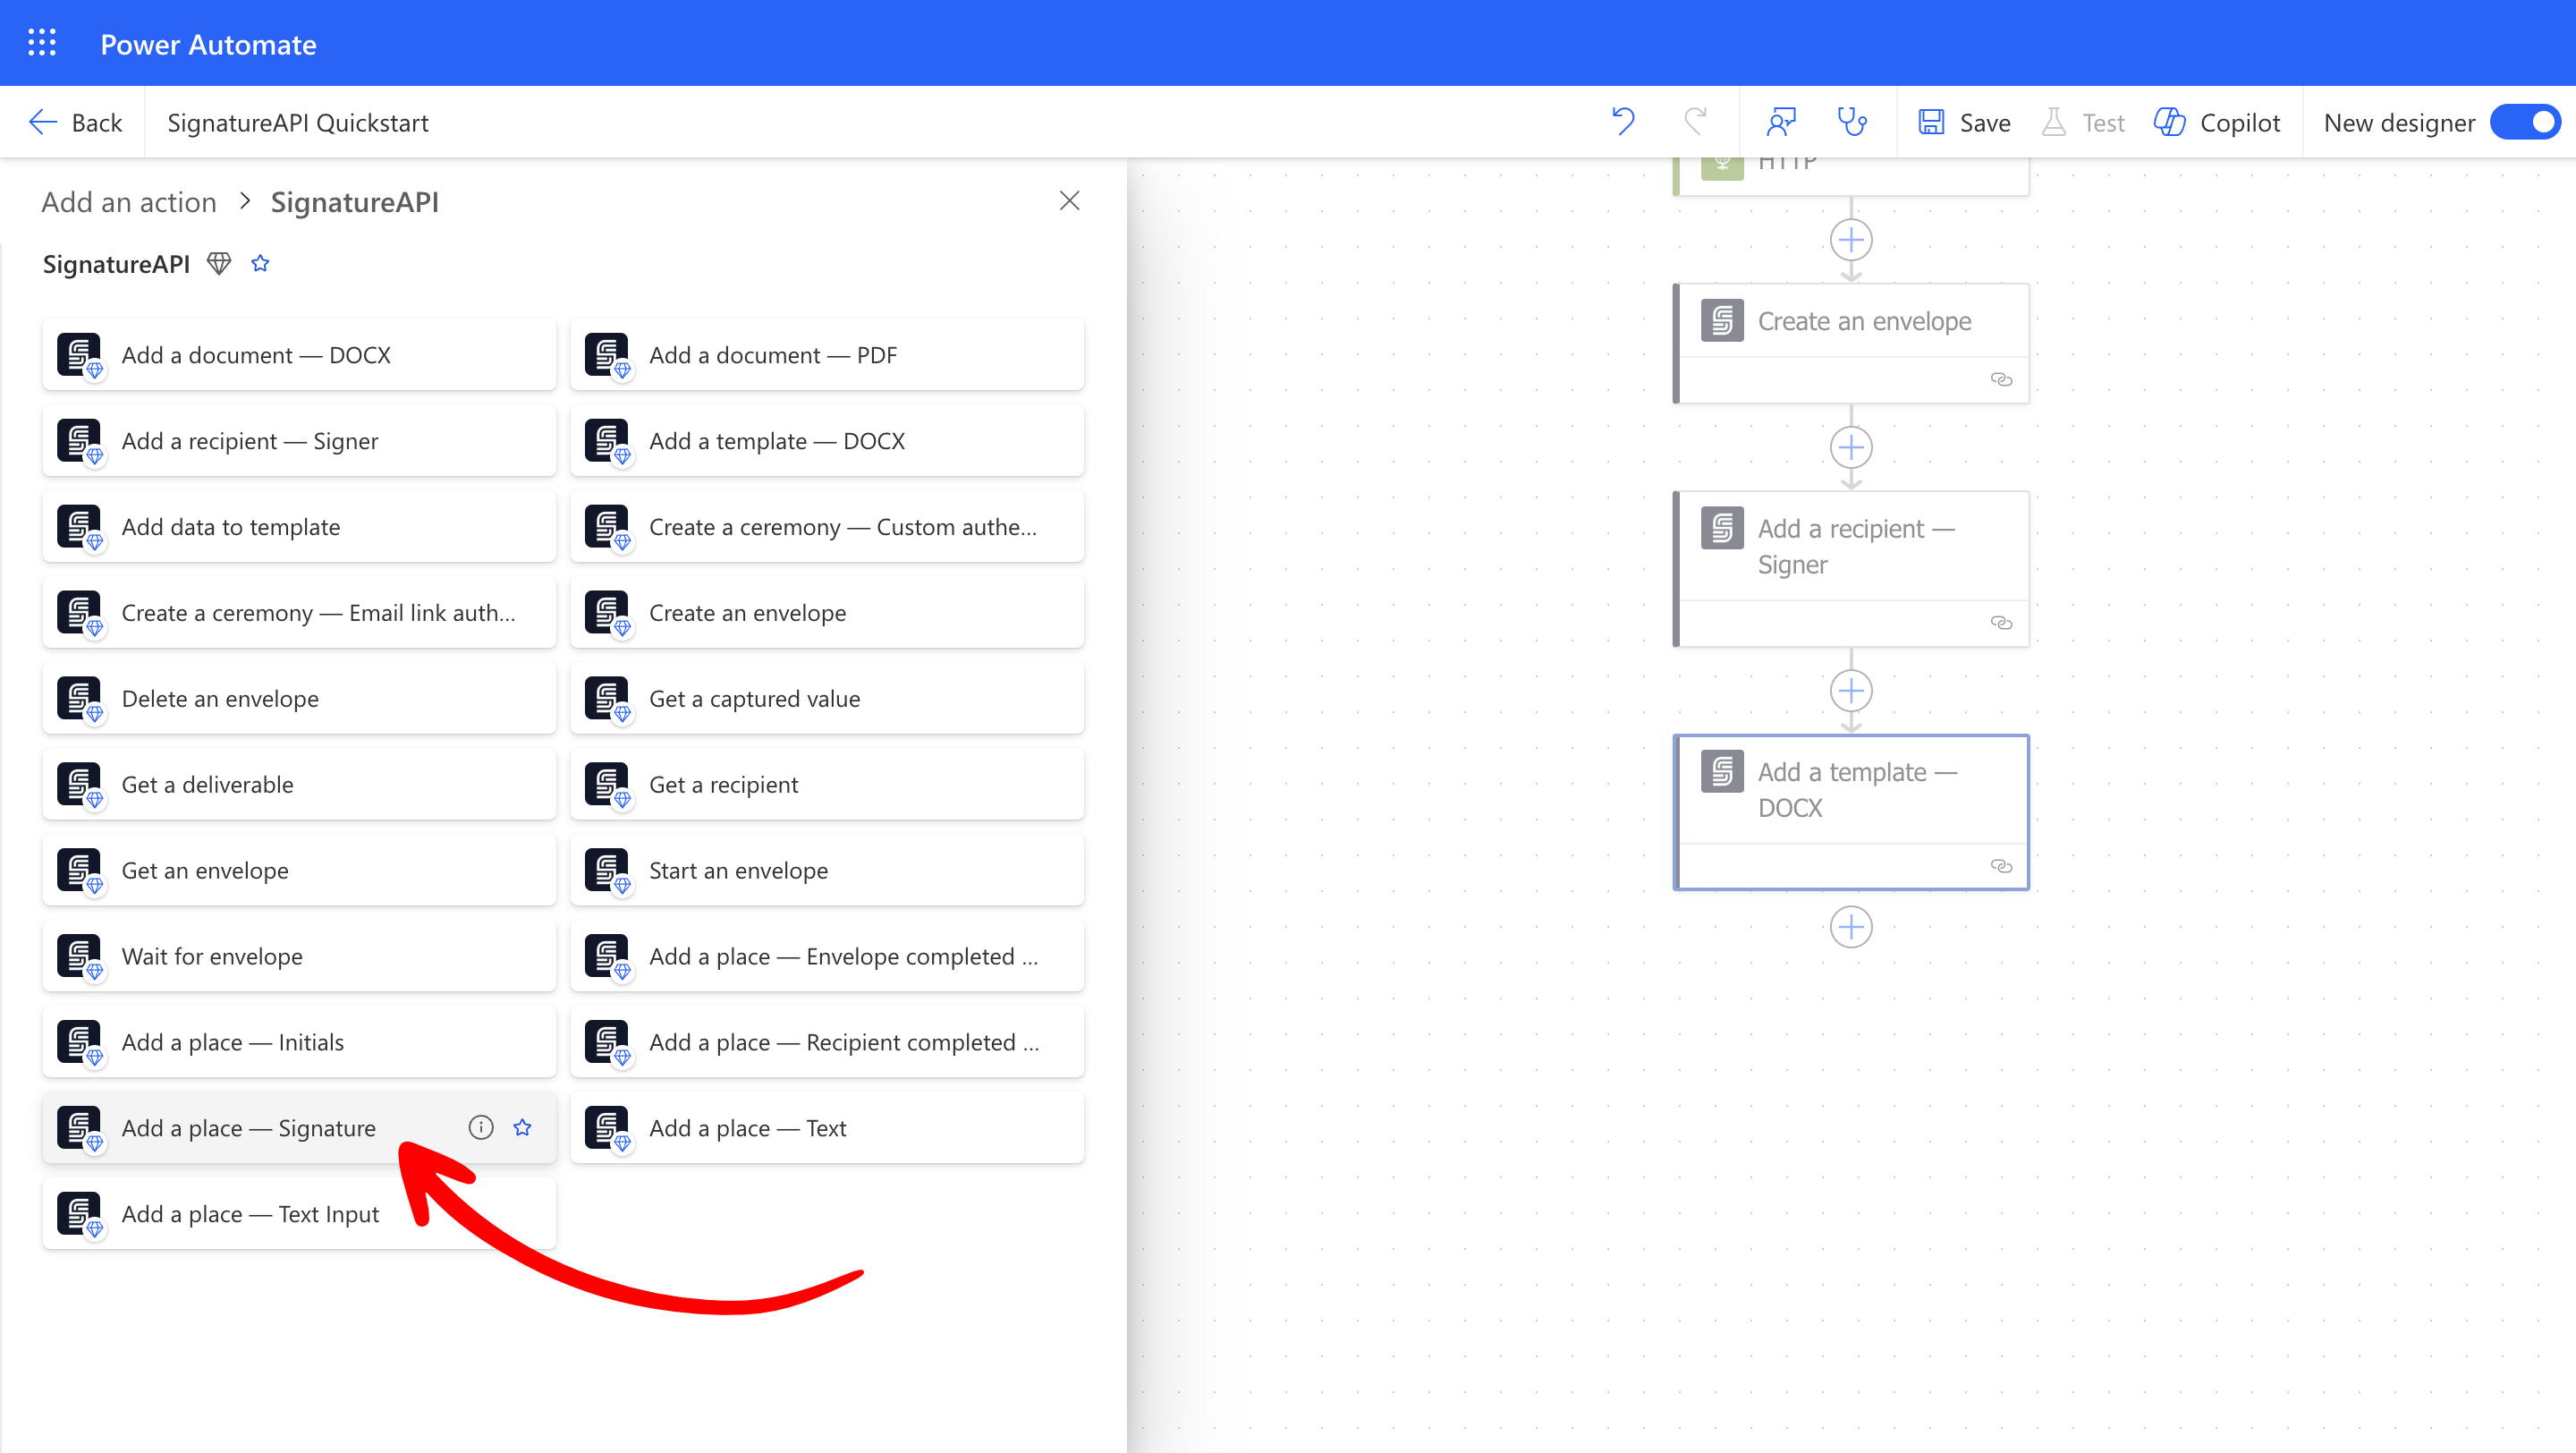
### Add the Signature Place
Now that we've set up the envelope template, we'll add the signature place to the document.
* Add the **Add a place - Signature** action from SignatureAPI to your flow.
* For the `companyName` field, set the **Value** to `Doe Enterprises, LLC`.
* For the conditional `showStatement`, set the **Value** to `true`.
### Add the Signature Place
Now that we've set up the envelope template, we'll add the signature place to the document.
* Add the **Add a place - Signature** action from SignatureAPI to your flow.
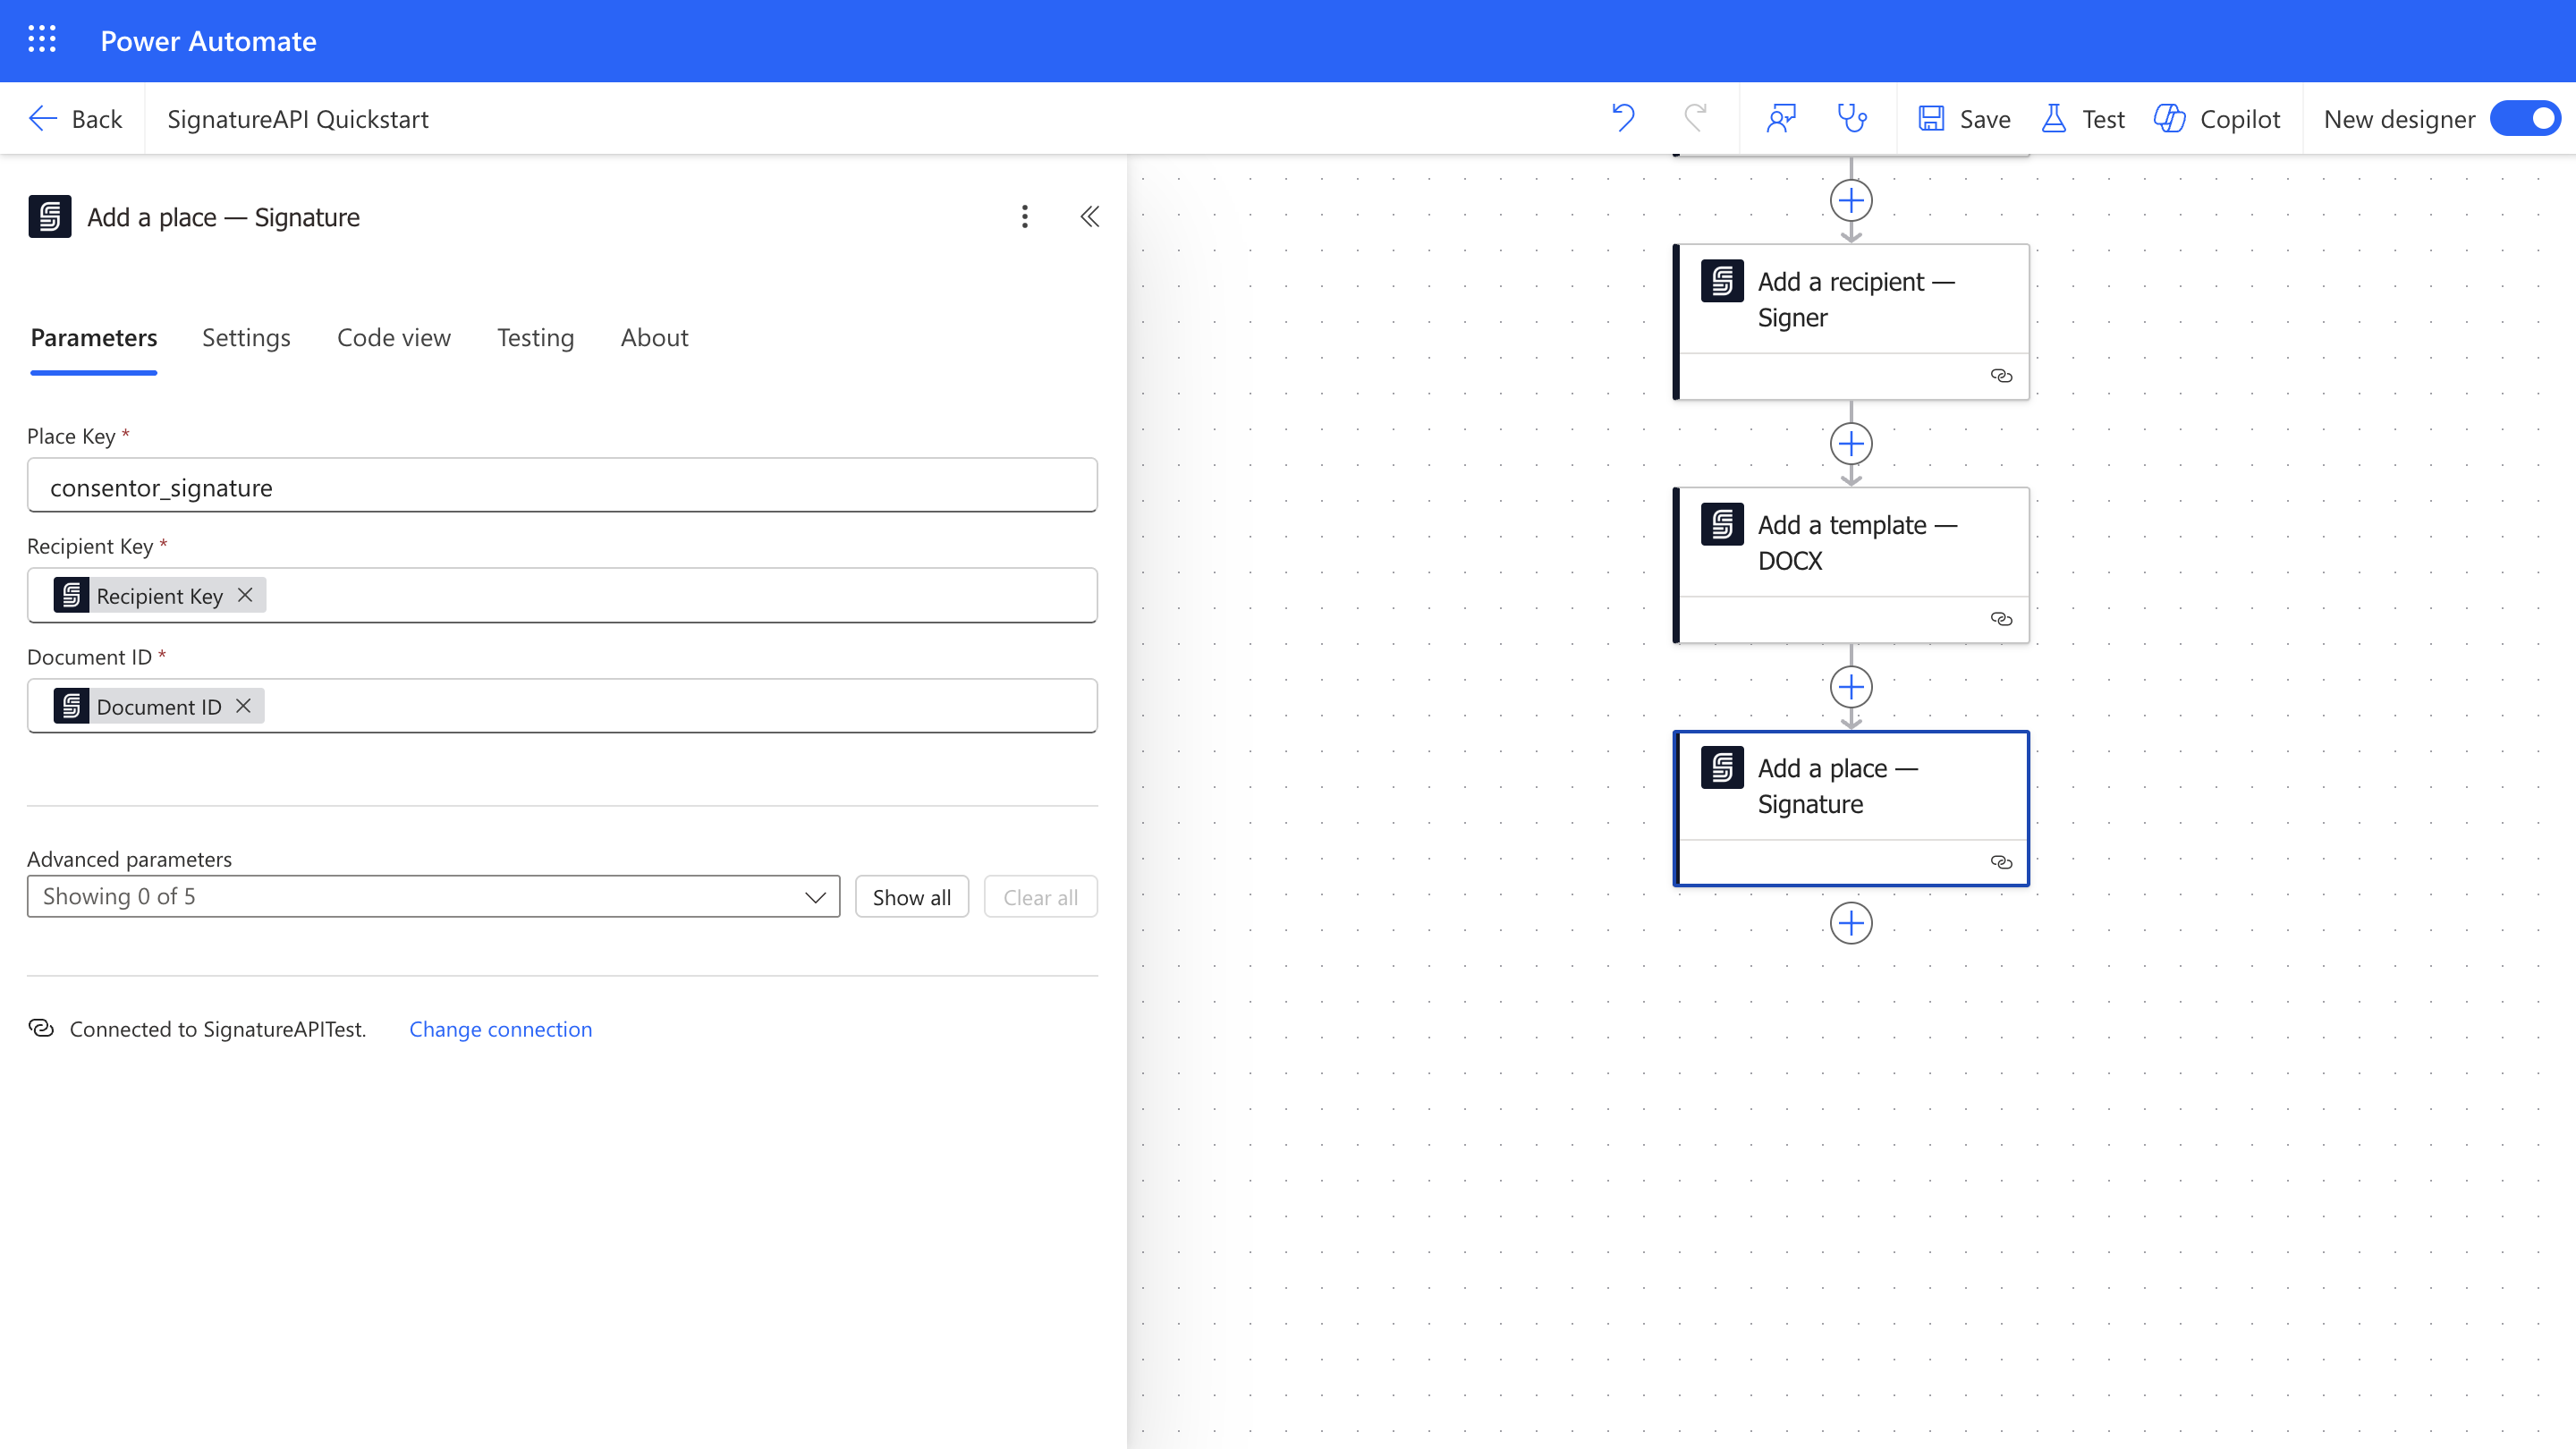
 Configure the **Add a place - Signature** action:
* **Place Key**: Enter the place key you used in the signature placeholder in your template (in this case, `[[consentor_signature]]`).
* **Recipient Key**: Select the **Recipient Key** output from the **Add a recipient - Signer** action.
* **Document ID**: Select the **Document ID** output from the **Add a template - DOCX** action.
Configure the **Add a place - Signature** action:
* **Place Key**: Enter the place key you used in the signature placeholder in your template (in this case, `[[consentor_signature]]`).
* **Recipient Key**: Select the **Recipient Key** output from the **Add a recipient - Signer** action.
* **Document ID**: Select the **Document ID** output from the **Add a template - DOCX** action.
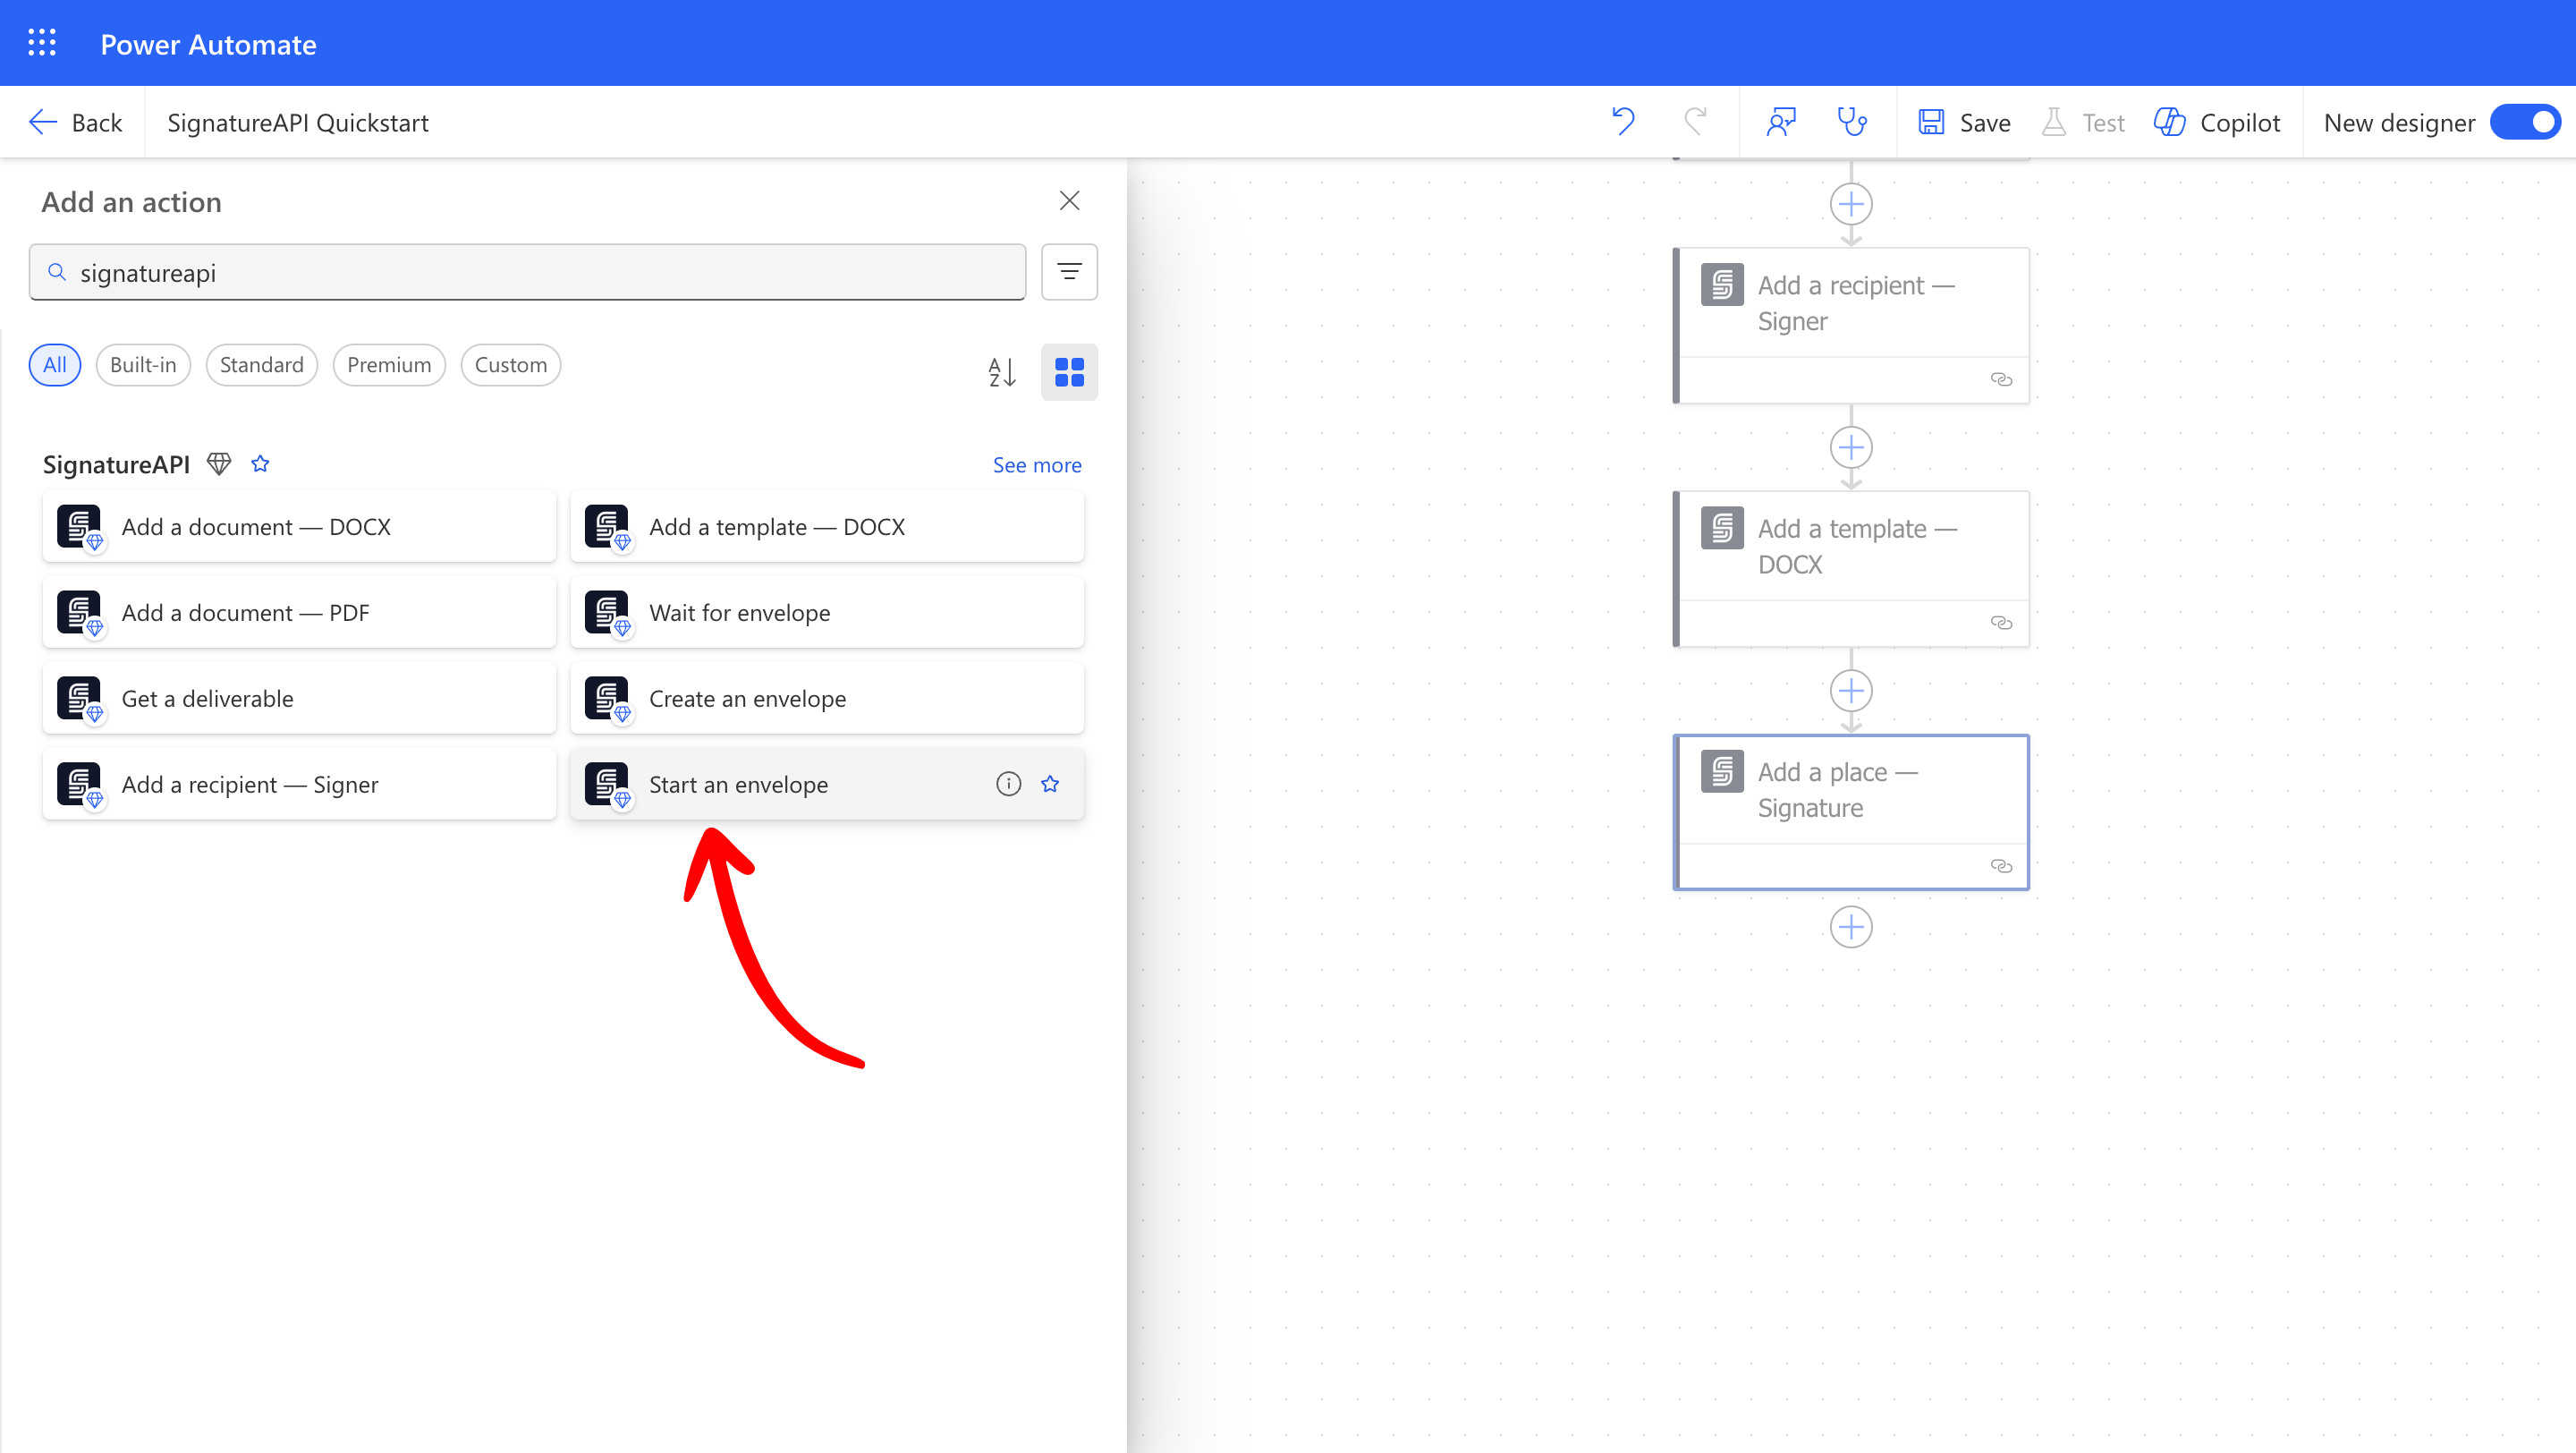
 ### Start the Envelope
Now that we've set up the envelope with the recipient and template, we'll start the signing process.
* Add the **Start an envelope** action from SignatureAPI to your flow.
### Start the Envelope
Now that we've set up the envelope with the recipient and template, we'll start the signing process.
* Add the **Start an envelope** action from SignatureAPI to your flow.
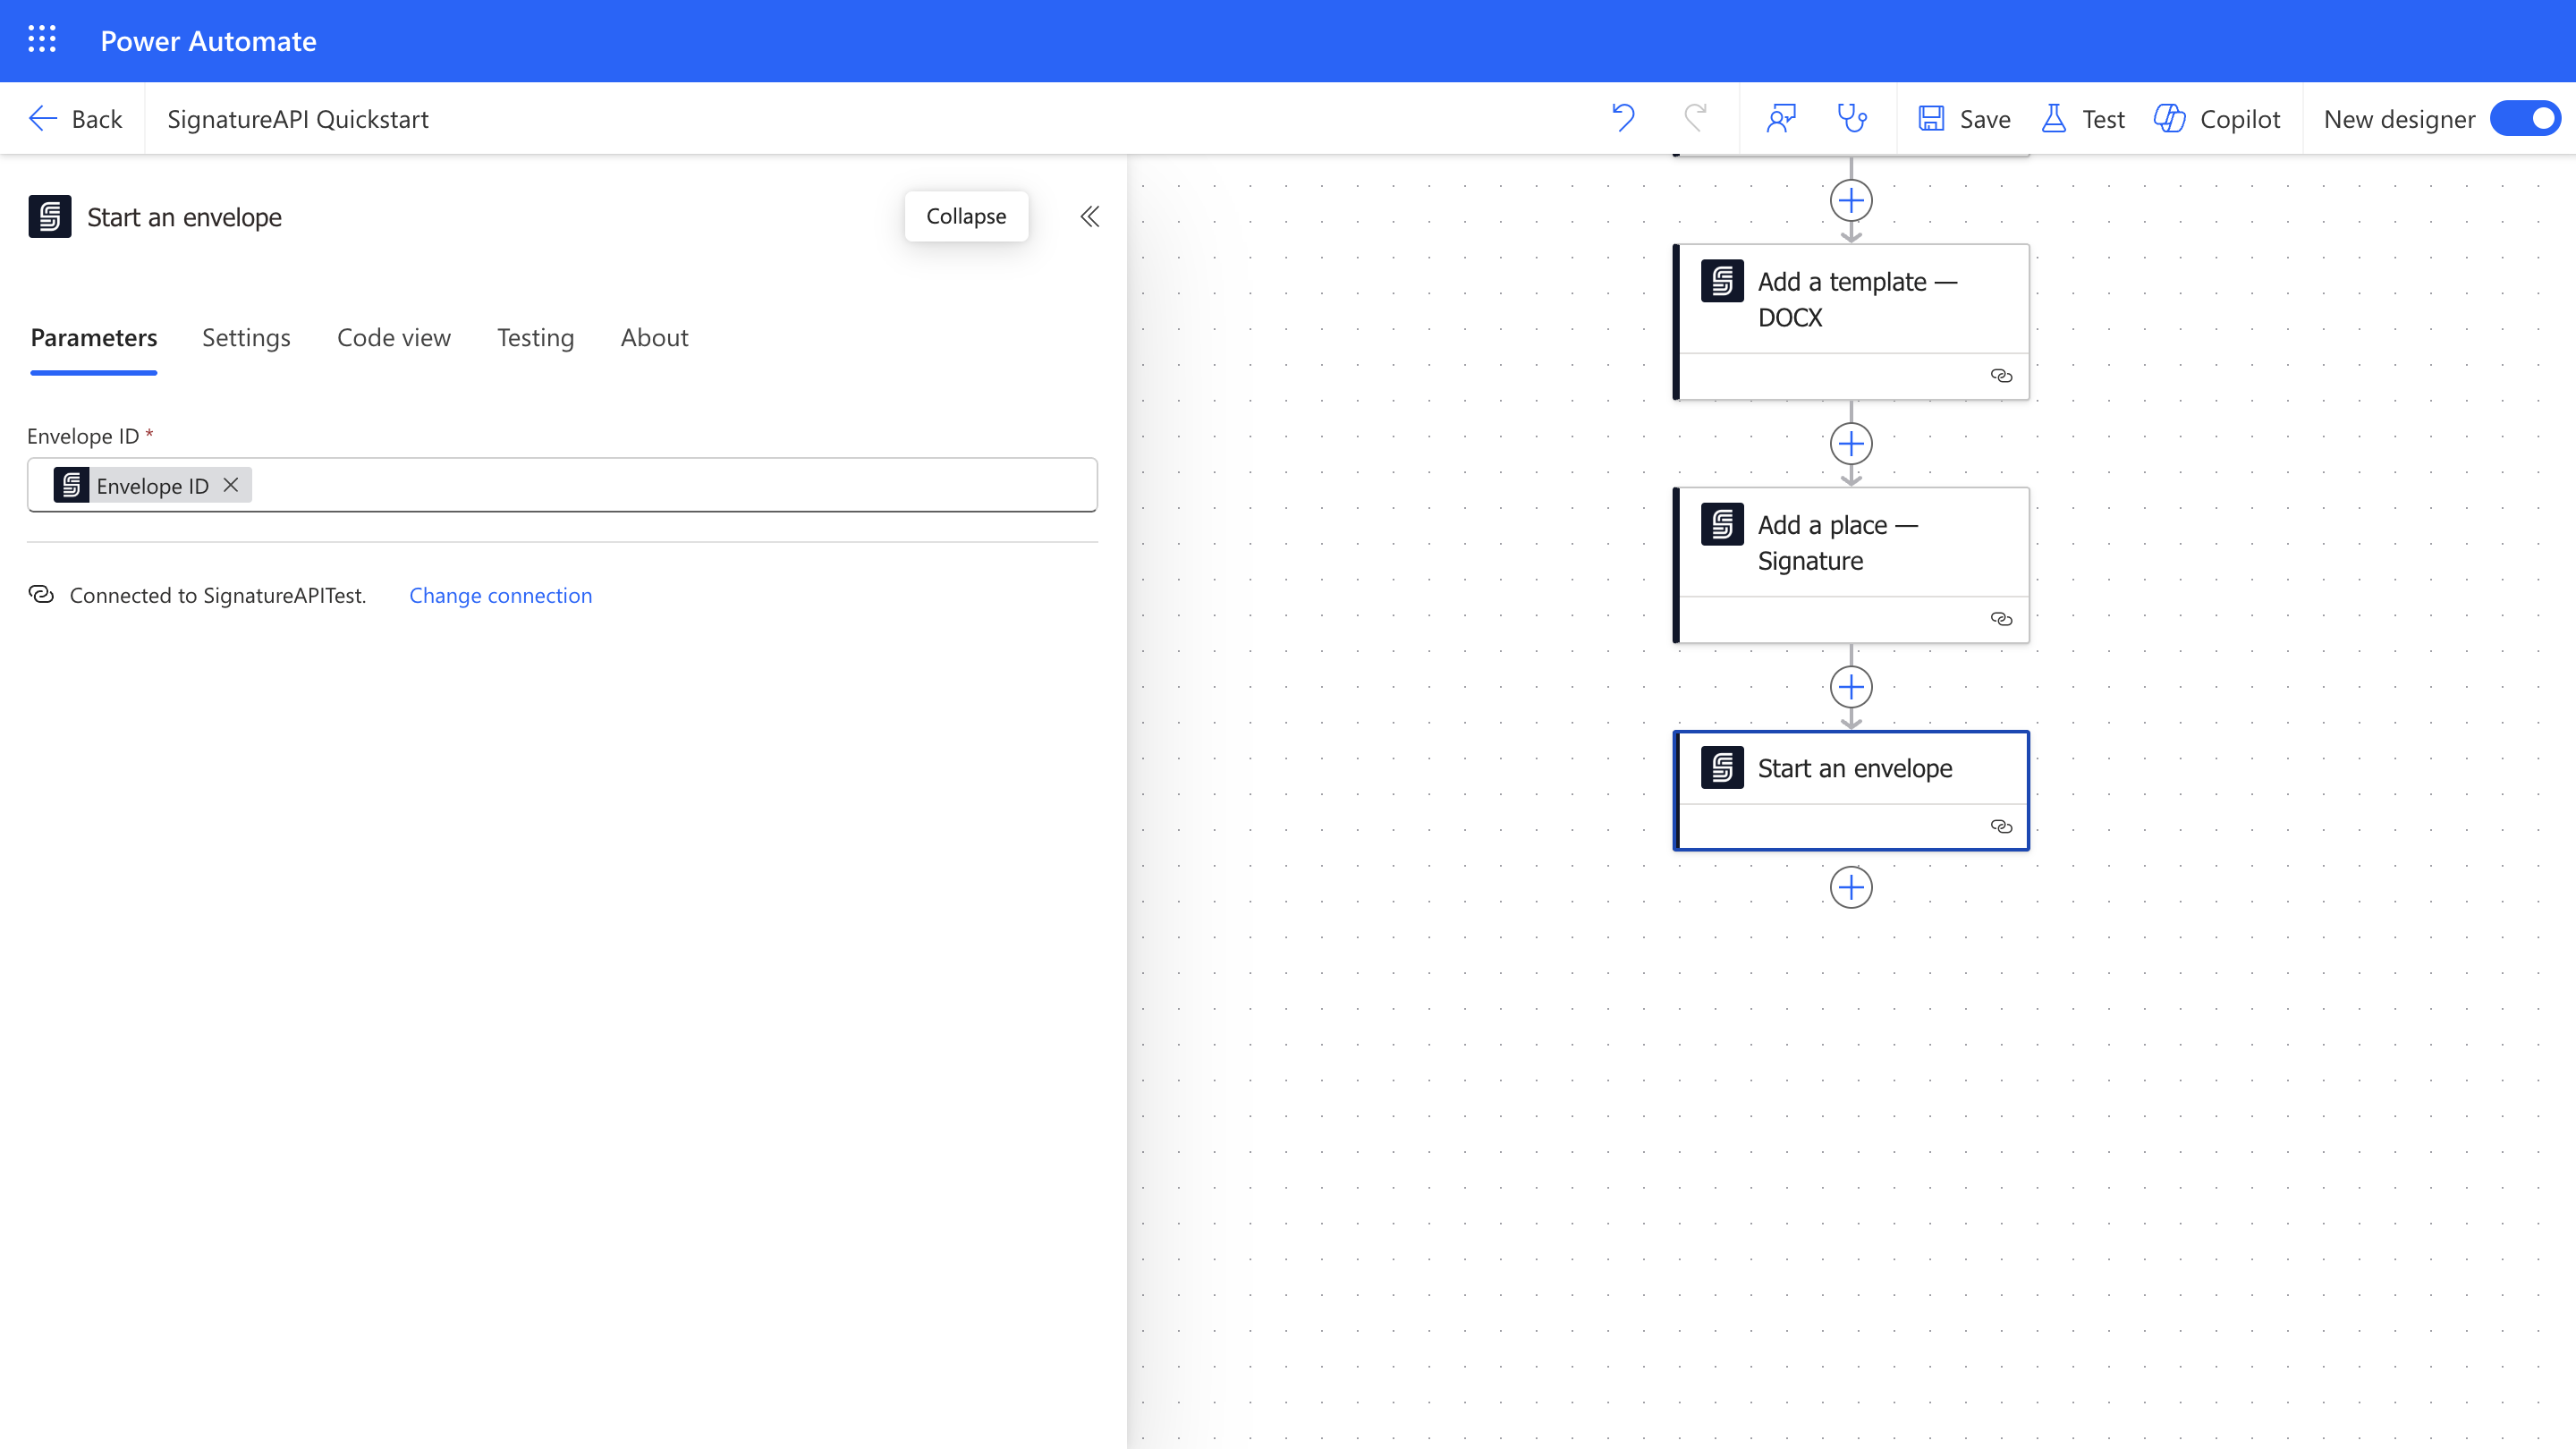
 Configure the **Start an envelope** action:
* **Envelope ID**: Select the **Envelope ID** output from the **Create an envelope** action.
Configure the **Start an envelope** action:
* **Envelope ID**: Select the **Envelope ID** output from the **Create an envelope** action.
 ### Wait for the Envelope to Complete
After starting the envelope, we need to wait until all recipients have signed and the signed document is ready.
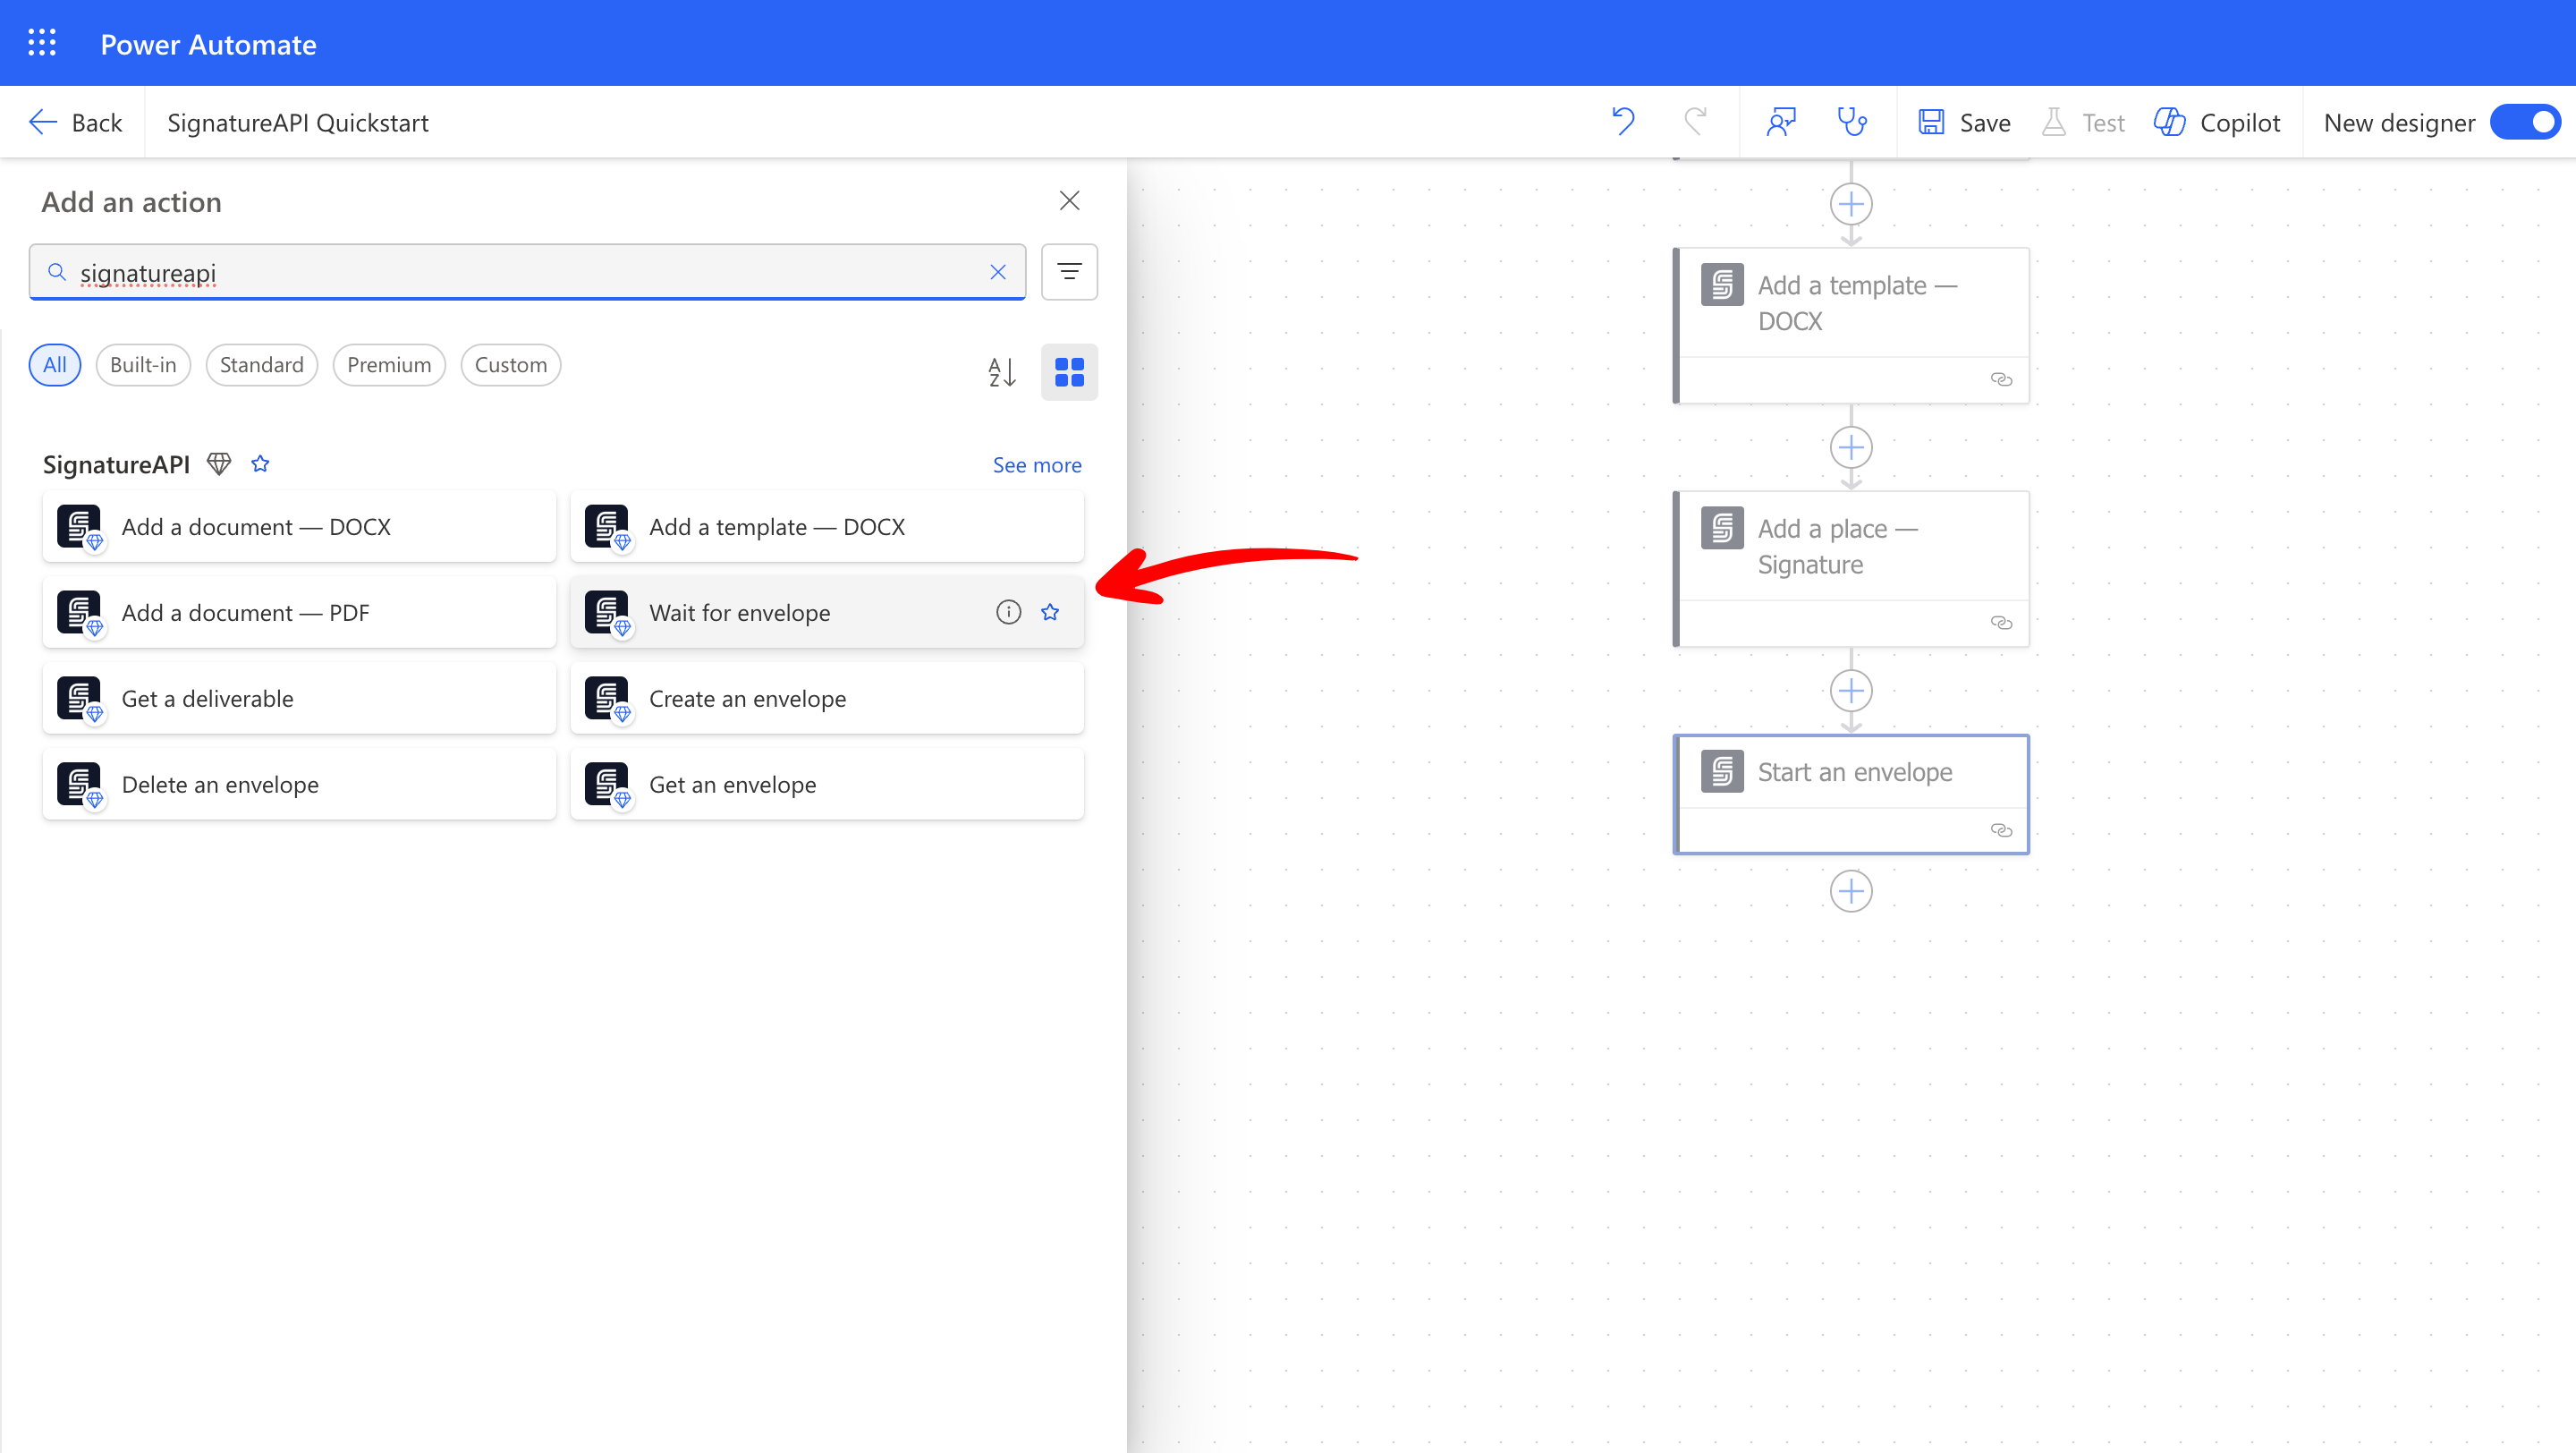
* Add the **Wait for envelope** action from SignatureAPI to your flow. This action pauses the flow for up to 30 days until the process is complete.
### Wait for the Envelope to Complete
After starting the envelope, we need to wait until all recipients have signed and the signed document is ready.
* Add the **Wait for envelope** action from SignatureAPI to your flow. This action pauses the flow for up to 30 days until the process is complete.
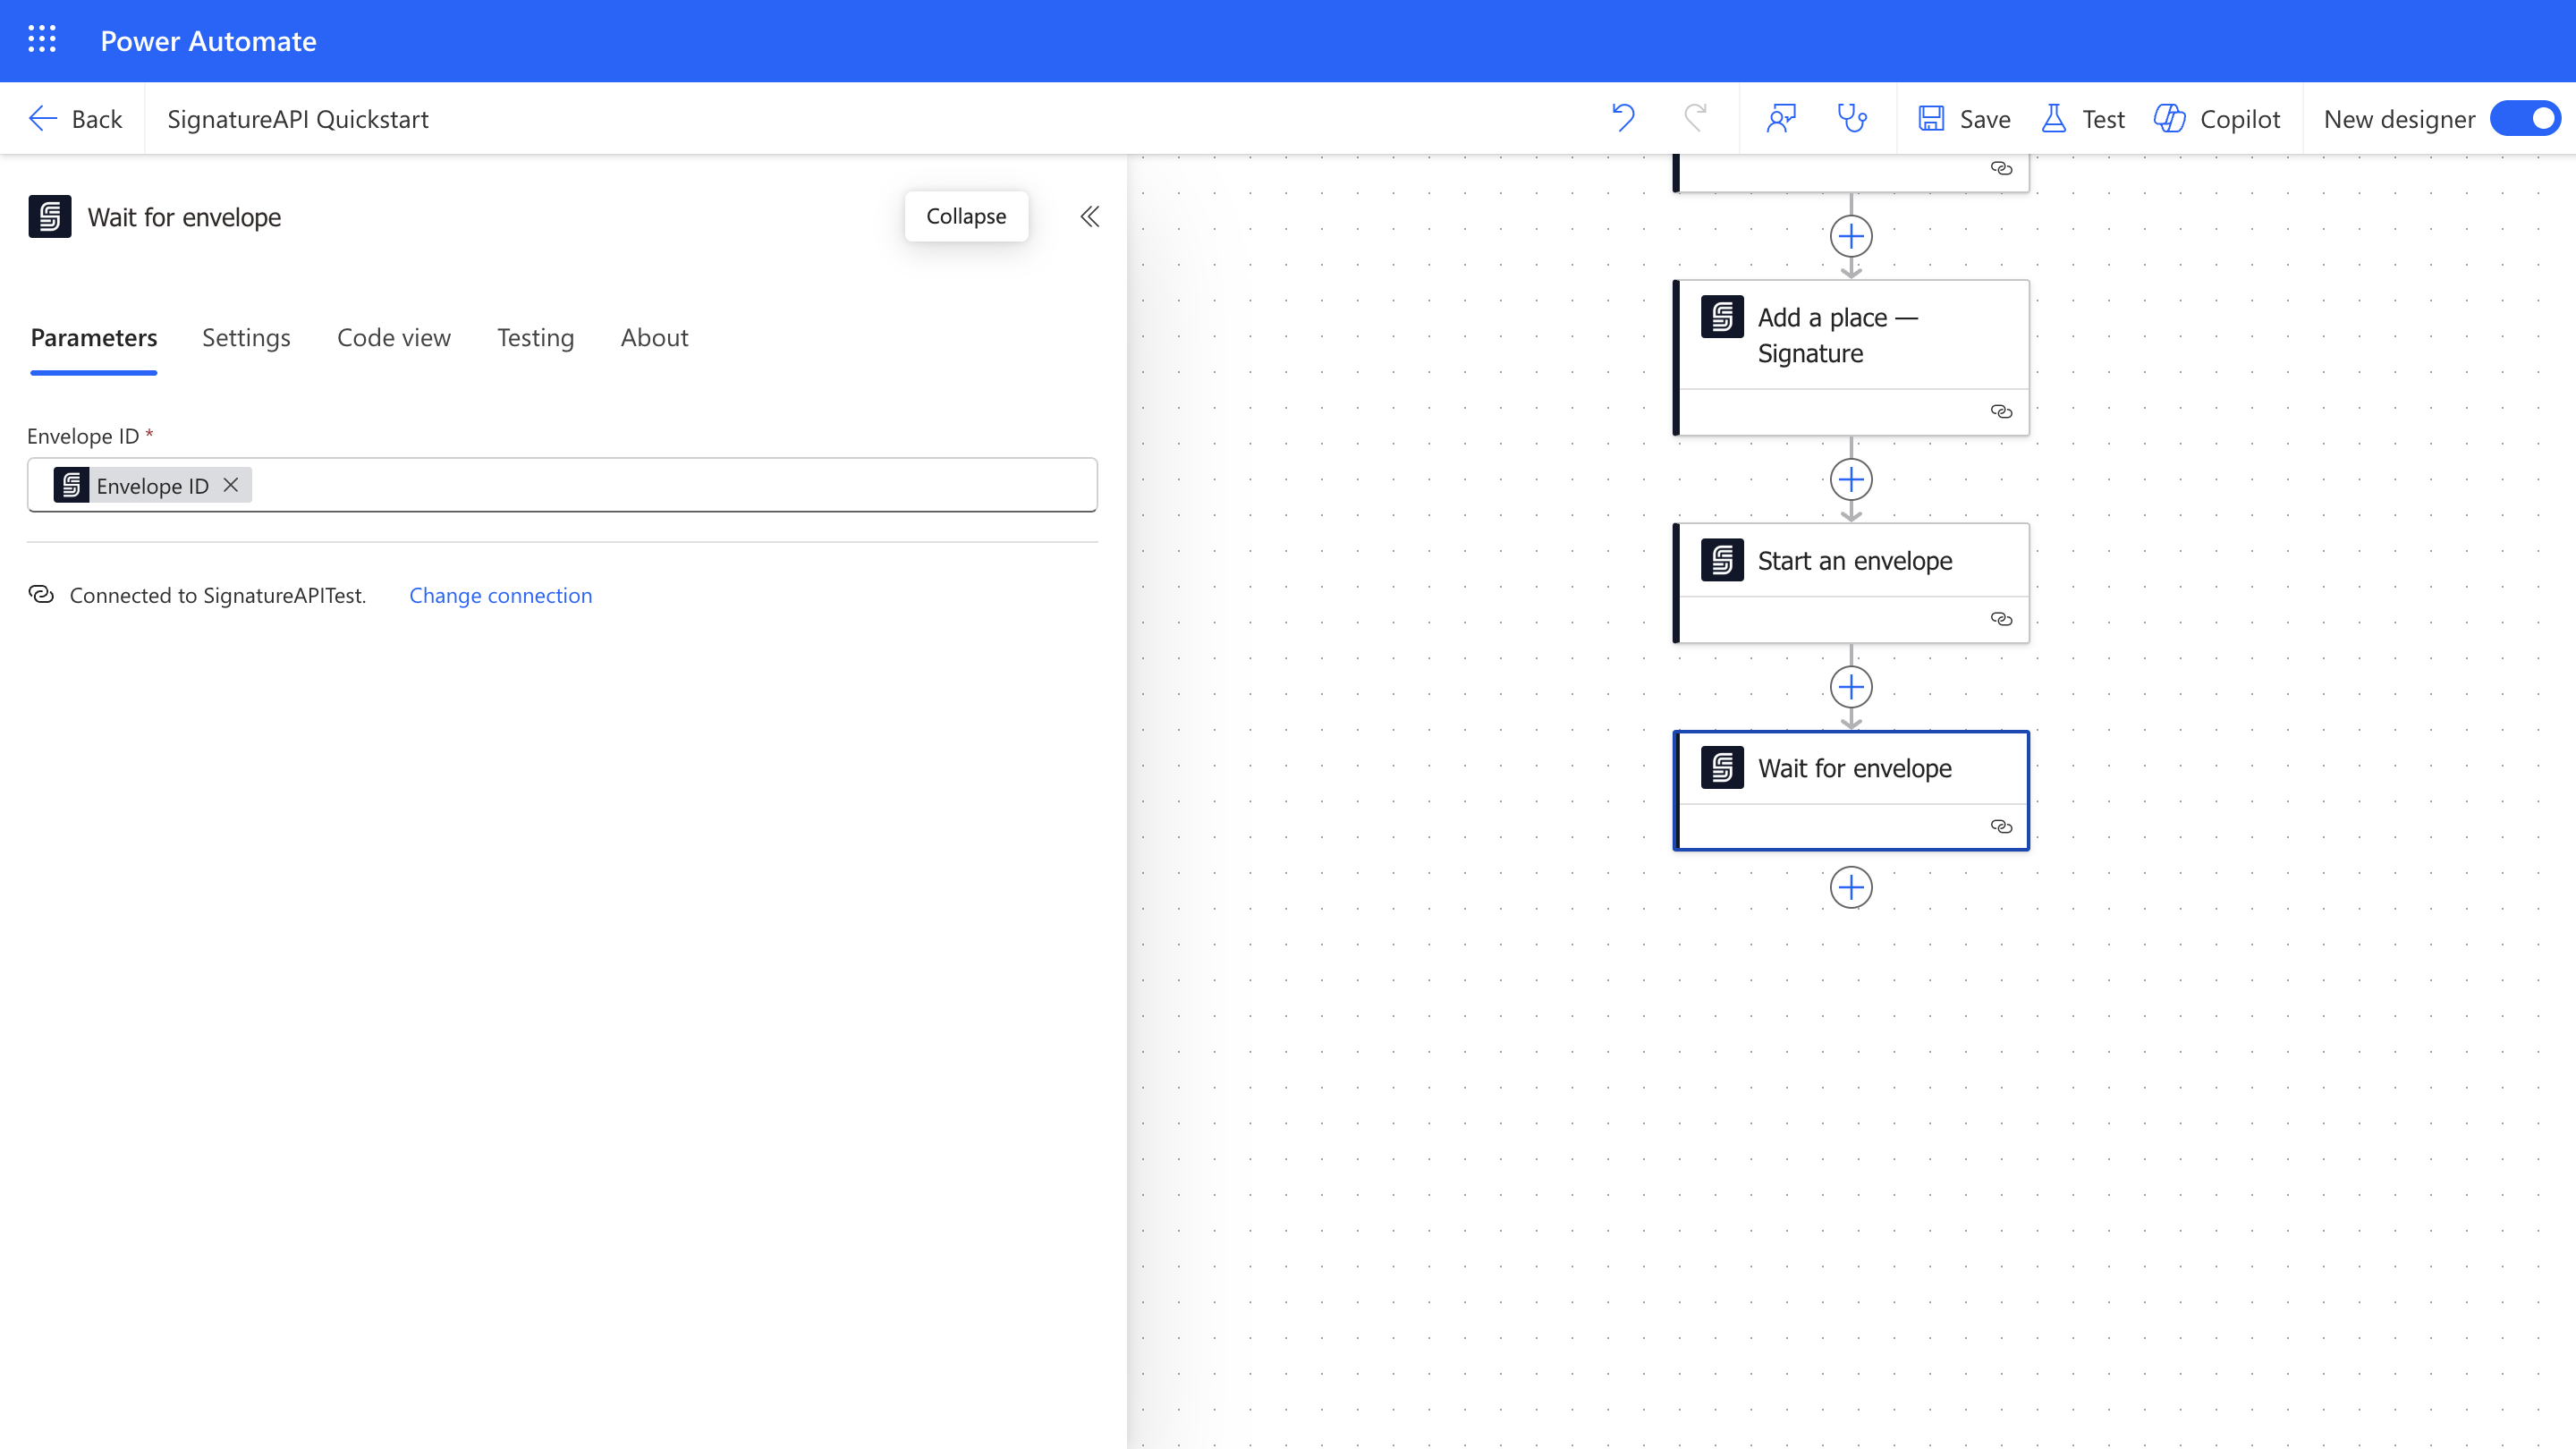
 Configure the **Wait for envelope** action:
* **Envelope ID**: Select the **Envelope ID** output from the **Create an envelope** action.
Configure the **Wait for envelope** action:
* **Envelope ID**: Select the **Envelope ID** output from the **Create an envelope** action.
 ### Retrieve the Deliverable
Once the envelope is complete and the deliverable is generated, we'll retrieve it. The deliverable is a tamper-proof document that includes the signed document and the audit log.
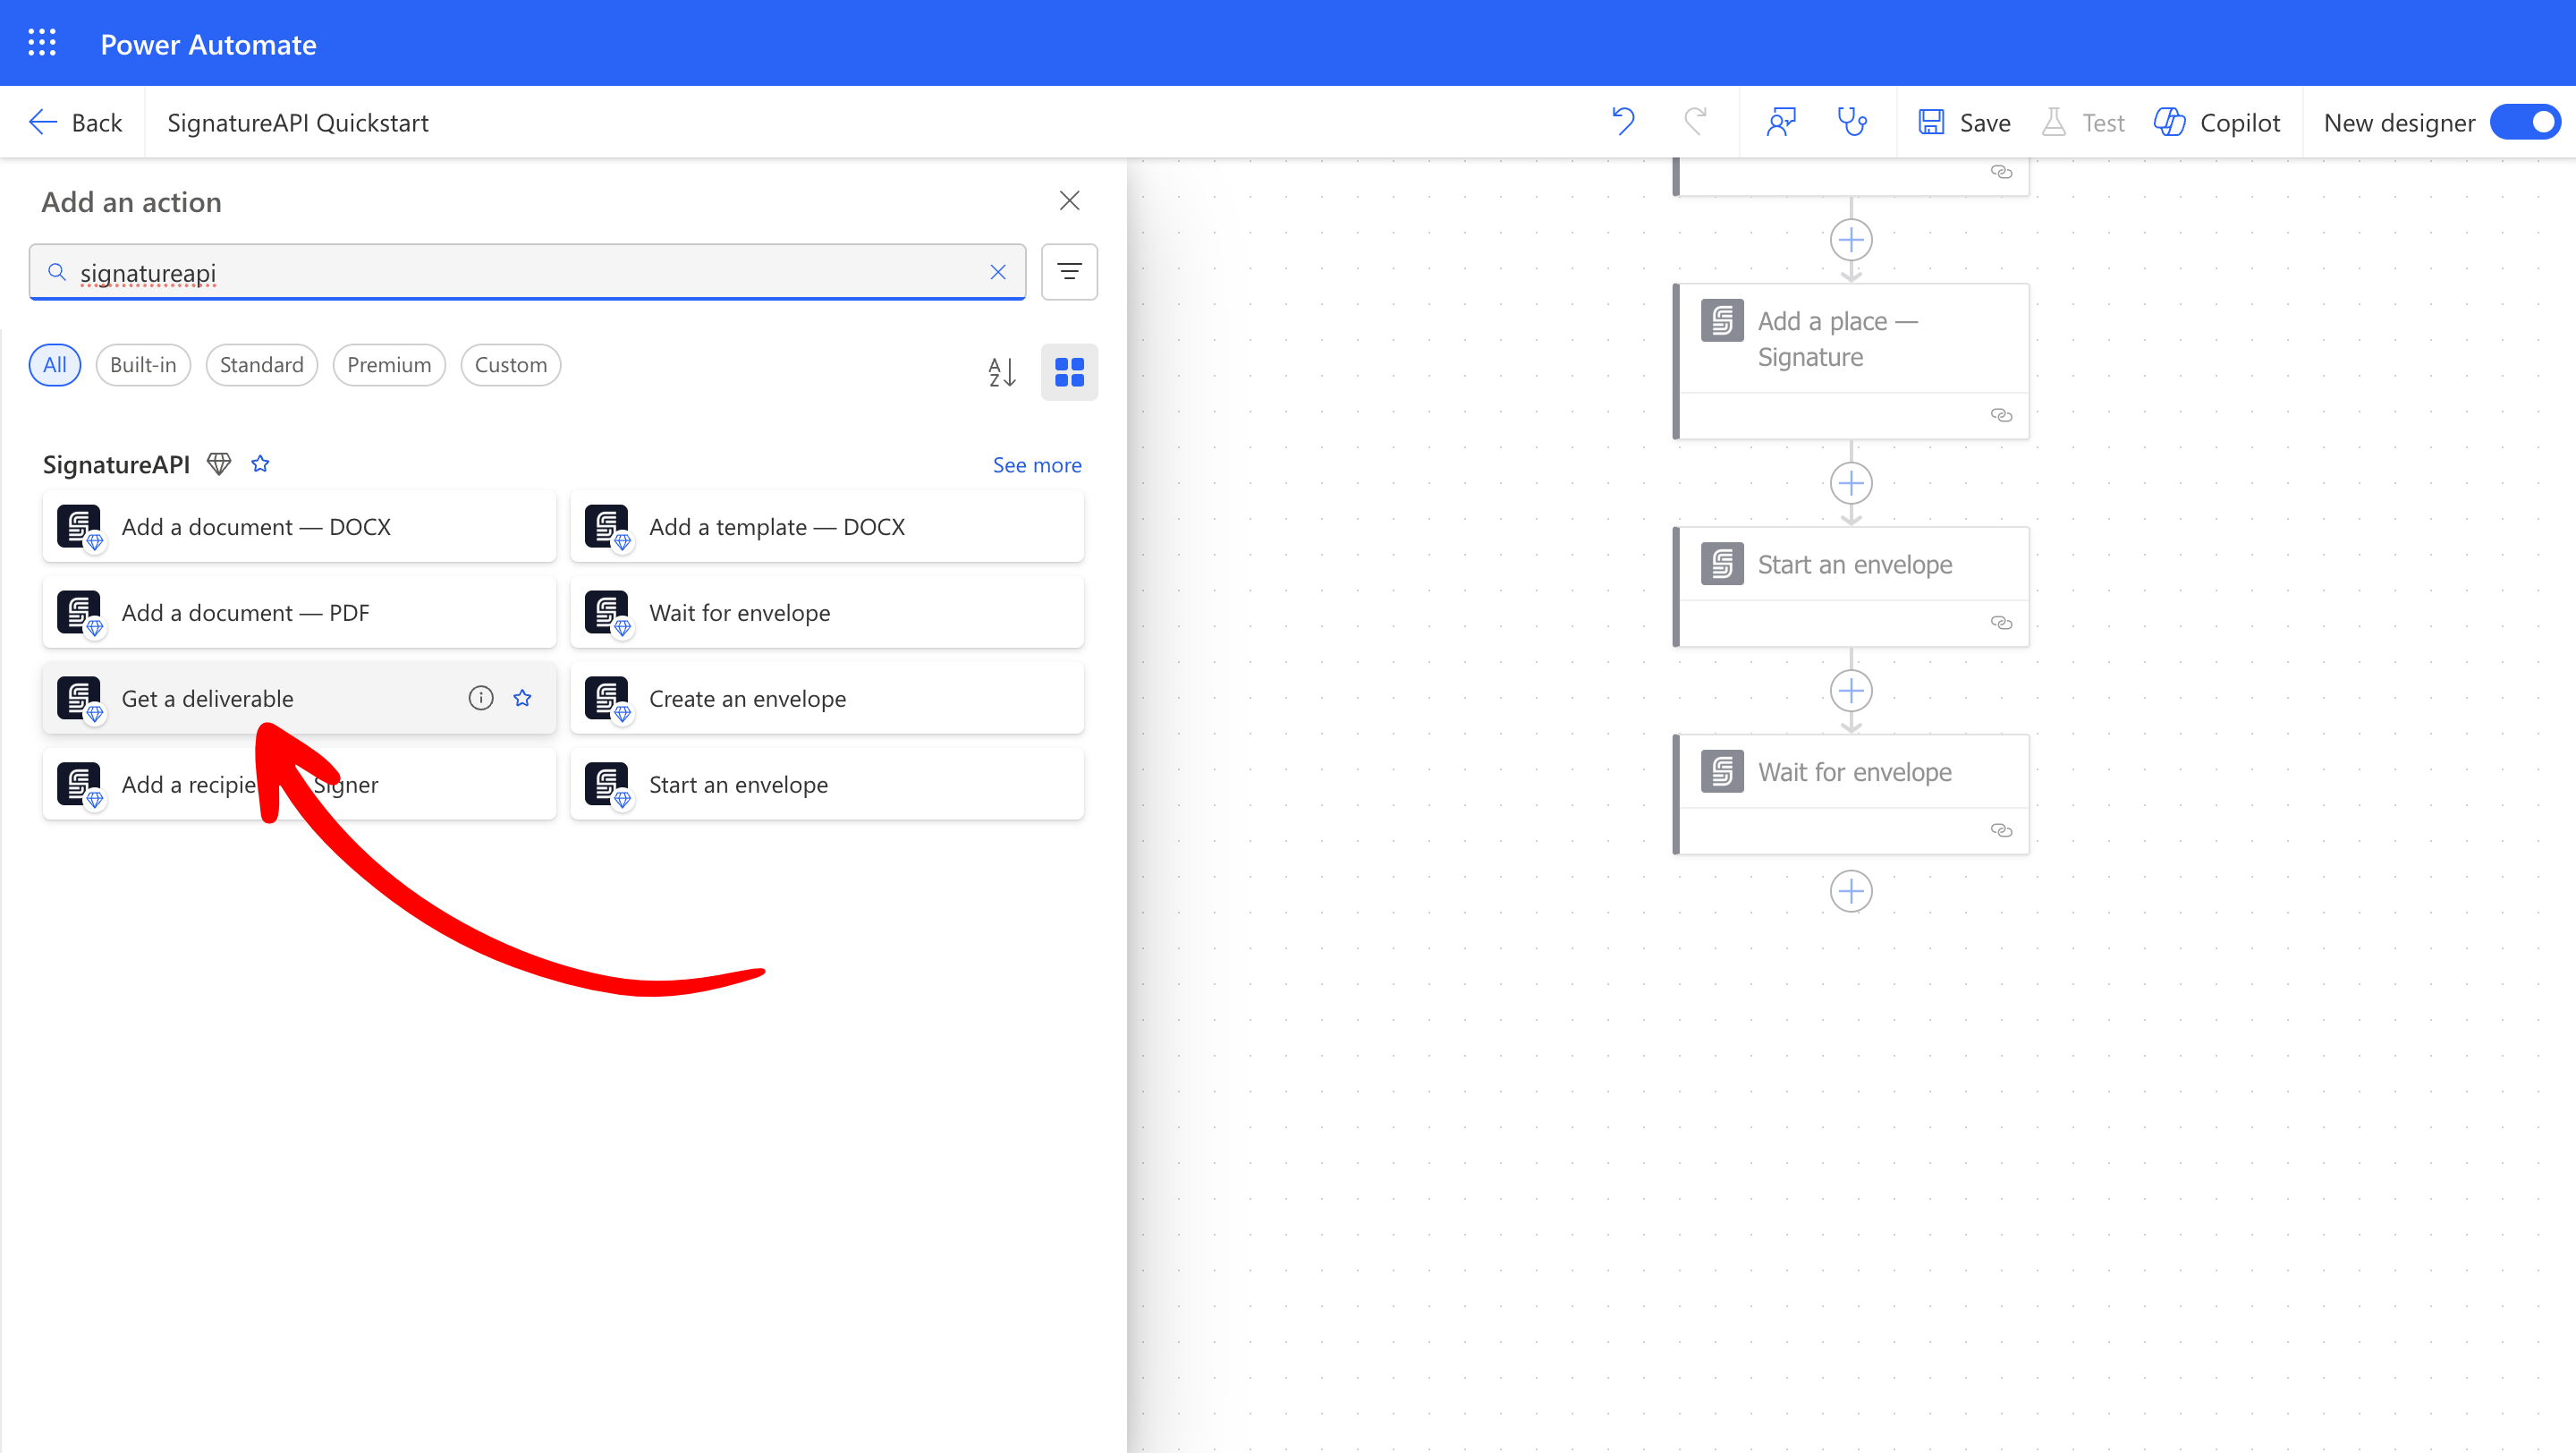
* Add the **Get a deliverable** action from SignatureAPI to your flow.
### Retrieve the Deliverable
Once the envelope is complete and the deliverable is generated, we'll retrieve it. The deliverable is a tamper-proof document that includes the signed document and the audit log.
* Add the **Get a deliverable** action from SignatureAPI to your flow.
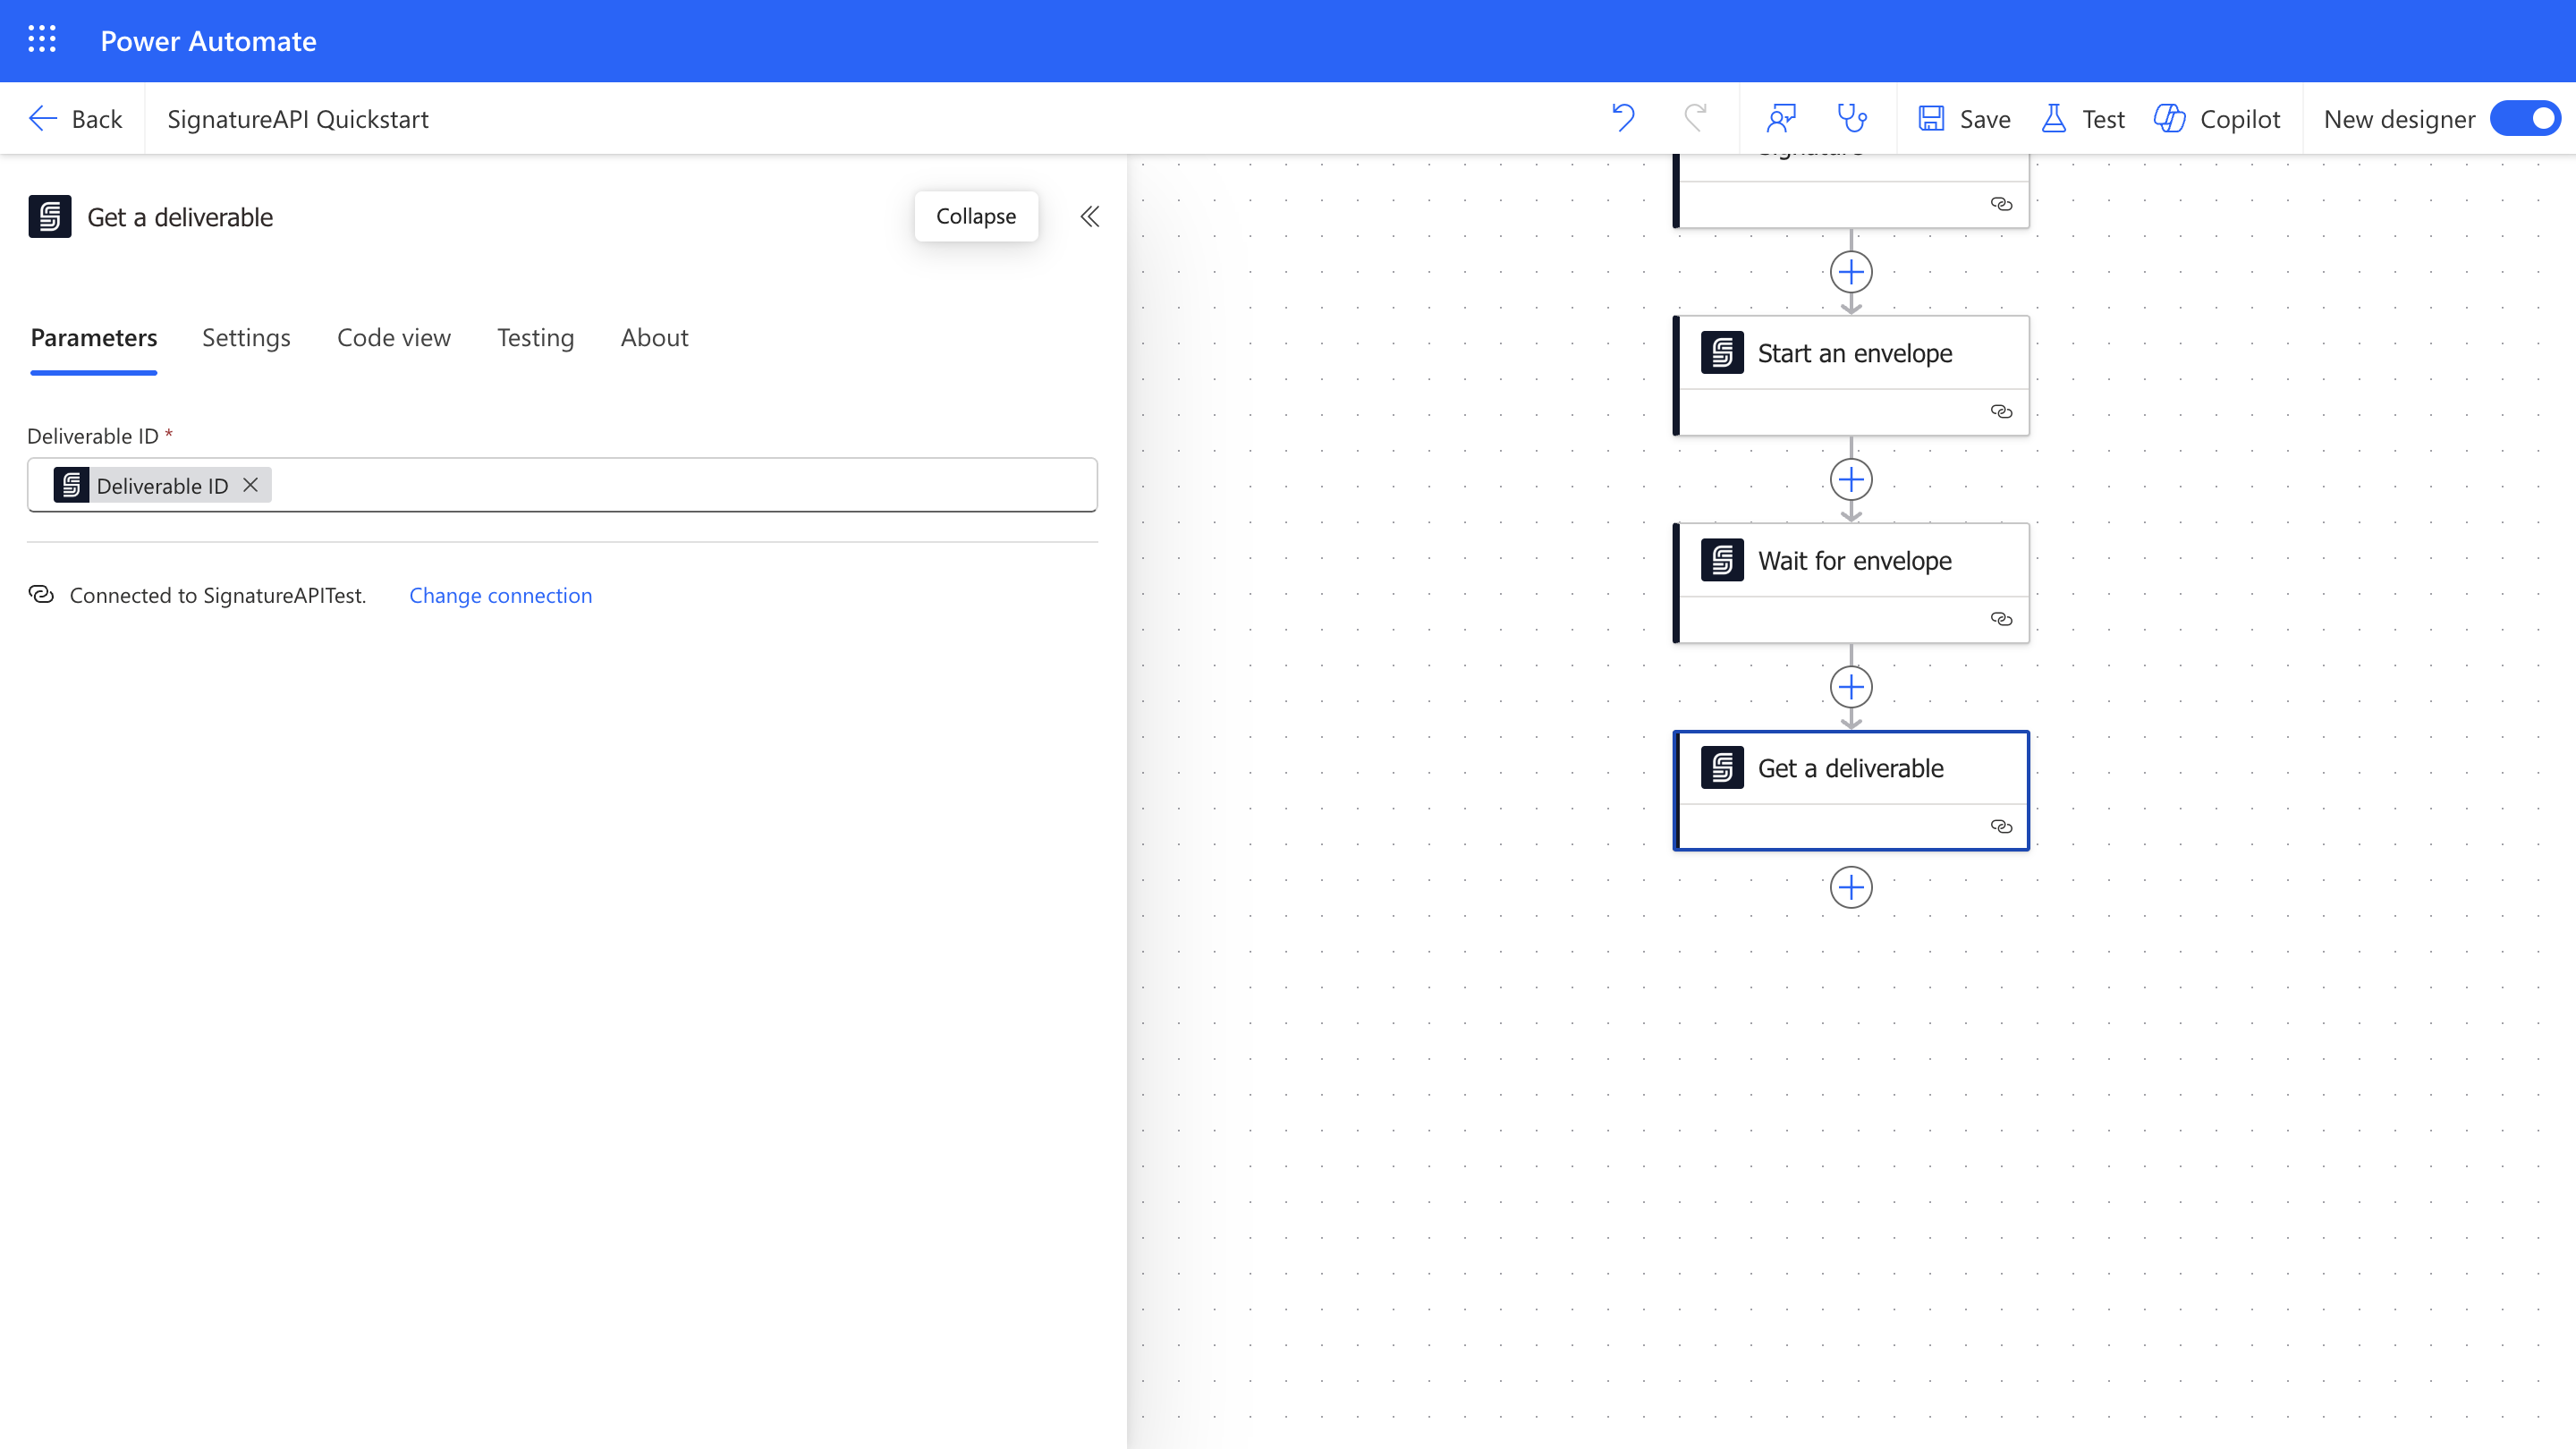
 Configure the **Get a deliverable** action:
* **Deliverable ID**: Select the **Deliverable ID** output from the **Wait for envelope** action.
> **Important:** Use the **Deliverable ID** from the **Wait for envelope** action, not from the **Create an envelope** action, because the latter does not contain the completed deliverable.
Configure the **Get a deliverable** action:
* **Deliverable ID**: Select the **Deliverable ID** output from the **Wait for envelope** action.
> **Important:** Use the **Deliverable ID** from the **Wait for envelope** action, not from the **Create an envelope** action, because the latter does not contain the completed deliverable.
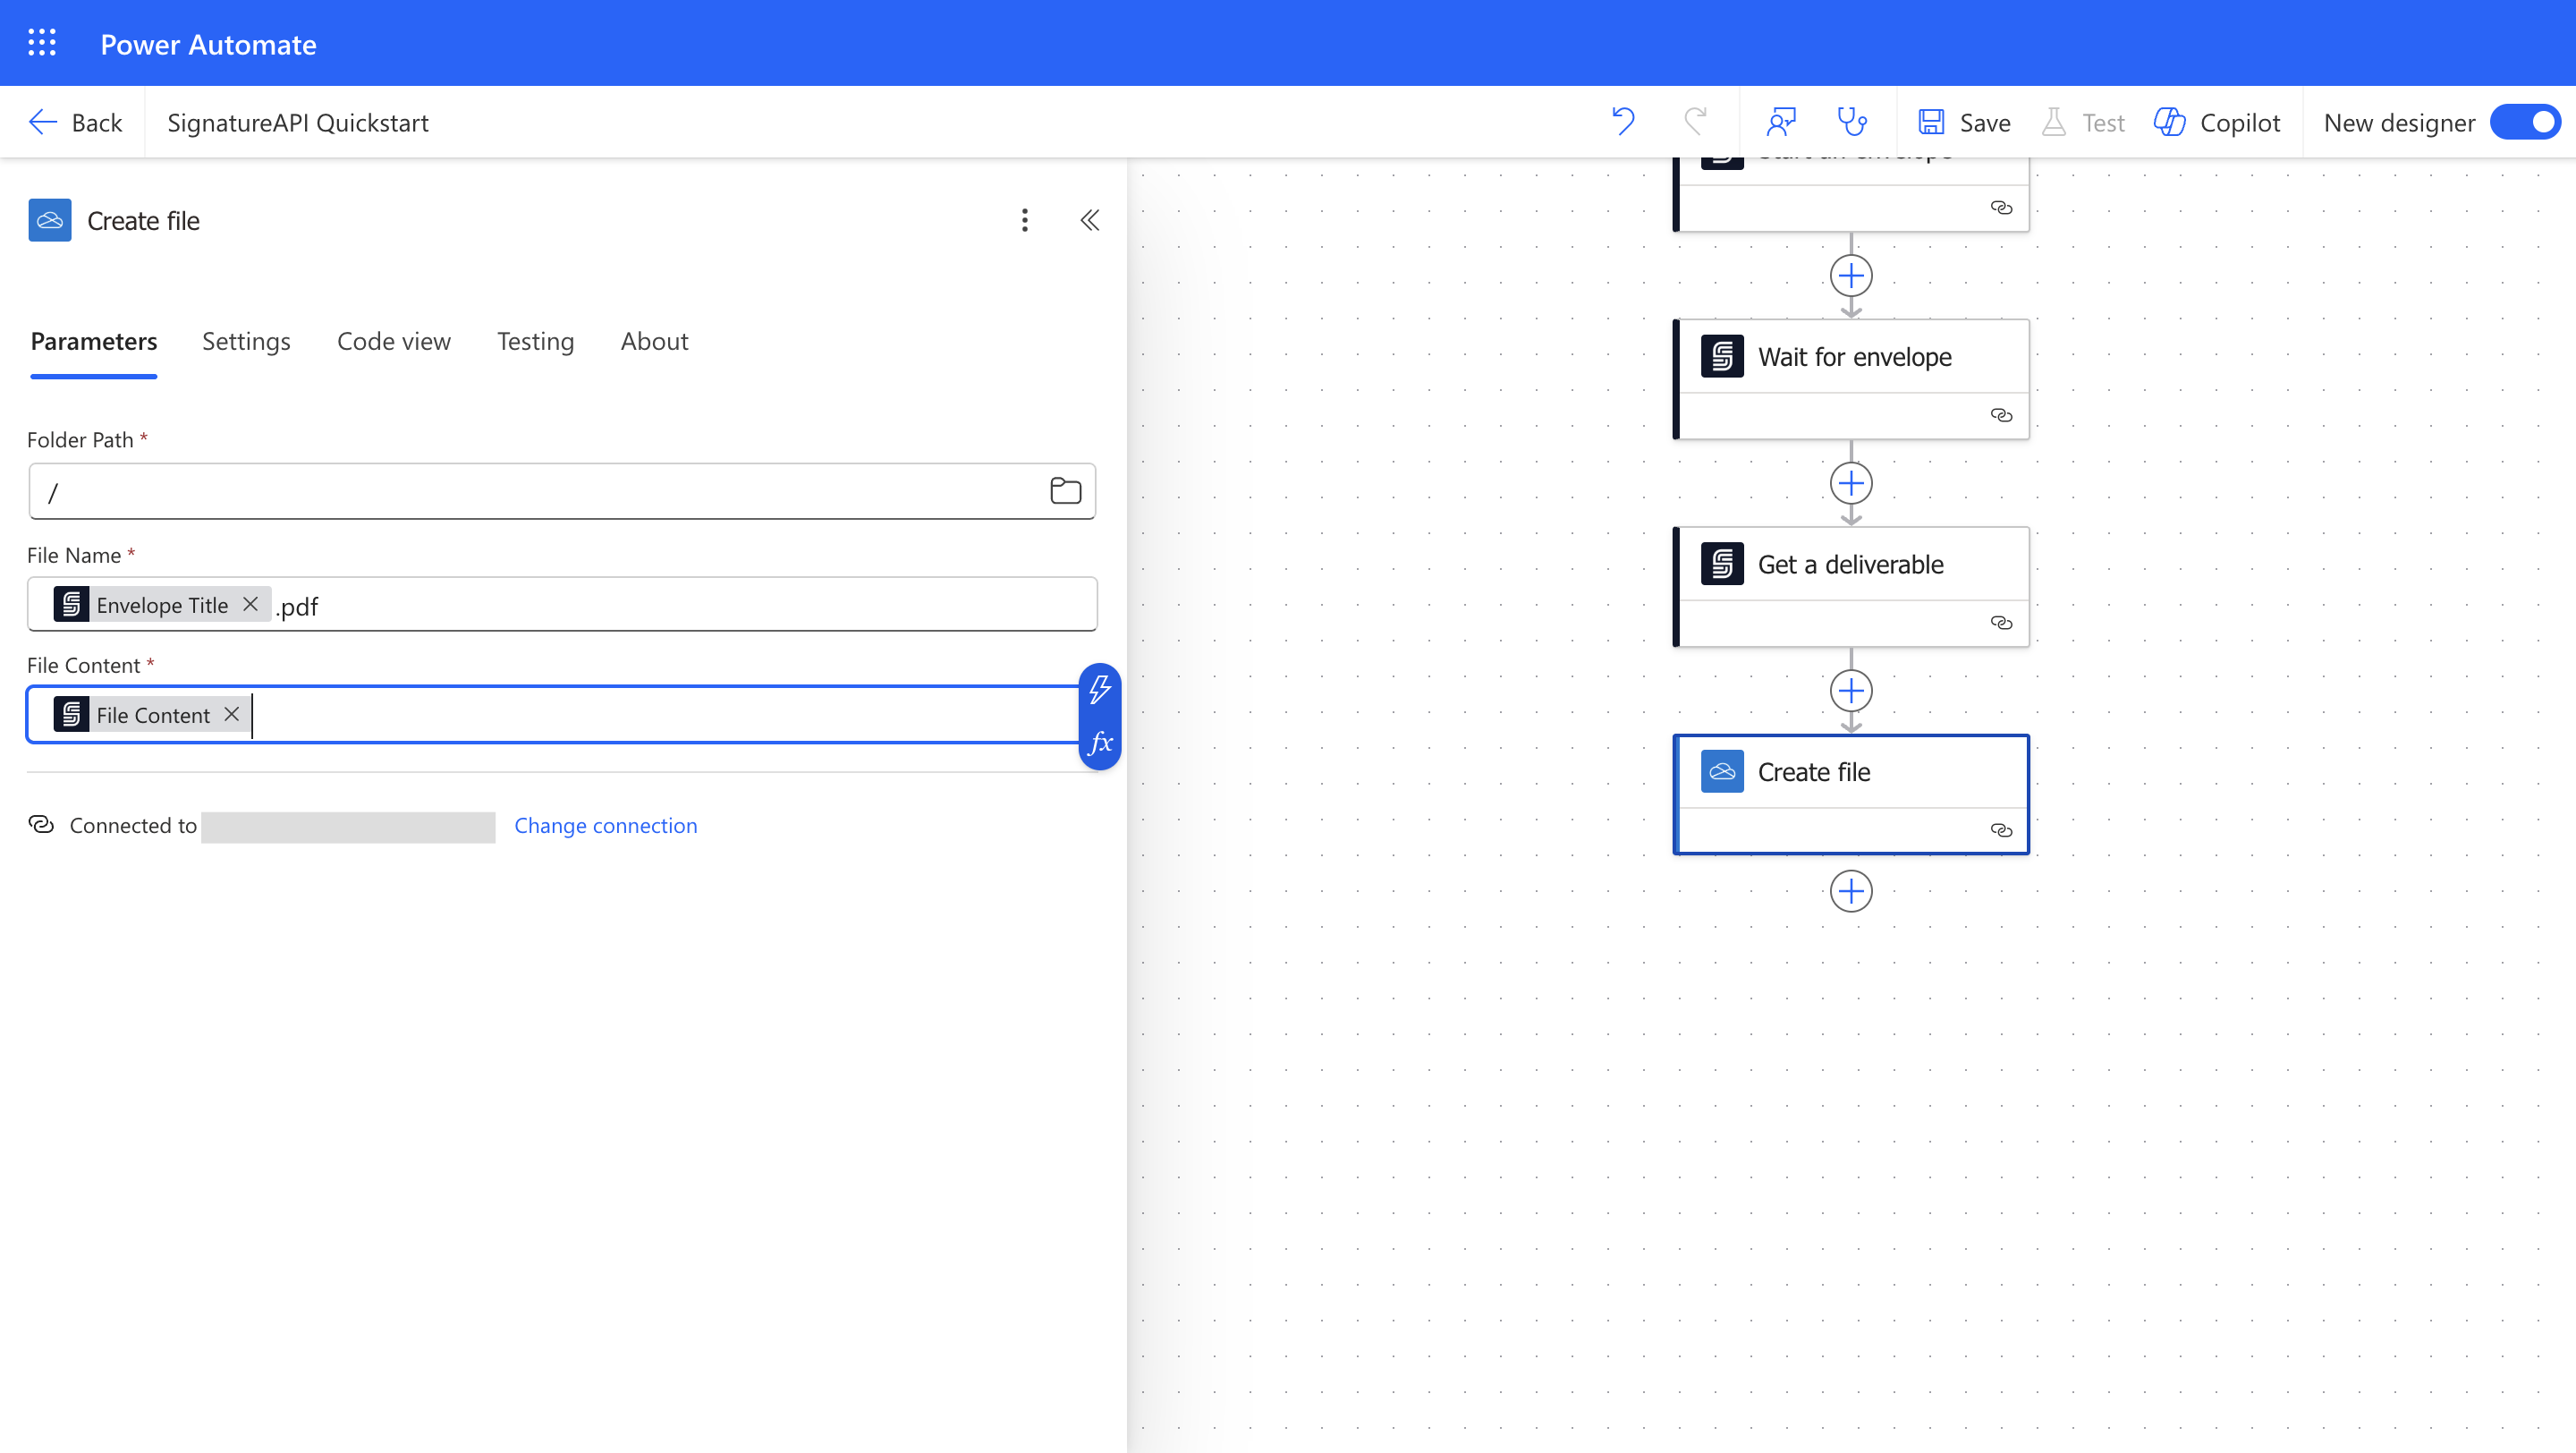
 The **Get a deliverable** action outputs a **File Content** property containing the PDF file of the deliverable. You can use this **File Content** in any Power Automate action that accepts files, such as OneDrive's **Create file** action.
 ## Running the Flow
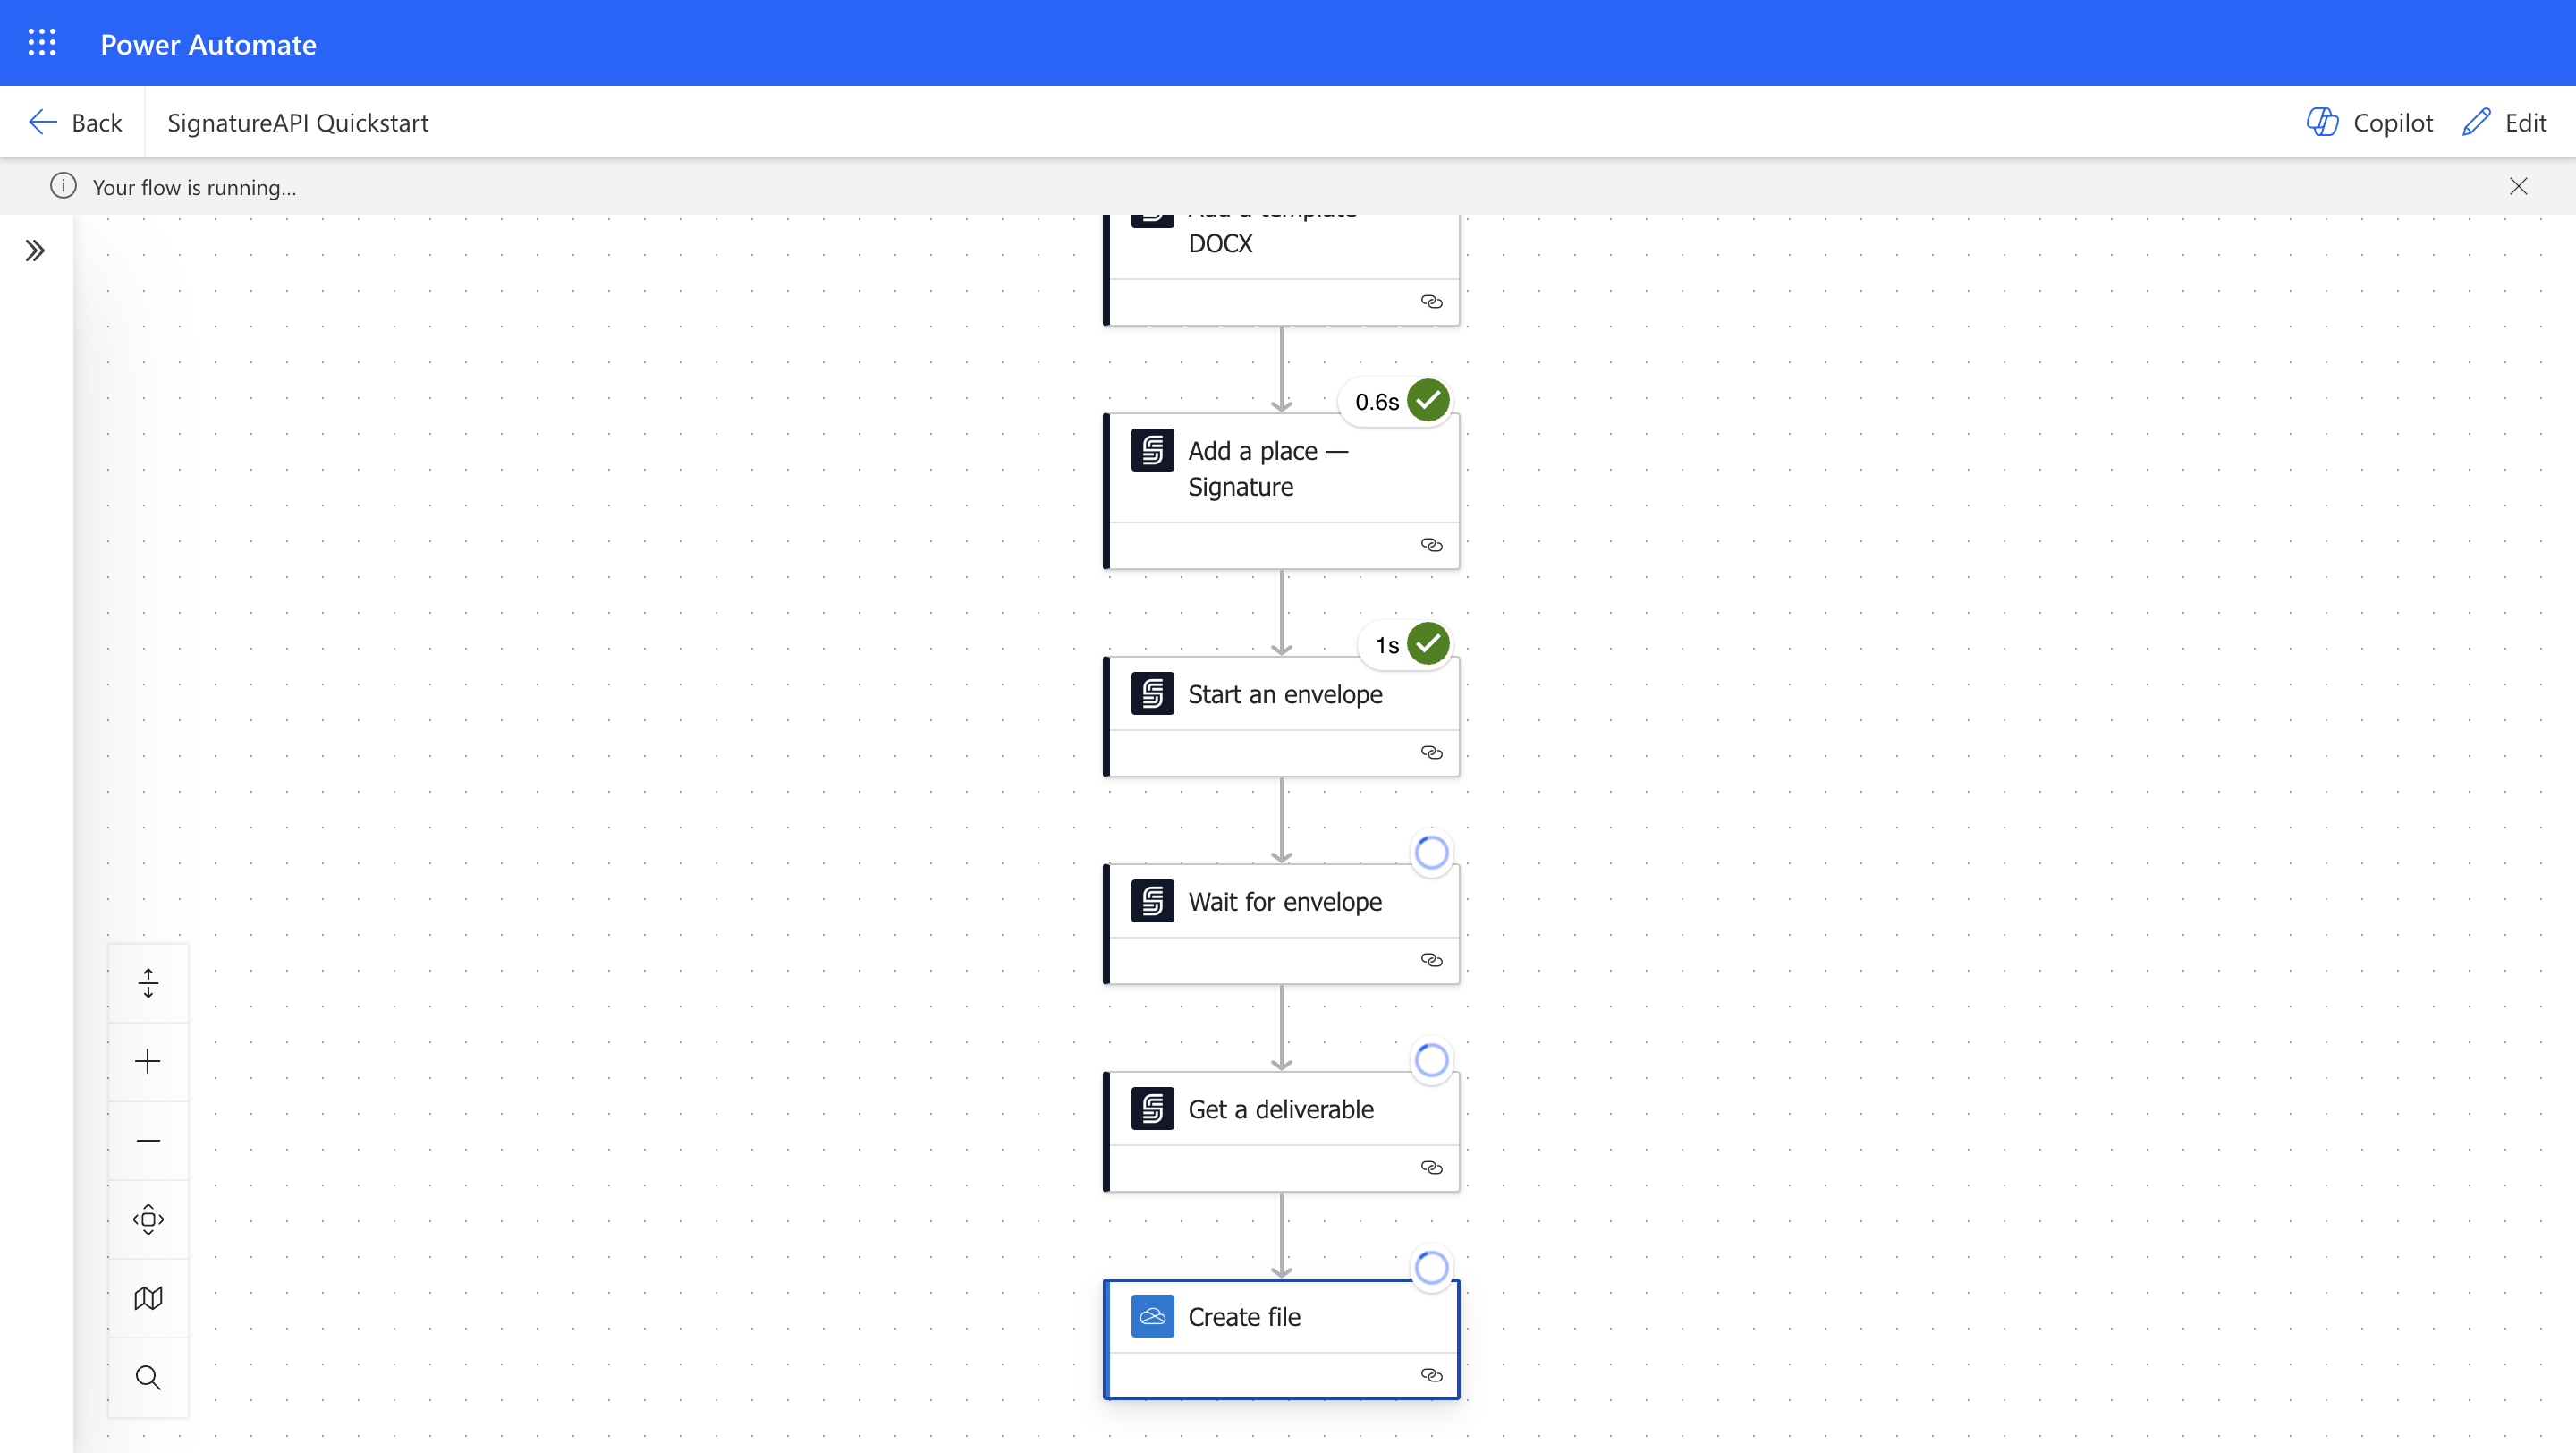
In Power Automate, click on **Test** to run your flow. The flow will start running. If everything is set up correctly, you should see green checkmarks on all steps up to **Start an envelope**. The **Wait for envelope** action will be in a waiting state until the envelope is completed and the deliverable is generated.
## Running the Flow
In Power Automate, click on **Test** to run your flow. The flow will start running. If everything is set up correctly, you should see green checkmarks on all steps up to **Start an envelope**. The **Wait for envelope** action will be in a waiting state until the envelope is completed and the deliverable is generated.
 ### Sign the Envelope
The envelope has been sent to the recipient, John Doe, at `john@example.com`.
Since we're using a test API key, real emails are not sent. However, you can preview the email in the SignatureAPI Dashboard.
* Log in to your SignatureAPI Dashboard.
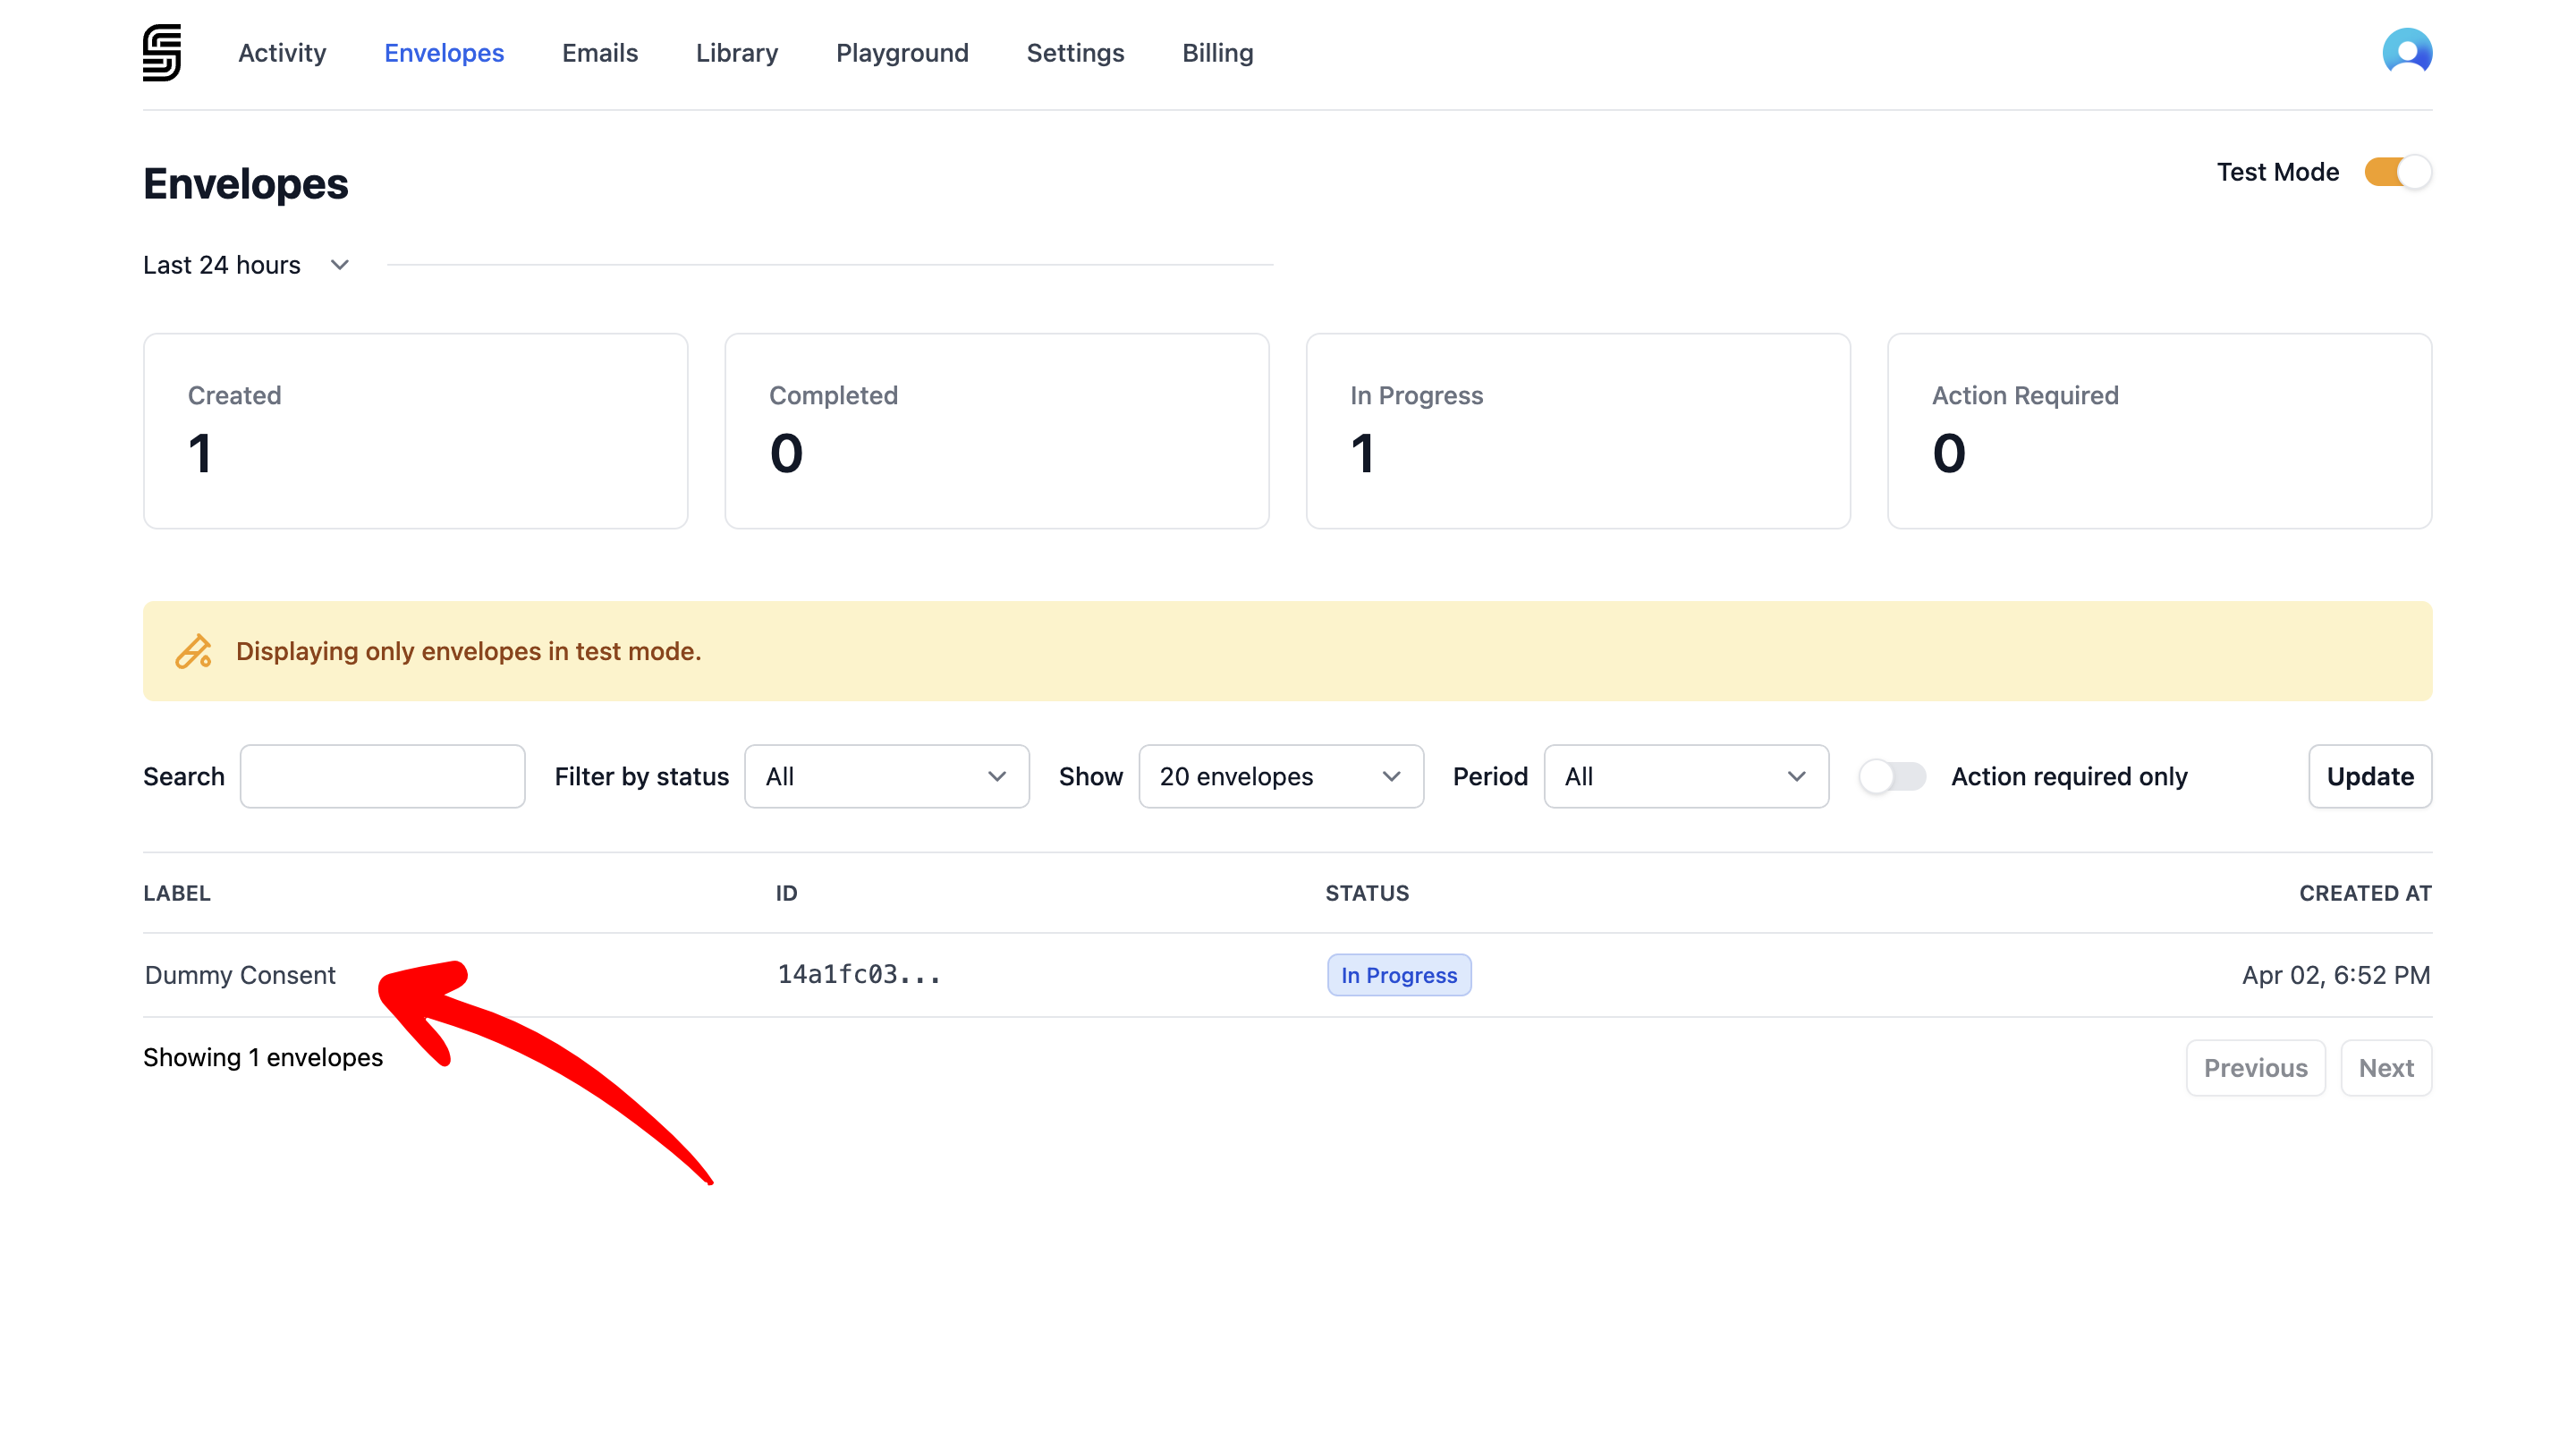
* Navigate to the **Envelopes** list and select your newly created envelope.
### Sign the Envelope
The envelope has been sent to the recipient, John Doe, at `john@example.com`.
Since we're using a test API key, real emails are not sent. However, you can preview the email in the SignatureAPI Dashboard.
* Log in to your SignatureAPI Dashboard.
* Navigate to the **Envelopes** list and select your newly created envelope.
 In the envelope details, scroll down to the **Emails** section and click on the email sent to John Doe.
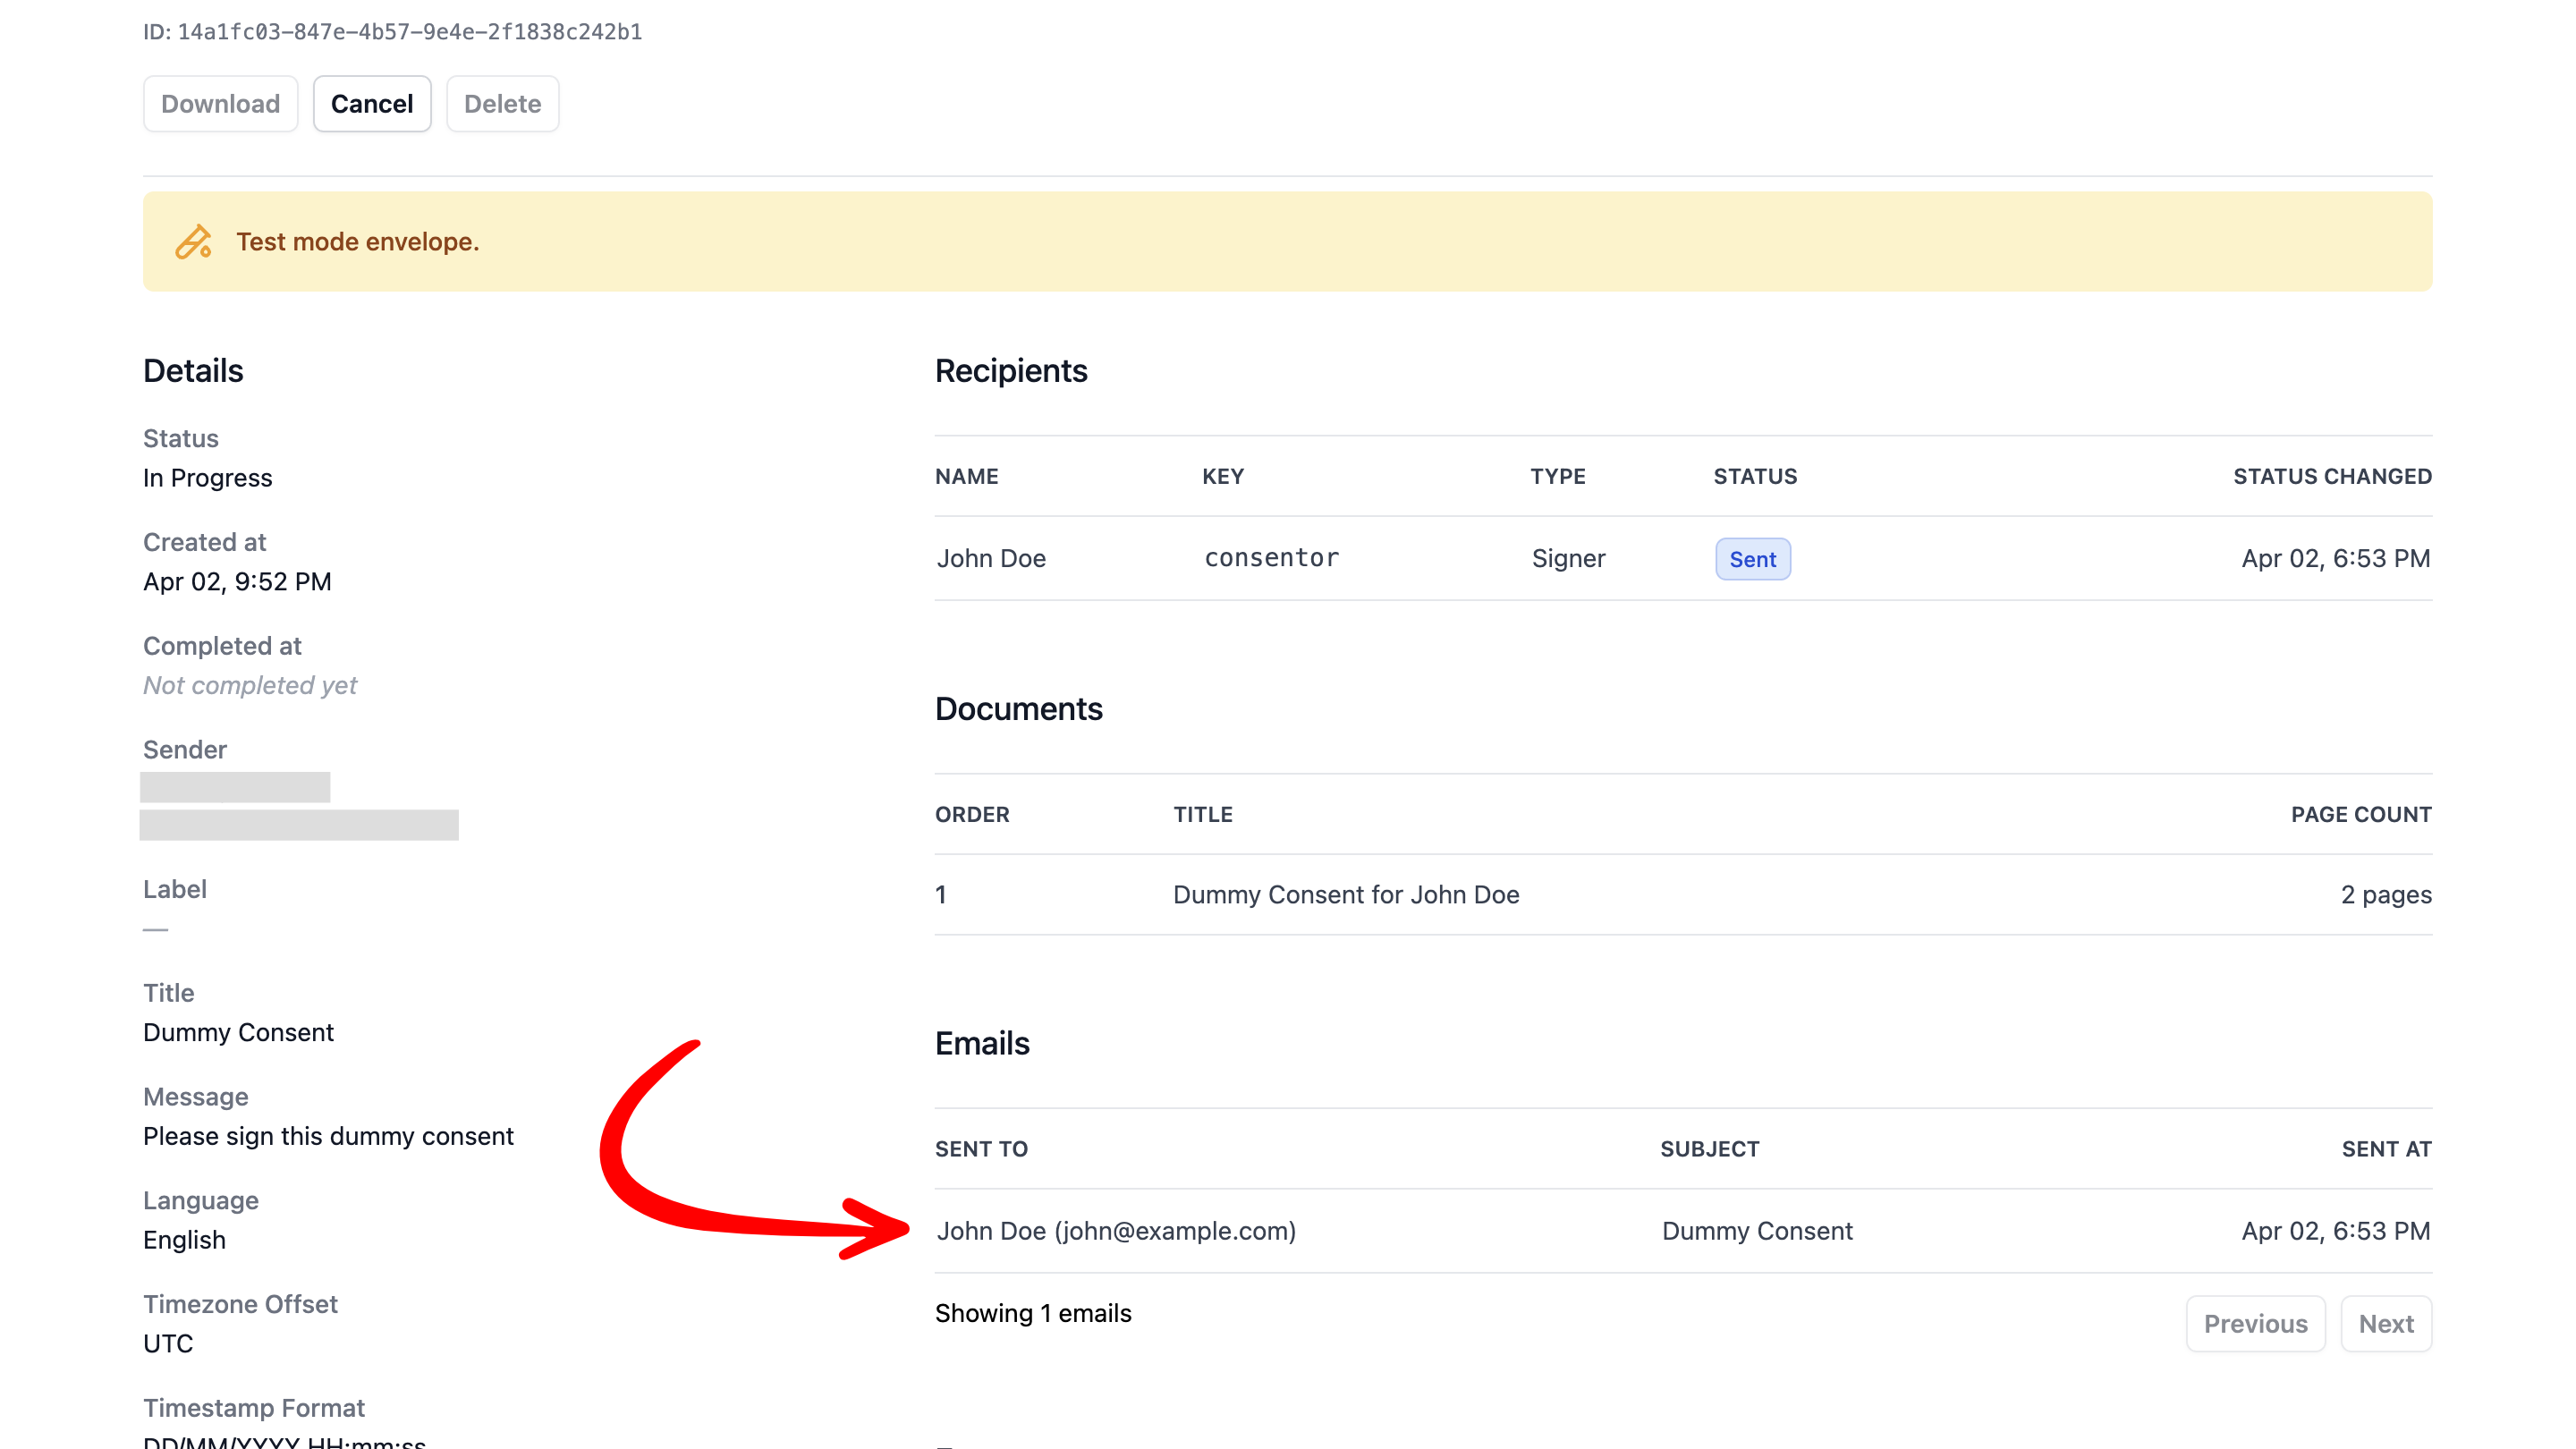 You can preview the email to see how it would appear to the recipient.
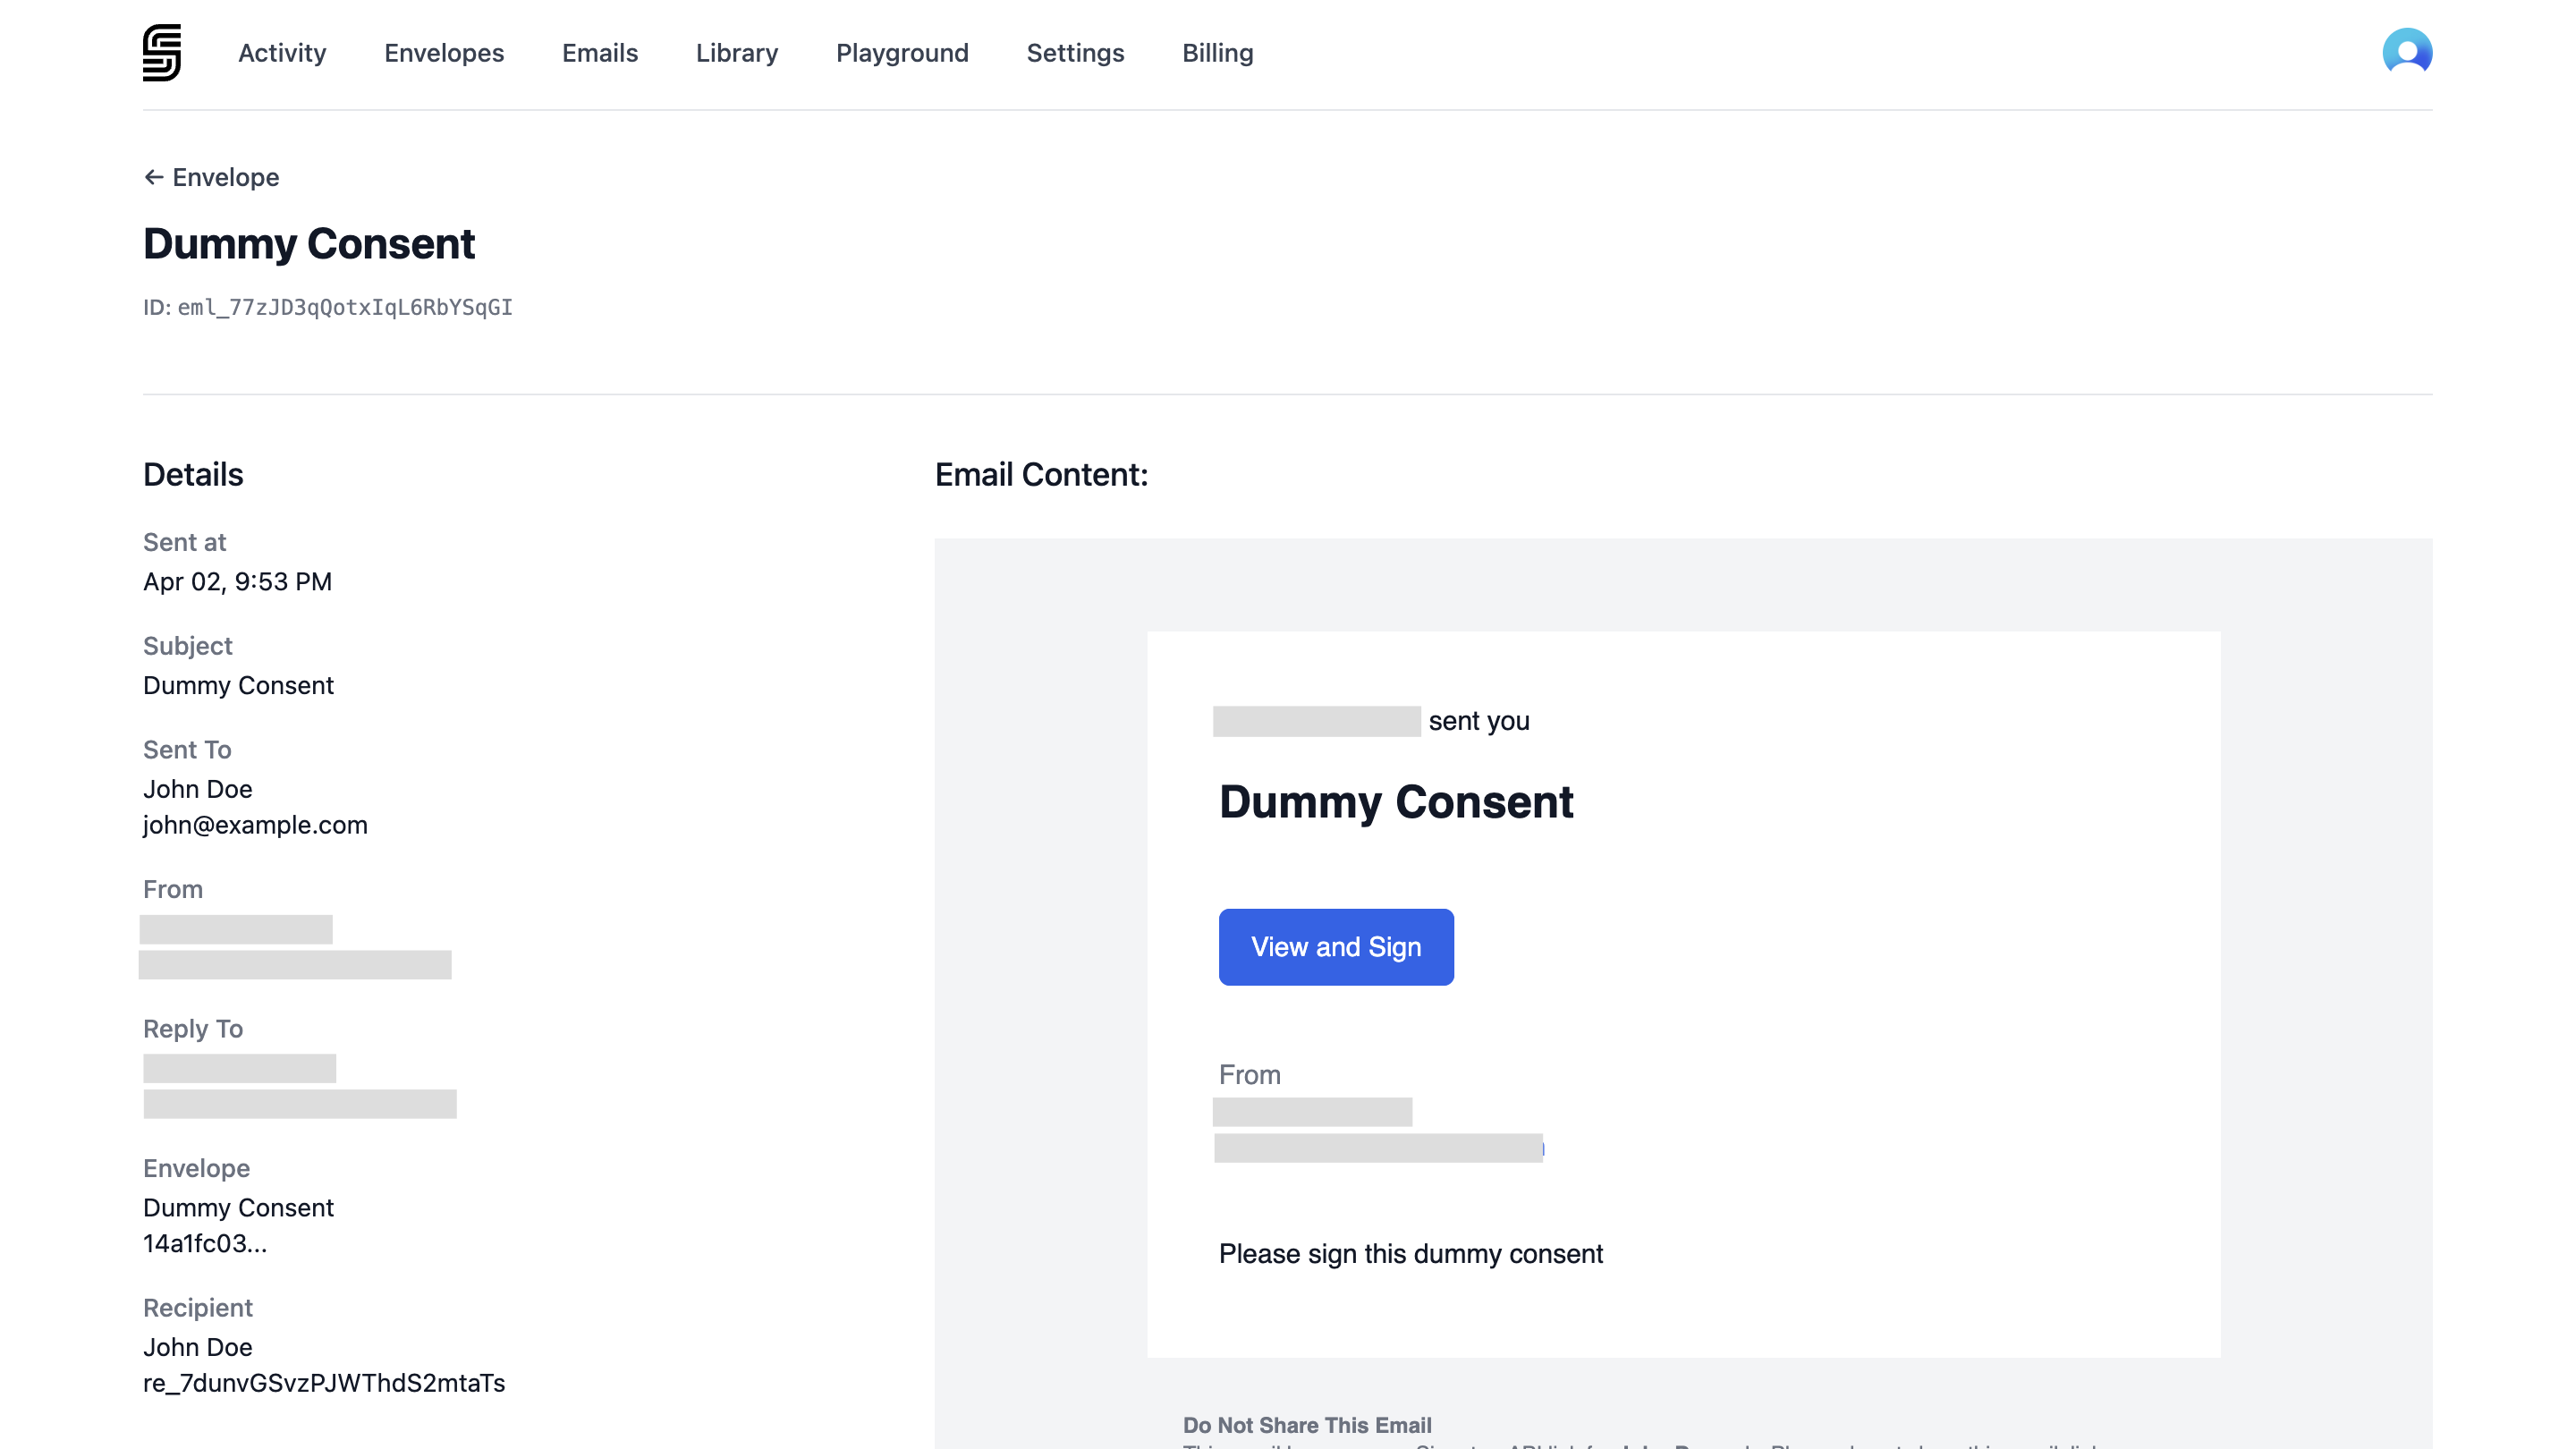 Click on the blue button in the email preview to access the signing ceremony as John Doe.
### Sign the Document as John Doe
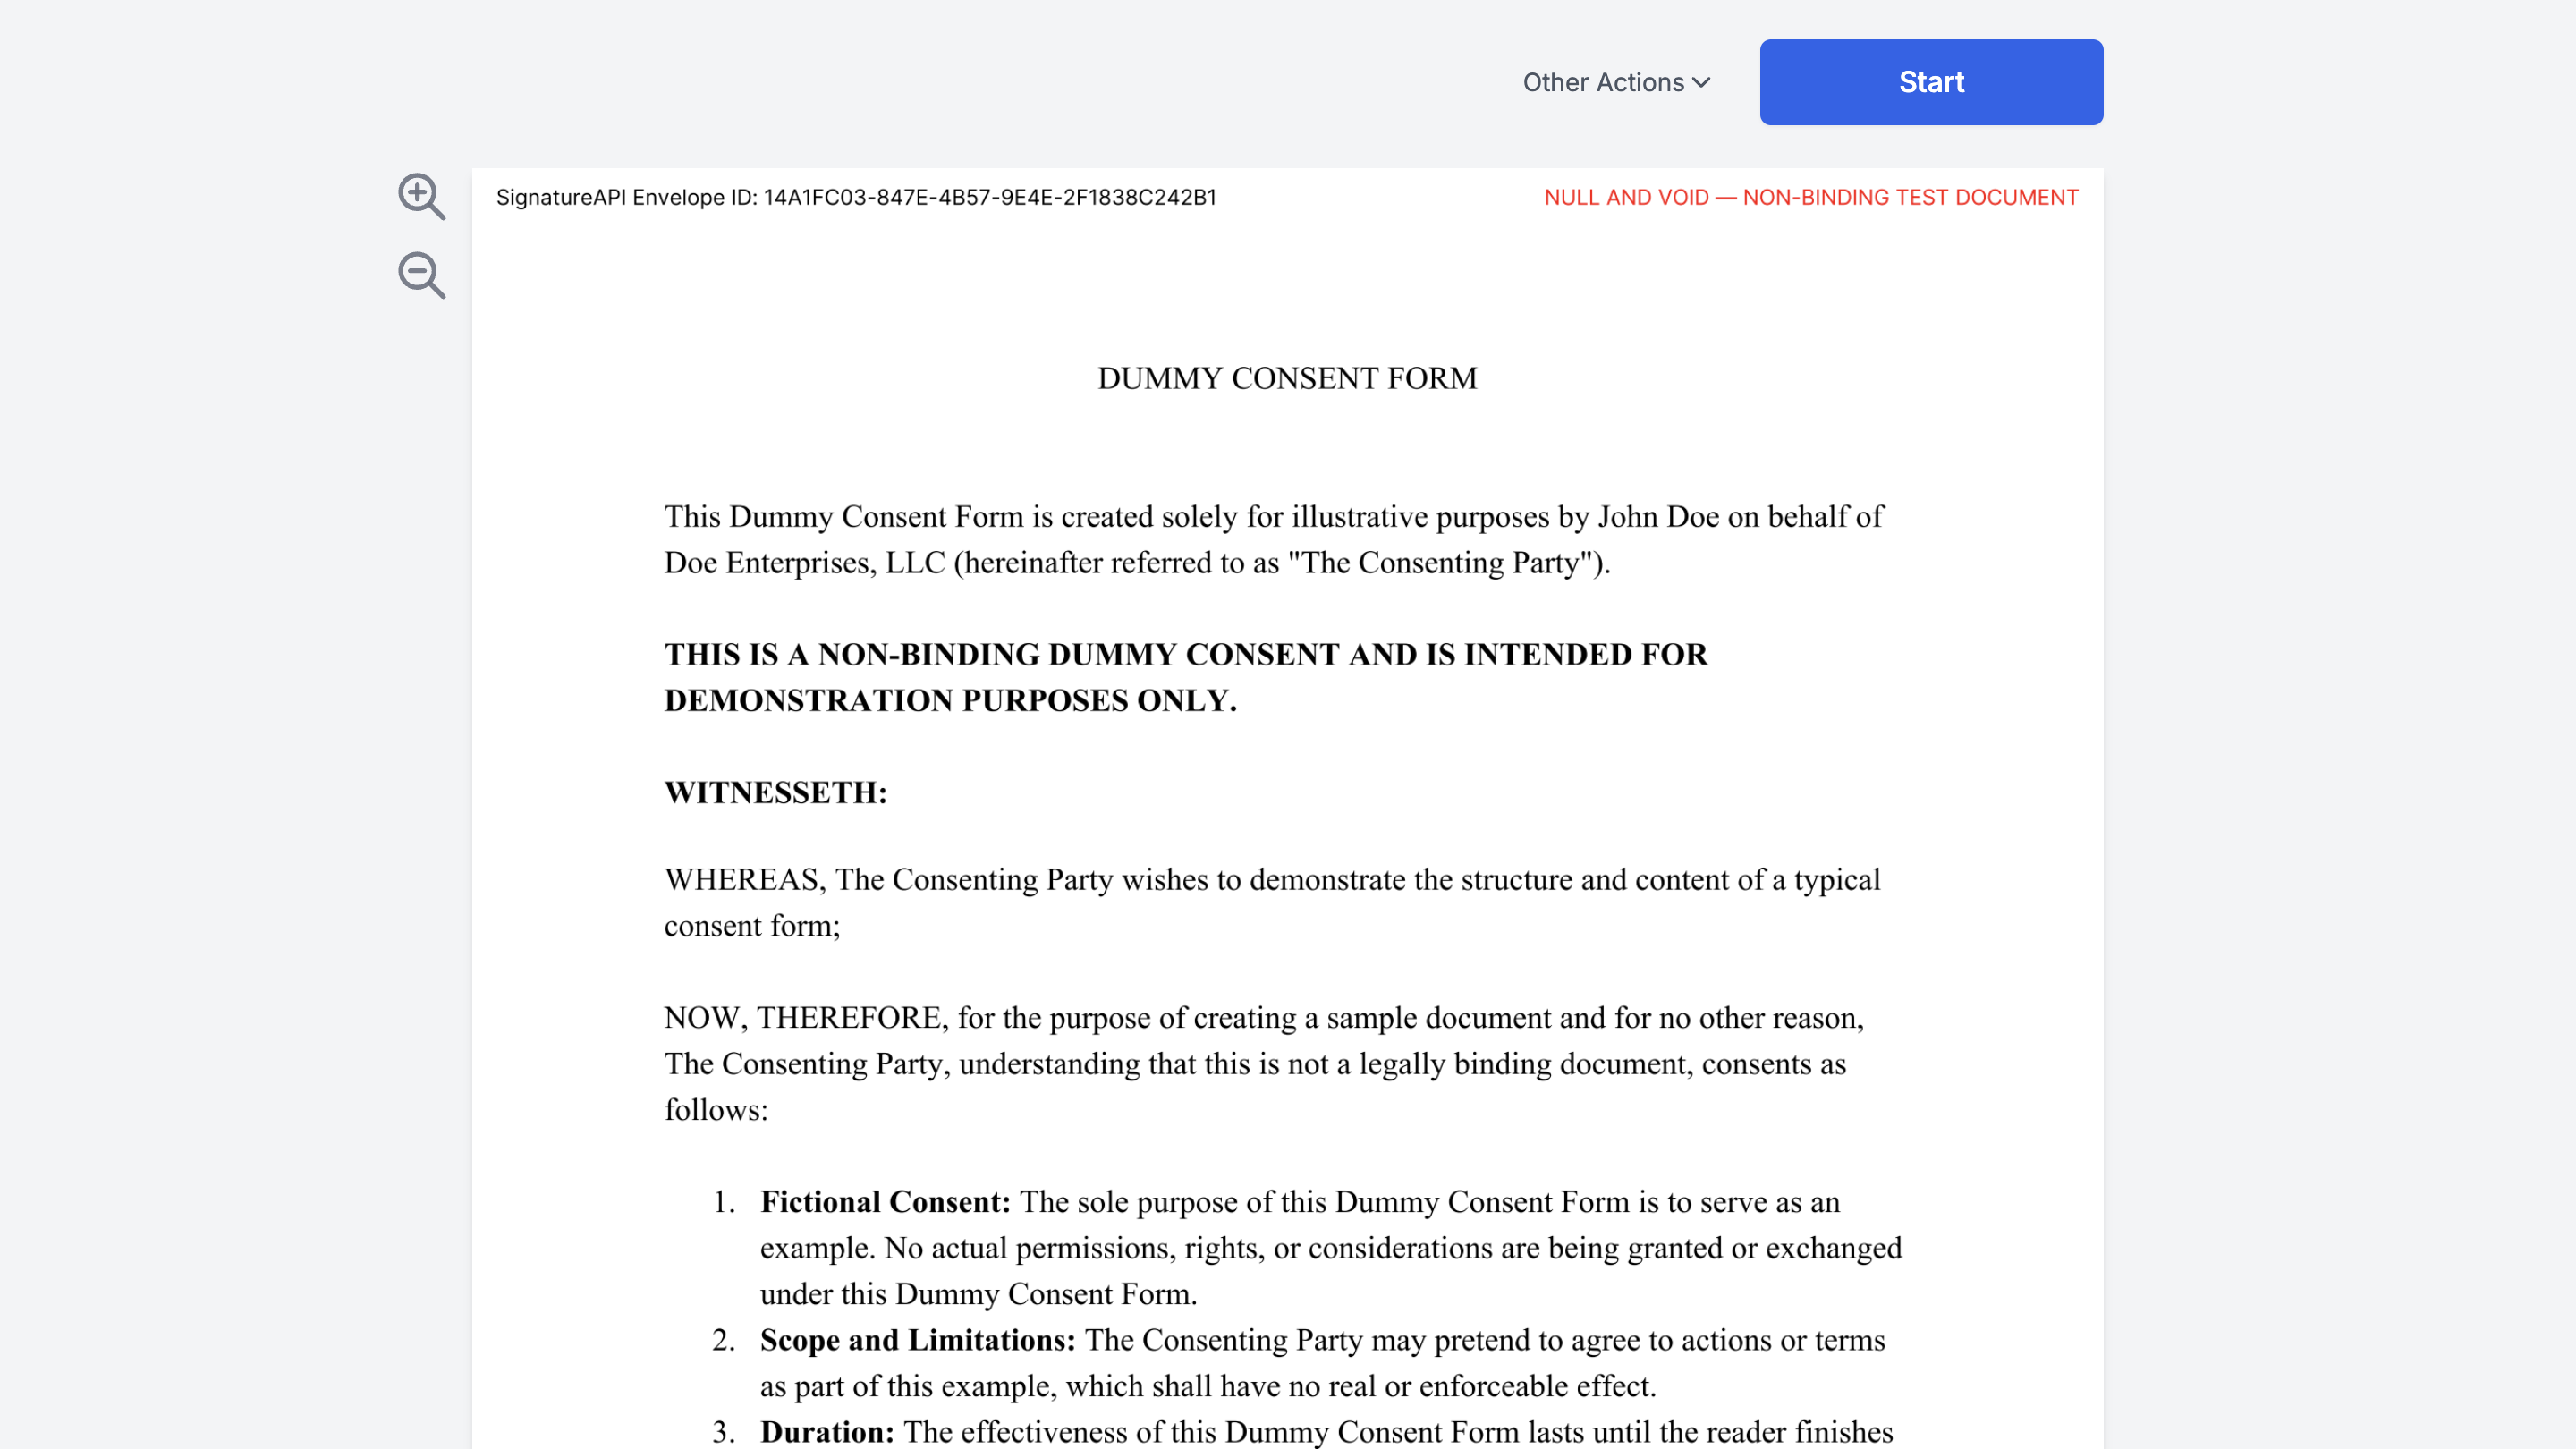
You'll now experience the signing process from John Doe's perspective. Go through the signing ceremony and sign the document.
Click on the blue button in the email preview to access the signing ceremony as John Doe.
### Sign the Document as John Doe
You'll now experience the signing process from John Doe's perspective. Go through the signing ceremony and sign the document.
 ### Verify the Envelope Status
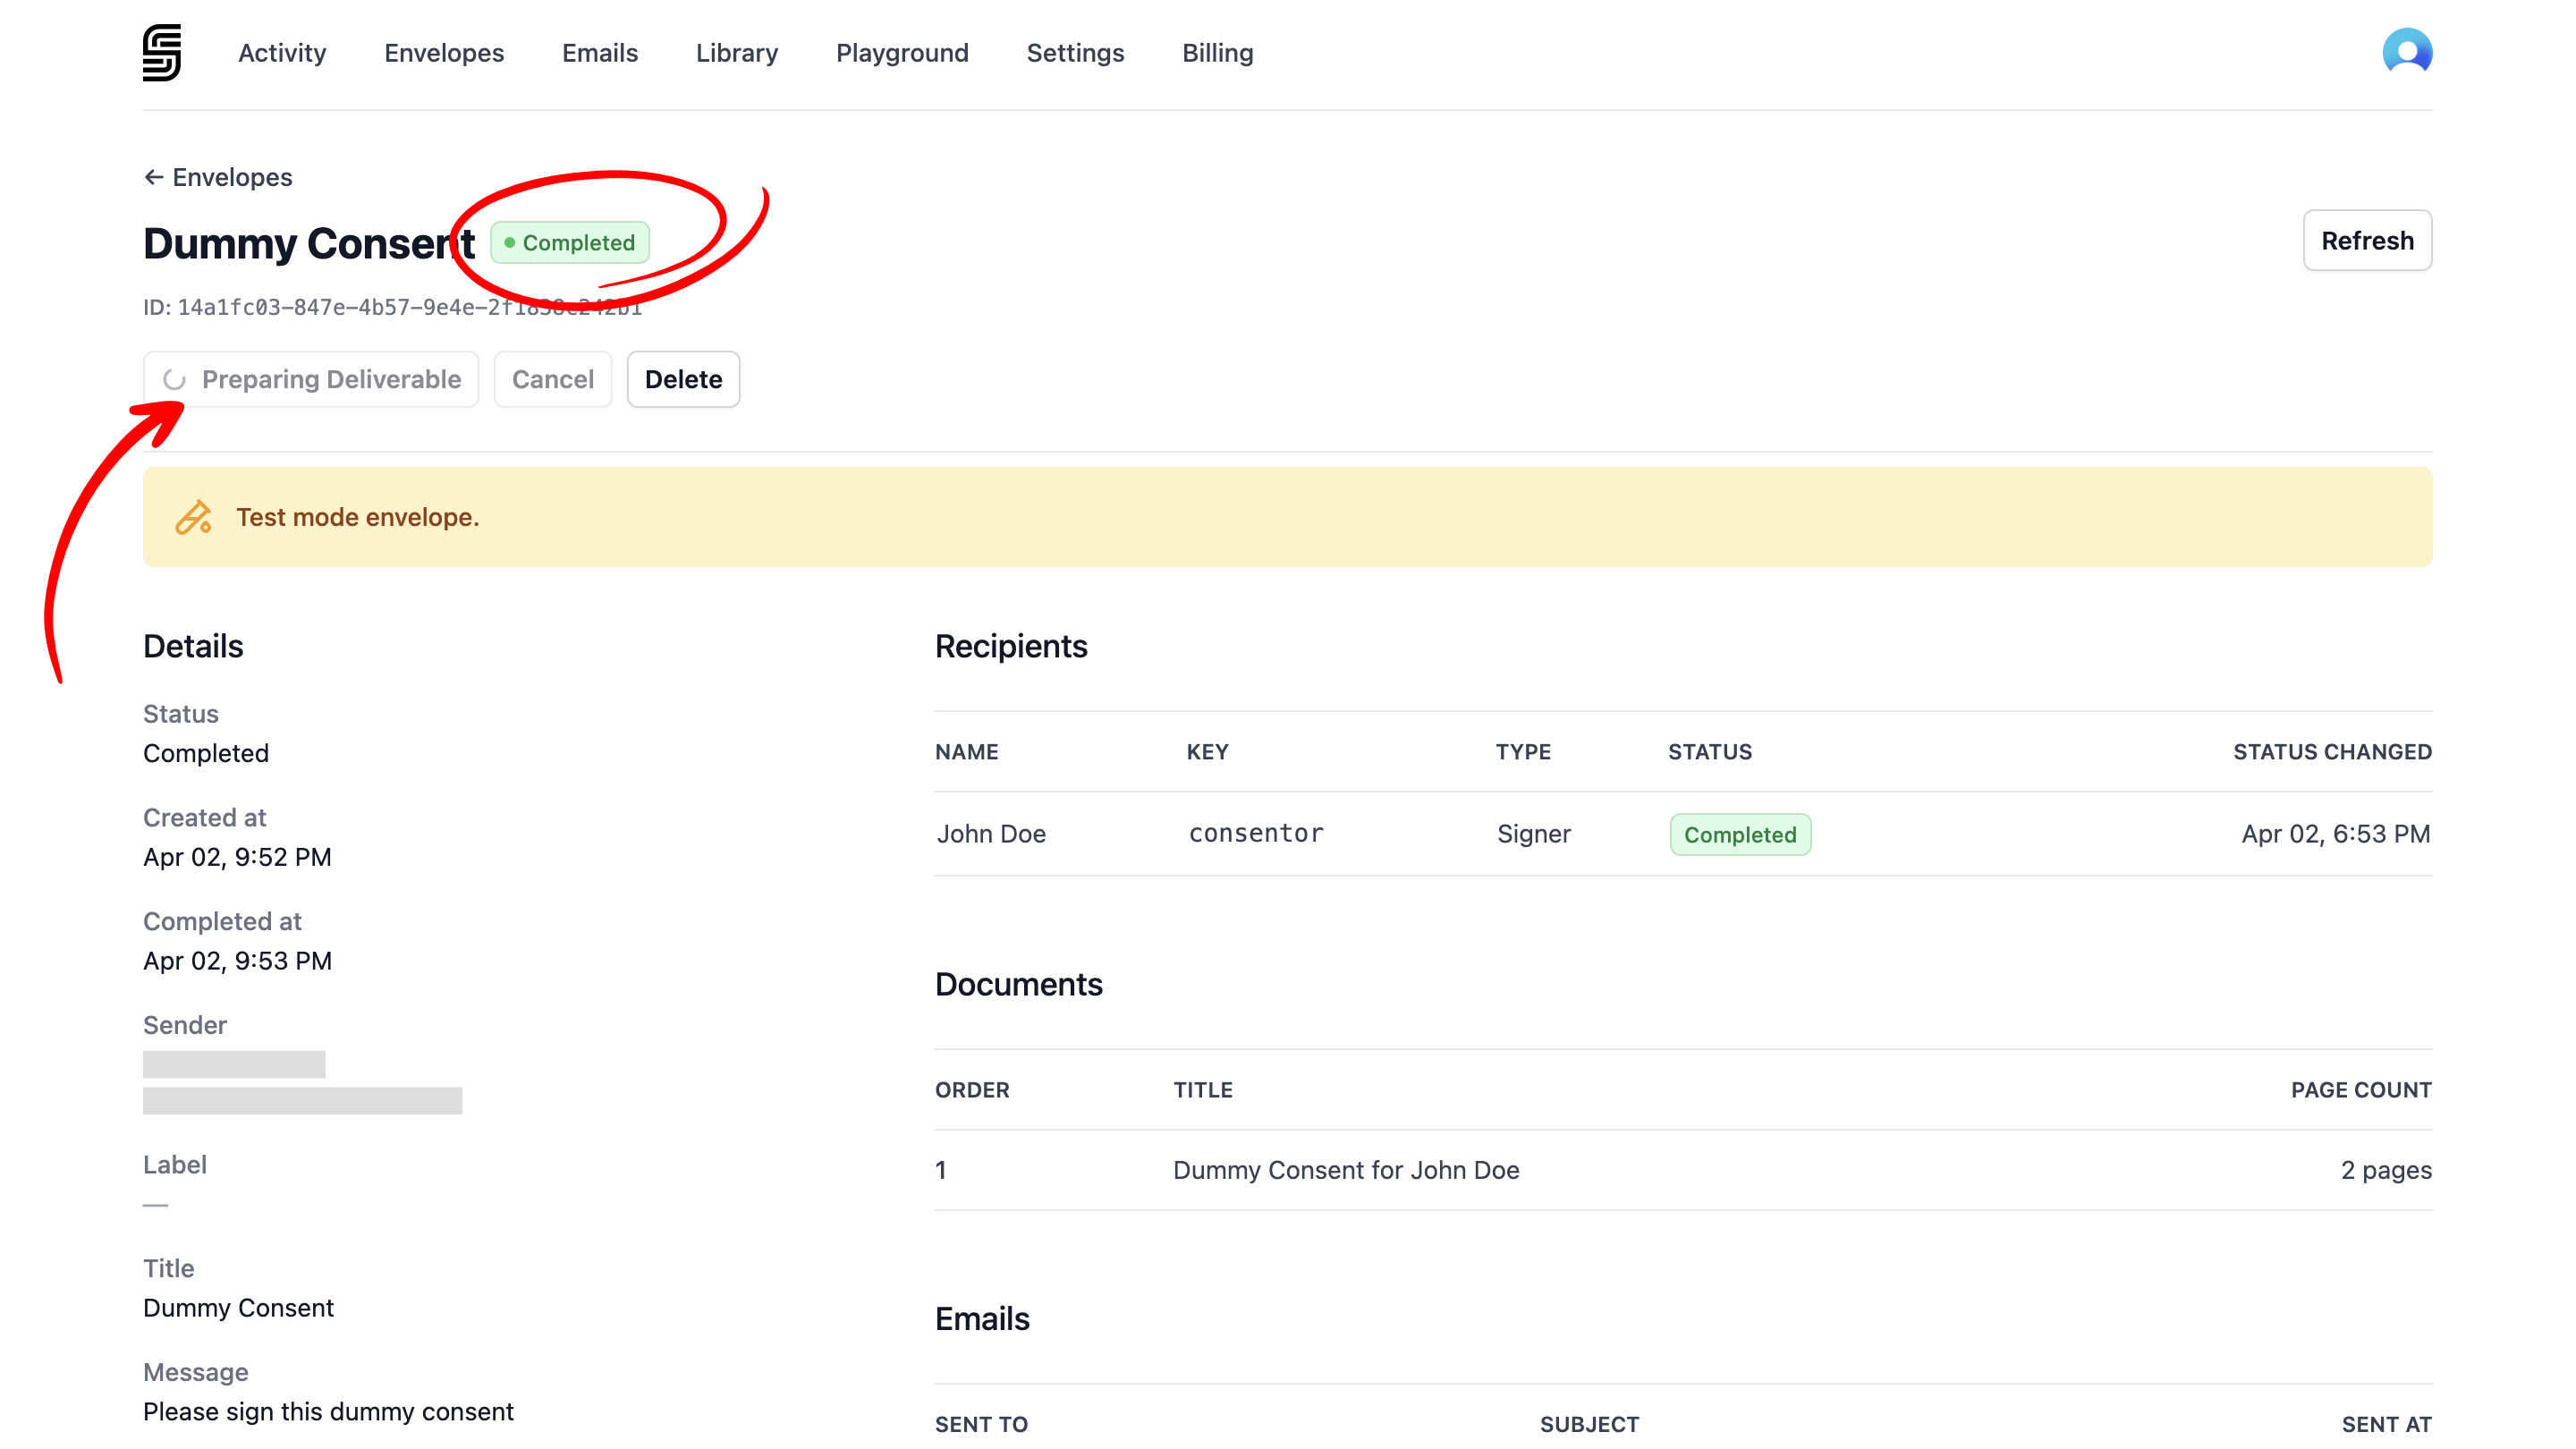
After signing, return to the SignatureAPI Dashboard to check the status of the envelope and ensure that everything is progressing smoothly.
### Verify the Envelope Status
After signing, return to the SignatureAPI Dashboard to check the status of the envelope and ensure that everything is progressing smoothly.
 ### Check the Power Automate Flow
Go back to your flow run in Power Automate. If the steps are still processing, wait a few minutes or refresh the page. The deliverable may take a few minutes to generate.
### Check the Power Automate Flow
Go back to your flow run in Power Automate. If the steps are still processing, wait a few minutes or refresh the page. The deliverable may take a few minutes to generate.
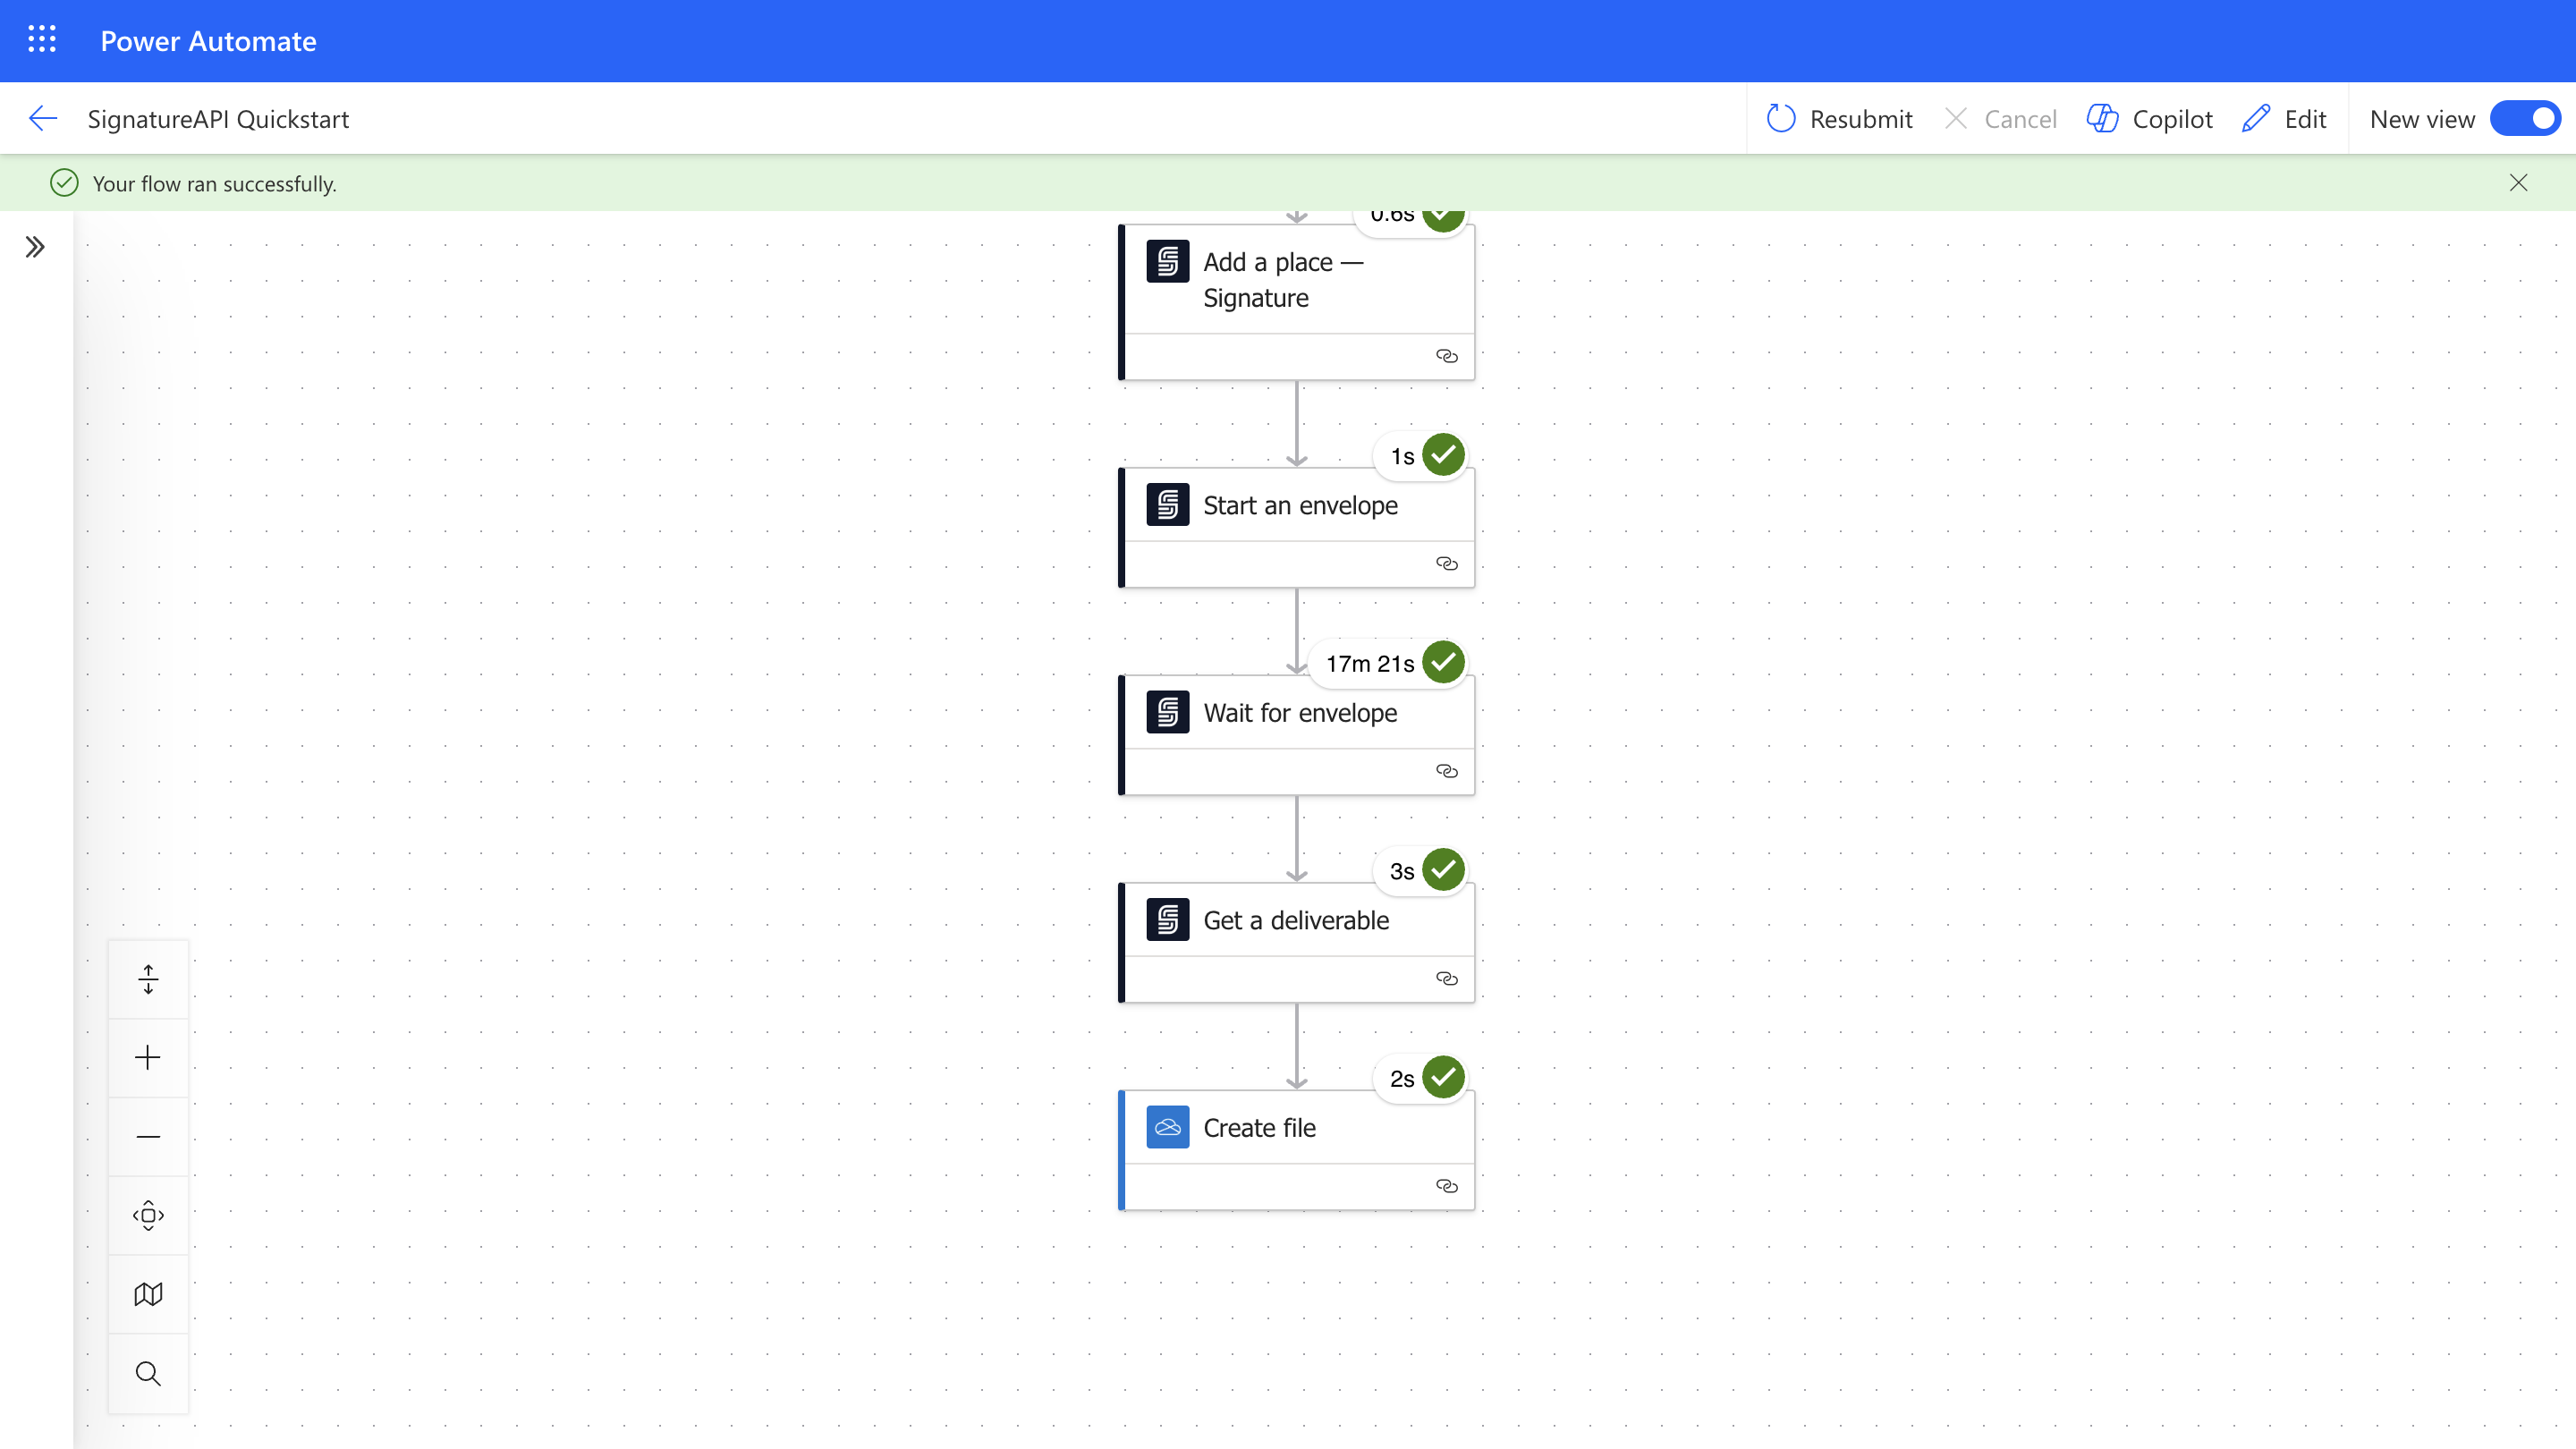 Once the flow has completed successfully, you can go to OneDrive (or whichever app you used to store the deliverable) to download and view the final document.