> ## Documentation Index
> Fetch the complete documentation index at: https://signatureapi-daf4ee54.mintlify.site/llms.txt
> Use this file to discover all available pages before exploring further.
# Automate Contract Signing with SignatureAPI and Microsoft Power Automate
> This tutorial shows how to streamline contract signatures by integrating SignatureAPI with Microsoft Forms, Power Automate, OneDrive, Dataverse, and Outlook.
## Overview
This tutorial guides you through automating the employment contract process using SignatureAPI integrated with Microsoft tools such as Forms, Power Automate, OneDrive, and Dataverse.
You will build an automated workflow that begins when a new employee submits a form. The flow generates a personalized contract, sends it for signing using SignatureAPI, captures any information filled during signing, and stores the results automatically. HR is notified when the process is completed.
### What you'll learn
* How to fill a document template with data using SignatureAPI.
* How to set up signature and input fields in your document.
* How to send documents to multiple signers using SignatureAPI.
* How to collect additional information from signers during the signing process.
* How to send documents for signature and track their status.
* How to retrieve the signed document and save it.
### Tools you'll use
* **SignatureAPI** – to generate, send, and manage signing workflows. SignatureAPI handles document generation, signature requests, tracking, and document delivery.
Sign up for a free account to get your test API key. Use it to generate non-binding envelopes and test your integration with SignatureAPI.
* **Microsoft Power Automate** – to build and automate the workflow.
* **Microsoft Forms** – to collect employee information.
* **OneDrive** – to store your DOCX template and signed contract (other document repositories also work).
* **Microsoft Dataverse** – to store employee data.
* **Microsoft Outlook** – to send notifications (other email providers also work).
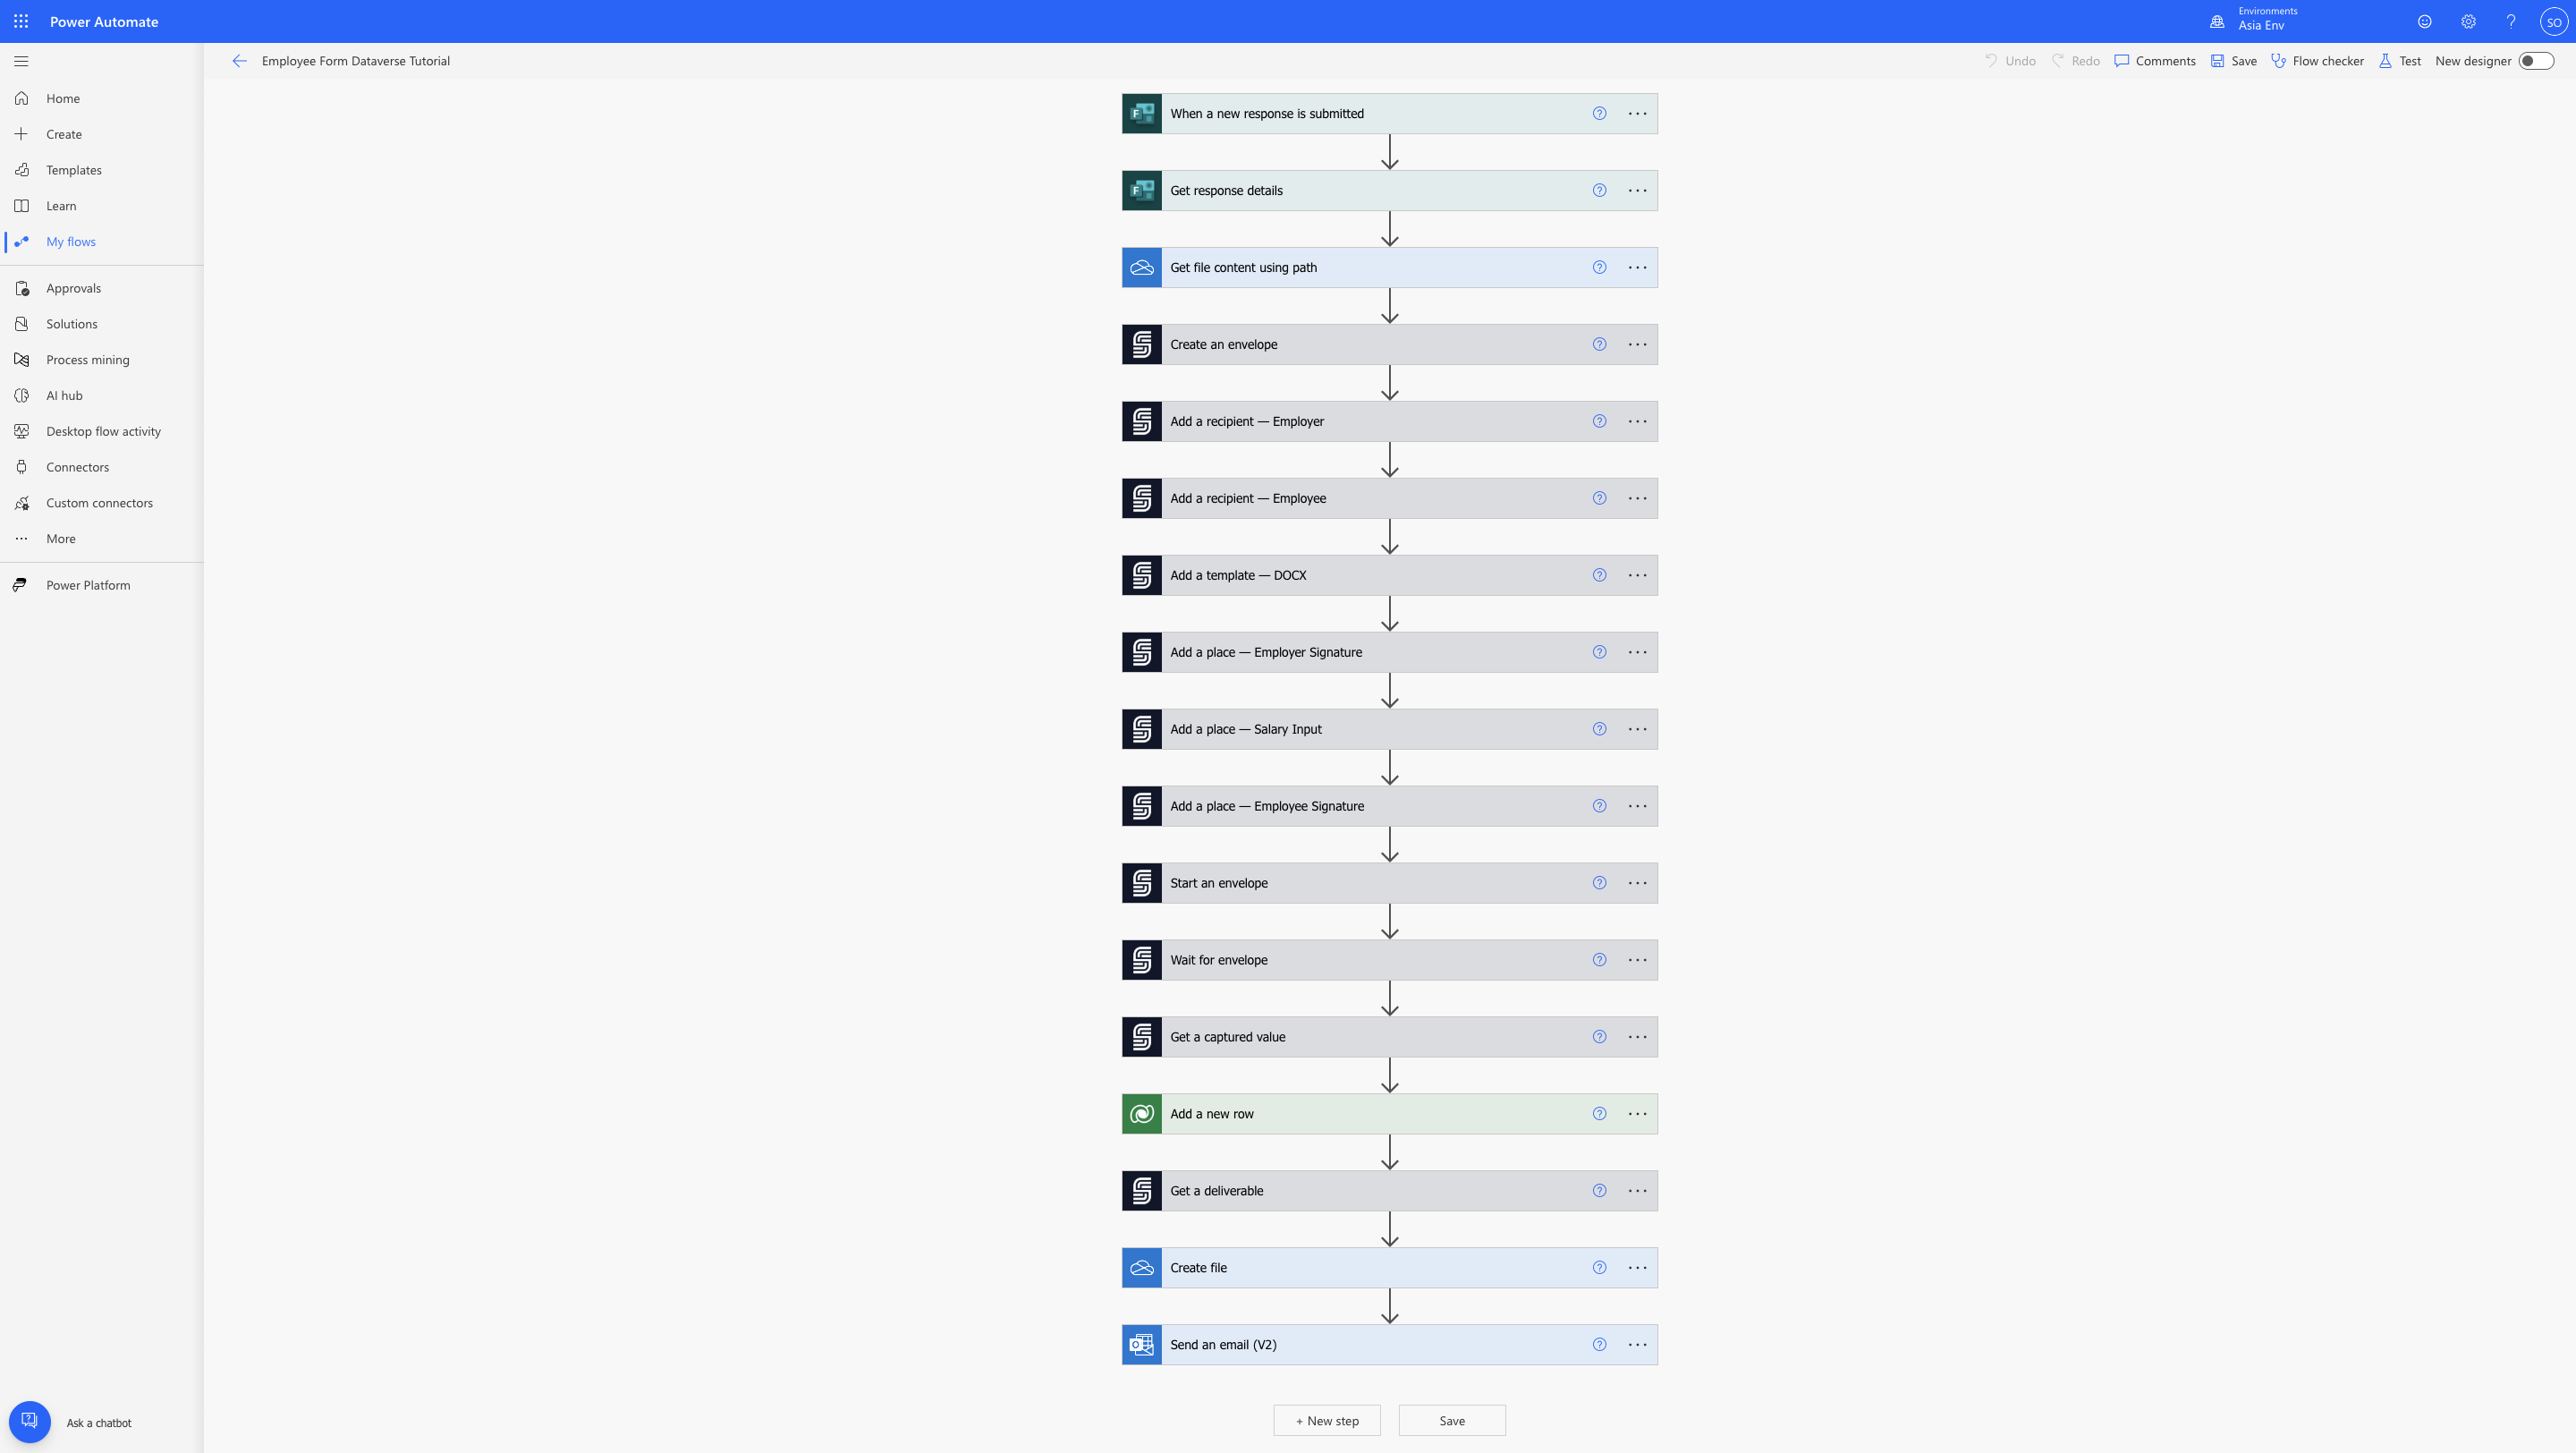
### Flow overview
The flow follows these steps:
1. **Trigger** – A Microsoft Forms submission starts the flow.
2. **Data Retrieval** – Employee details are pulled from the form, and the contract template is fetched from OneDrive.
3. **Signature Process** – An envelope is created in SignatureAPI, recipients are added, and the DOCX template is filled and sent.
4. **Monitoring** – The flow waits until all parties have signed.
5. **Storage & Notification** – The signed contract is saved to OneDrive, employee data is stored in Dataverse, and HR is notified by email.
Here’s what your final Power Automate flow will look like:
 ## Prepare the contract template
Begin by preparing your employment contract template in DOCX format. This template is used to generate personalized contracts.
You need to add two types of annotations to your document: **template fields** and **placeholders**.
**Template Fields**
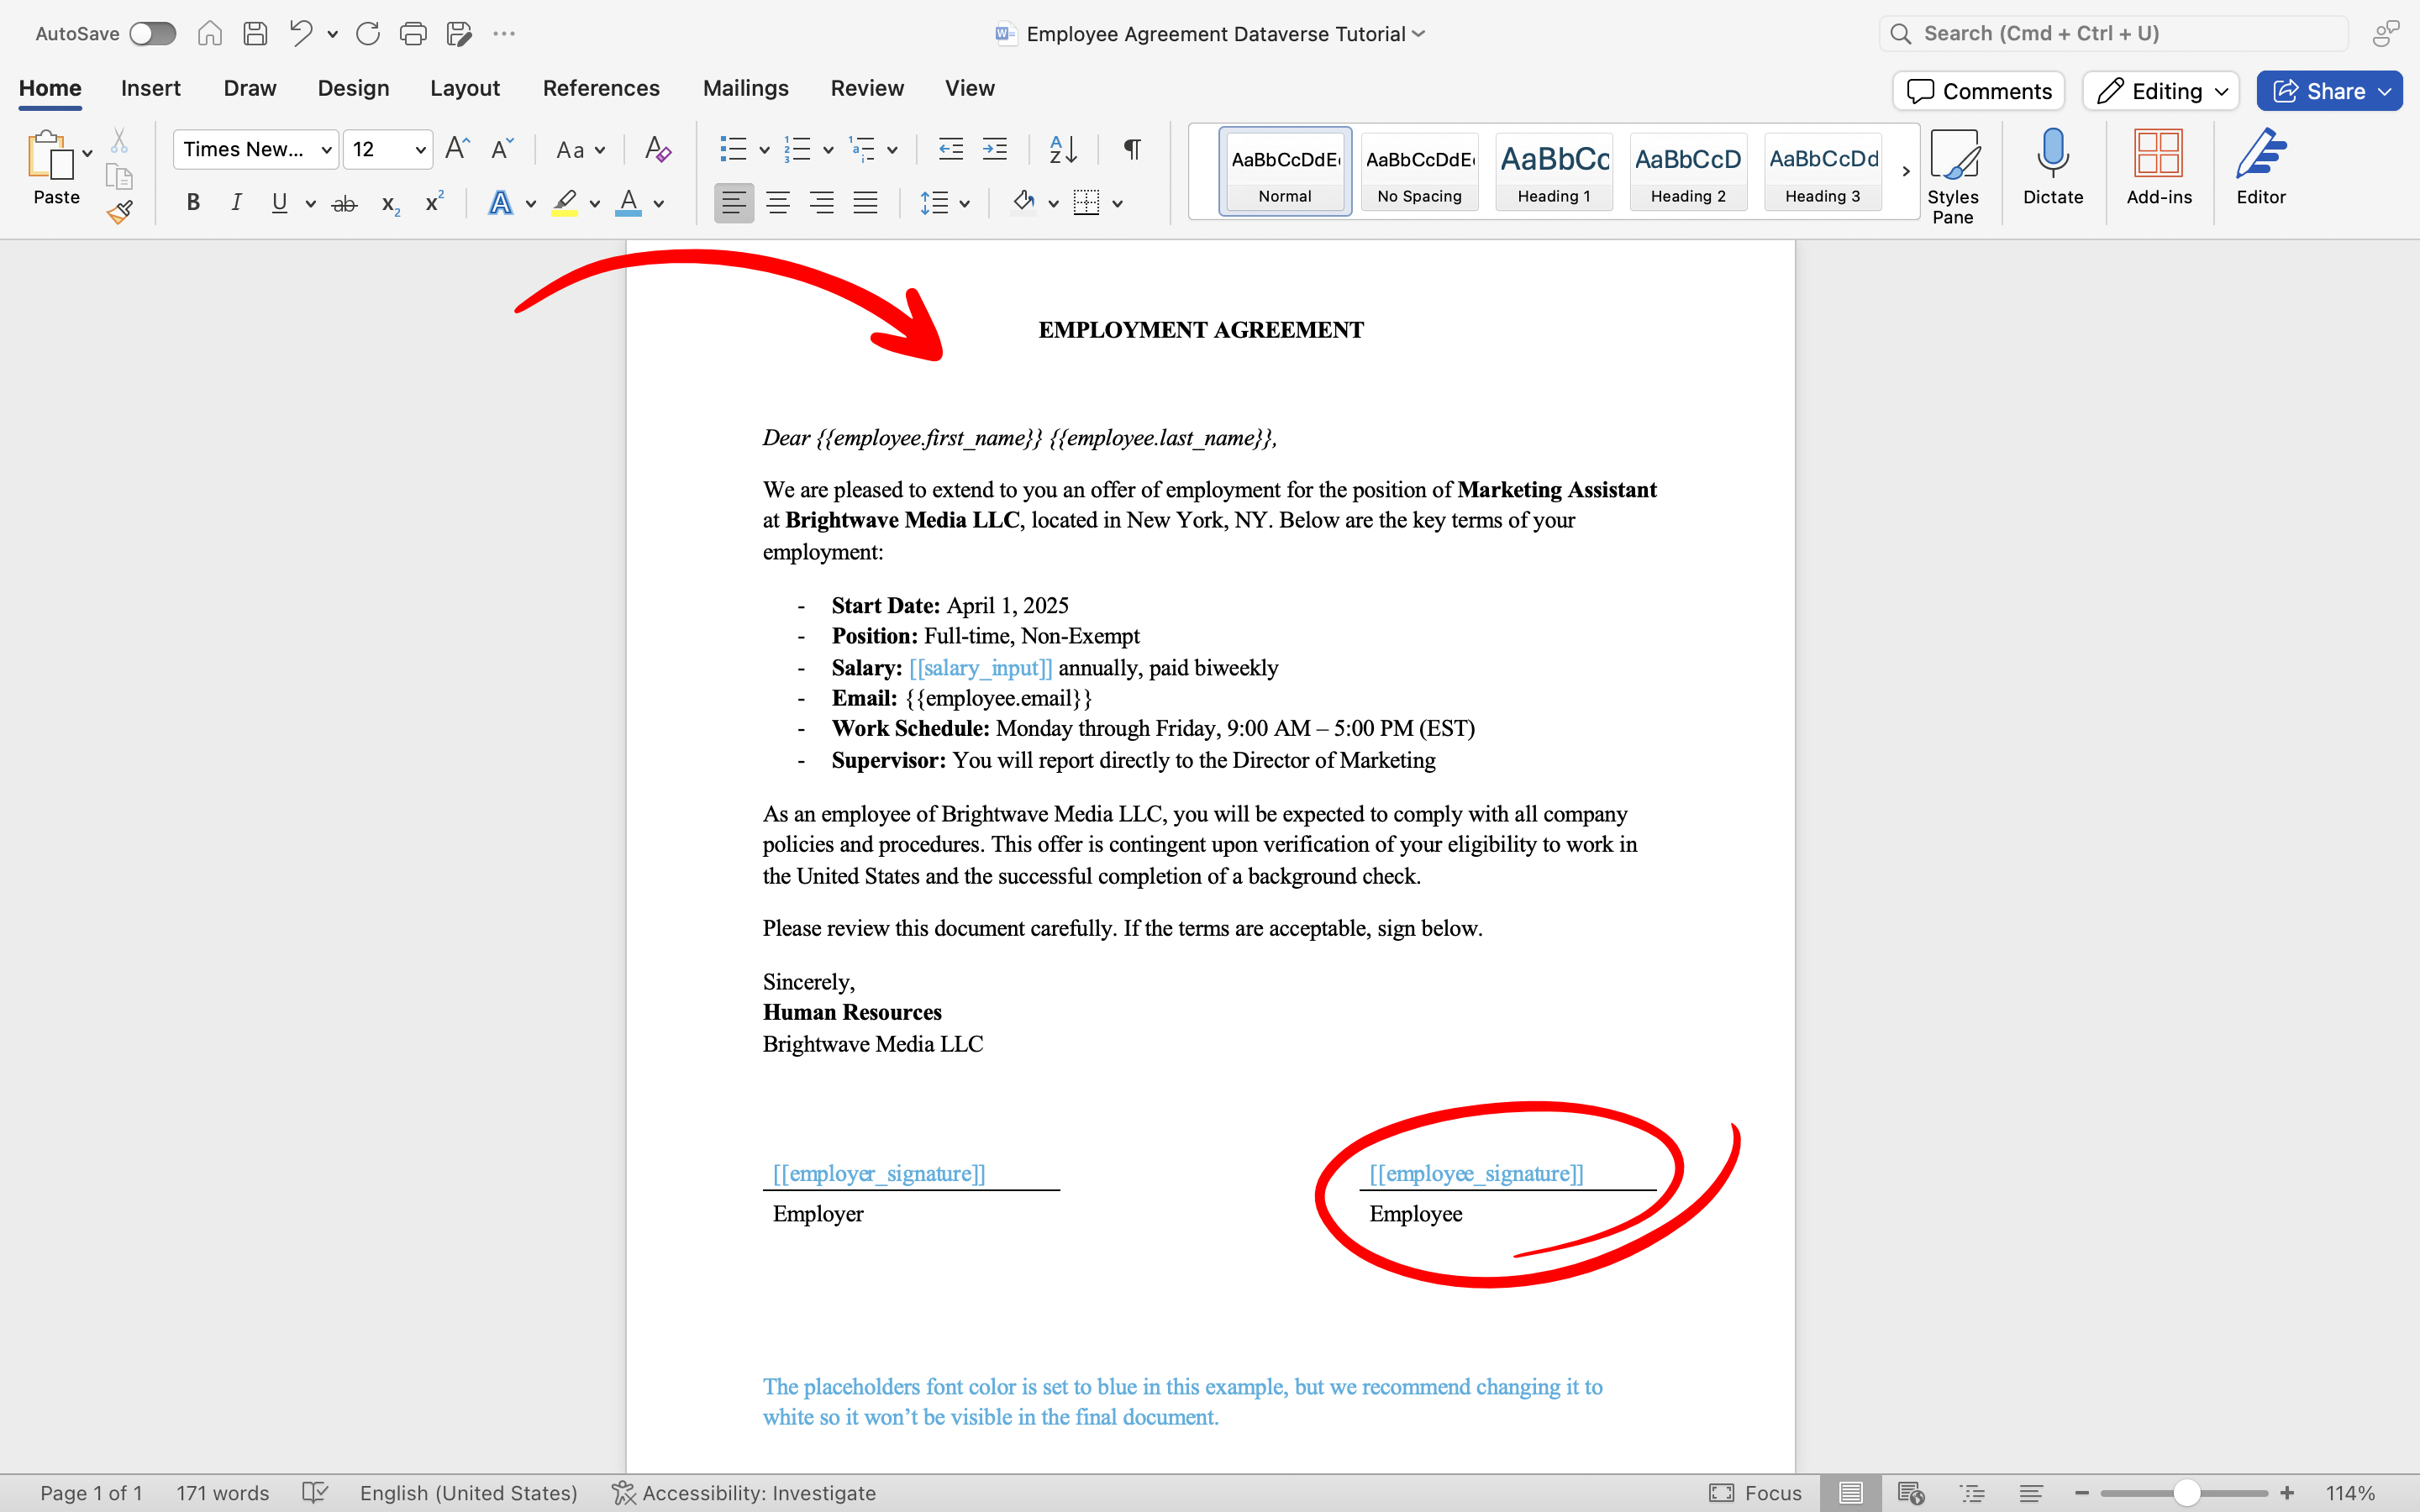
Template fields insert data into the document before it is sent to recipients. These fields are marked with **double curly brackets**, for example: `{{employee.first_name}}`.
SignatureAPI replaces these fields with actual values when generating the document.
Learn more about [document templates](/docs/integrations/power-automate/documents/templates).
**Placeholders**
Placeholders mark where recipients should sign or enter information during the signing process. These are identified by **double square brackets**, for example: `[[employee_signature]]`.
Learn more about [placeholders](/docs/integrations/power-automate/places/positioning#placeholders).
In this tutorial, we will:
* Use **template fields** to fill in employee details.
* Define signature places for both the employer and the employee using **placeholders**.
* Add a text input place for the employer to enter the salary using a **placeholder**.
To prepare your template:
1. Open your existing employment contract (DOCX) in Microsoft Word.
2. Locate where employee details should be inserted (e.g., name, email).
3. Add template fields using **double curly brackets**, for example:
* First name: `{{employee.first_name}}`
* Last name: `{{employee.last_name}}`
* Email: `{{employee.email}}`
4. Add placeholders for signatures using **double square brackets**, for example:
* Employer signature: `[[employer_signature]]`
* Employee signature: `[[employee_signature]]`
5. Add a placeholder for salary input: `[[salary_input]]`
6. Save the template and upload it to **OneDrive** (or another supported storage service).
In the example shown below, placeholders and template fields are colored blue for visibility. In your final document, we recommend coloring them white so they are hidden from recipients.
## Prepare the contract template
Begin by preparing your employment contract template in DOCX format. This template is used to generate personalized contracts.
You need to add two types of annotations to your document: **template fields** and **placeholders**.
**Template Fields**
Template fields insert data into the document before it is sent to recipients. These fields are marked with **double curly brackets**, for example: `{{employee.first_name}}`.
SignatureAPI replaces these fields with actual values when generating the document.
Learn more about [document templates](/docs/integrations/power-automate/documents/templates).
**Placeholders**
Placeholders mark where recipients should sign or enter information during the signing process. These are identified by **double square brackets**, for example: `[[employee_signature]]`.
Learn more about [placeholders](/docs/integrations/power-automate/places/positioning#placeholders).
In this tutorial, we will:
* Use **template fields** to fill in employee details.
* Define signature places for both the employer and the employee using **placeholders**.
* Add a text input place for the employer to enter the salary using a **placeholder**.
To prepare your template:
1. Open your existing employment contract (DOCX) in Microsoft Word.
2. Locate where employee details should be inserted (e.g., name, email).
3. Add template fields using **double curly brackets**, for example:
* First name: `{{employee.first_name}}`
* Last name: `{{employee.last_name}}`
* Email: `{{employee.email}}`
4. Add placeholders for signatures using **double square brackets**, for example:
* Employer signature: `[[employer_signature]]`
* Employee signature: `[[employee_signature]]`
5. Add a placeholder for salary input: `[[salary_input]]`
6. Save the template and upload it to **OneDrive** (or another supported storage service).
In the example shown below, placeholders and template fields are colored blue for visibility. In your final document, we recommend coloring them white so they are hidden from recipients.
 ## Create the Microsoft Form
We use Microsoft Forms to collect employee details such as name and email address.
1. Visit [Microsoft Forms](https://forms.office.com) and sign in.
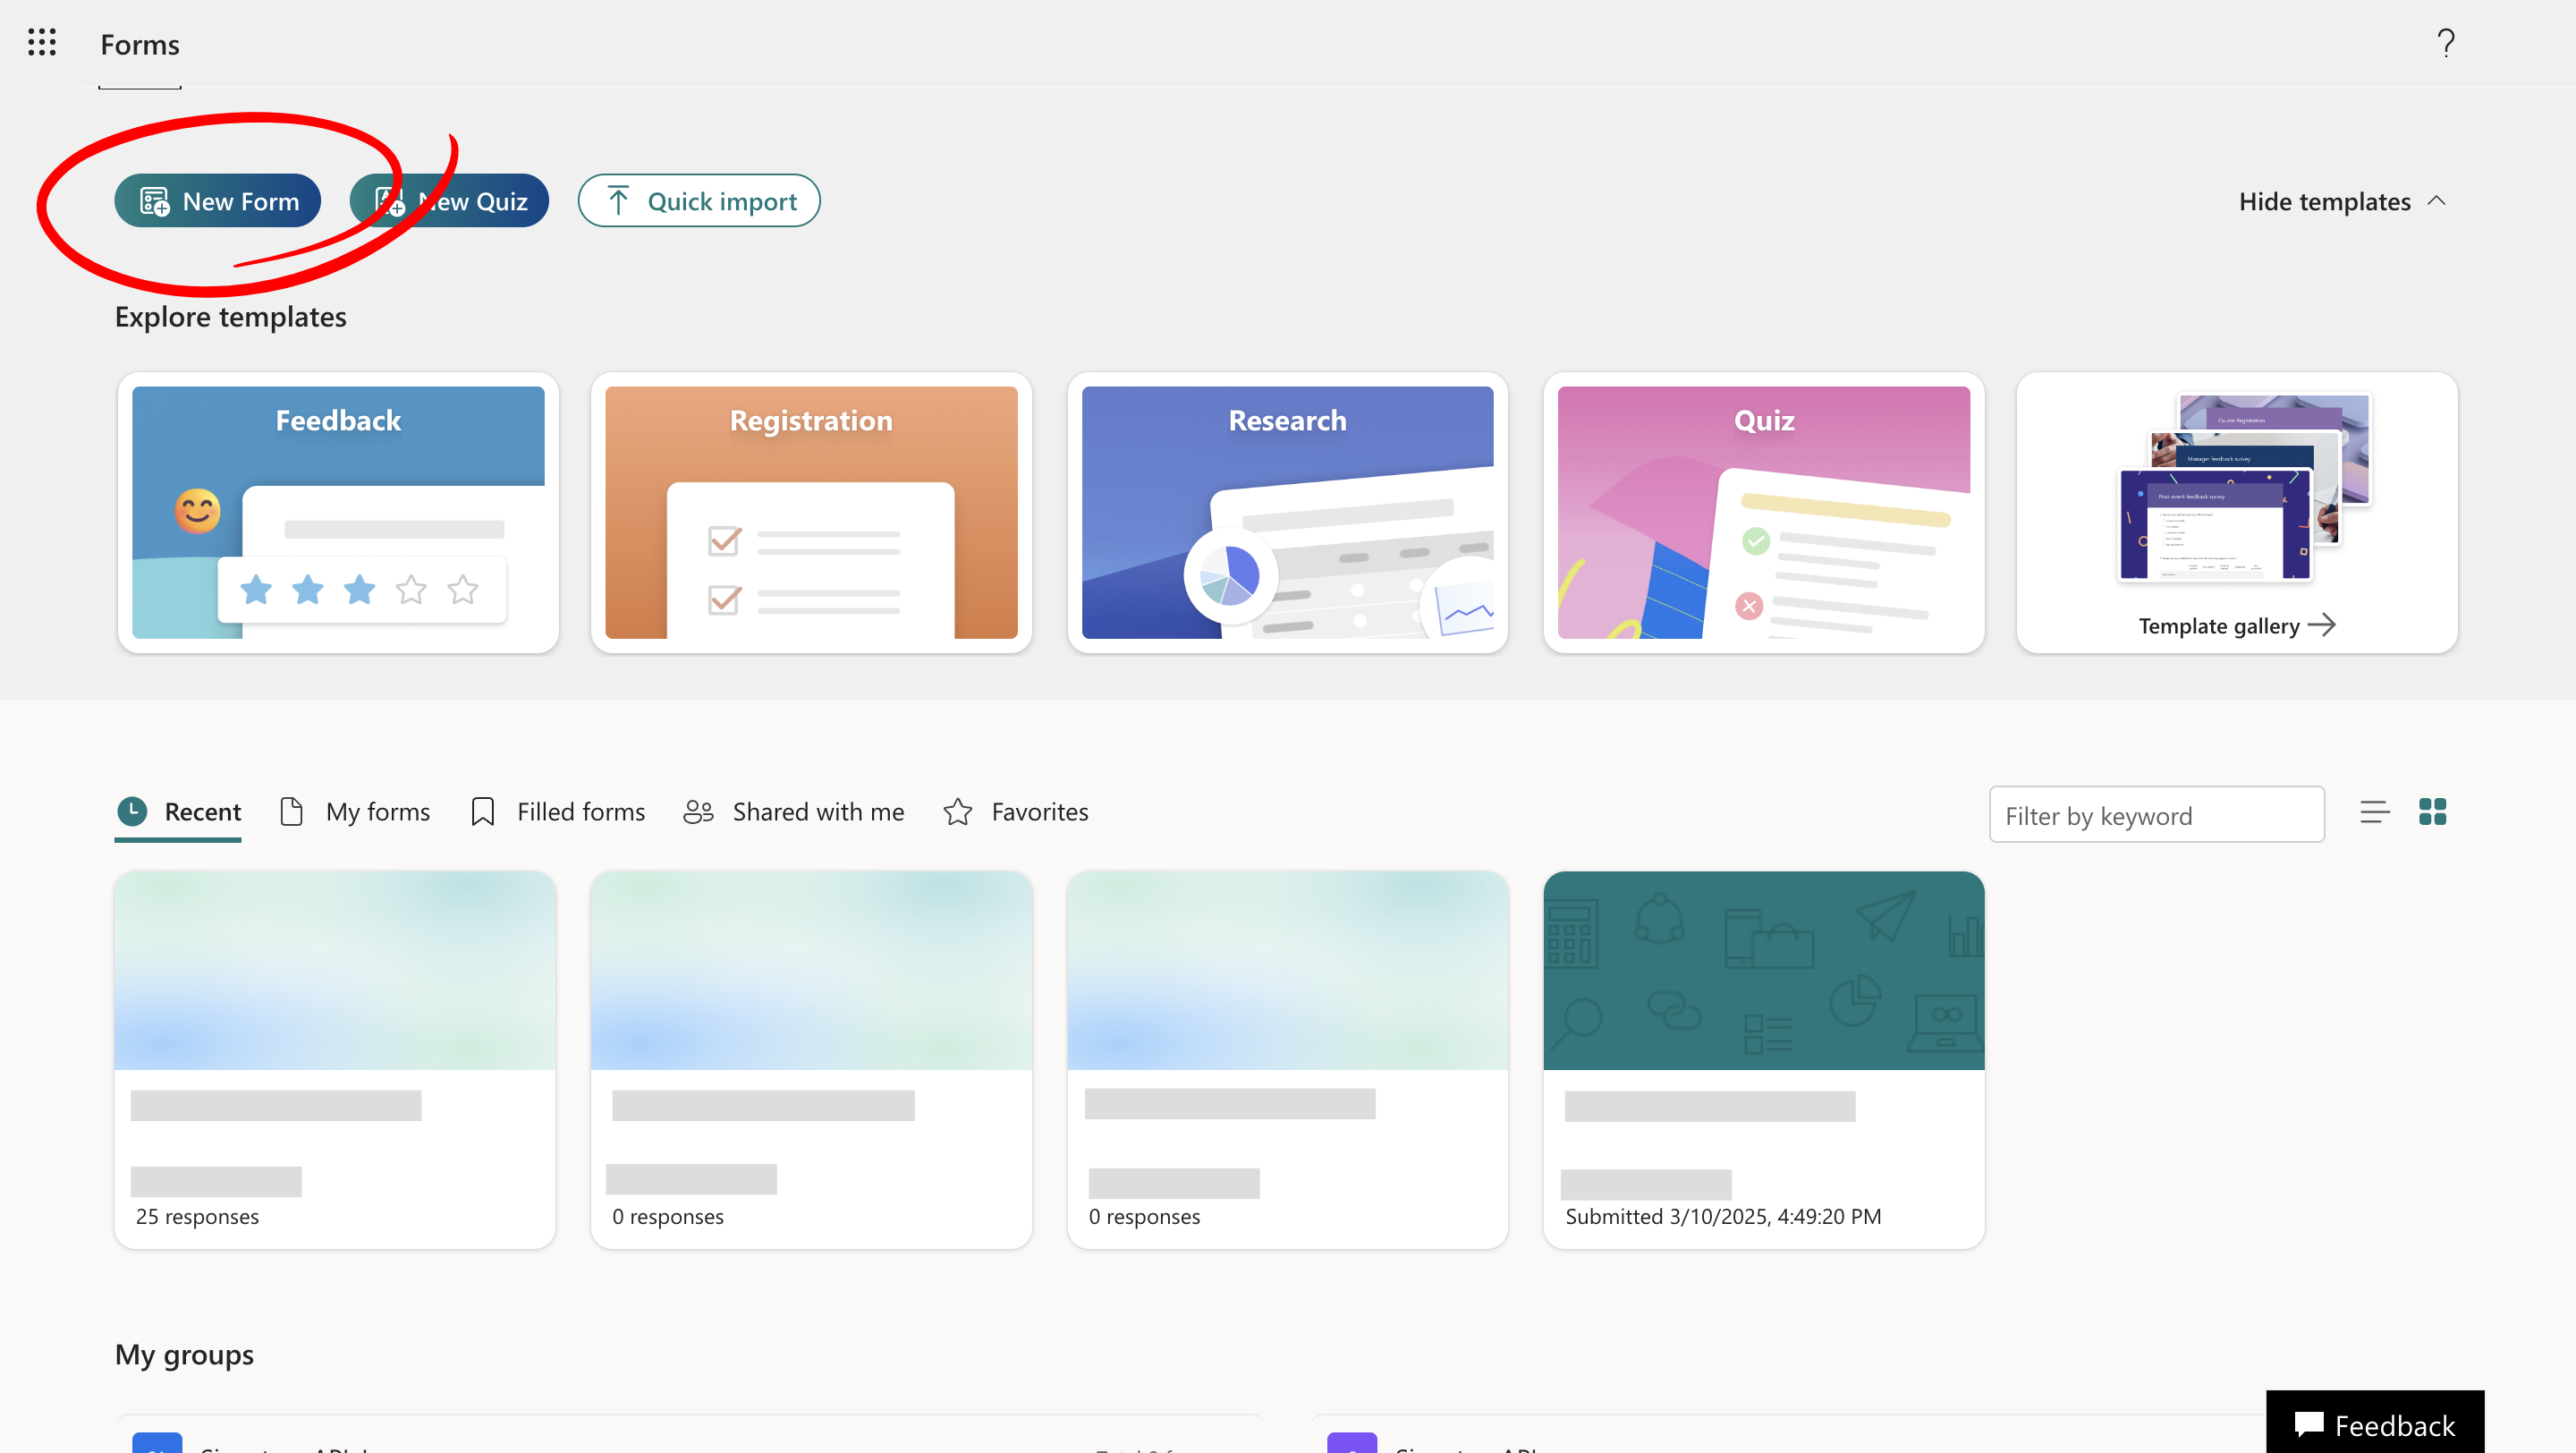
2. Click **New Form**.
## Create the Microsoft Form
We use Microsoft Forms to collect employee details such as name and email address.
1. Visit [Microsoft Forms](https://forms.office.com) and sign in.
2. Click **New Form**.
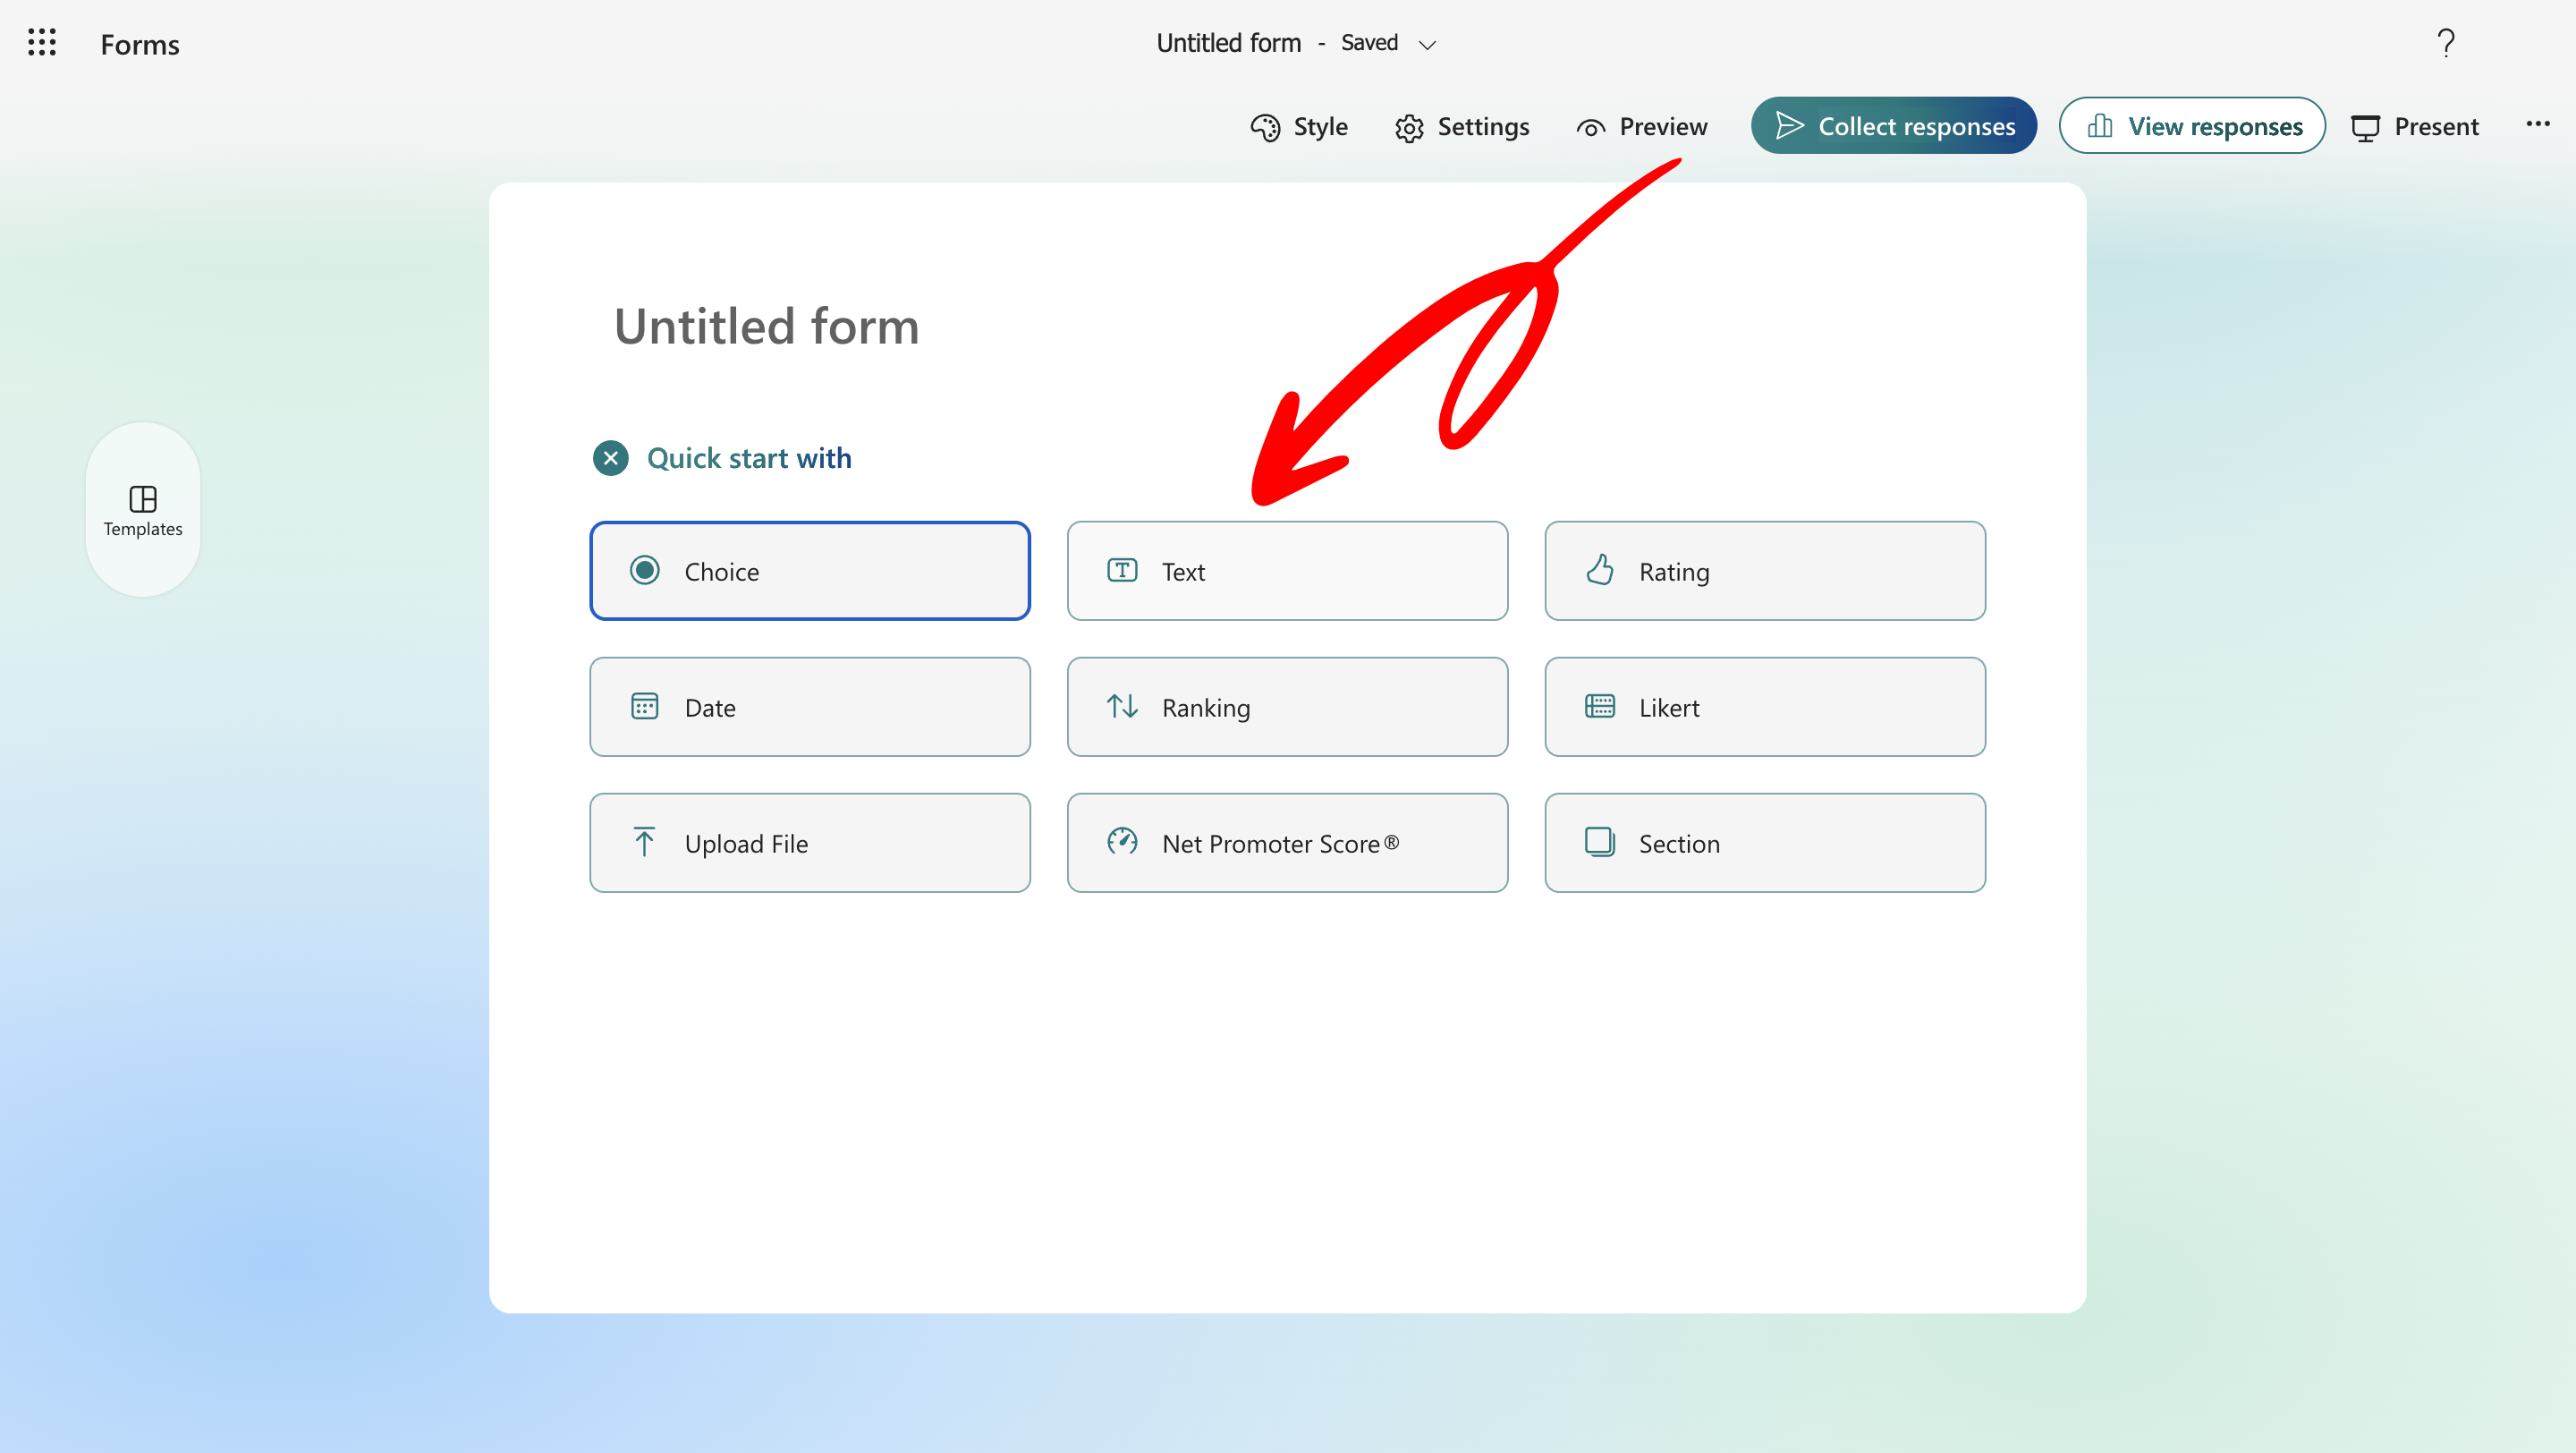
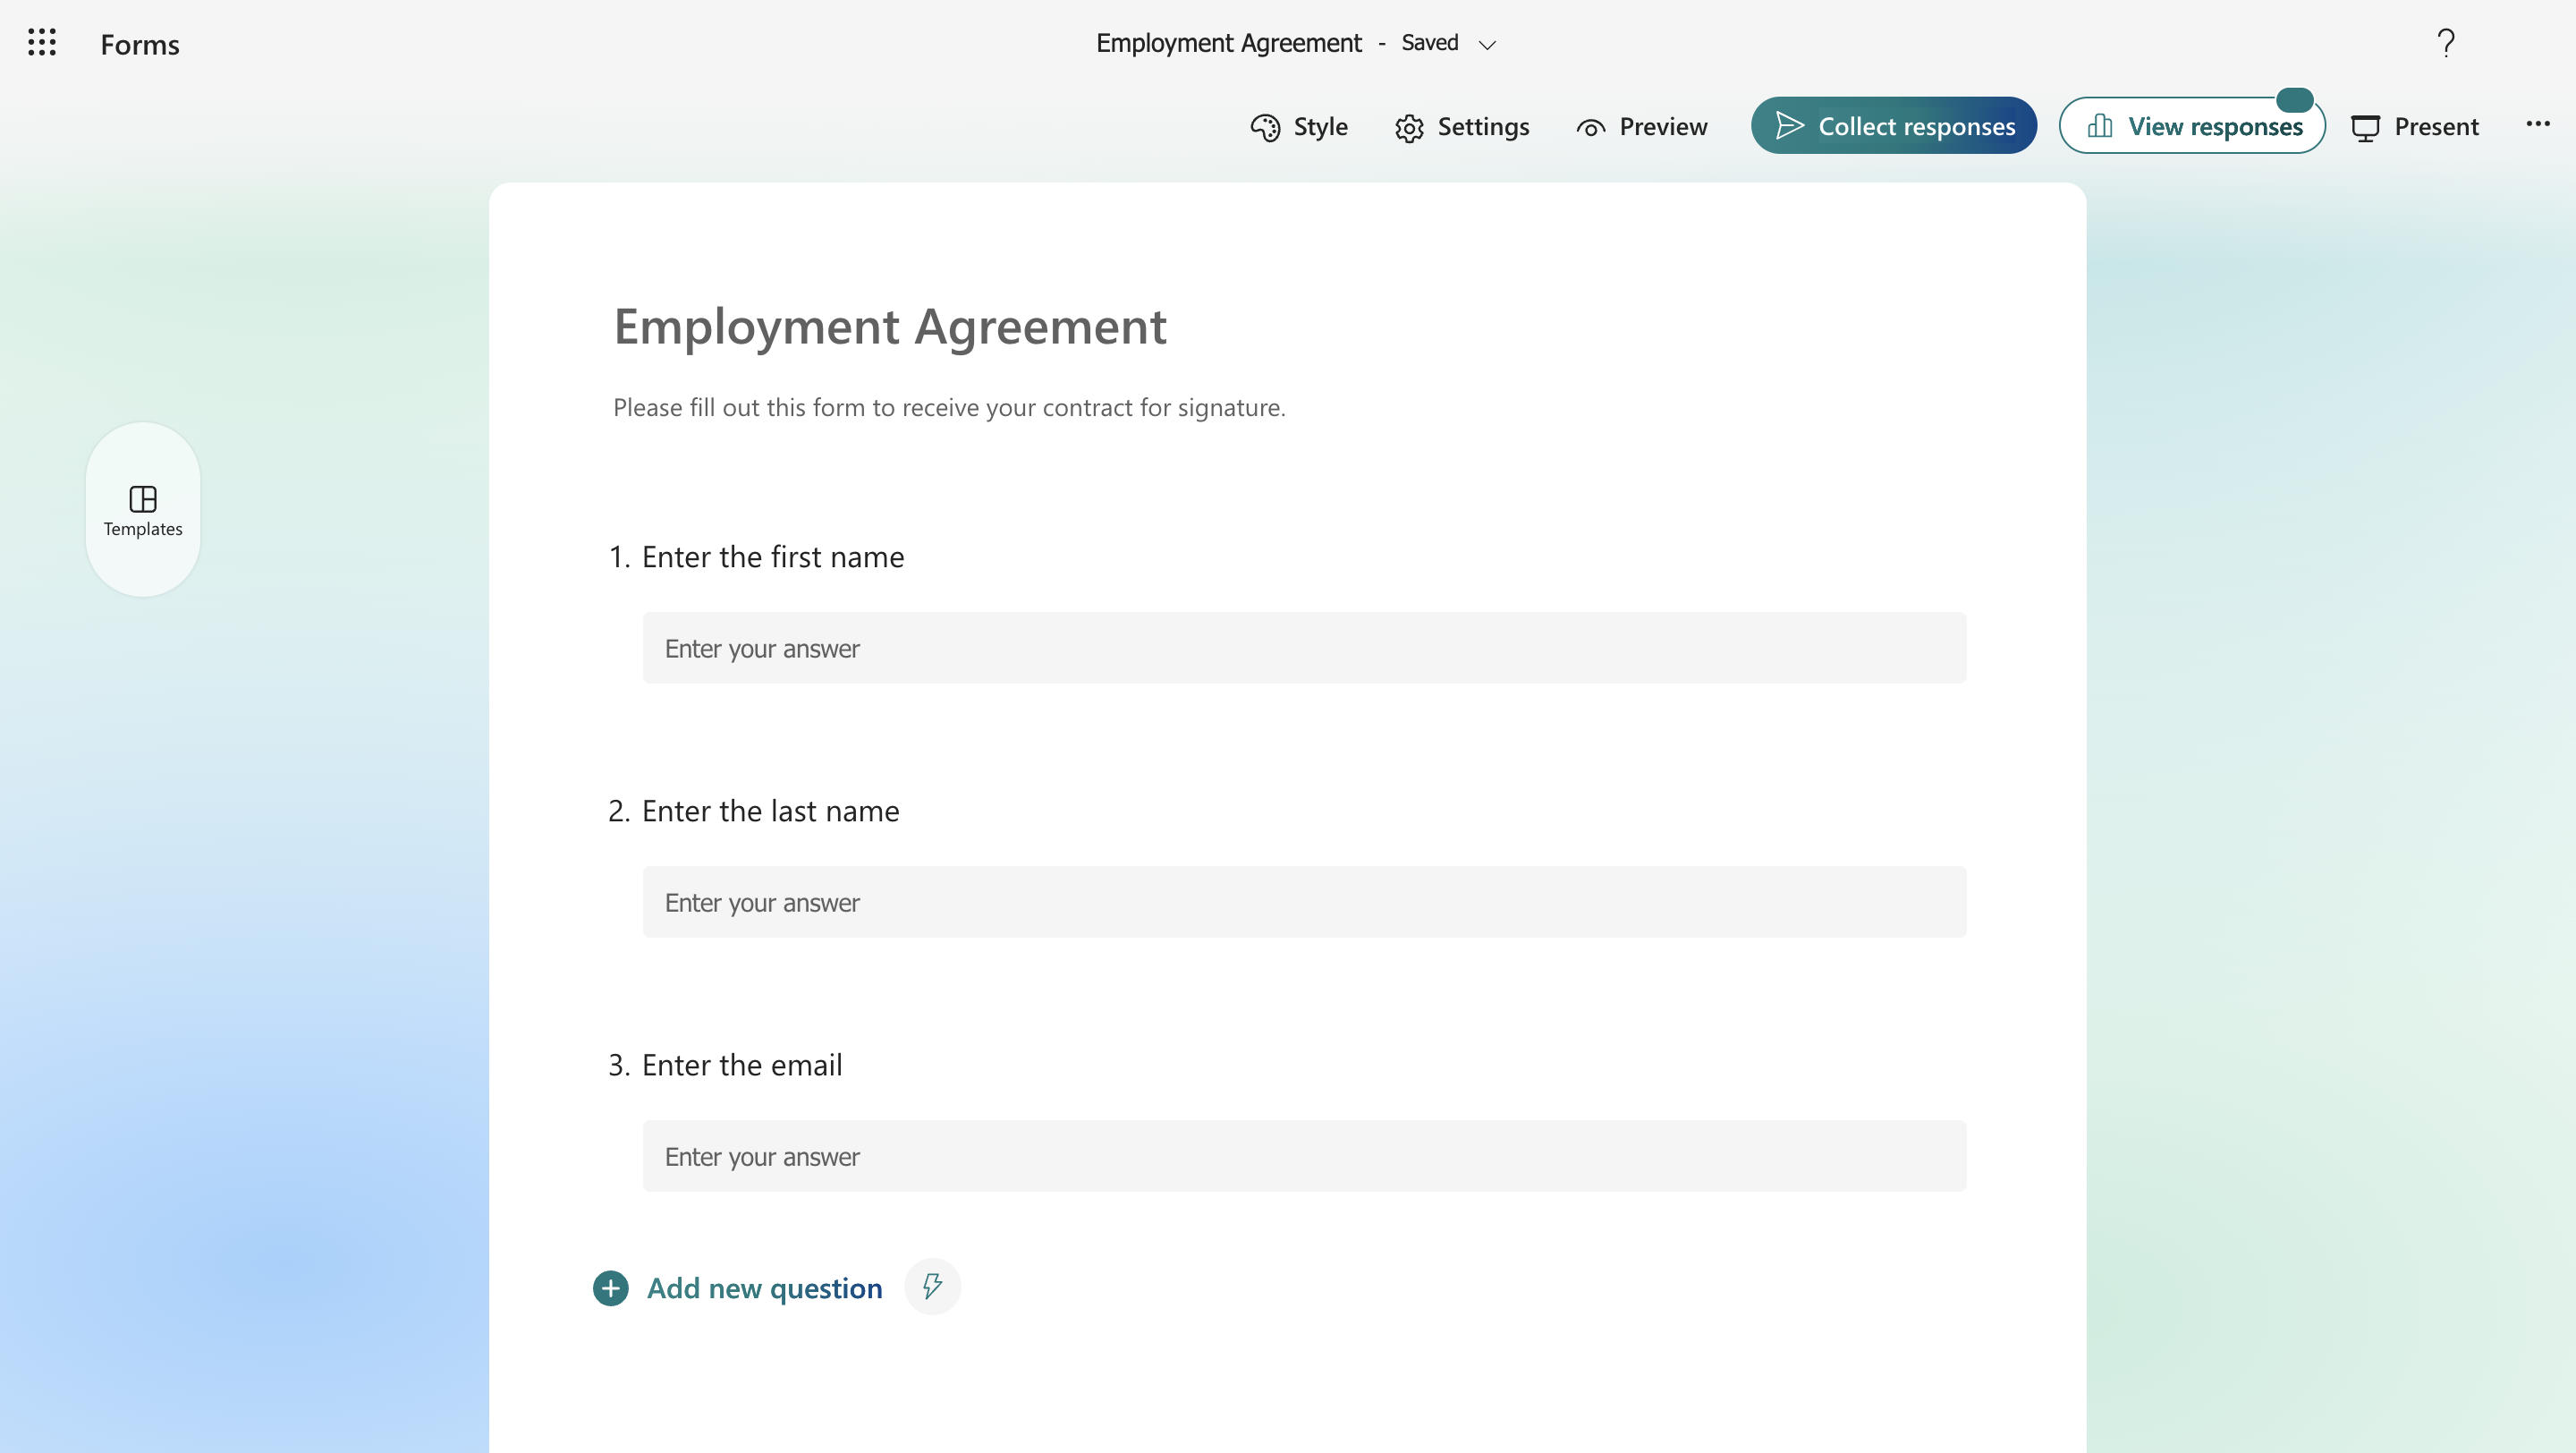
 3. Name your form and add the following required questions:
* **First Name** (Text, required)
* **Last Name** (Text, required)
* **Email Address** (Text, required)
3. Name your form and add the following required questions:
* **First Name** (Text, required)
* **Last Name** (Text, required)
* **Email Address** (Text, required)
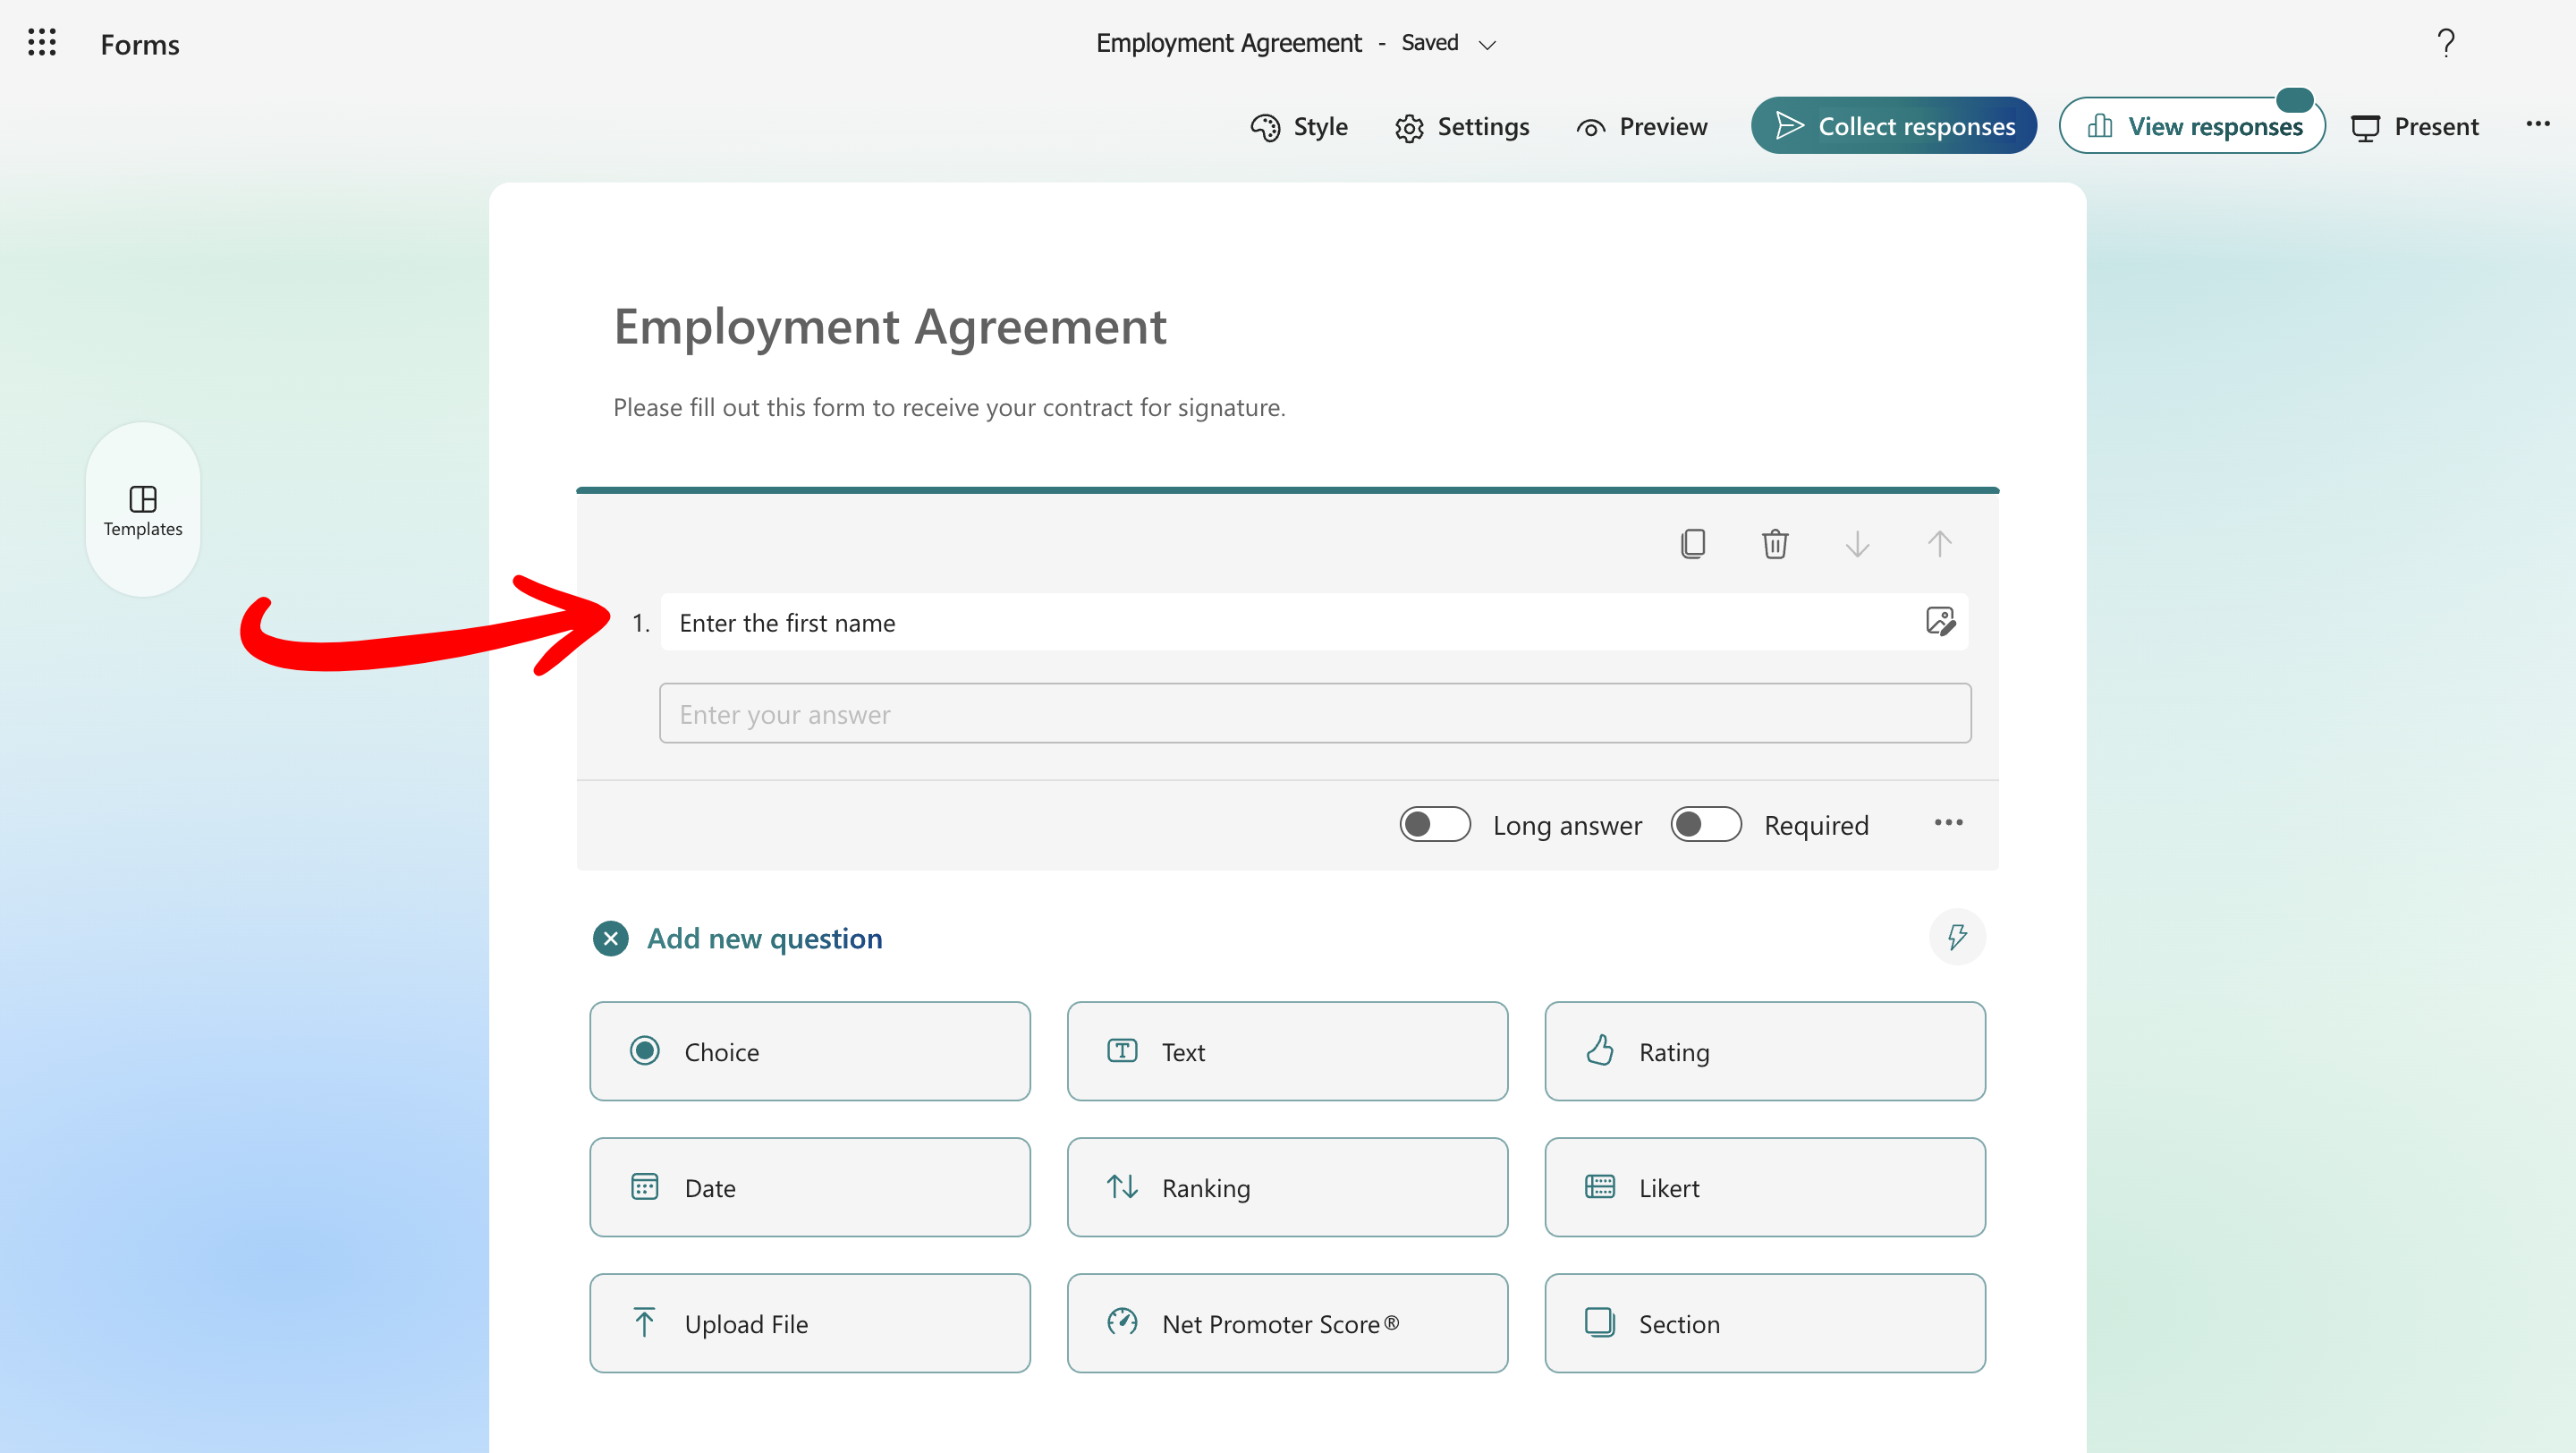 4. Save and publish your form.
 ## Create the Dataverse table
We will store employee details in a Dataverse table.
1. Go to [Power Apps](https://make.powerapps.com) and sign in.
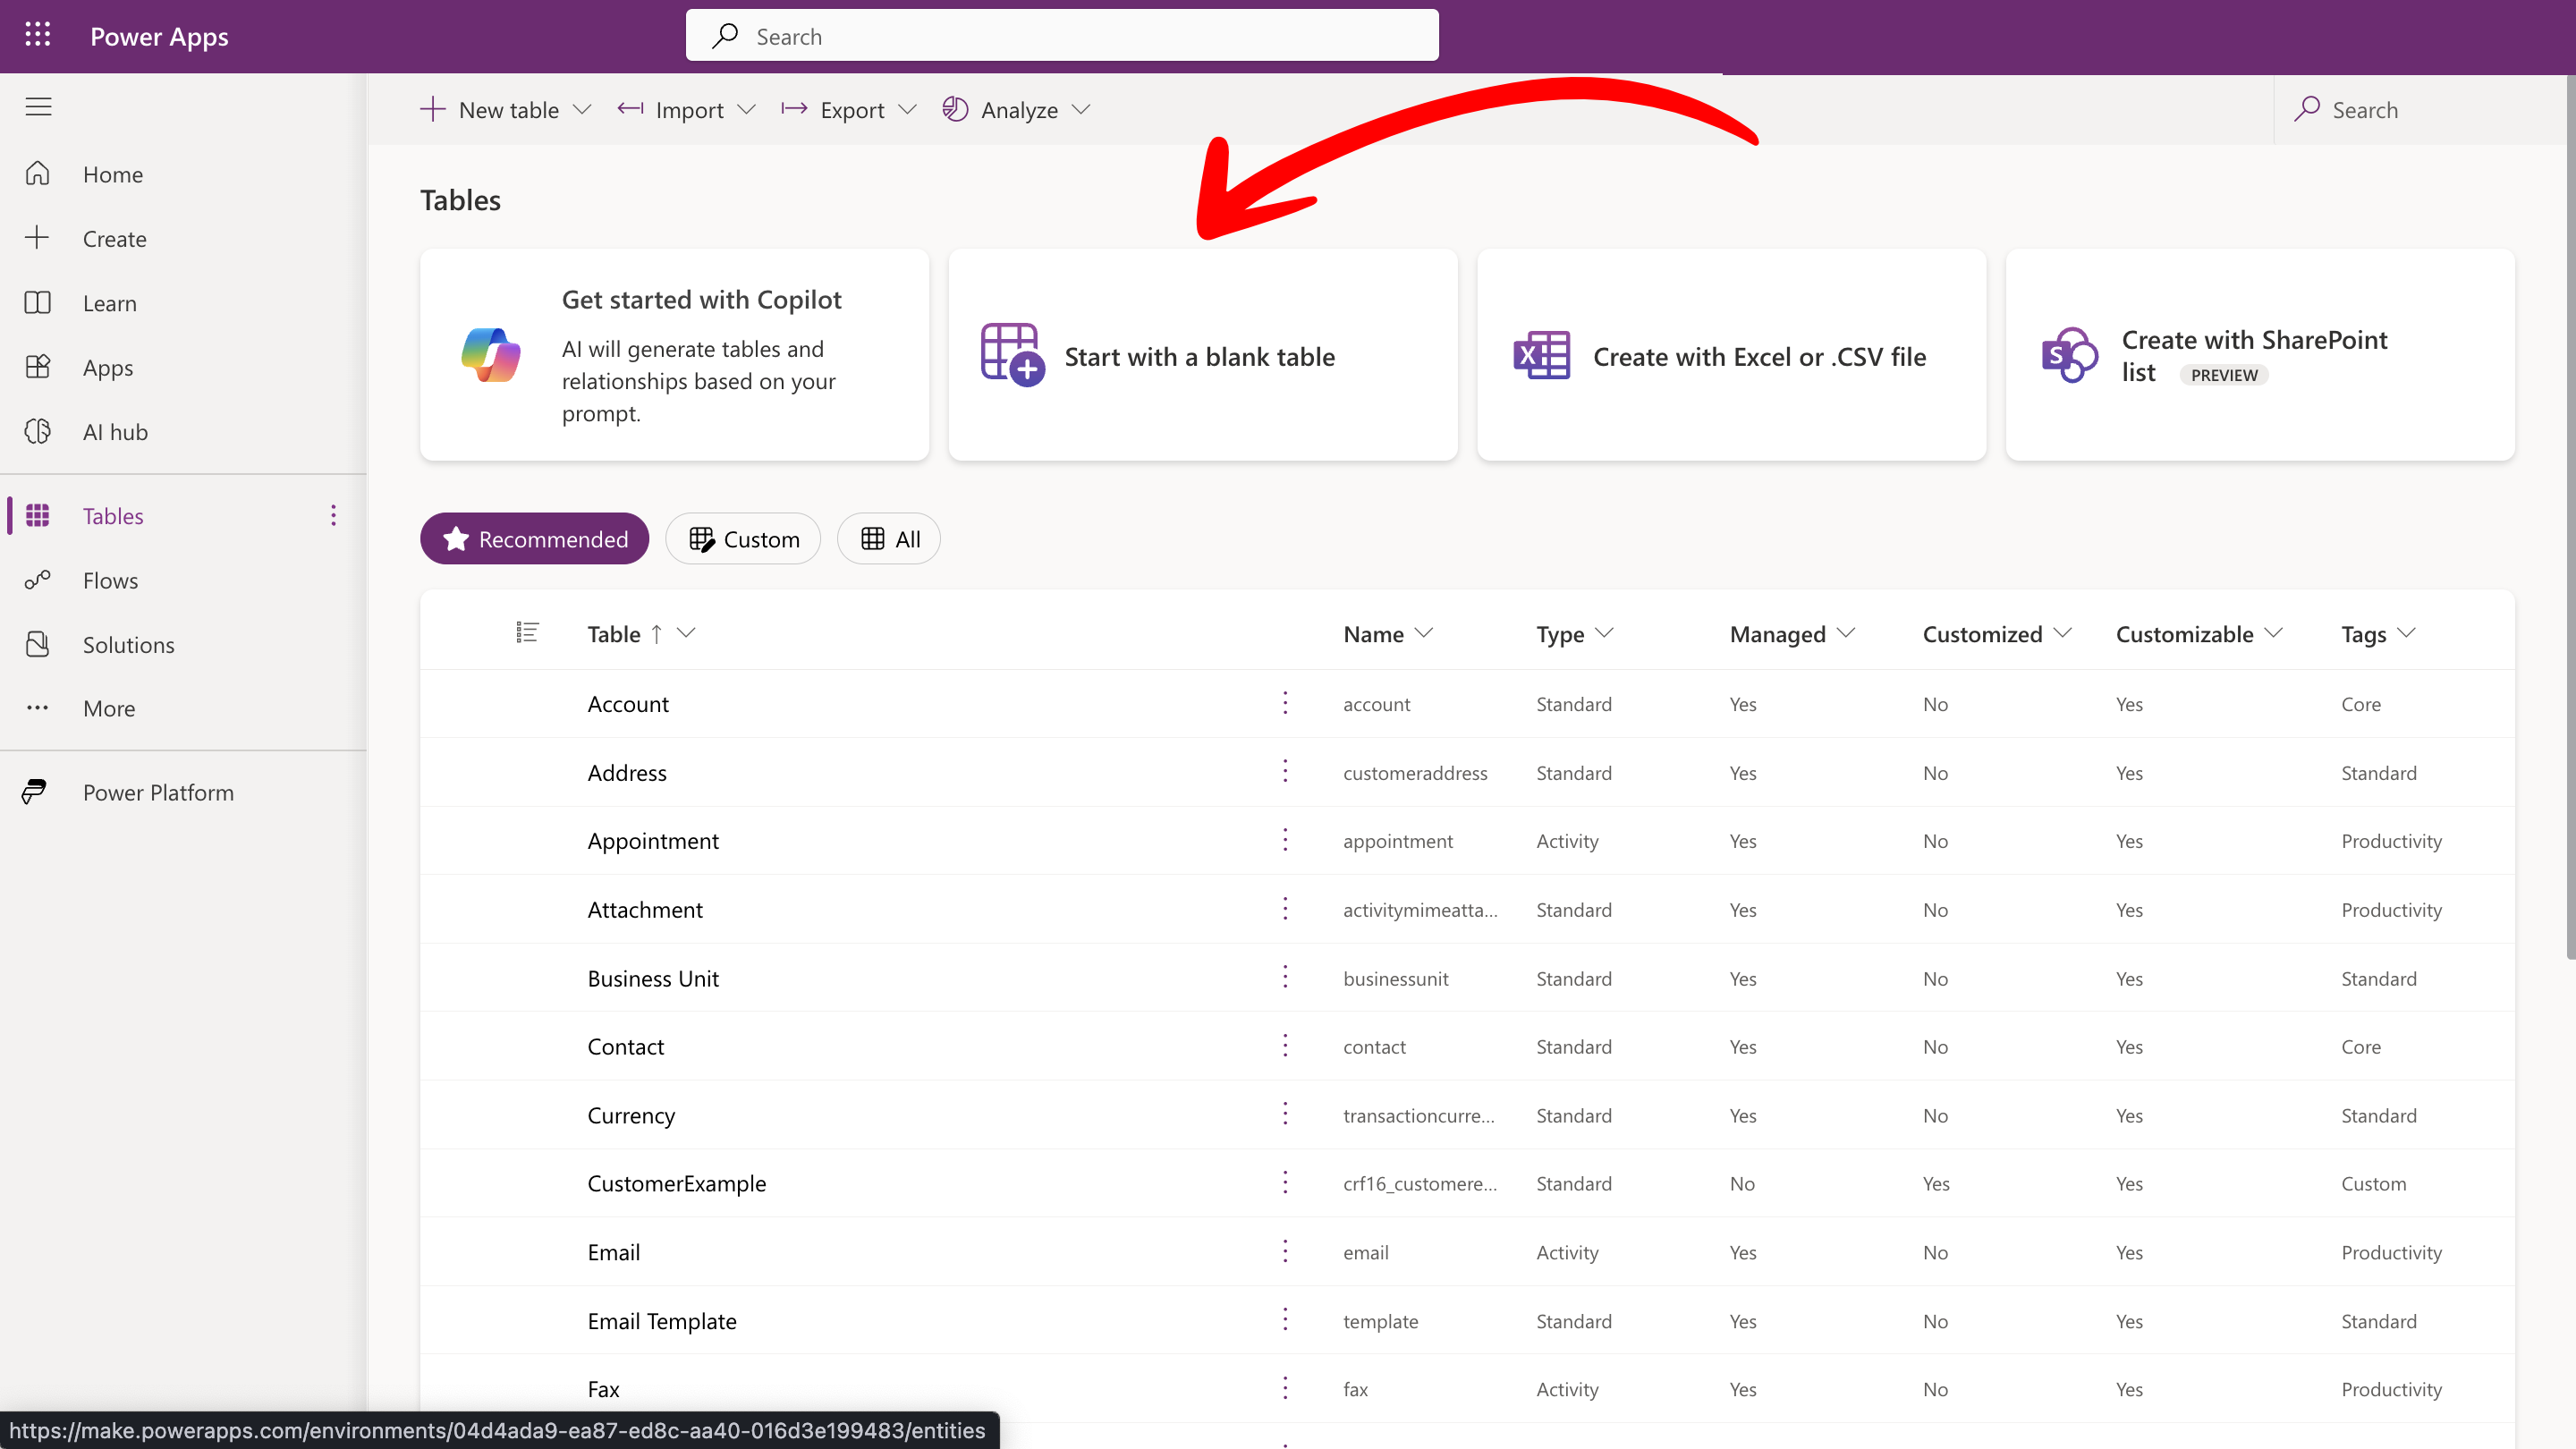
2. In the left menu, click on **"Tables"**.
3. Click **Start with a blank table**.
## Create the Dataverse table
We will store employee details in a Dataverse table.
1. Go to [Power Apps](https://make.powerapps.com) and sign in.
2. In the left menu, click on **"Tables"**.
3. Click **Start with a blank table**.
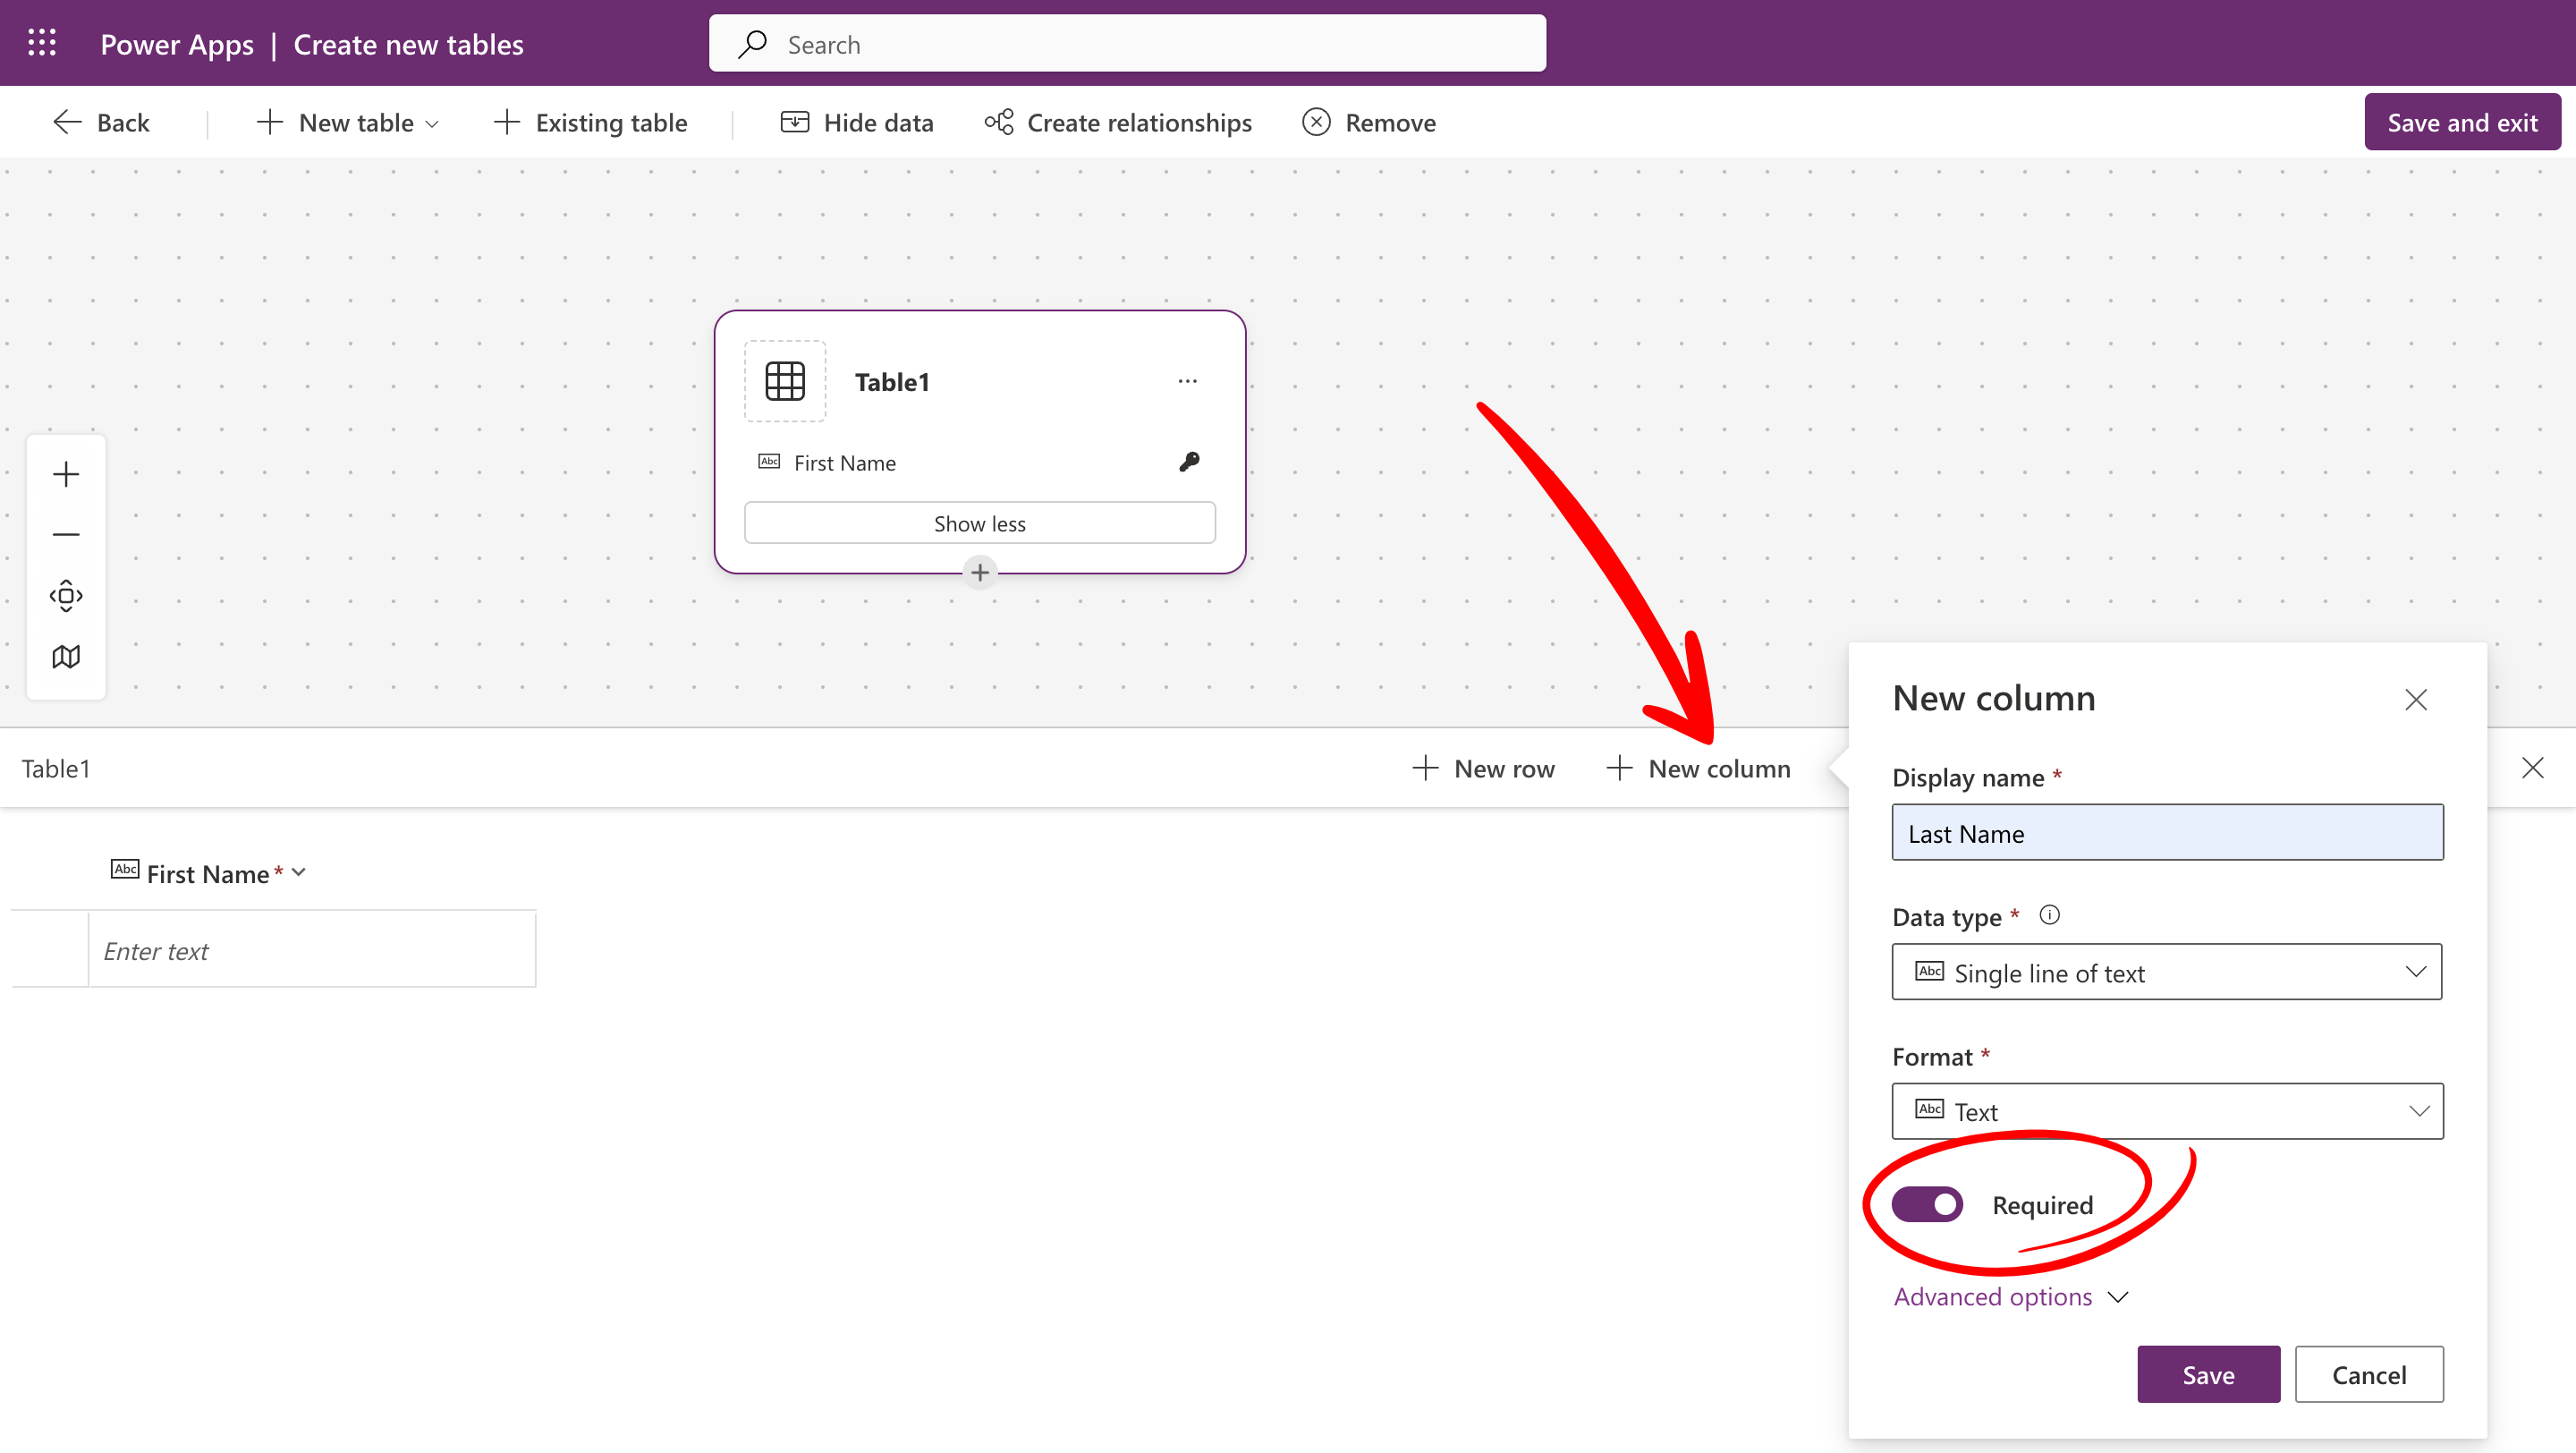
 4. Add the following columns, all with **Text** format and **Required**:
* **First Name**
* **Last Name**
* **Email Address**
* **Salary Amount**
* **Signature Completion**
4. Add the following columns, all with **Text** format and **Required**:
* **First Name**
* **Last Name**
* **Email Address**
* **Salary Amount**
* **Signature Completion**
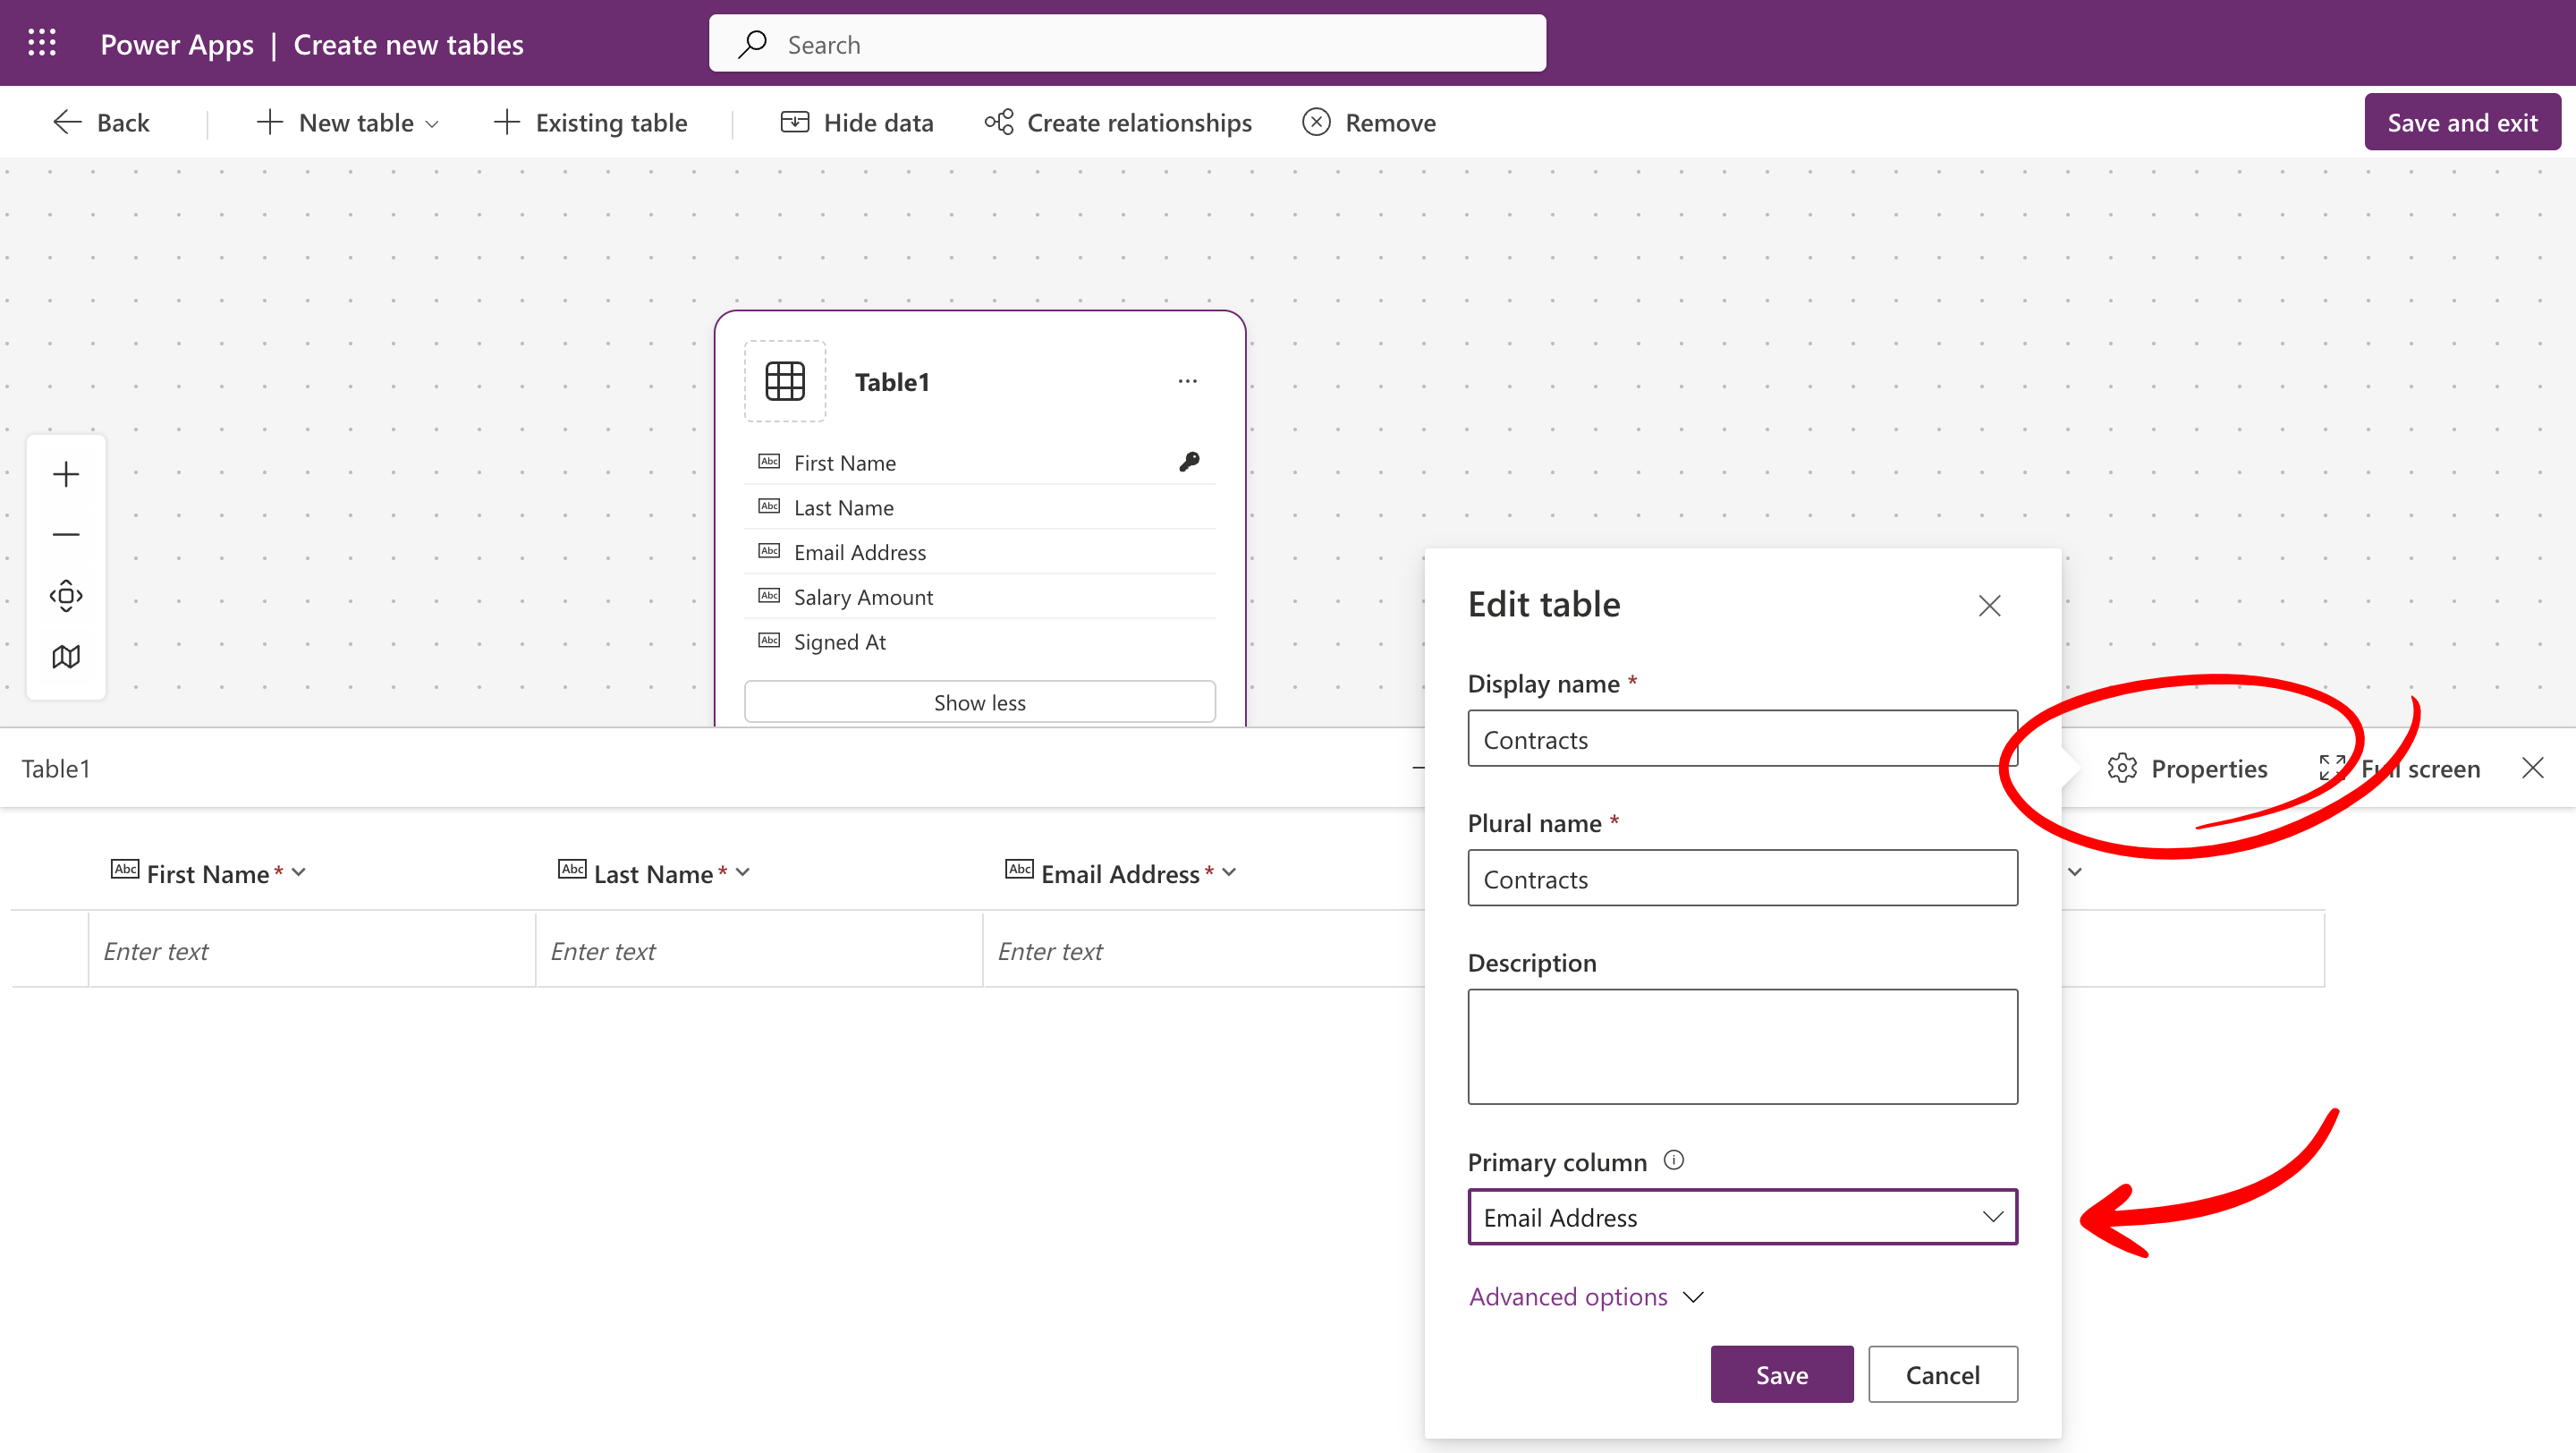
 5. Rename the table:
* Click **Properties**, then enter a new name (e.g., **Contracts**).
* Change the **Primary column** to **Email Address**.
* Click **Save and exit**.
5. Rename the table:
* Click **Properties**, then enter a new name (e.g., **Contracts**).
* Change the **Primary column** to **Email Address**.
* Click **Save and exit**.
 ## Build the Power Automate flow
Now that you have the contract template, the form, and the Dataverse table set up, create a Power Automate flow that runs whenever someone submits the form.
### Configure the trigger
Set up the flow trigger so it runs when a new form response is submitted.
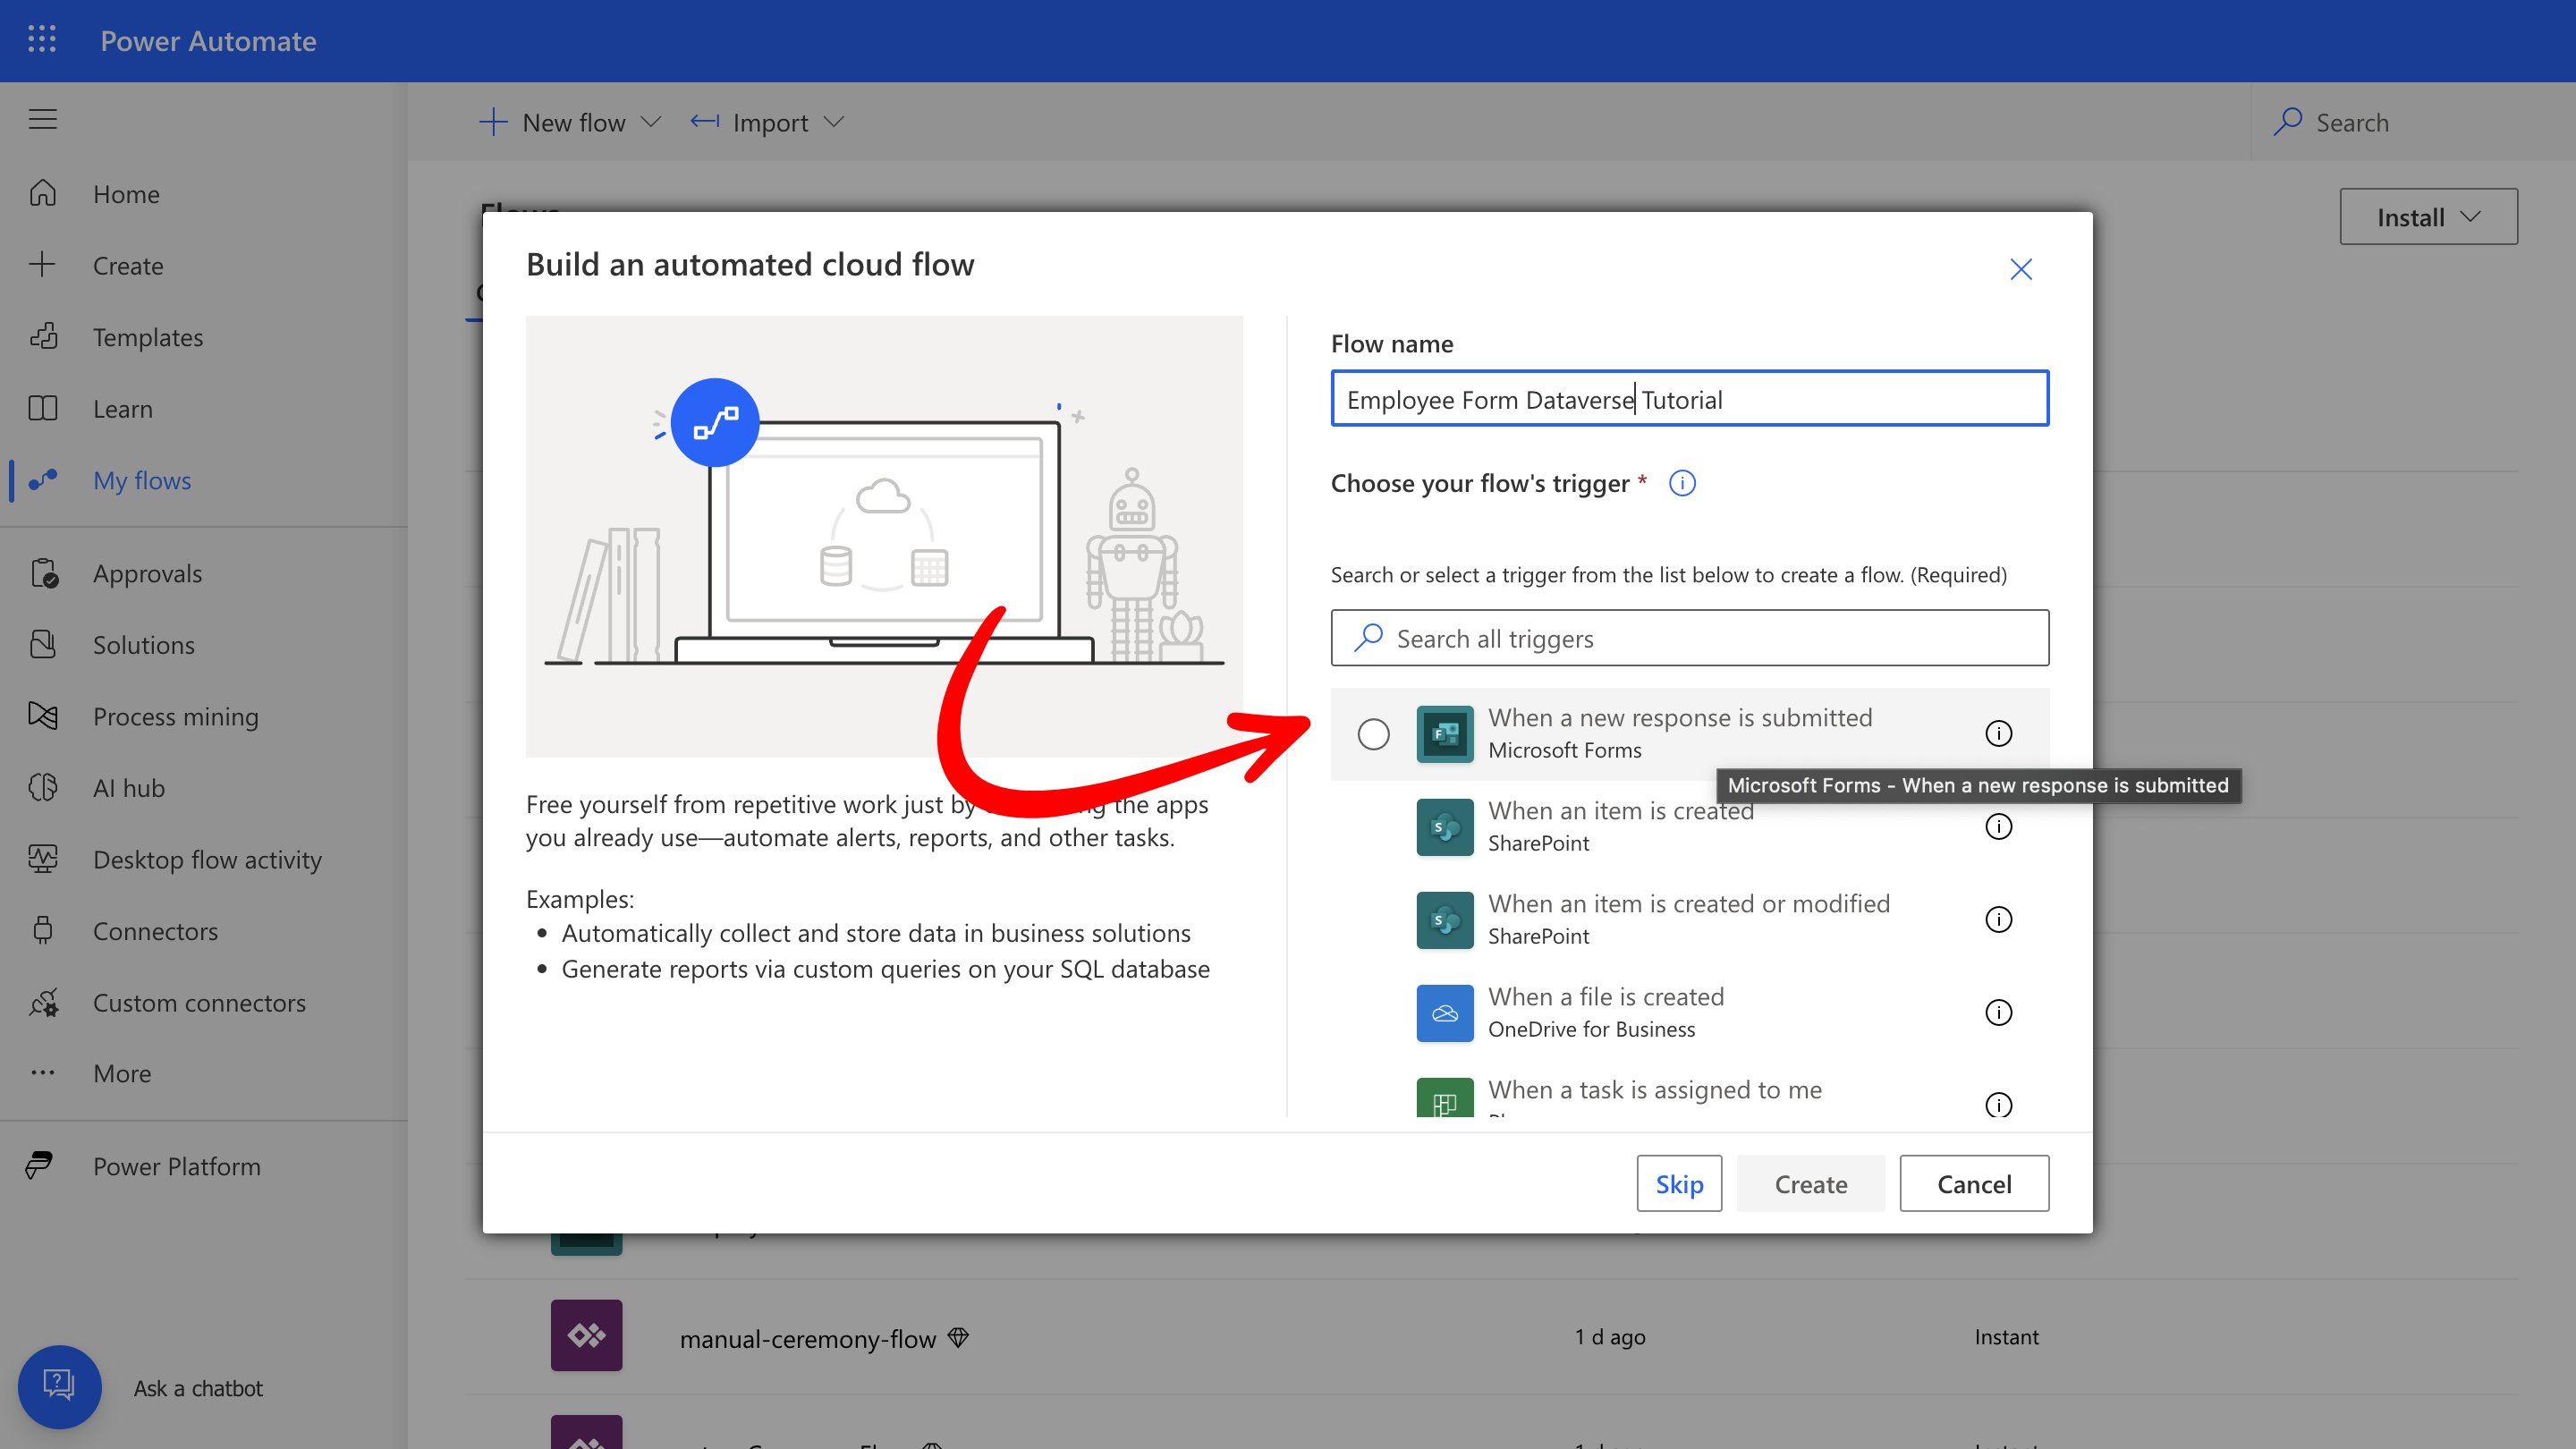
1. Go to **Power Automate** and select **Automated Cloud Flow**.
2. Choose the trigger **"When a new response is submitted"** from the **Microsoft Forms** connector.
3. Click **Create**.
## Build the Power Automate flow
Now that you have the contract template, the form, and the Dataverse table set up, create a Power Automate flow that runs whenever someone submits the form.
### Configure the trigger
Set up the flow trigger so it runs when a new form response is submitted.
1. Go to **Power Automate** and select **Automated Cloud Flow**.
2. Choose the trigger **"When a new response is submitted"** from the **Microsoft Forms** connector.
3. Click **Create**.
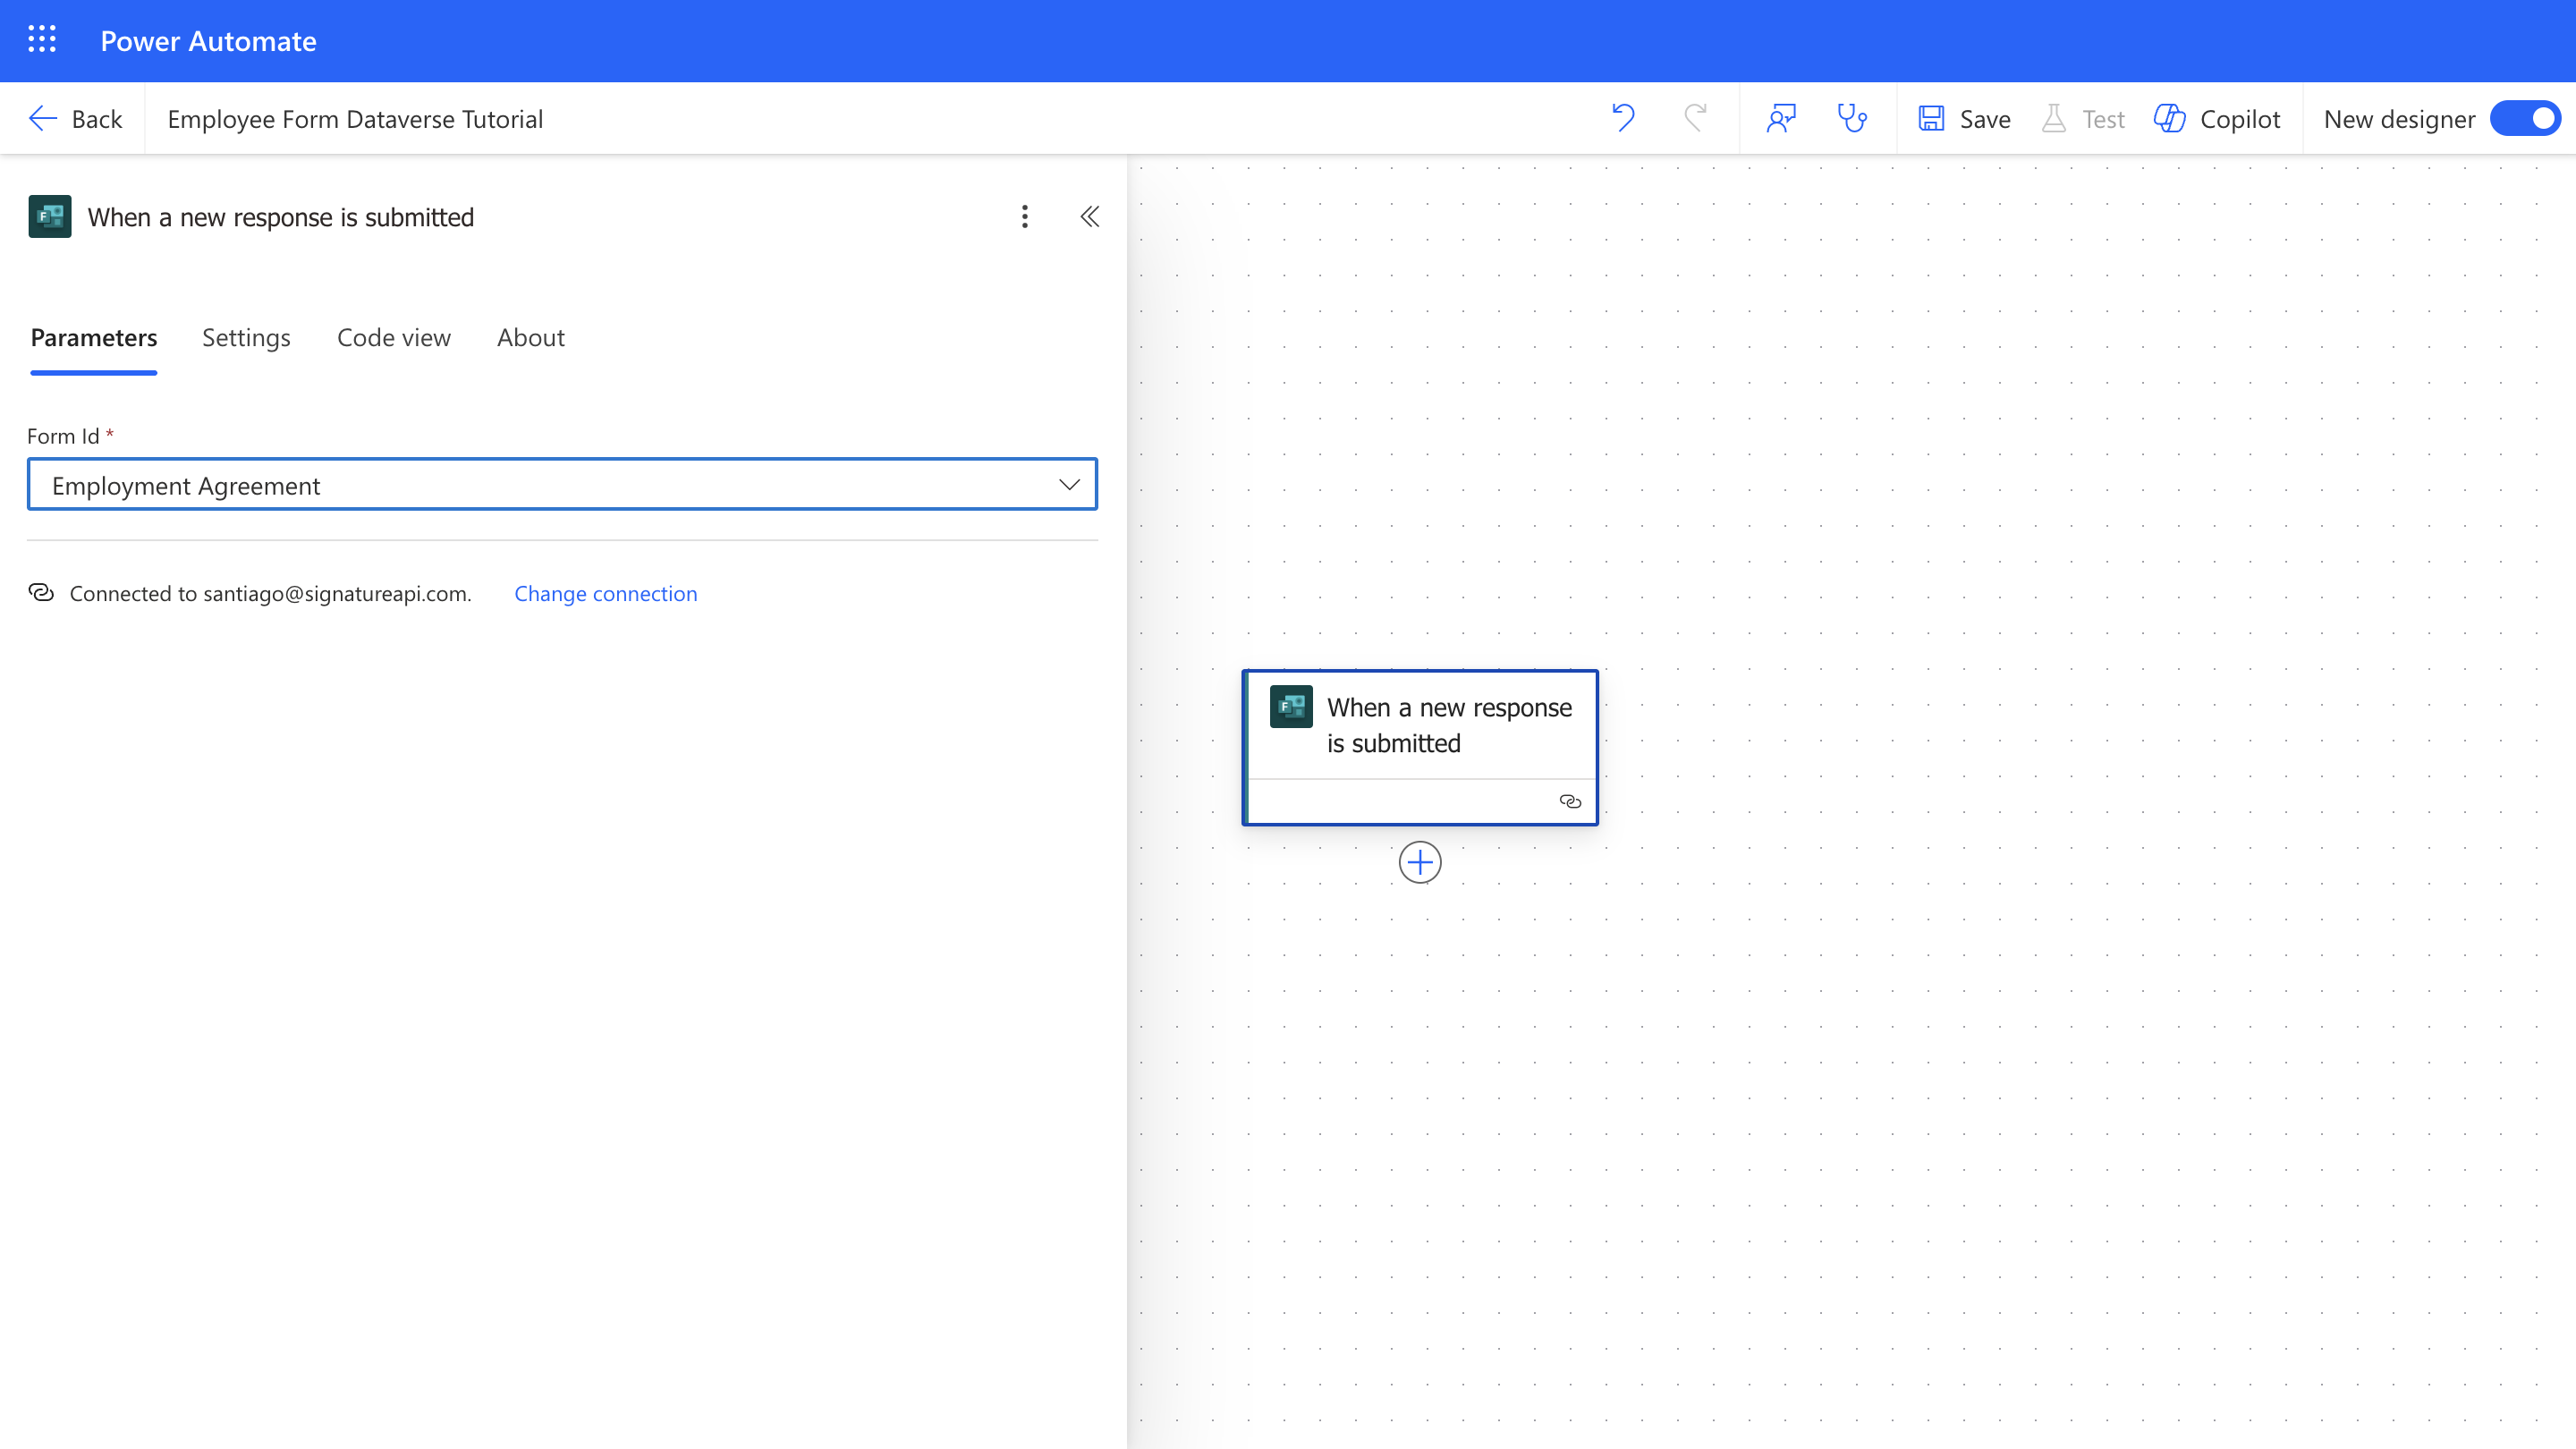
 3. In the **Form Id** field, select your form from the dropdown.
 ### Retrieve form response details
Get the details submitted by the employee.
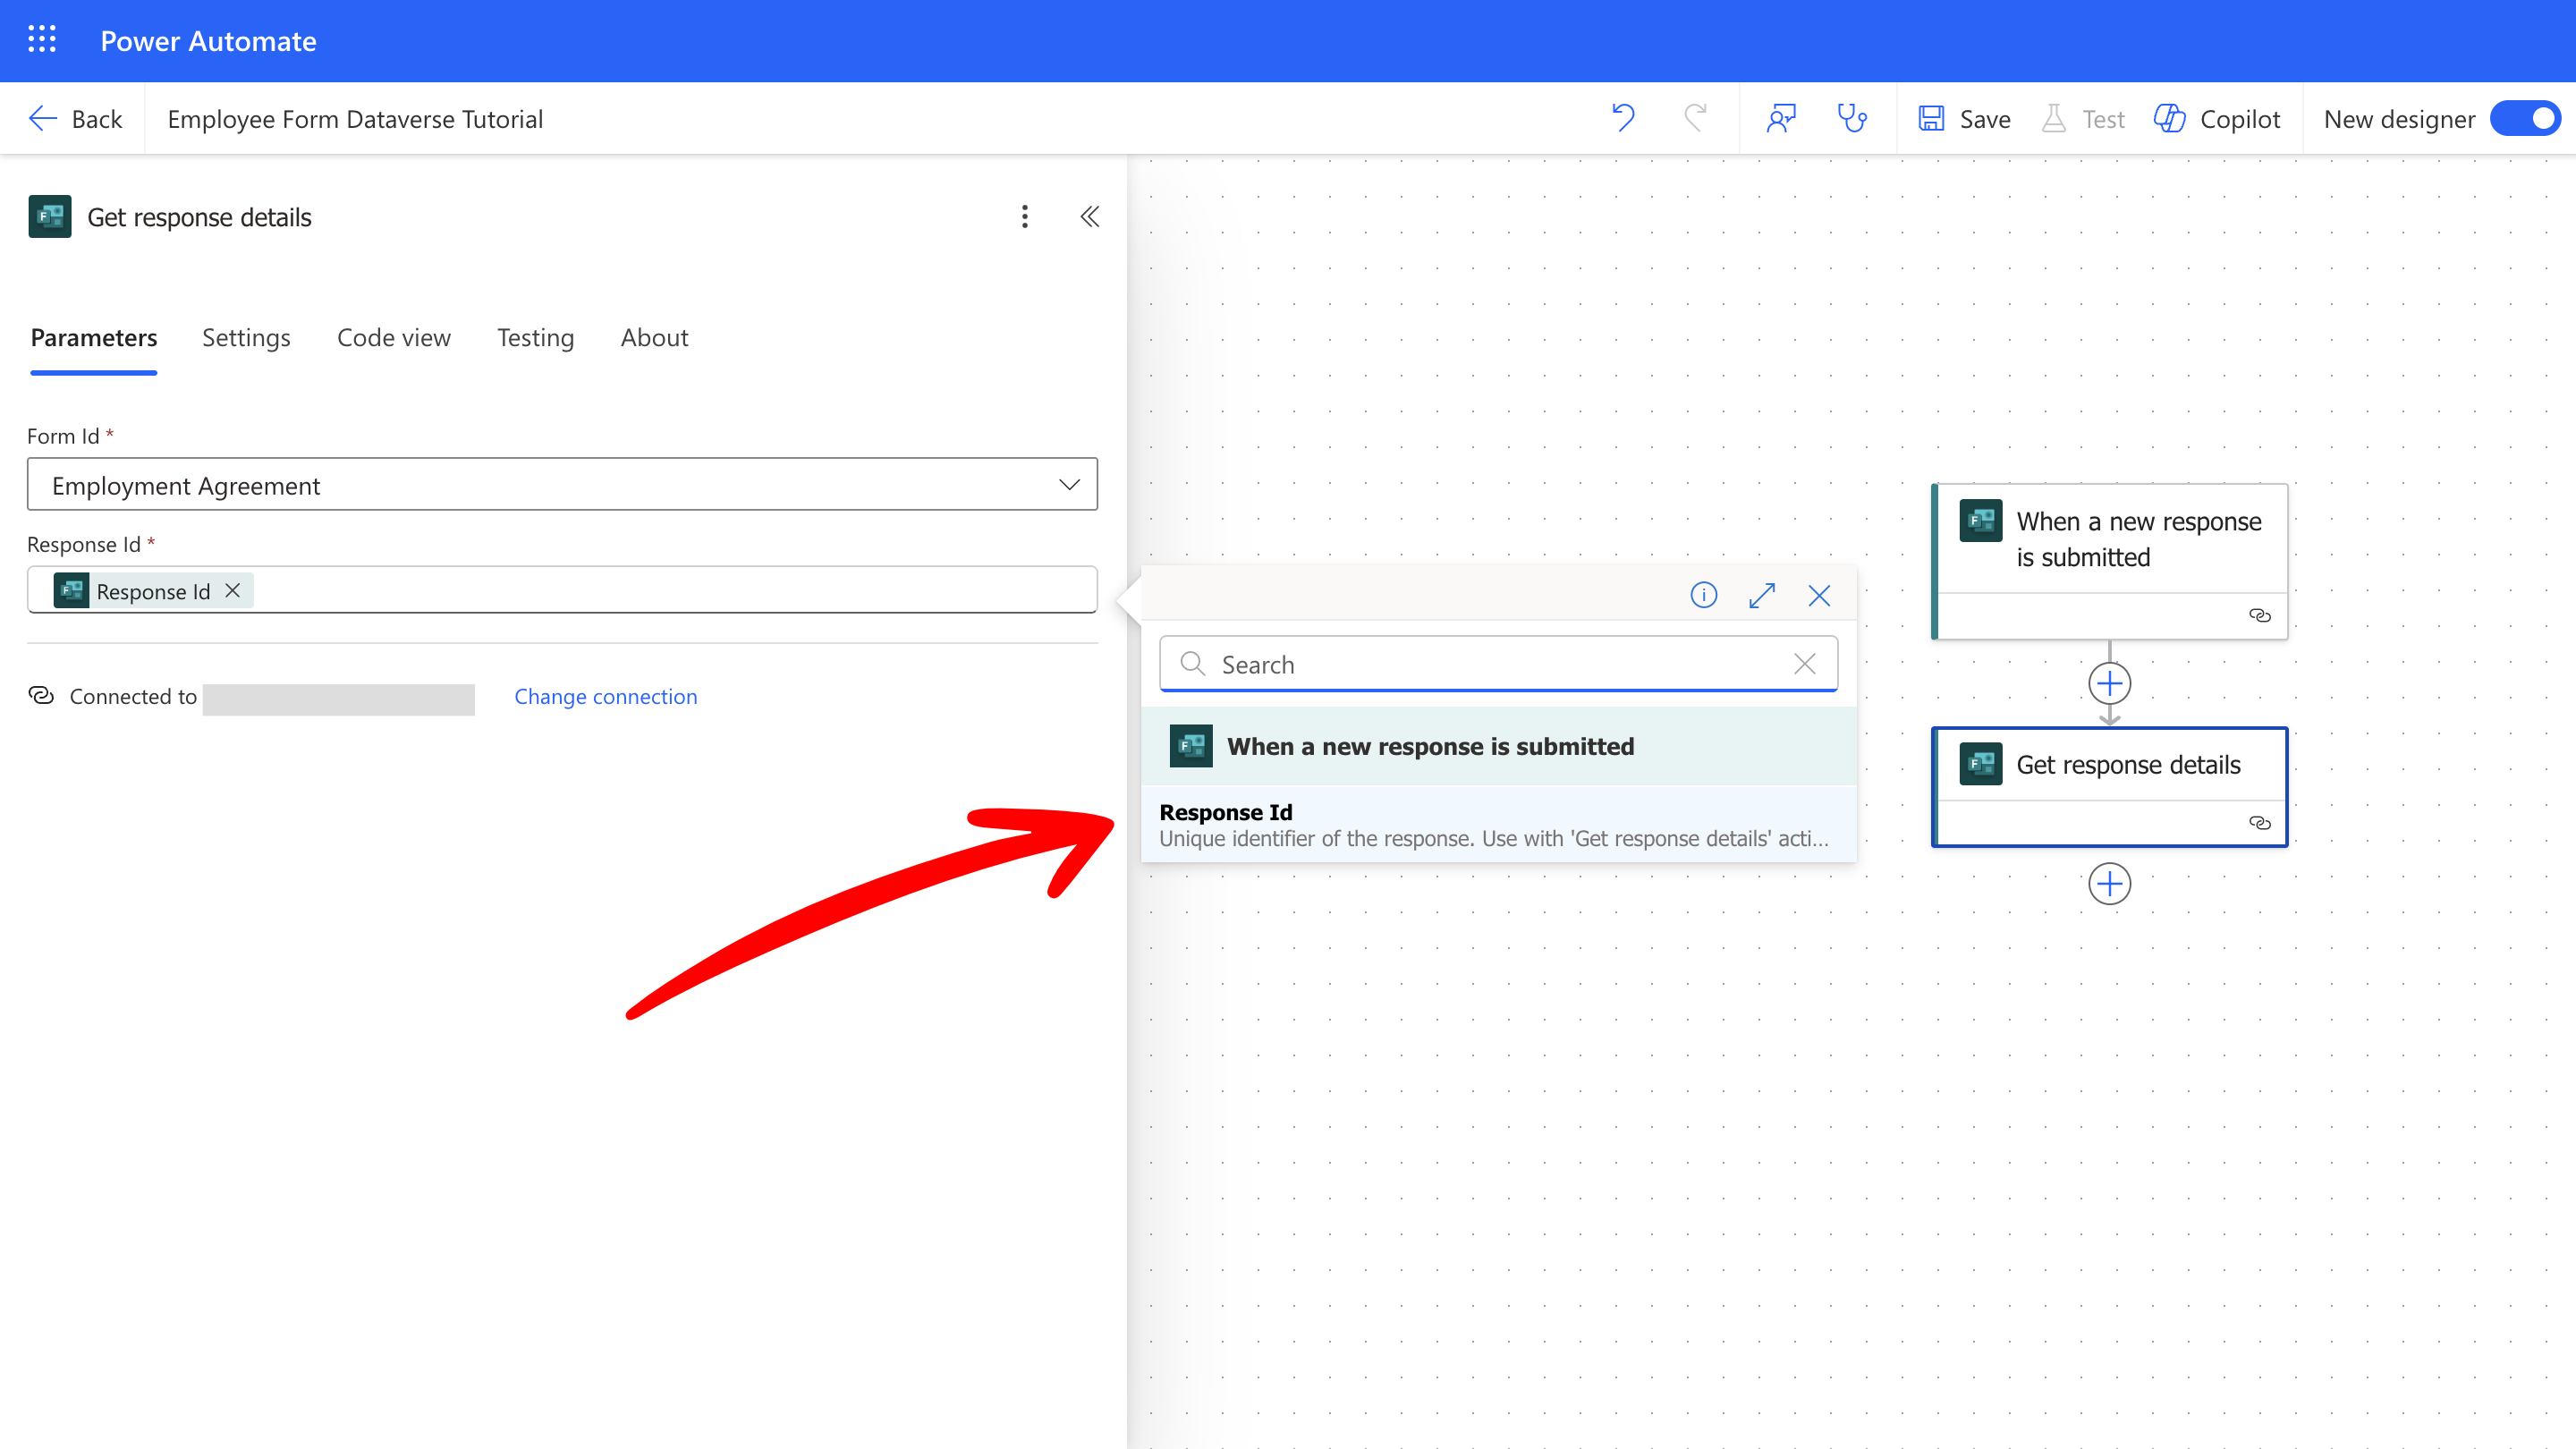
1. Add the **Get response details** action from the **Microsoft Forms** connector.
2. In the **Form Id** field, select the same form.
3. In the **Response Id** field, select **Response Id** from the trigger step.
### Retrieve form response details
Get the details submitted by the employee.
1. Add the **Get response details** action from the **Microsoft Forms** connector.
2. In the **Form Id** field, select the same form.
3. In the **Response Id** field, select **Response Id** from the trigger step.
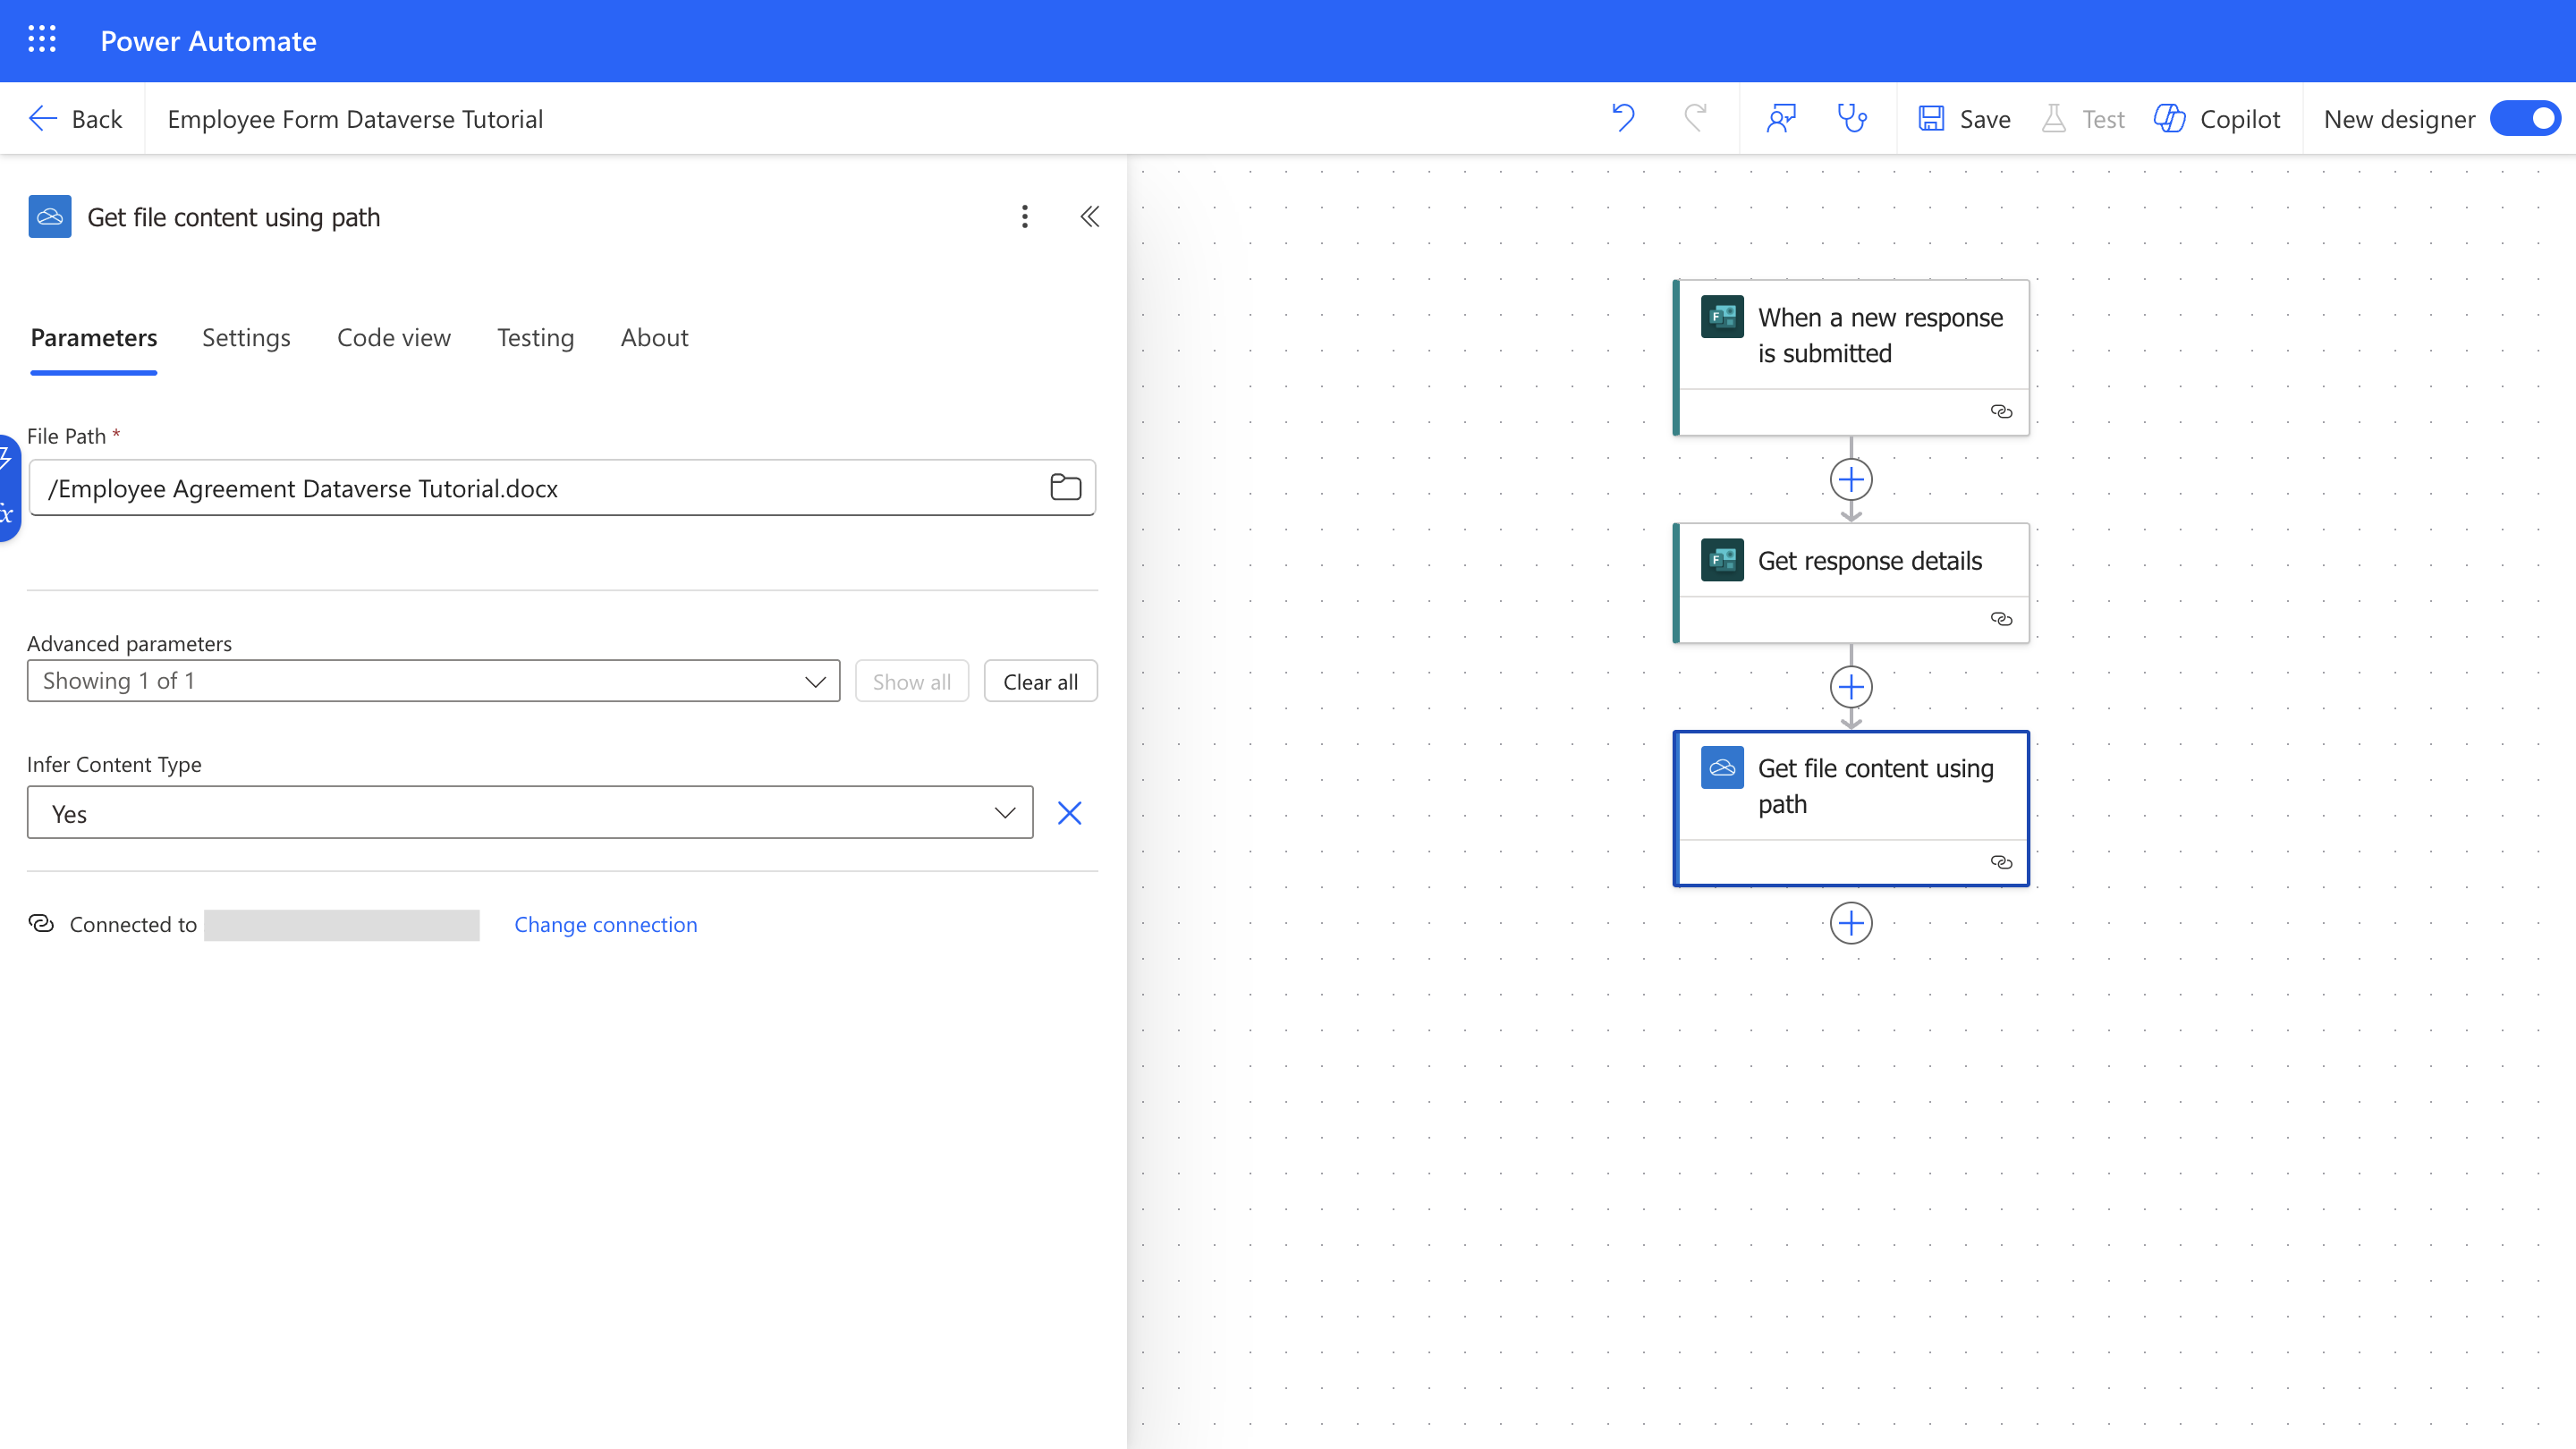
 ### Retrieve the contract template from OneDrive
Fetch the contract template stored in OneDrive.
1. Add **Get file content using path** from the **OneDrive** connector.
2. In the **File Path** field, select the DOCX template you uploaded.
### Retrieve the contract template from OneDrive
Fetch the contract template stored in OneDrive.
1. Add **Get file content using path** from the **OneDrive** connector.
2. In the **File Path** field, select the DOCX template you uploaded.
 ### Create an envelope
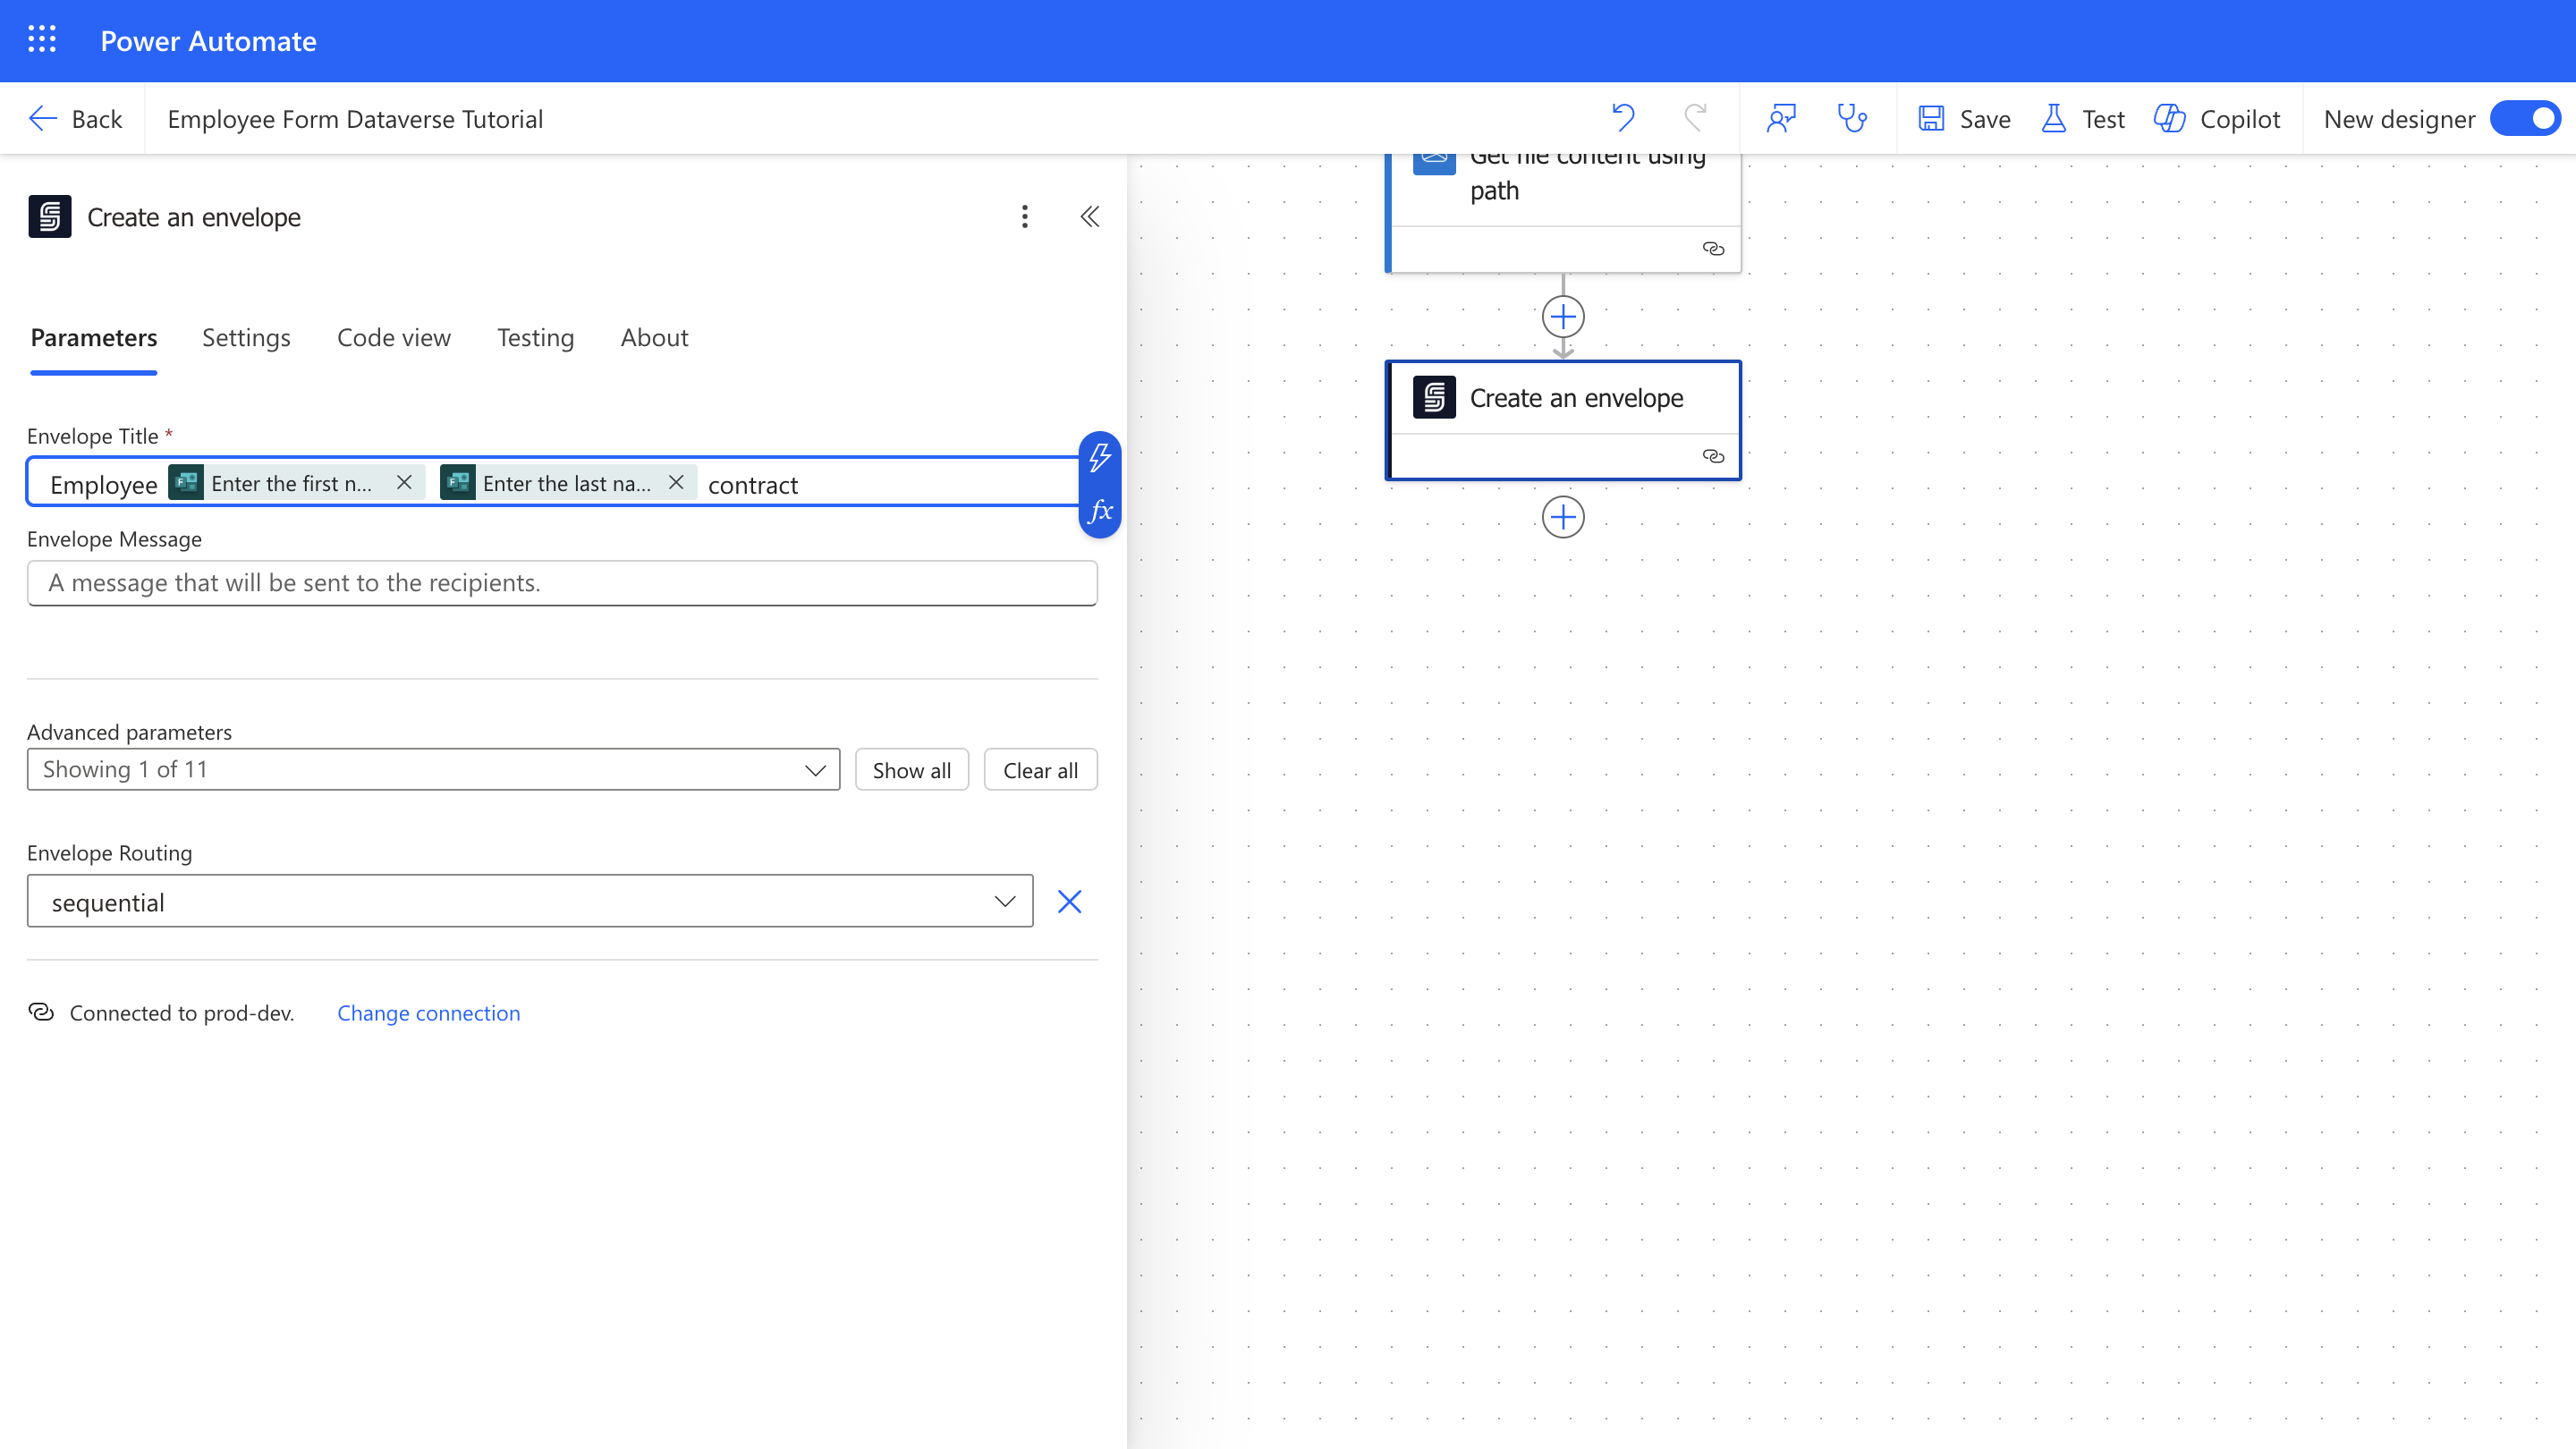
In SignatureAPI, an [Envelope](/docs/integrations/power-automate/envelopes/envelope) is a container that holds one or more documents to be sent to recipients. It defines and manages the signing process for those documents.
Start by creating the envelope in your flow:
1. Add the **Create an envelope** action from the **SignatureAPI** connector.
2. If this is your first time using the connector, you’ll be prompted to enter your SignatureAPI API key. Learn more about [authentication and connections](/docs/integrations/power-automate/authentication).
3. Set an **Envelope Title** and include a message to recipients. You can use dynamic data from earlier steps.
4. In **Advanced parameters**, set **Envelope Routing** to **Sequential**. This ensures the employer signs first, followed by the employee.
### Create an envelope
In SignatureAPI, an [Envelope](/docs/integrations/power-automate/envelopes/envelope) is a container that holds one or more documents to be sent to recipients. It defines and manages the signing process for those documents.
Start by creating the envelope in your flow:
1. Add the **Create an envelope** action from the **SignatureAPI** connector.
2. If this is your first time using the connector, you’ll be prompted to enter your SignatureAPI API key. Learn more about [authentication and connections](/docs/integrations/power-automate/authentication).
3. Set an **Envelope Title** and include a message to recipients. You can use dynamic data from earlier steps.
4. In **Advanced parameters**, set **Envelope Routing** to **Sequential**. This ensures the employer signs first, followed by the employee.
 ### Add the employer as a recipient
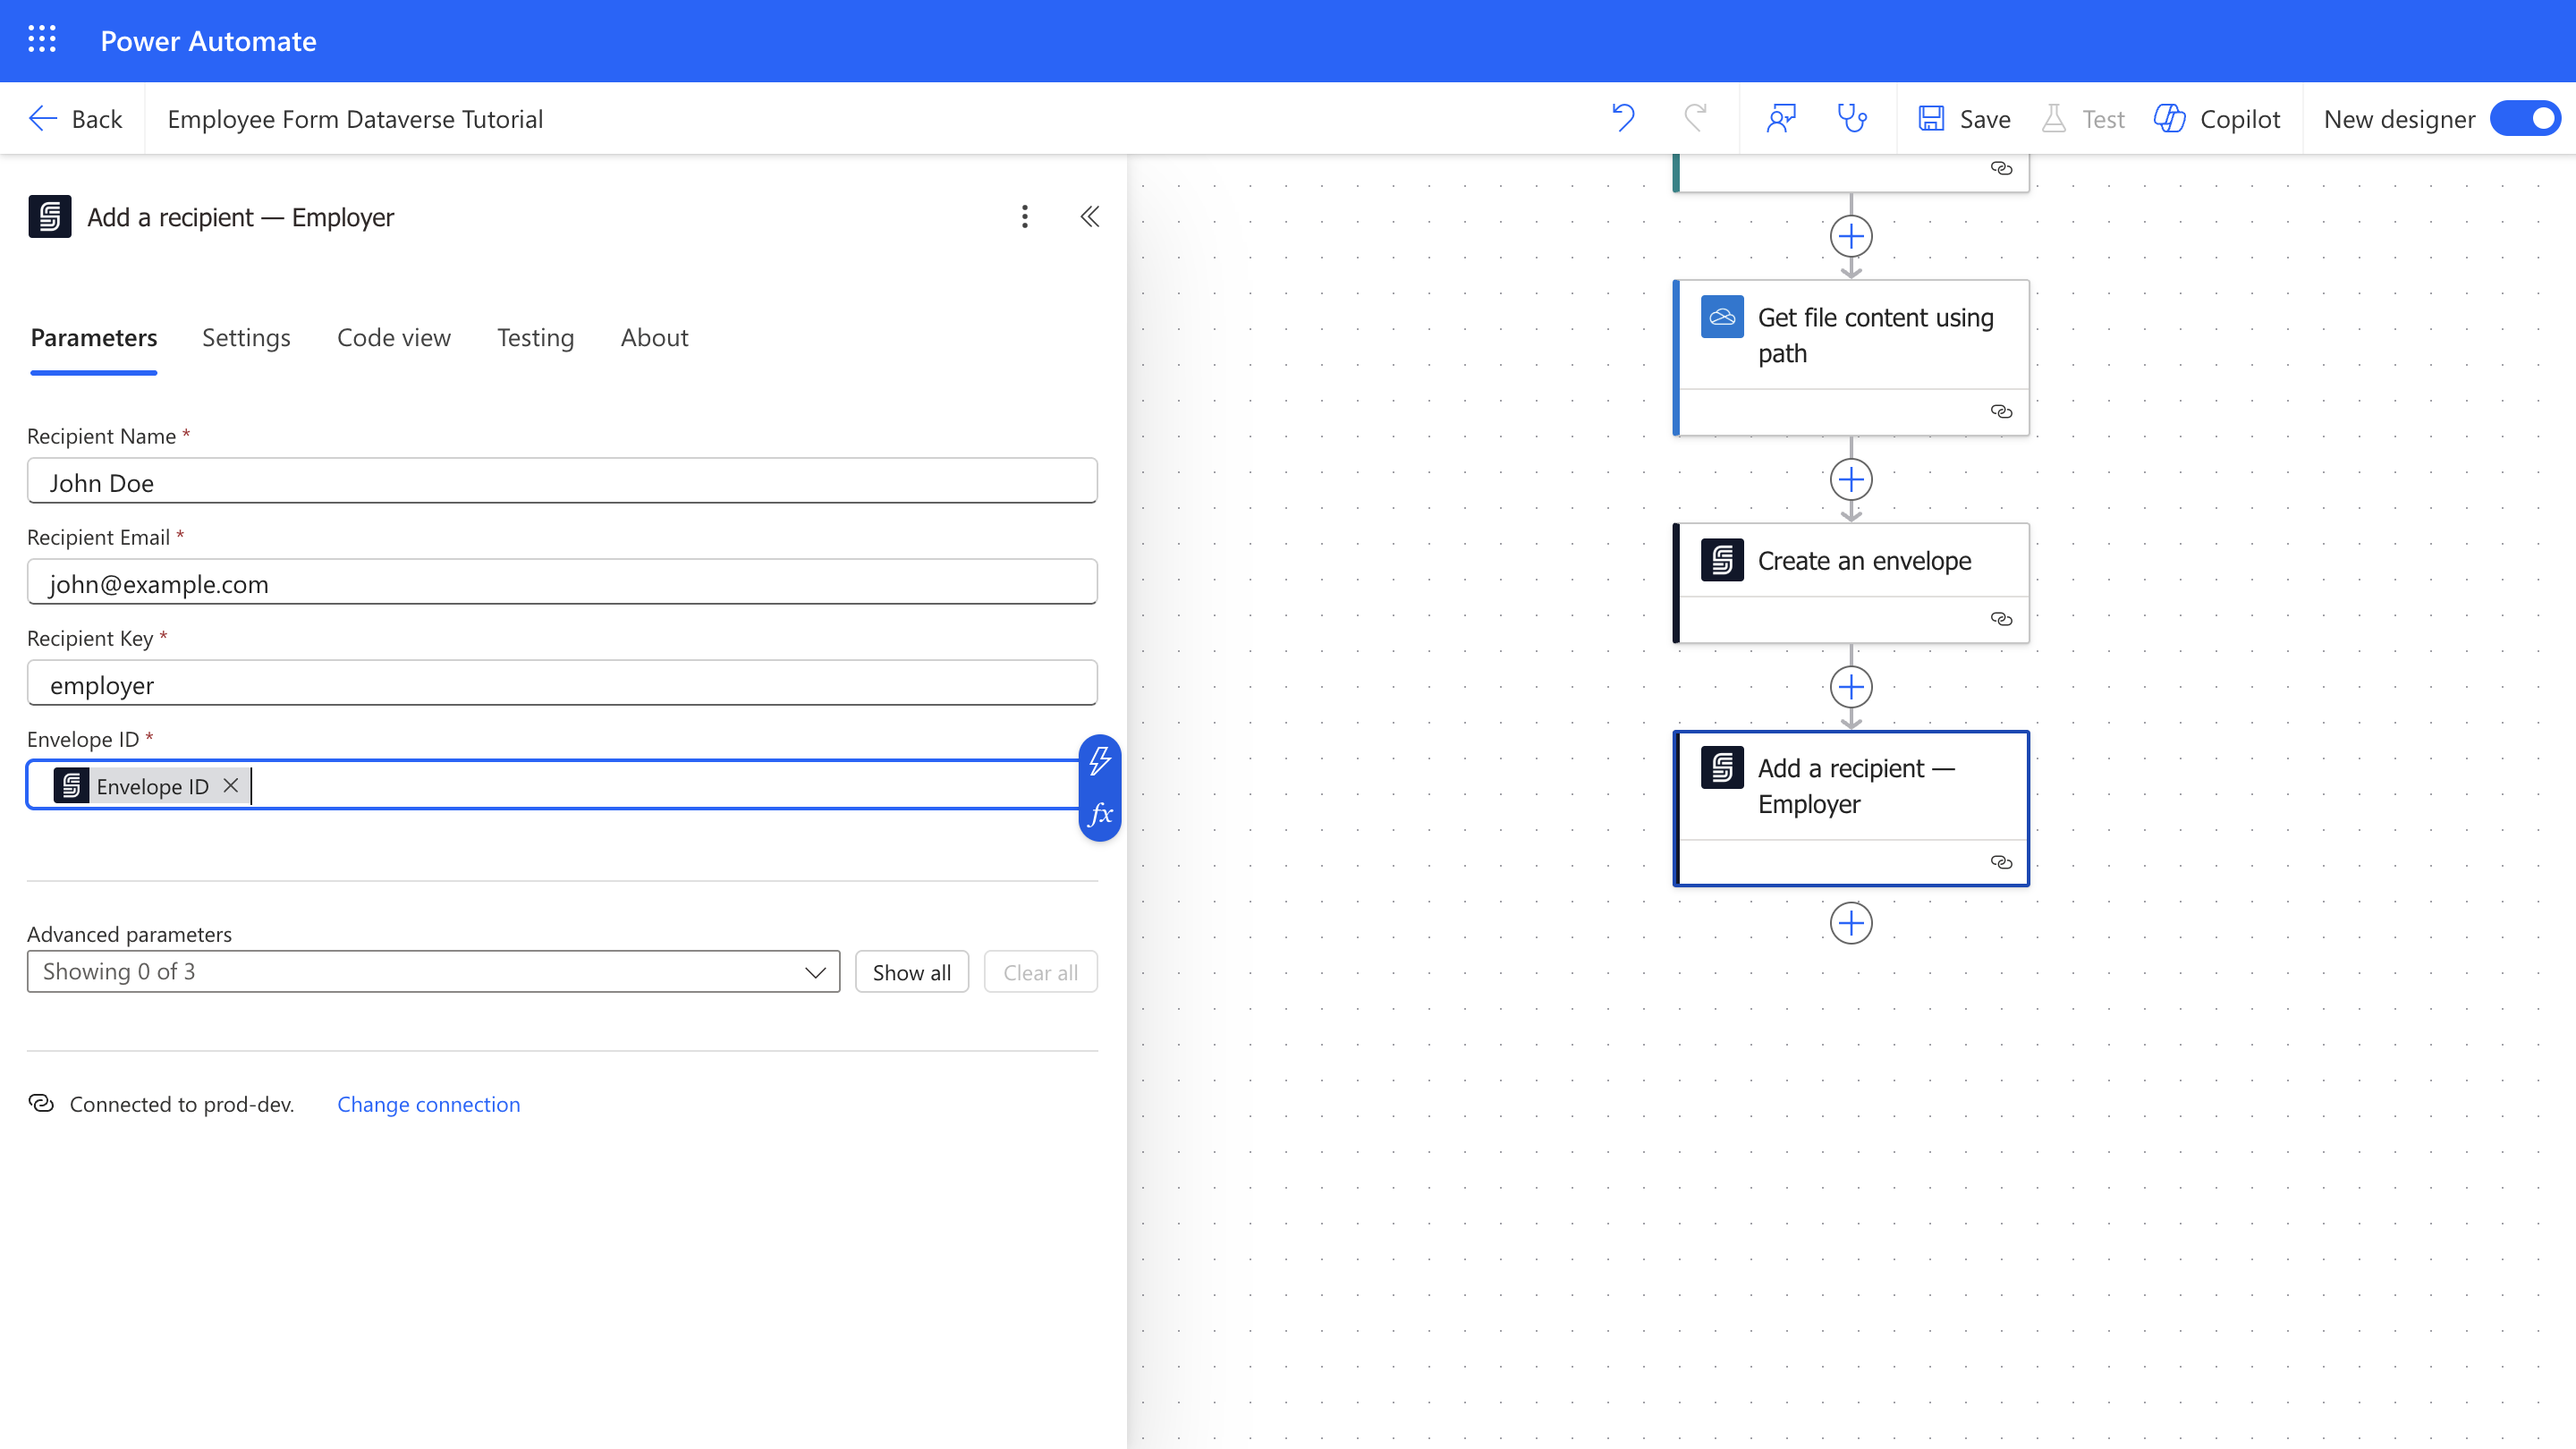
Add the first recipient, the **employer**.
1. Add the **Add a recipient** action from the **SignatureAPI** connector.
2. Rename the action to **Add a recipient – Employer** to keep things organized.
3. Set the **Recipient Name** and **Recipient Email** (e.g., "John Doe" and "[john.doe@example.com](mailto:john.doe@example.com)").
4. Set the **Recipient Key** field to `employer`. You’ll reference this key when assigning signature places.
### Add the employer as a recipient
Add the first recipient, the **employer**.
1. Add the **Add a recipient** action from the **SignatureAPI** connector.
2. Rename the action to **Add a recipient – Employer** to keep things organized.
3. Set the **Recipient Name** and **Recipient Email** (e.g., "John Doe" and "[john.doe@example.com](mailto:john.doe@example.com)").
4. Set the **Recipient Key** field to `employer`. You’ll reference this key when assigning signature places.
 ### Add the employee as a recipient
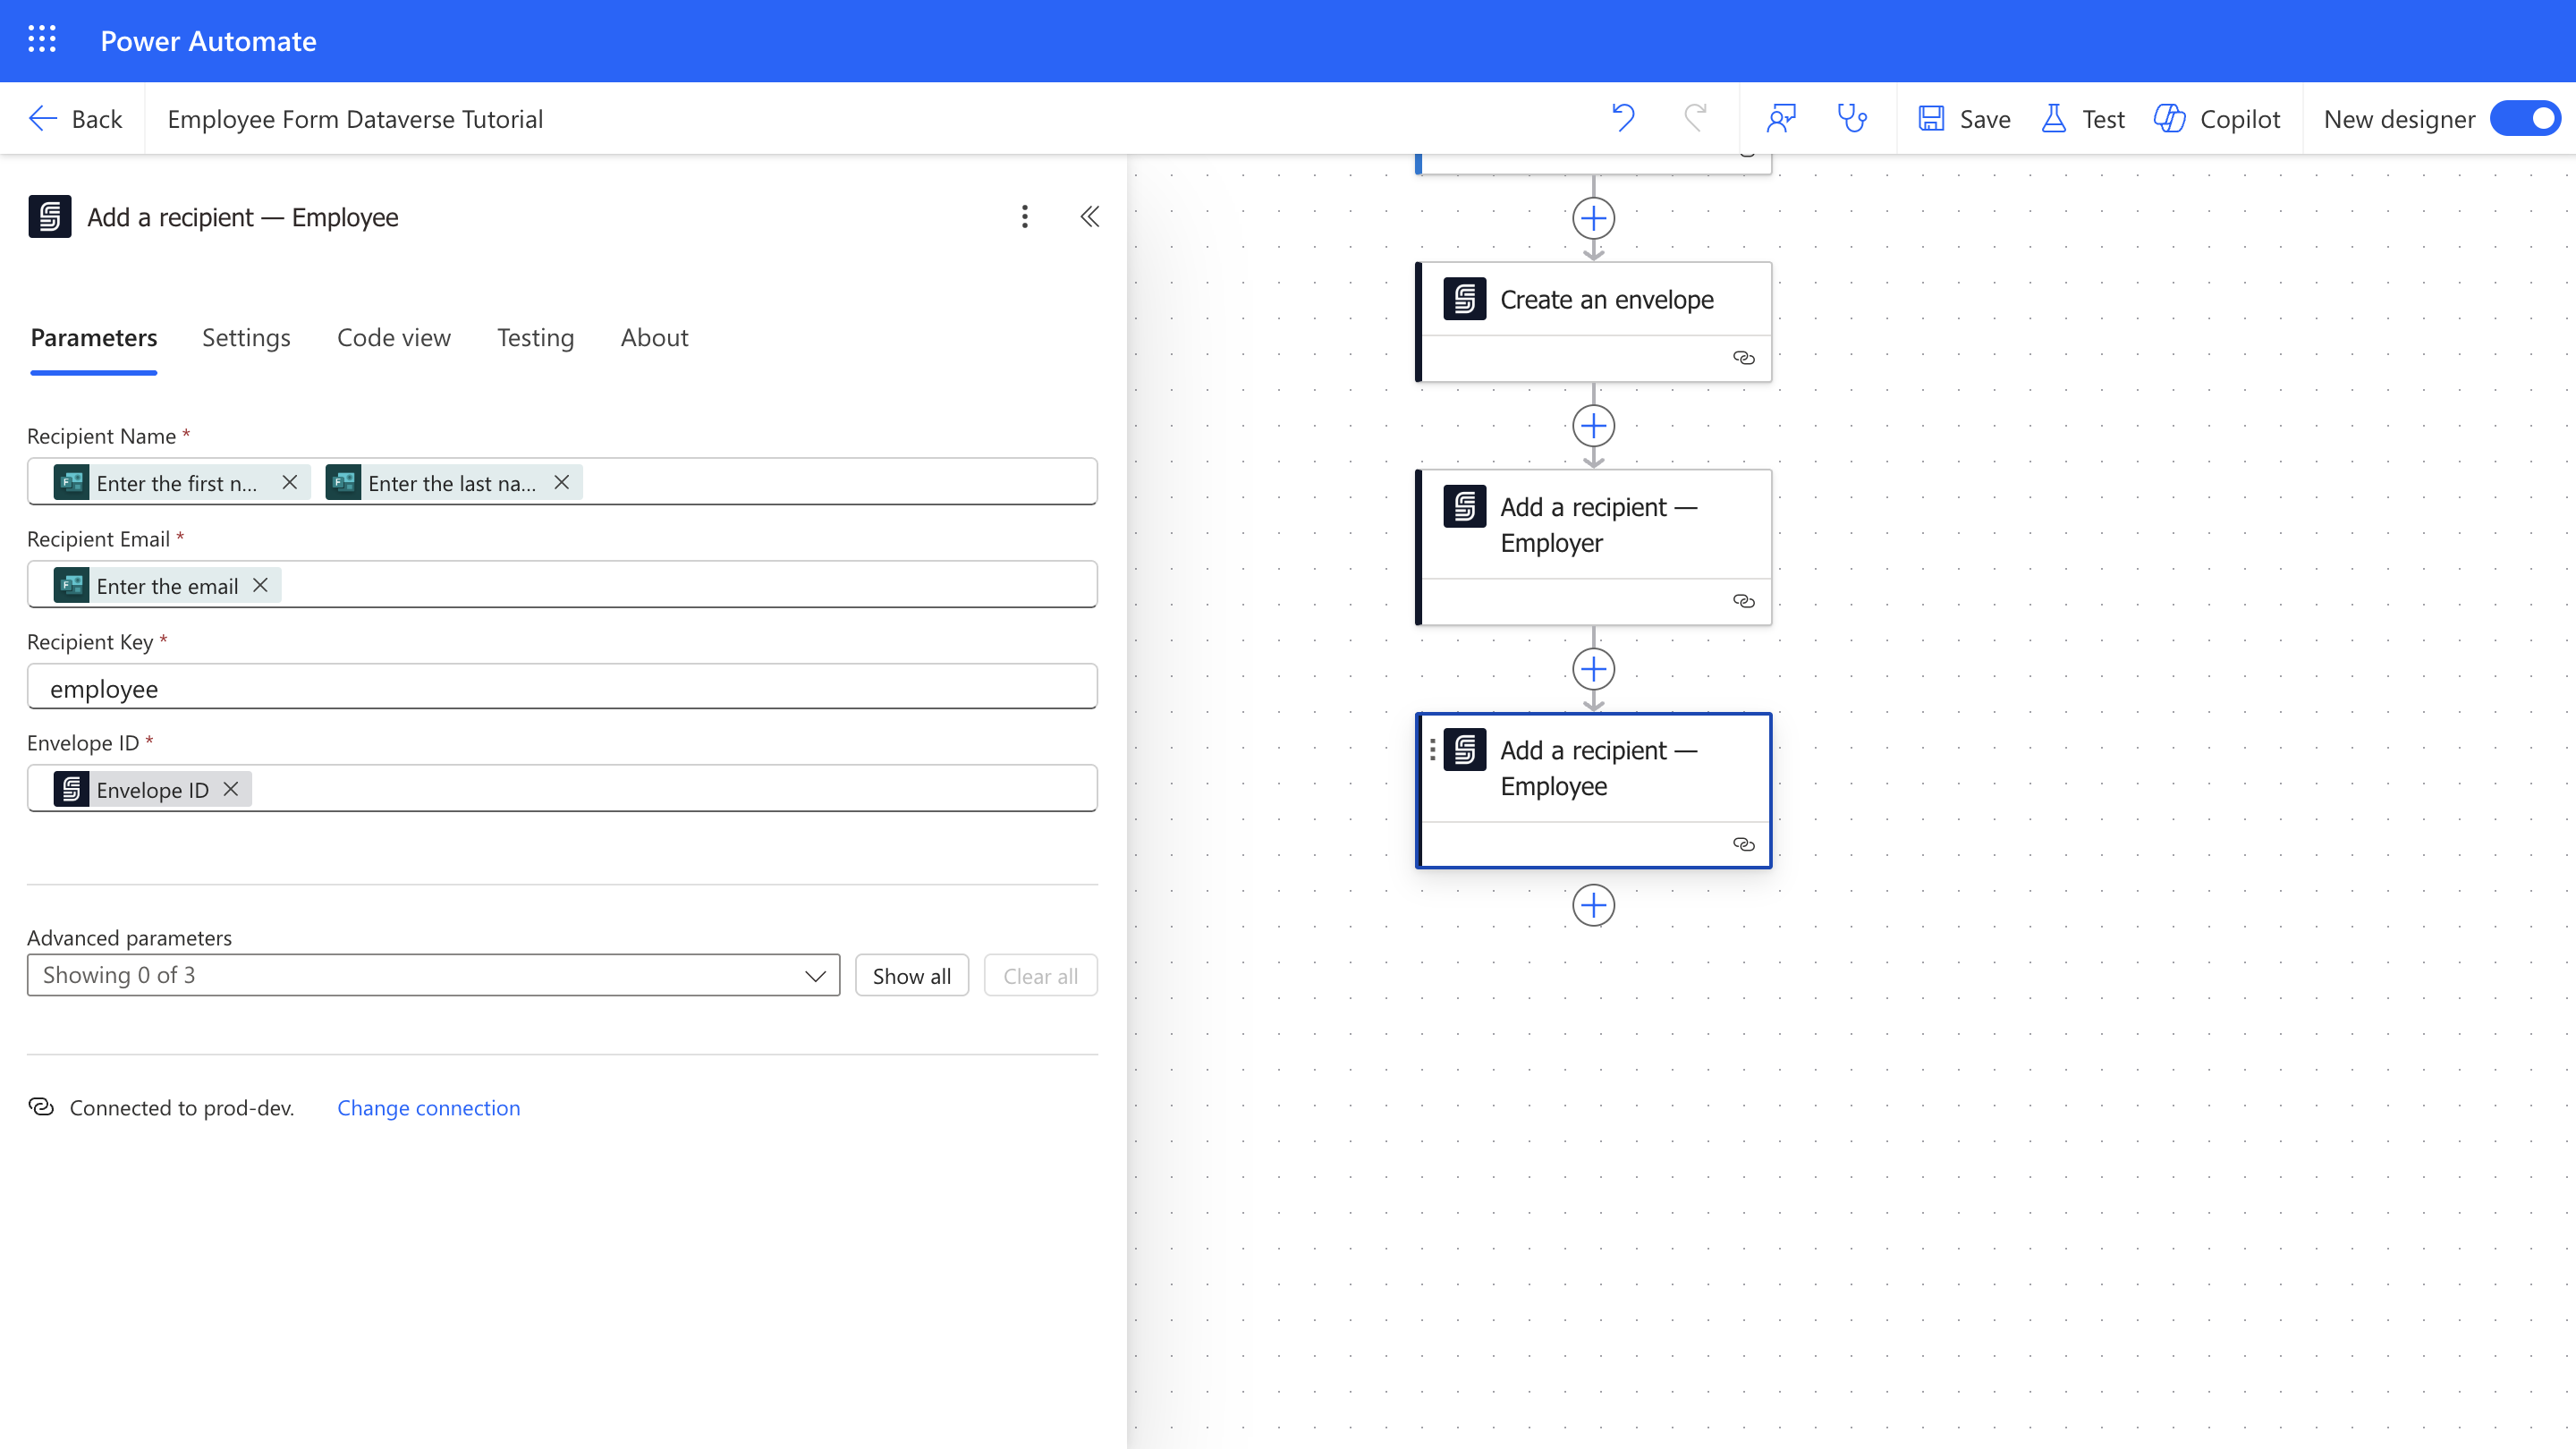
Add the second recipient, the **employee**.
1. Add the **Add a recipient** action from the **SignatureAPI** connector.
2. Rename the action to **Add a recipient – Employee**.
3. Set the **Recipient Name** and **Recipient Email** using dynamic content from the **Get response details** step.
4. Set the **Recipient Key** field to `employee`.
### Add the employee as a recipient
Add the second recipient, the **employee**.
1. Add the **Add a recipient** action from the **SignatureAPI** connector.
2. Rename the action to **Add a recipient – Employee**.
3. Set the **Recipient Name** and **Recipient Email** using dynamic content from the **Get response details** step.
4. Set the **Recipient Key** field to `employee`.
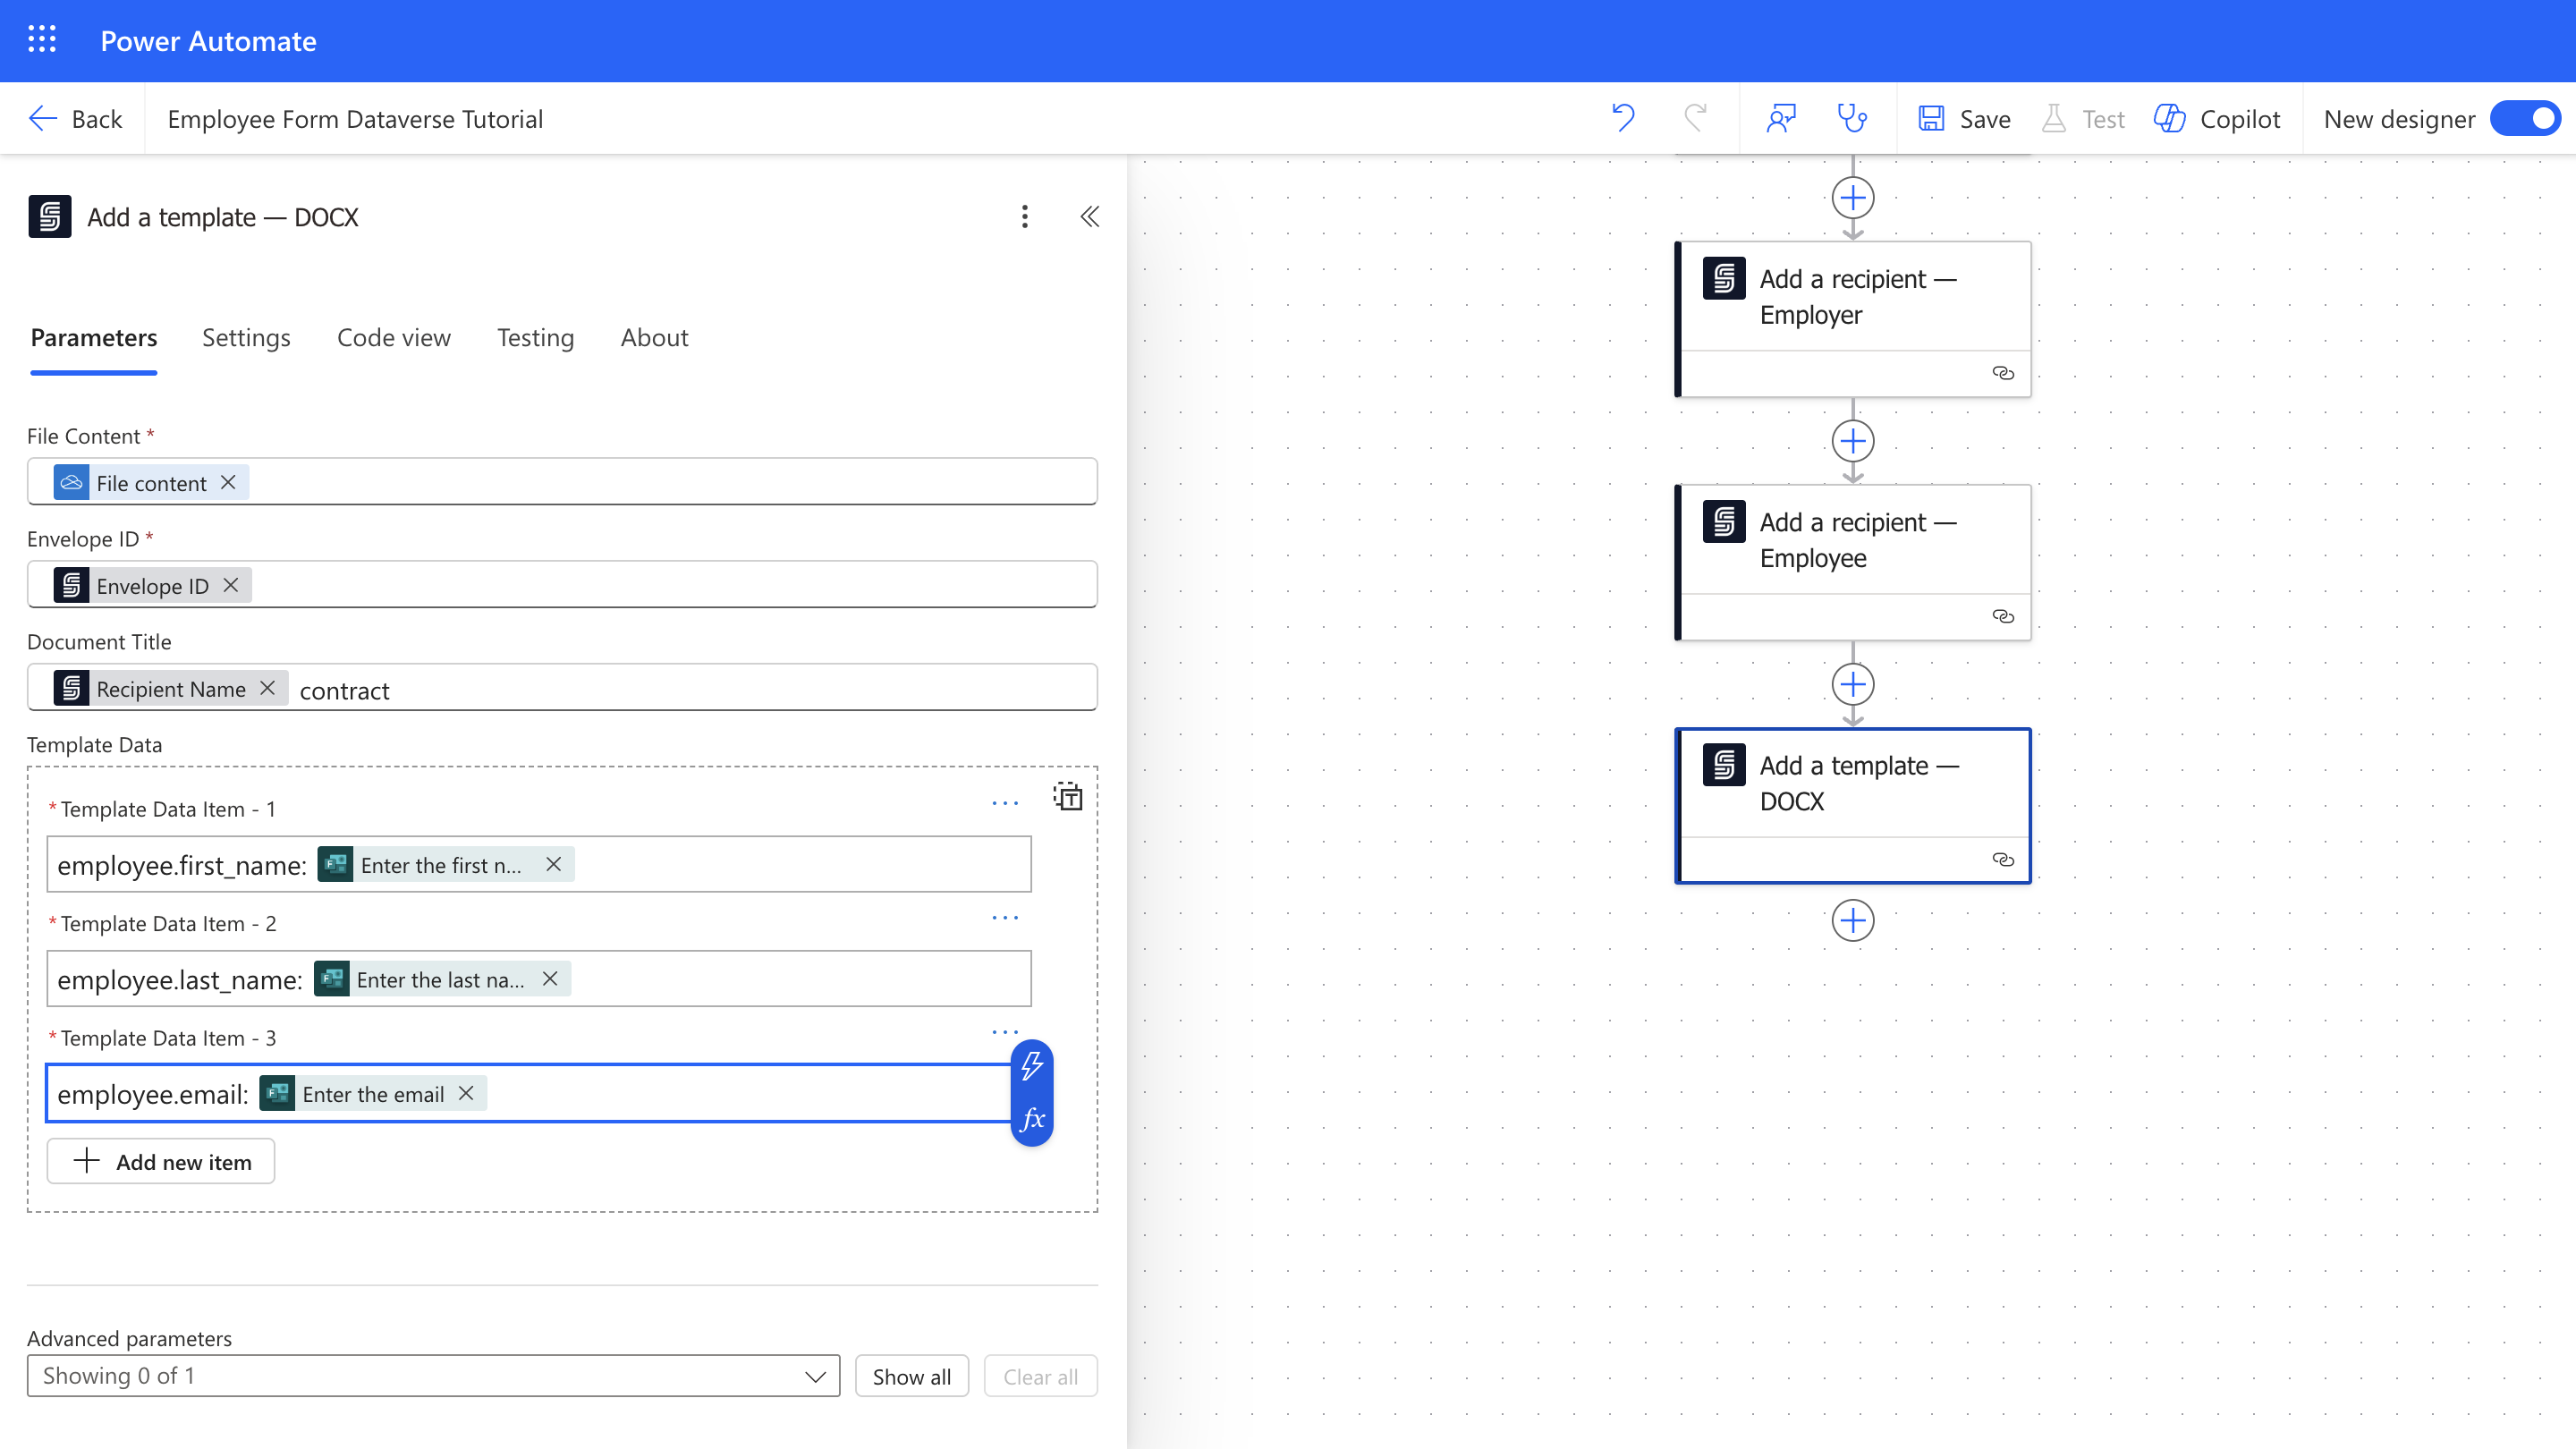
 ### Add the contract template
Next, add your contract template to the envelope and populate it with employee data.
1. Add the **Add a Template – DOCX** action from the **SignatureAPI** connector.
2. In the **File Content** field, select the **File Content** output from the **Get file content using path** action (OneDrive).
3. (Optional) Set a **Document Title**.
4. Use the **Template Data** array to fill in the template fields. For each field, add a **Template Data Item** in `key: value` format.
For example, to fill the field `{{employee.first_name}}` with the value "Richard Roe", set the item as `employee.first_name: Richard Roe`.
You can use dynamic content from earlier steps to set values for each template field.
### Add the contract template
Next, add your contract template to the envelope and populate it with employee data.
1. Add the **Add a Template – DOCX** action from the **SignatureAPI** connector.
2. In the **File Content** field, select the **File Content** output from the **Get file content using path** action (OneDrive).
3. (Optional) Set a **Document Title**.
4. Use the **Template Data** array to fill in the template fields. For each field, add a **Template Data Item** in `key: value` format.
For example, to fill the field `{{employee.first_name}}` with the value "Richard Roe", set the item as `employee.first_name: Richard Roe`.
You can use dynamic content from earlier steps to set values for each template field.
 ### Add a signature place for the employer
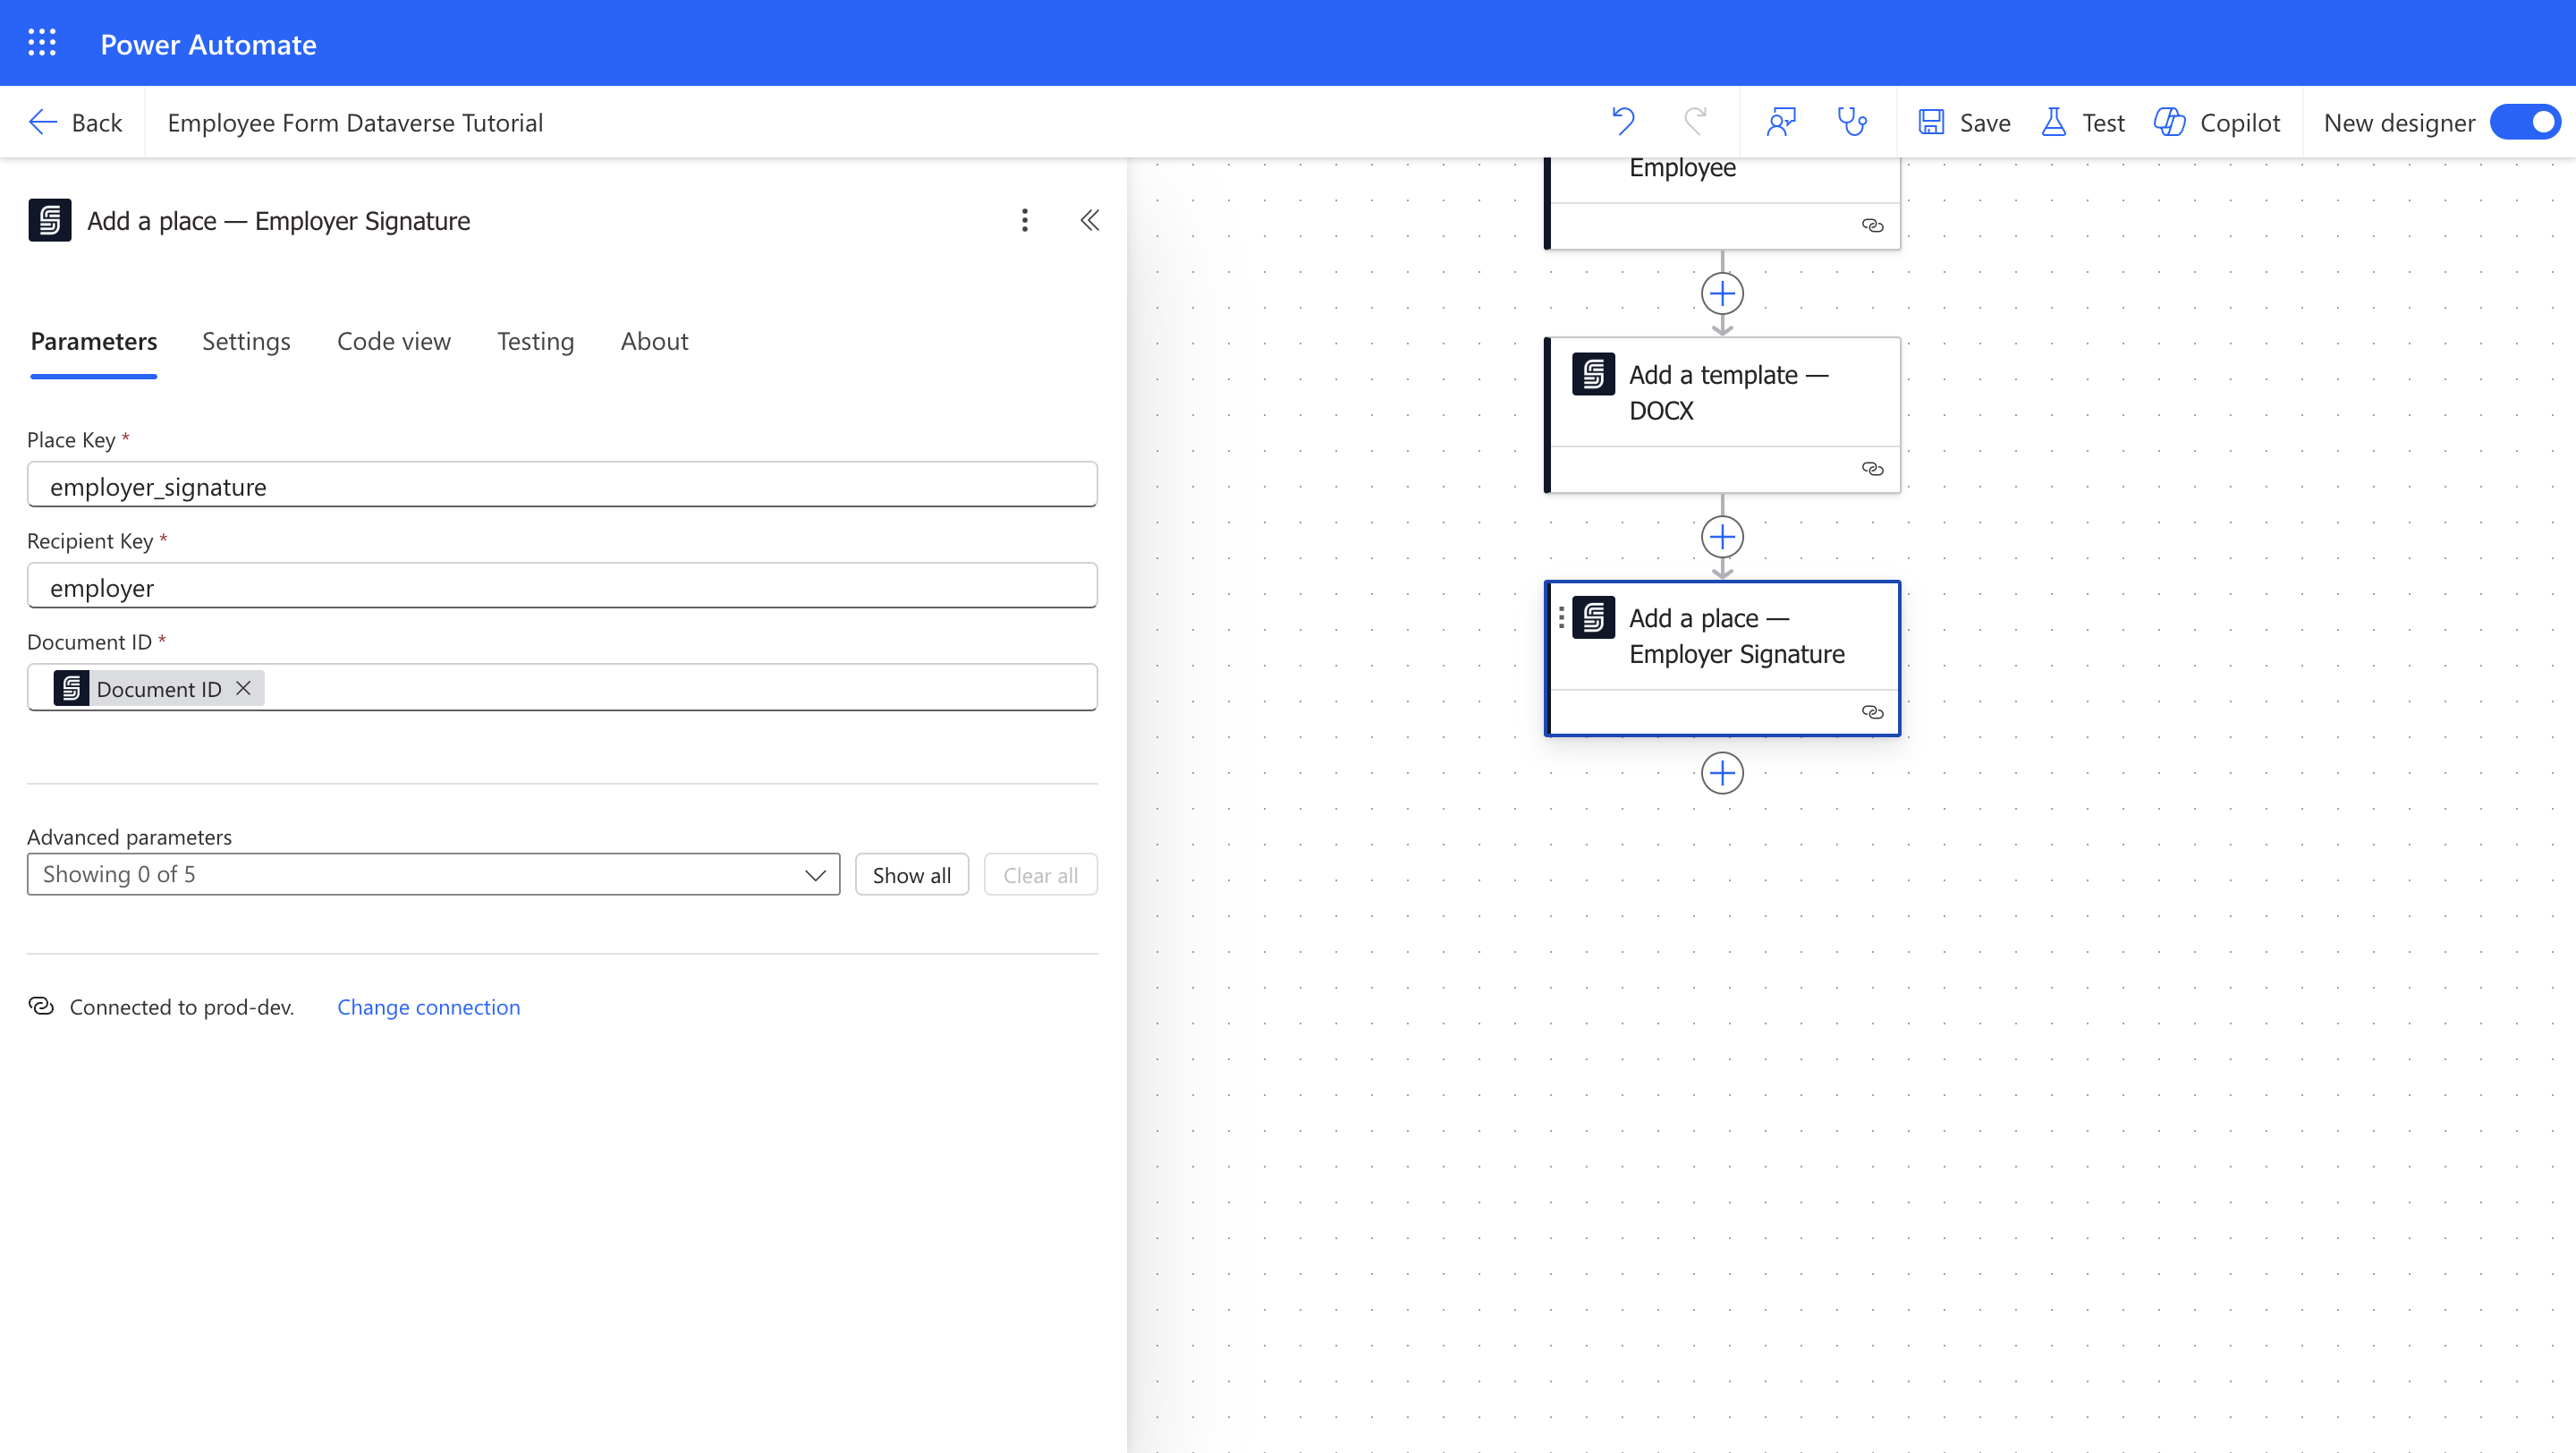
When preparing the template, you set a placeholder `[[employer_signature]]` to indicate where in the document the employer will sign.
Now, add a **Signature place** to the document and associate this placeholder with the employer. Use the placeholder key `employer_signature` to identify the place in the document and the recipient key `employer` to identify the recipient.
1. Add **"Add a place – Signature"** action from the **SignatureAPI** connector. Rename it to **Add a place – Employer Signature** for clarity.
2. Set the **Place Key** field to the placeholder key used inside the document (without square brackets), for example, `employer_signature`.
3. Set the **Recipient Key** field to `employer`, matching the recipient key you set earlier.
4. Set the **Document ID** field to the **Document ID** from the previous **Add a Template – DOCX** action.
### Add a signature place for the employer
When preparing the template, you set a placeholder `[[employer_signature]]` to indicate where in the document the employer will sign.
Now, add a **Signature place** to the document and associate this placeholder with the employer. Use the placeholder key `employer_signature` to identify the place in the document and the recipient key `employer` to identify the recipient.
1. Add **"Add a place – Signature"** action from the **SignatureAPI** connector. Rename it to **Add a place – Employer Signature** for clarity.
2. Set the **Place Key** field to the placeholder key used inside the document (without square brackets), for example, `employer_signature`.
3. Set the **Recipient Key** field to `employer`, matching the recipient key you set earlier.
4. Set the **Document ID** field to the **Document ID** from the previous **Add a Template – DOCX** action.
 ### Add the salary input for the employer
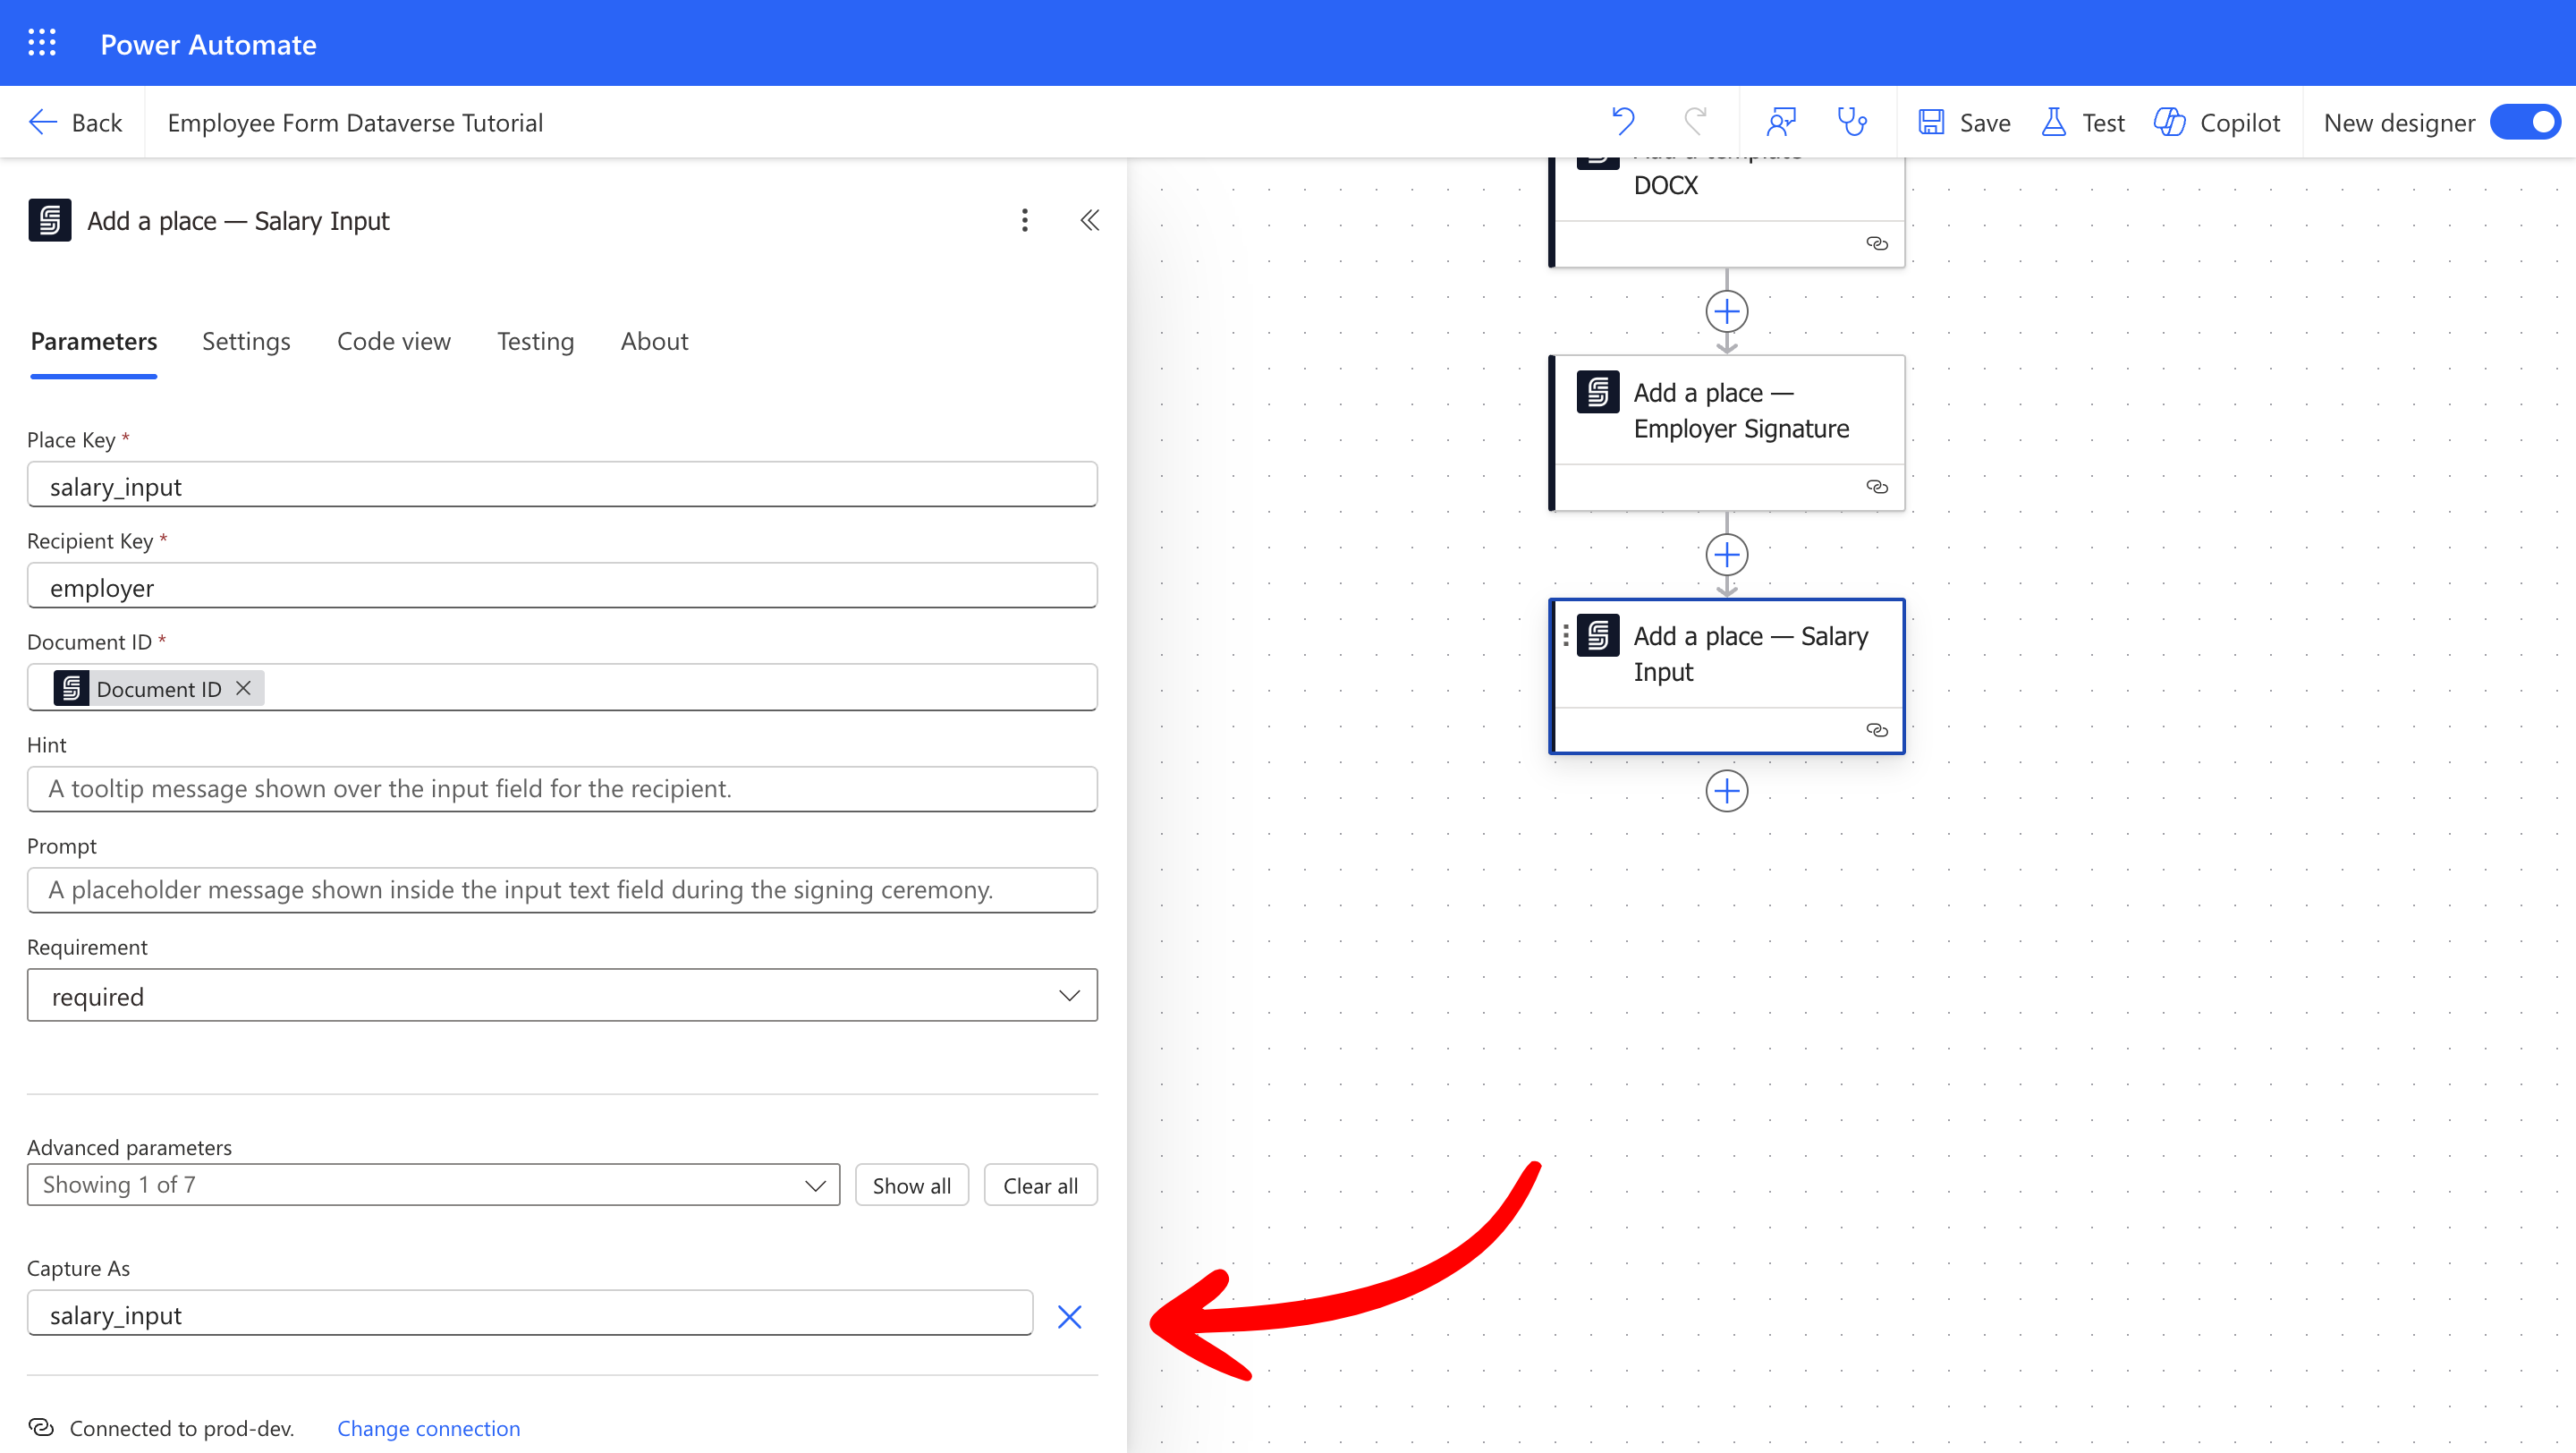
In a similar way, add a **Text Input Place** to link the `[[salary_input]]` placeholder in the document with the employer.
To access this value programmatically and add it to the Dataverse table later, capture this value by setting the **Capture As** field (in advanced parameters). Learn more about [captured values](/docs/integrations/power-automate/envelopes/captures).
1. Add an **Add a place – Text Input** action from the **SignatureAPI** connector. Rename it to **Add a place – Salary Input**.
2. Set the **Place Key** field to the placeholder key used inside the document (without the square brackets), for example, `salary_input`.
3. Set the **Recipient Key** field to `employer`, as before.
4. Set the **Document ID** field to the **Document ID** from the previous **Add a Template – DOCX** action.
5. To retrieve the value filled by the employer, set the **Capture As** field to `salary_input`. This allows you to retrieve this value later in the flow.
### Add the salary input for the employer
In a similar way, add a **Text Input Place** to link the `[[salary_input]]` placeholder in the document with the employer.
To access this value programmatically and add it to the Dataverse table later, capture this value by setting the **Capture As** field (in advanced parameters). Learn more about [captured values](/docs/integrations/power-automate/envelopes/captures).
1. Add an **Add a place – Text Input** action from the **SignatureAPI** connector. Rename it to **Add a place – Salary Input**.
2. Set the **Place Key** field to the placeholder key used inside the document (without the square brackets), for example, `salary_input`.
3. Set the **Recipient Key** field to `employer`, as before.
4. Set the **Document ID** field to the **Document ID** from the previous **Add a Template – DOCX** action.
5. To retrieve the value filled by the employer, set the **Capture As** field to `salary_input`. This allows you to retrieve this value later in the flow.
 ### Add a signature place for the employee
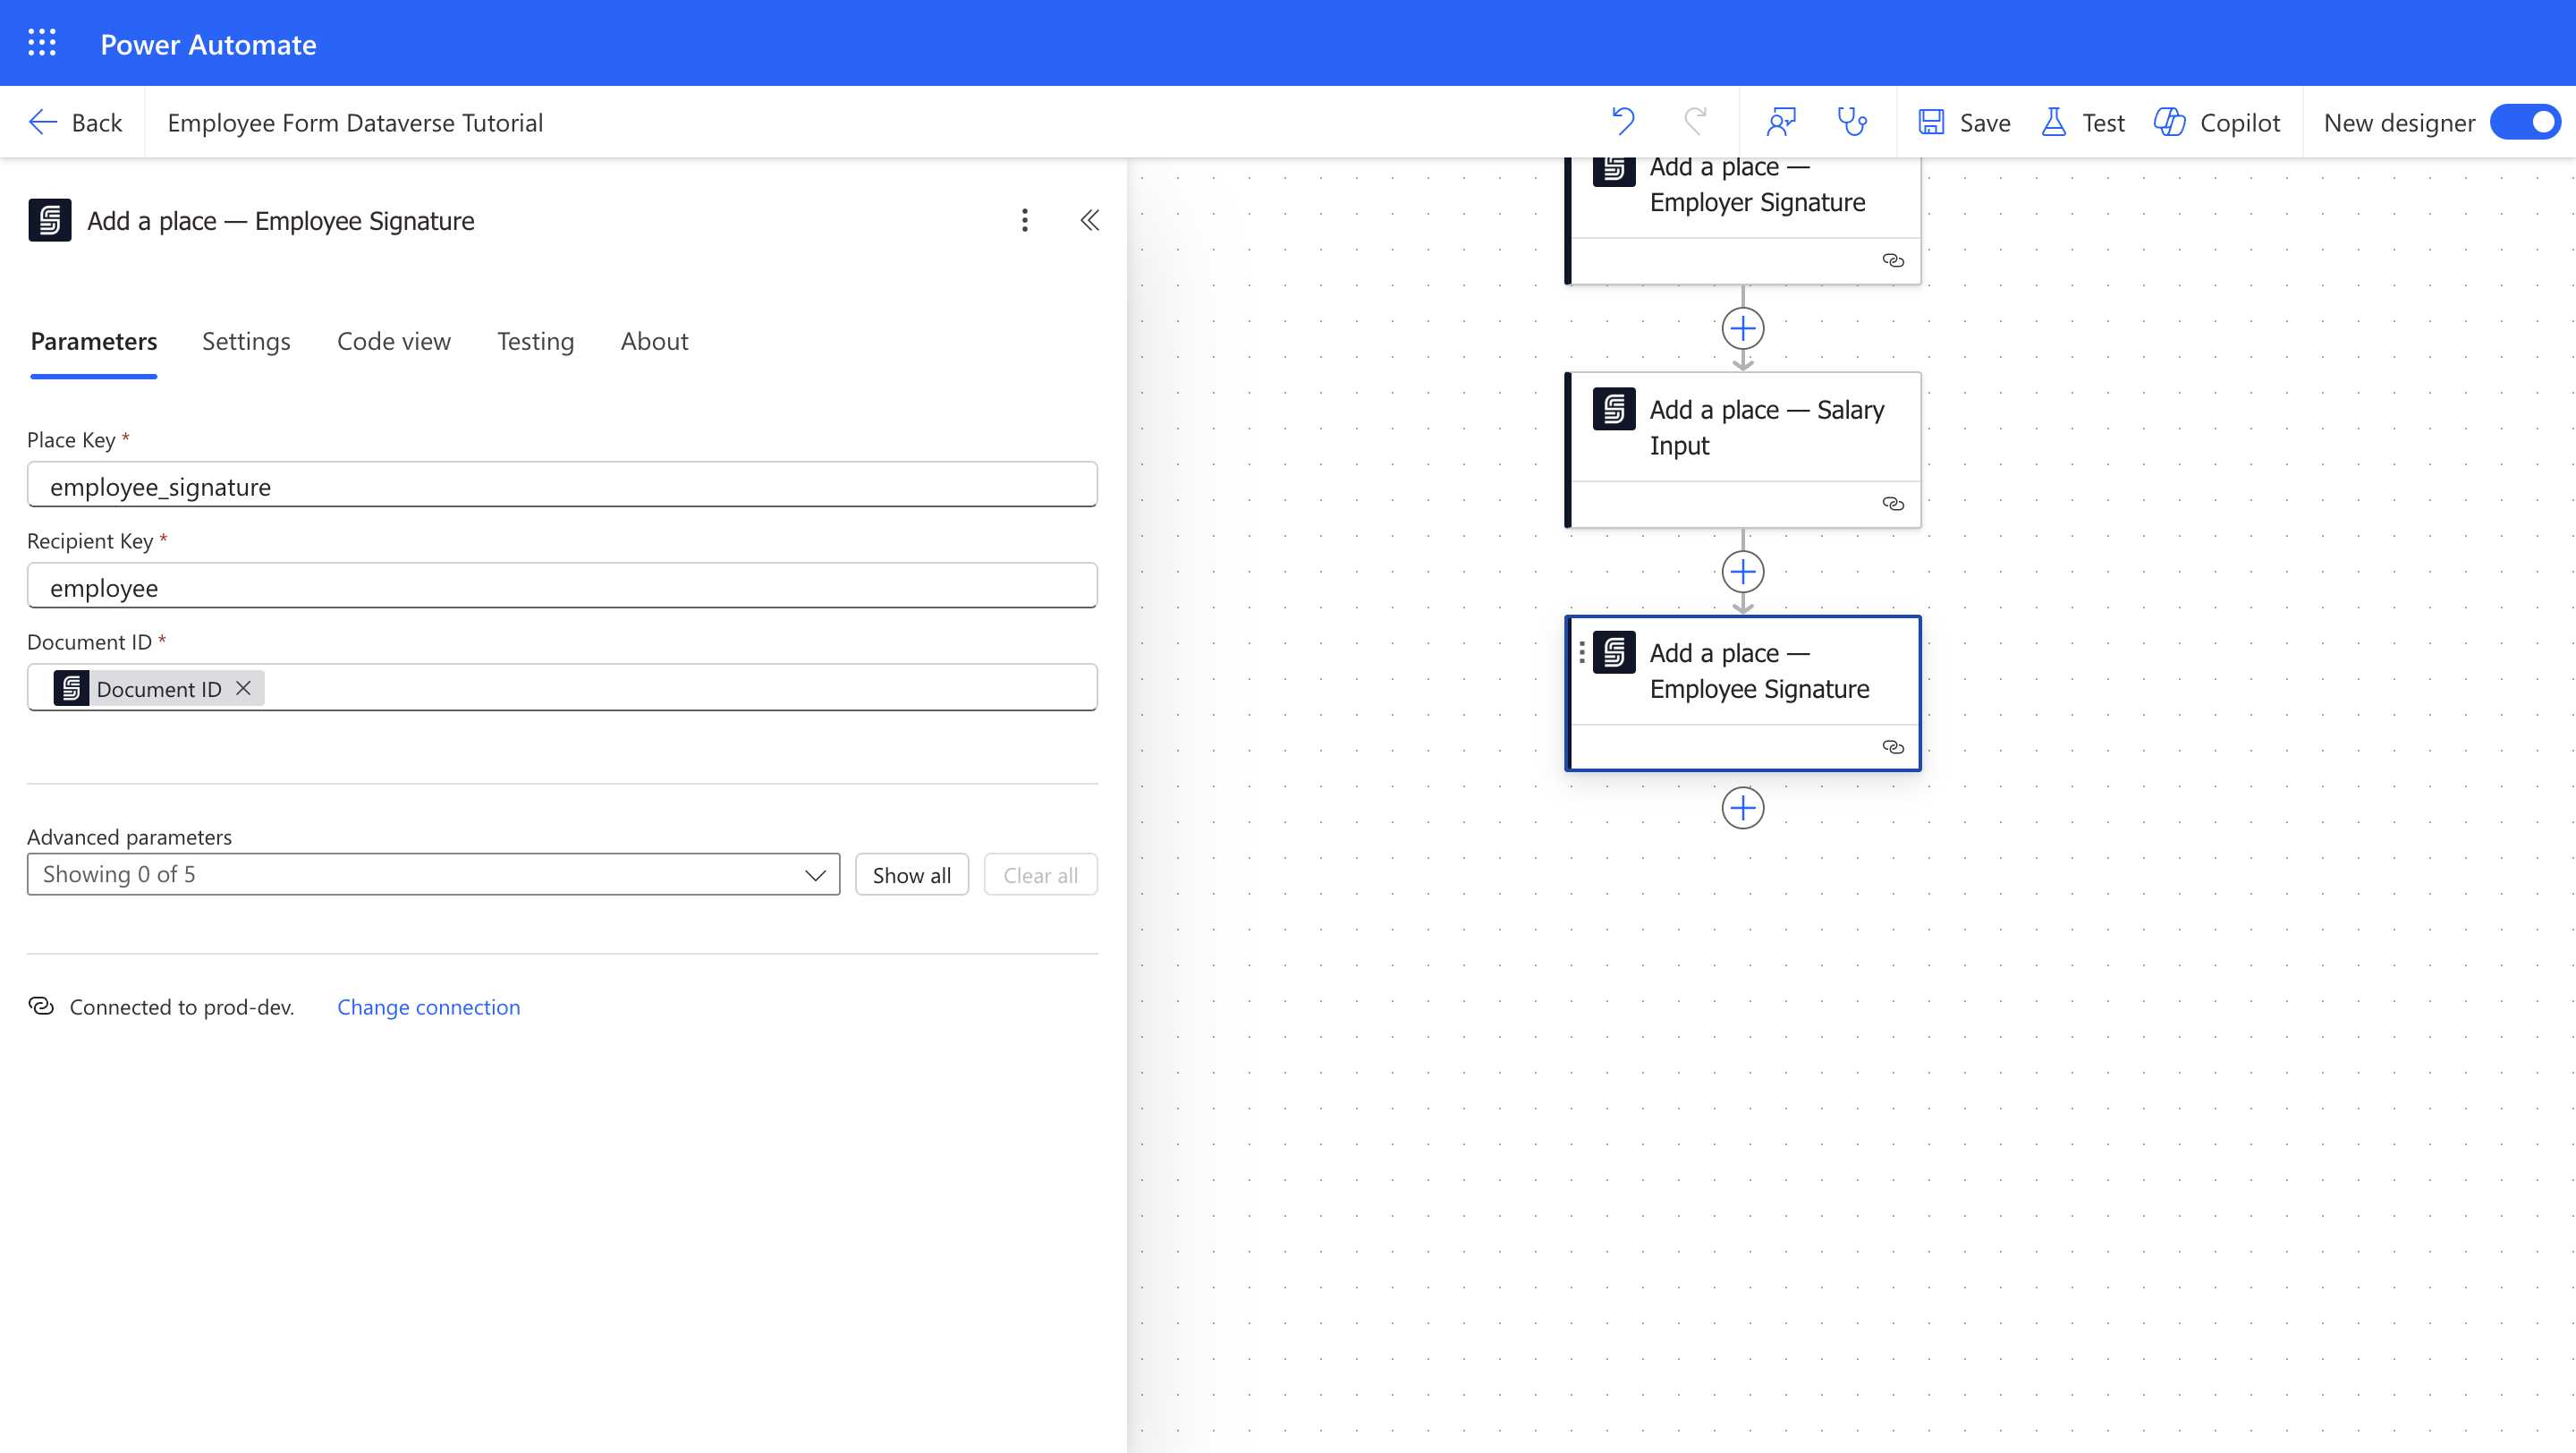
As you did for the employer, add a **Signature Place** for the employee.
1. Add **"Add a place – Signature"** action from the **SignatureAPI** connector. Rename it to **Add a place – Employee Signature** for clarity.
2. Set the **Place Key** field to the placeholder key used inside the document (without the square brackets), for example, `employee_signature`.
3. Set the **Recipient Key** field to `employee`, matching the recipient key you set for the employee.
4. Set the **Document ID** field to the **Document ID** from the previous **Add a Template – DOCX** action.
### Add a signature place for the employee
As you did for the employer, add a **Signature Place** for the employee.
1. Add **"Add a place – Signature"** action from the **SignatureAPI** connector. Rename it to **Add a place – Employee Signature** for clarity.
2. Set the **Place Key** field to the placeholder key used inside the document (without the square brackets), for example, `employee_signature`.
3. Set the **Recipient Key** field to `employee`, matching the recipient key you set for the employee.
4. Set the **Document ID** field to the **Document ID** from the previous **Add a Template – DOCX** action.
 ### Start the signing process
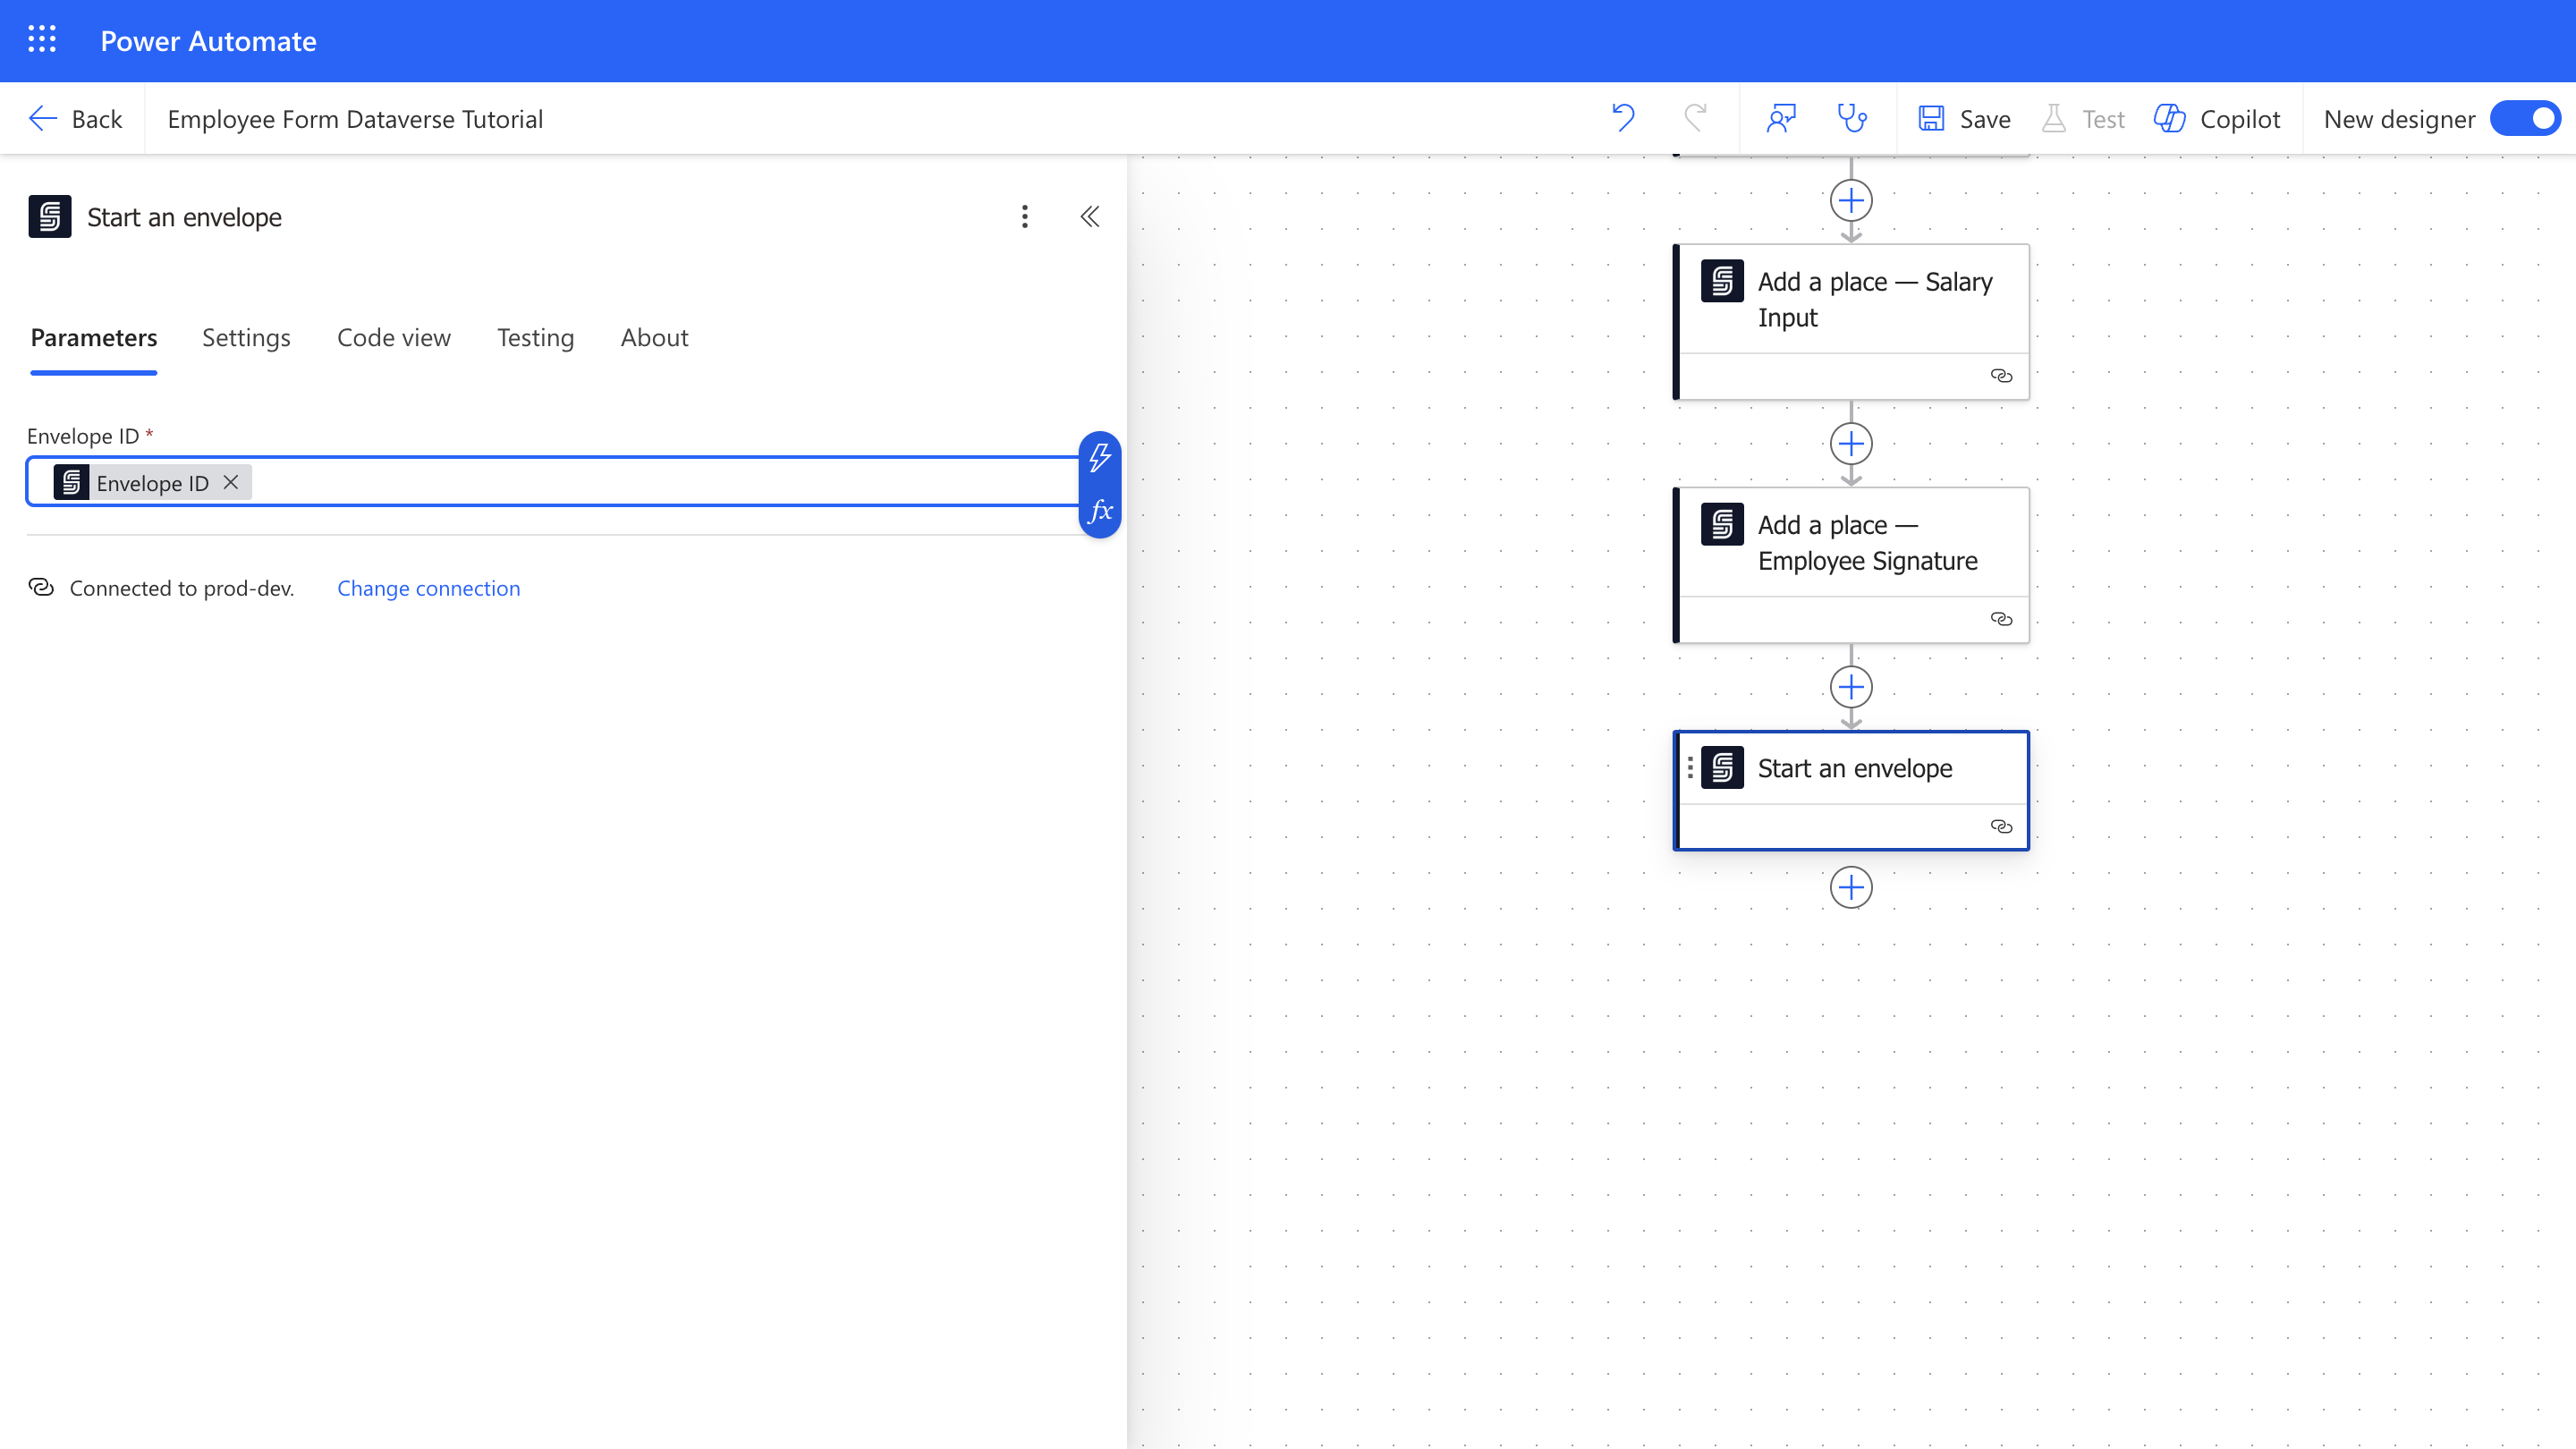
This step indicates the envelope is ready to be sent for signing. At this point, the envelope is fully assembled and sent to recipients.
1. Add **"Start Envelope"** action from the **SignatureAPI** connector.
2. Set the **Envelope ID** field to the **Envelope ID** output of the **Create an Envelope** action.
### Start the signing process
This step indicates the envelope is ready to be sent for signing. At this point, the envelope is fully assembled and sent to recipients.
1. Add **"Start Envelope"** action from the **SignatureAPI** connector.
2. Set the **Envelope ID** field to the **Envelope ID** output of the **Create an Envelope** action.
 ### Wait until all recipients have signed
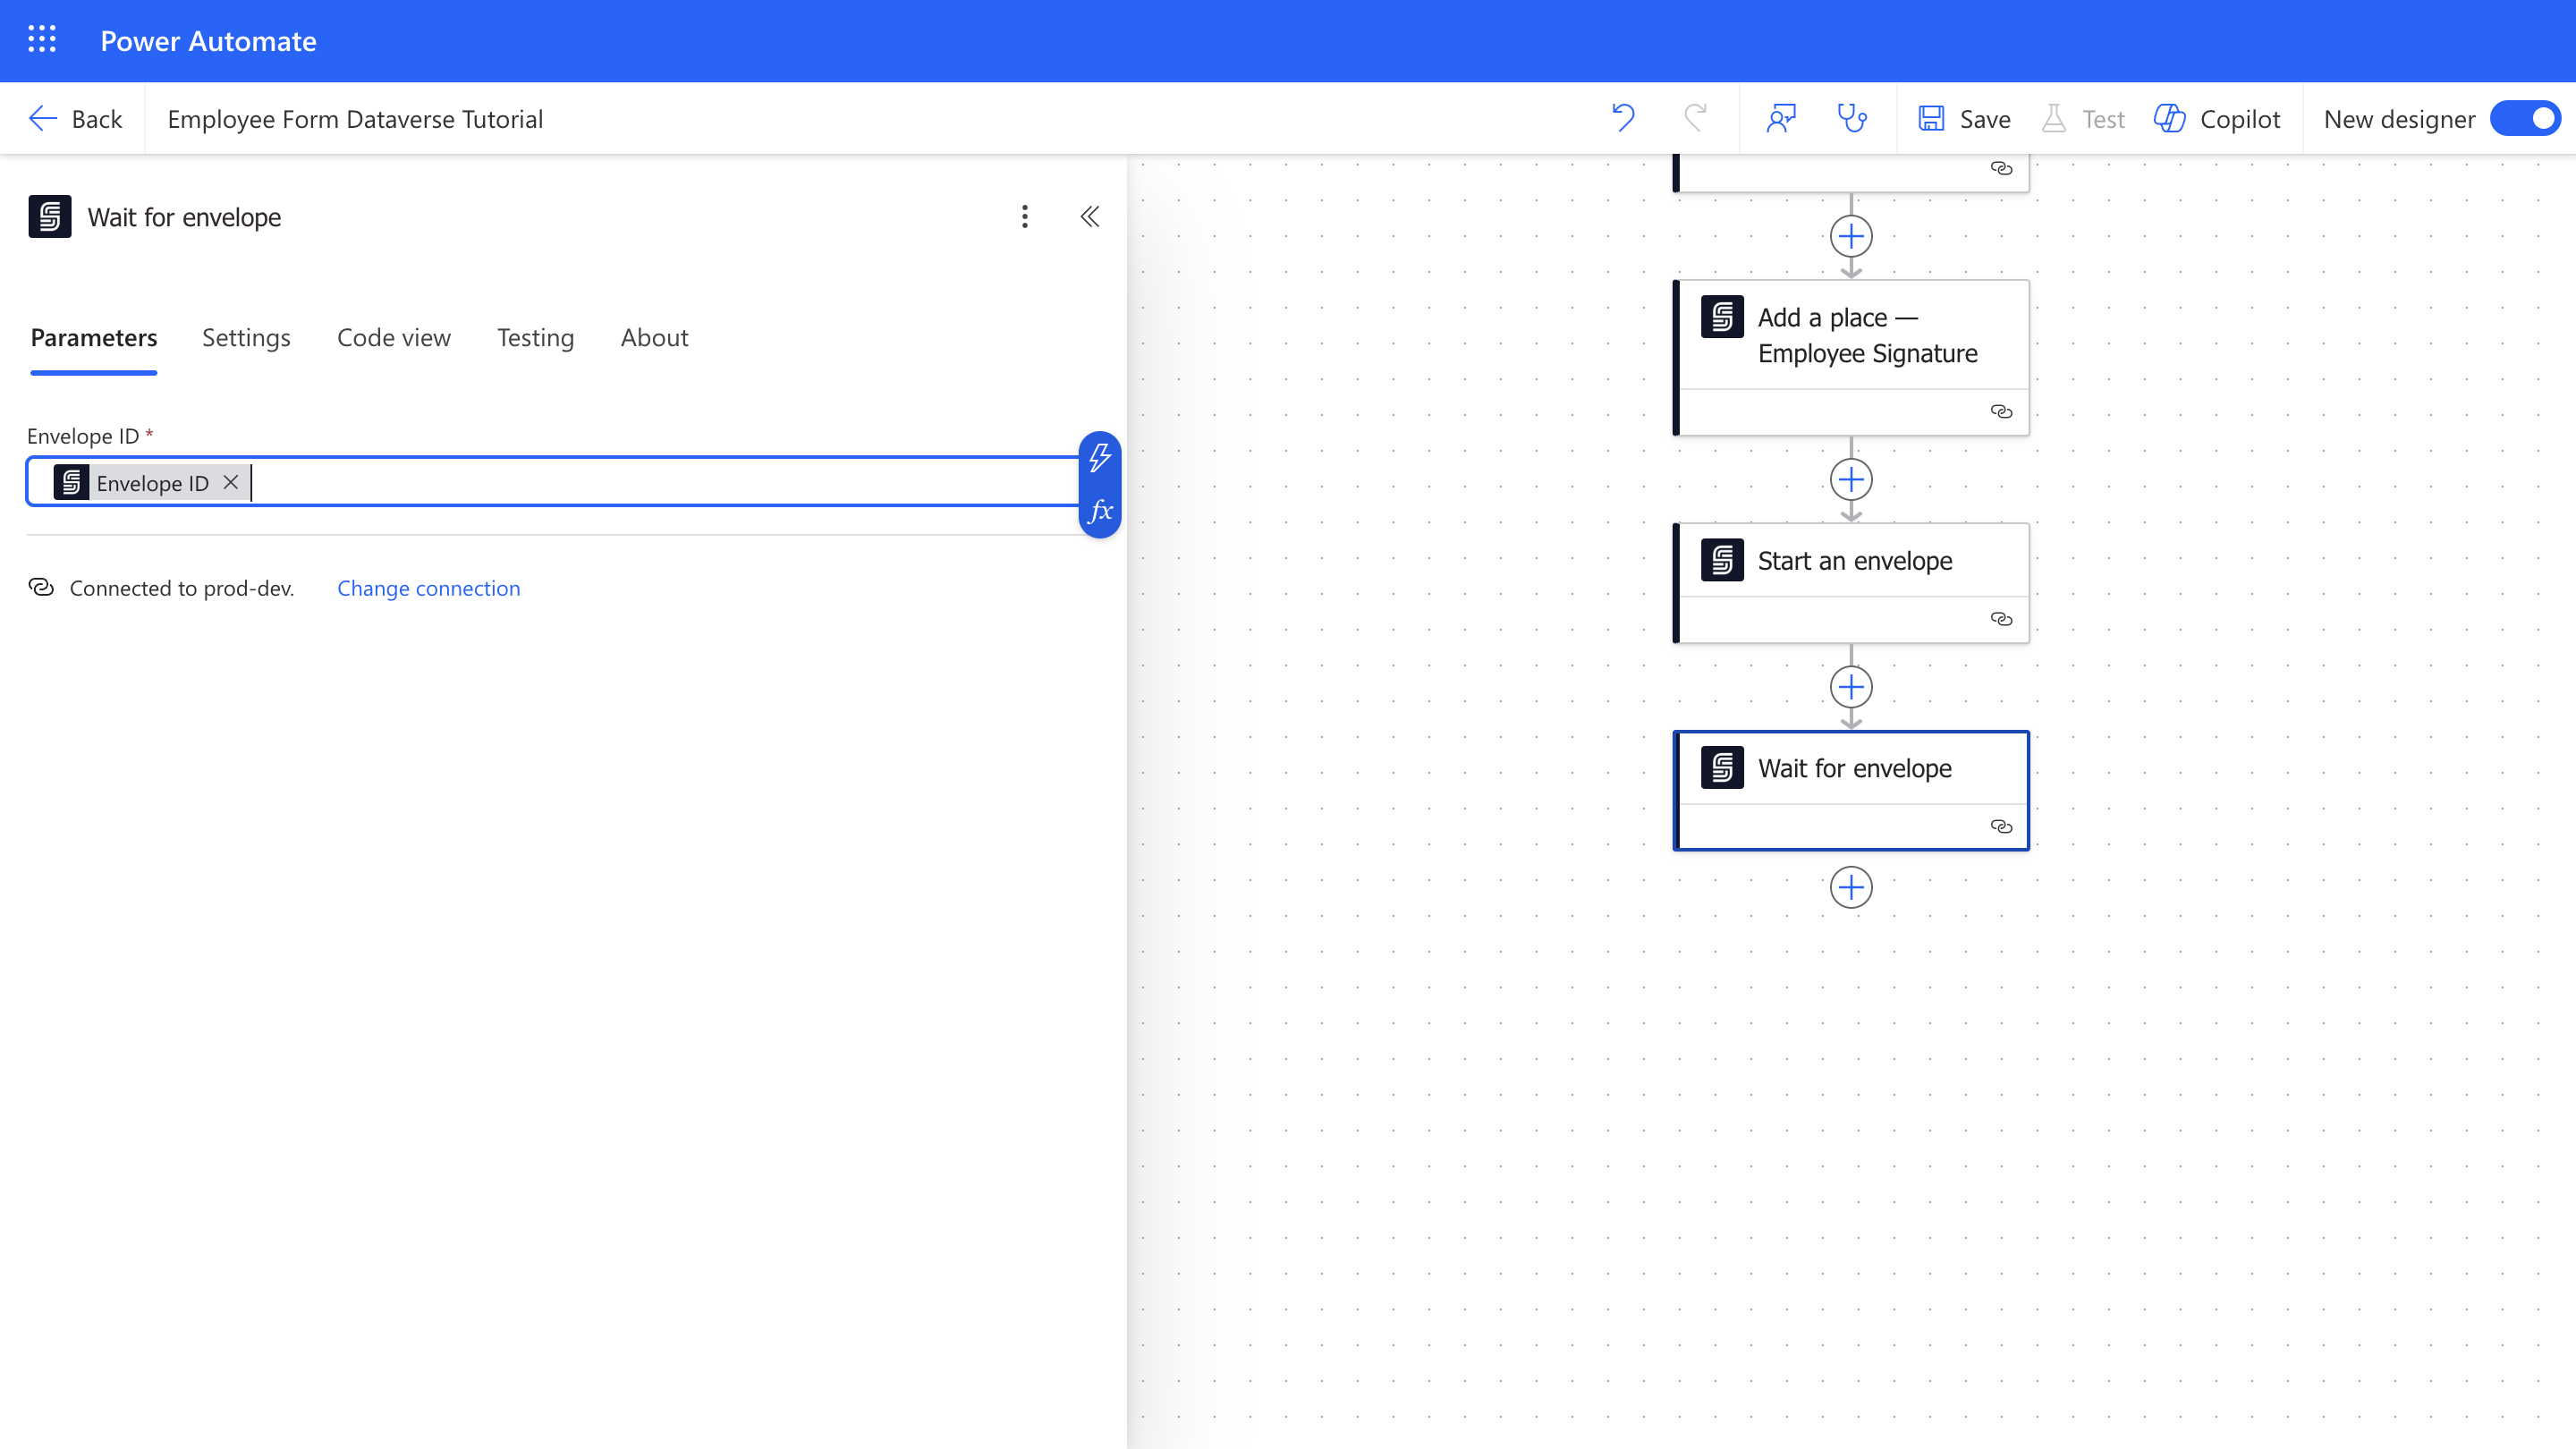
Use the **Wait for envelope** action to pause the flow until all recipients have signed the document.
Use **Wait for envelope** only if you expect fewer than 100 pending envelopes at once, and if you expect recipients to sign soon, since Power Automate actions cannot run for more than 30 days. For more flexibility, consider the trigger [When a deliverable is generated](/docs/integrations/power-automate/guides/how-to/save-deliverables) instead.
1. Add **"Wait for envelope"** action from the **SignatureAPI** connector.
2. Set the **Envelope ID** field to the **Envelope ID** output of the **Create an Envelope** action.
### Wait until all recipients have signed
Use the **Wait for envelope** action to pause the flow until all recipients have signed the document.
Use **Wait for envelope** only if you expect fewer than 100 pending envelopes at once, and if you expect recipients to sign soon, since Power Automate actions cannot run for more than 30 days. For more flexibility, consider the trigger [When a deliverable is generated](/docs/integrations/power-automate/guides/how-to/save-deliverables) instead.
1. Add **"Wait for envelope"** action from the **SignatureAPI** connector.
2. Set the **Envelope ID** field to the **Envelope ID** output of the **Create an Envelope** action.
 ### Get the captured salary input
At this point in the flow, recipients have signed, the envelope is completed, and the deliverable (the signed document) is generated.
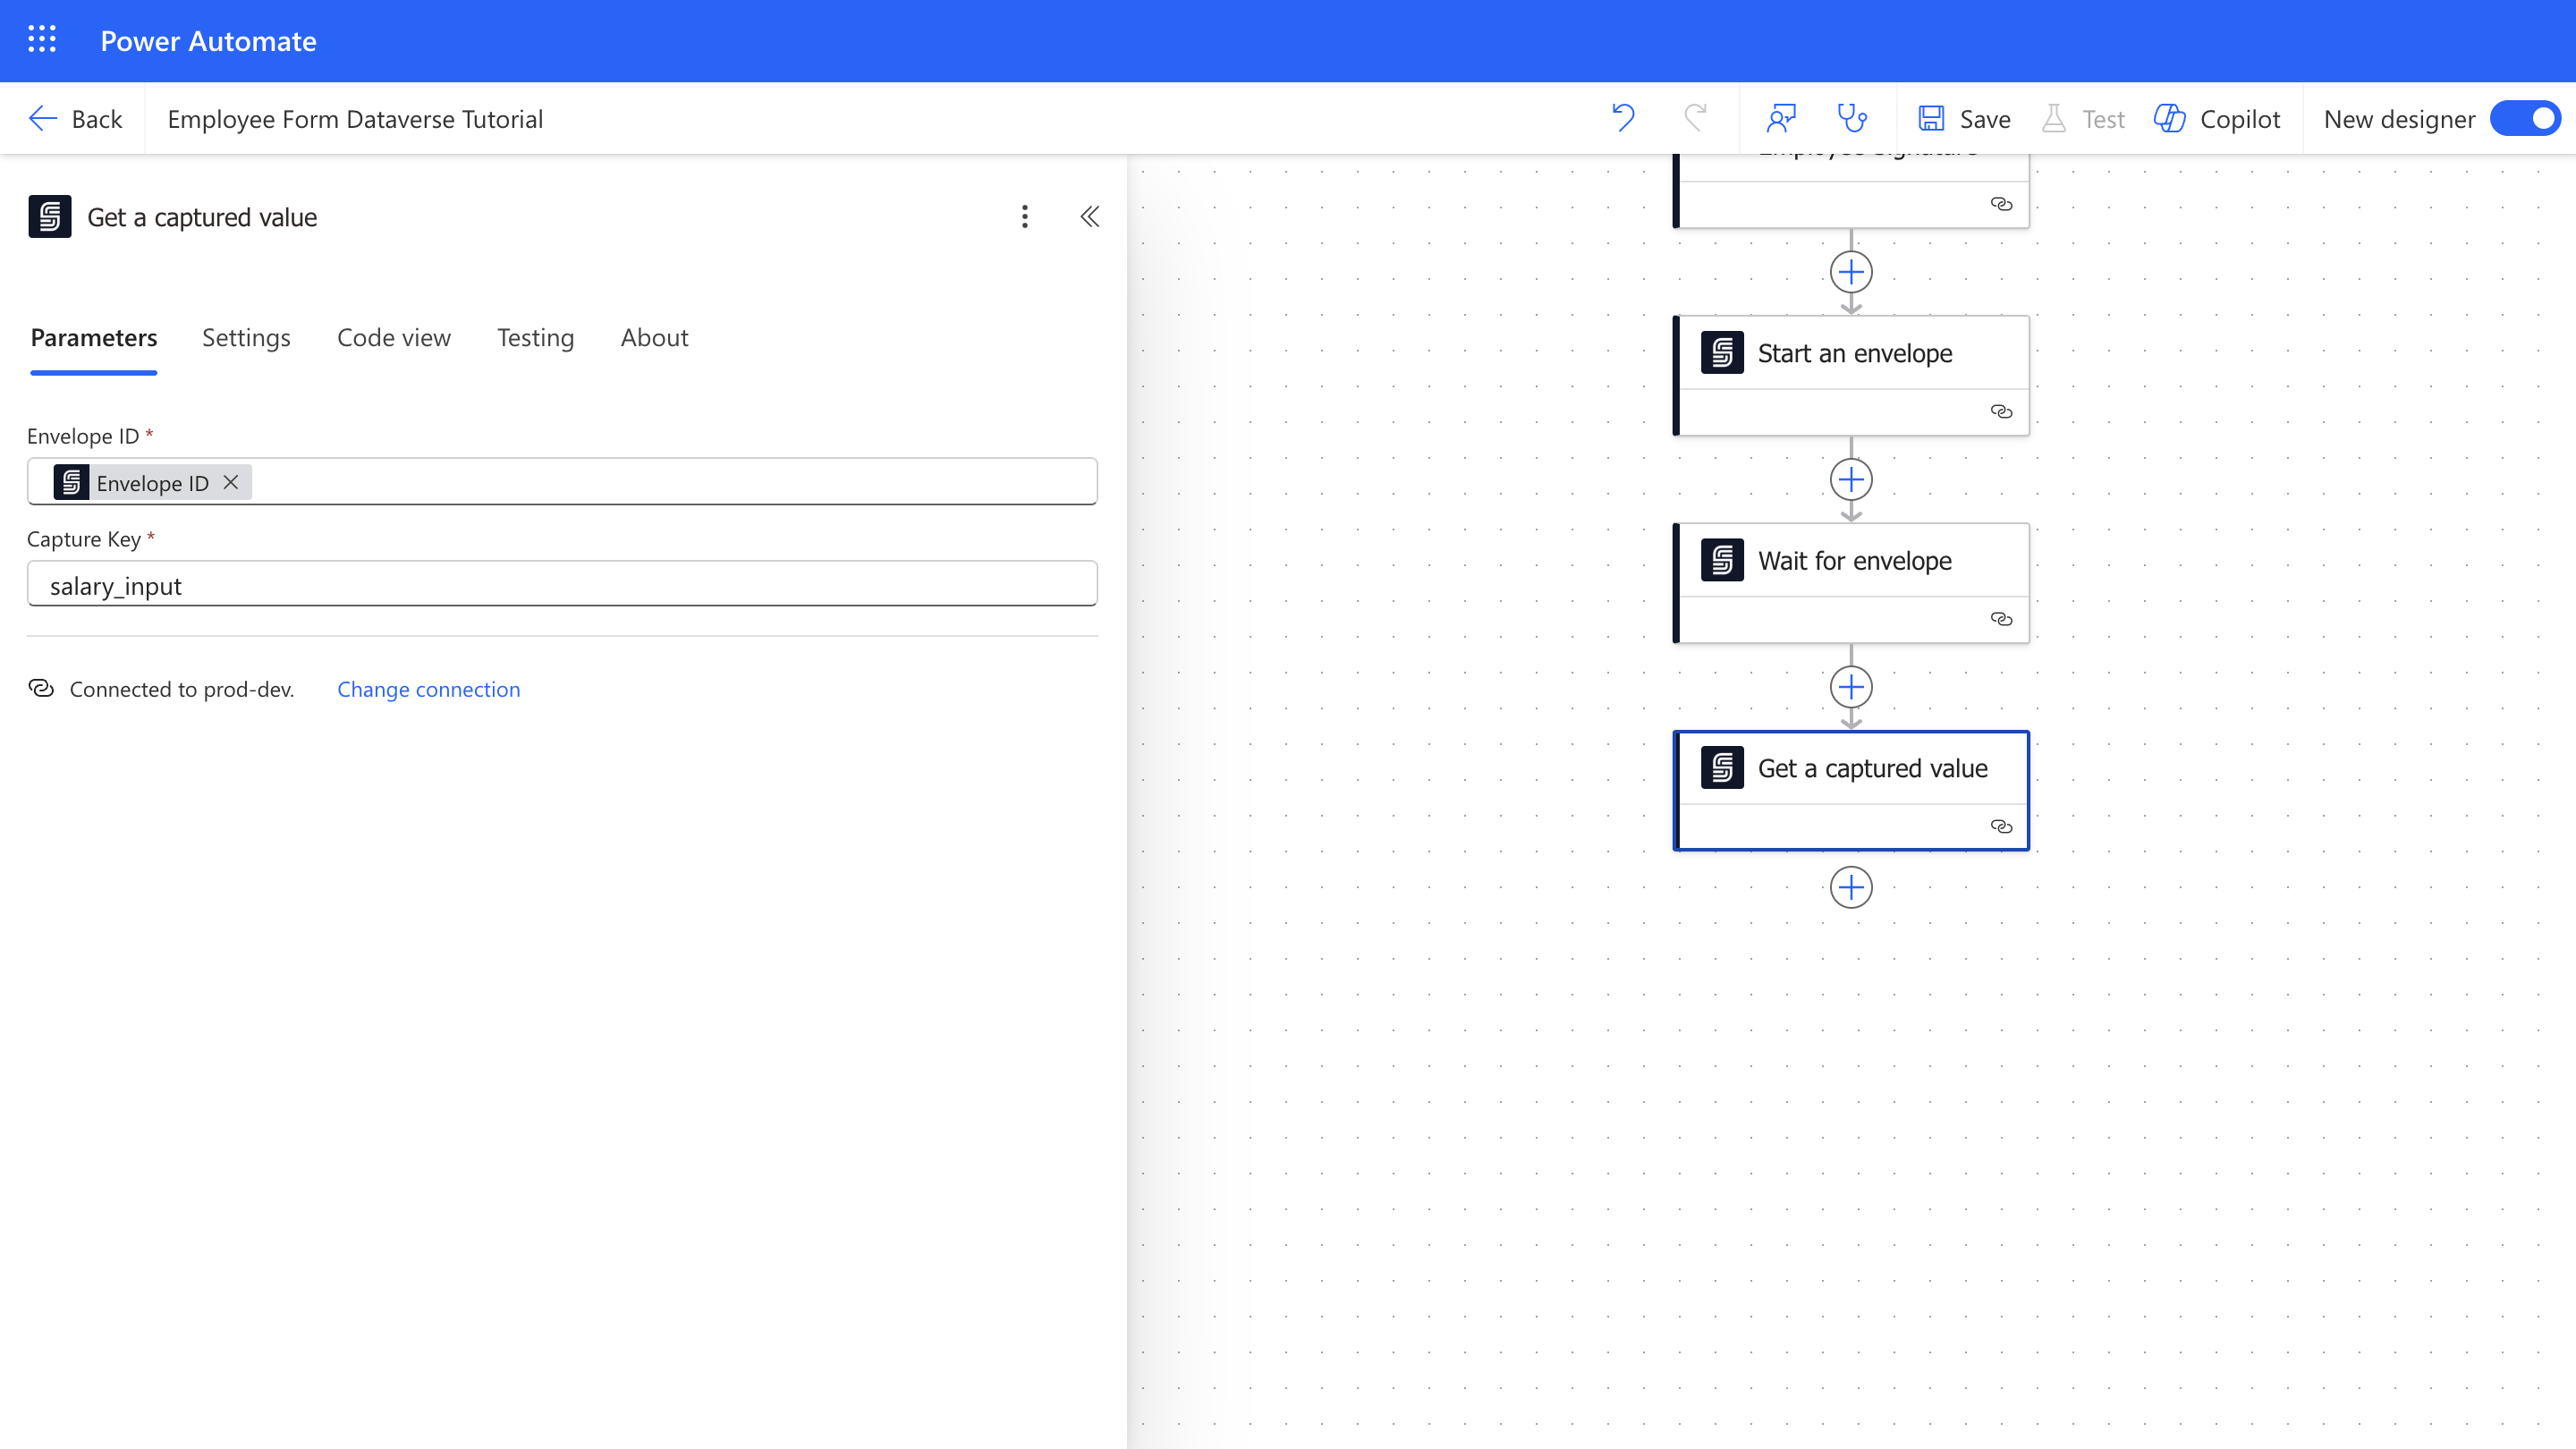
You can now retrieve the captured value from the salary input field the employer filled during the signing ceremony.
1. Add **Get a captured value** action from the **SignatureAPI** connector.
2. Set the **Envelope ID** field to the **Envelope ID** output of the **Create an Envelope** action.
3. In the **Capture Key** field, set the same key you used in the **Add a place – Text Input** action (in this case `salary_input`).
### Get the captured salary input
At this point in the flow, recipients have signed, the envelope is completed, and the deliverable (the signed document) is generated.
You can now retrieve the captured value from the salary input field the employer filled during the signing ceremony.
1. Add **Get a captured value** action from the **SignatureAPI** connector.
2. Set the **Envelope ID** field to the **Envelope ID** output of the **Create an Envelope** action.
3. In the **Capture Key** field, set the same key you used in the **Add a place – Text Input** action (in this case `salary_input`).
 ### Add a row to the Dataverse table
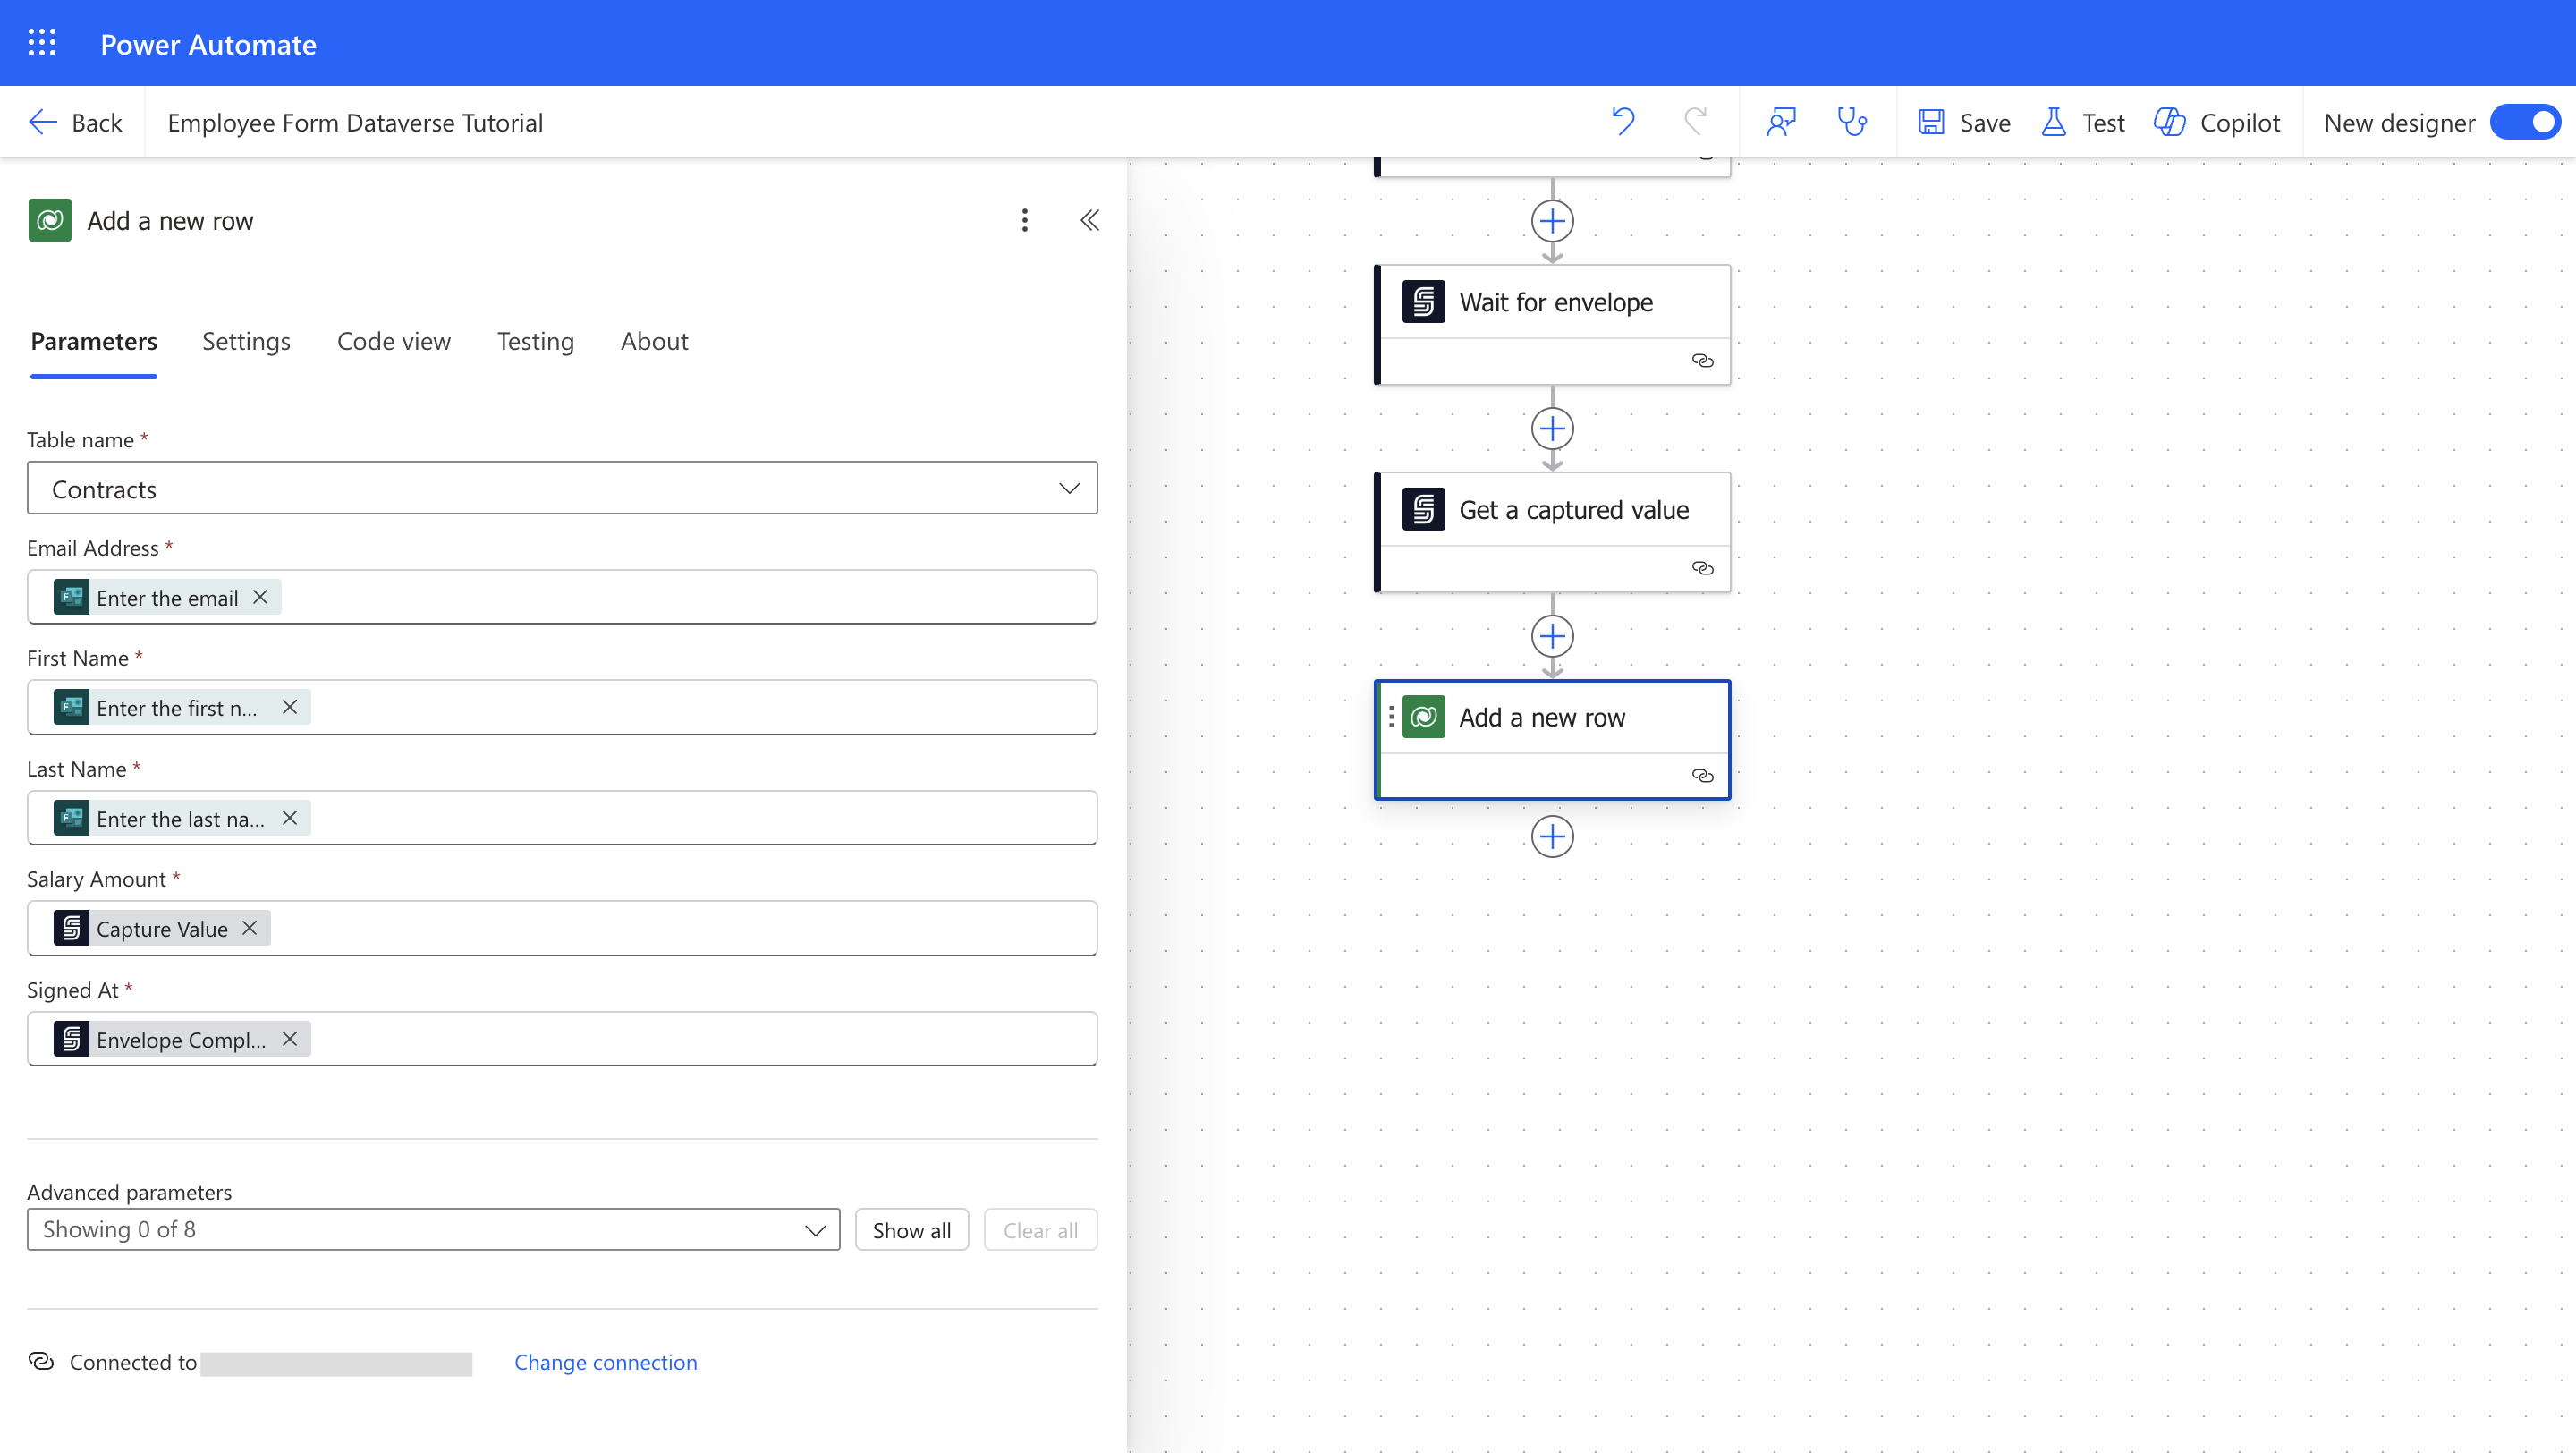
Now, add a row to the Dataverse table using the employee details and the captured salary amount.
1. Add **Add a new row** action from the **Micorosft Dataverse** connector.
2. In the **Table name**, select the table you created earlier (for example, **Employee Contracts**).
3. From the **Advanced parameters**, select the **Fields** to map to the employee details and the captured salary amount using dynamic content:
* Set the **First Name**, **Last Name**, and **Email Address** from the Microsoft Forms' **Get response details** action.
* Set the **Salary Amount** from the captured value in SignatureAPI's **Get a captured value** action.
* Set the **Signed At** from SignatureAPI's **Wait for Envelope** action.
### Add a row to the Dataverse table
Now, add a row to the Dataverse table using the employee details and the captured salary amount.
1. Add **Add a new row** action from the **Micorosft Dataverse** connector.
2. In the **Table name**, select the table you created earlier (for example, **Employee Contracts**).
3. From the **Advanced parameters**, select the **Fields** to map to the employee details and the captured salary amount using dynamic content:
* Set the **First Name**, **Last Name**, and **Email Address** from the Microsoft Forms' **Get response details** action.
* Set the **Salary Amount** from the captured value in SignatureAPI's **Get a captured value** action.
* Set the **Signed At** from SignatureAPI's **Wait for Envelope** action.
 ### Retrieve the signed contract
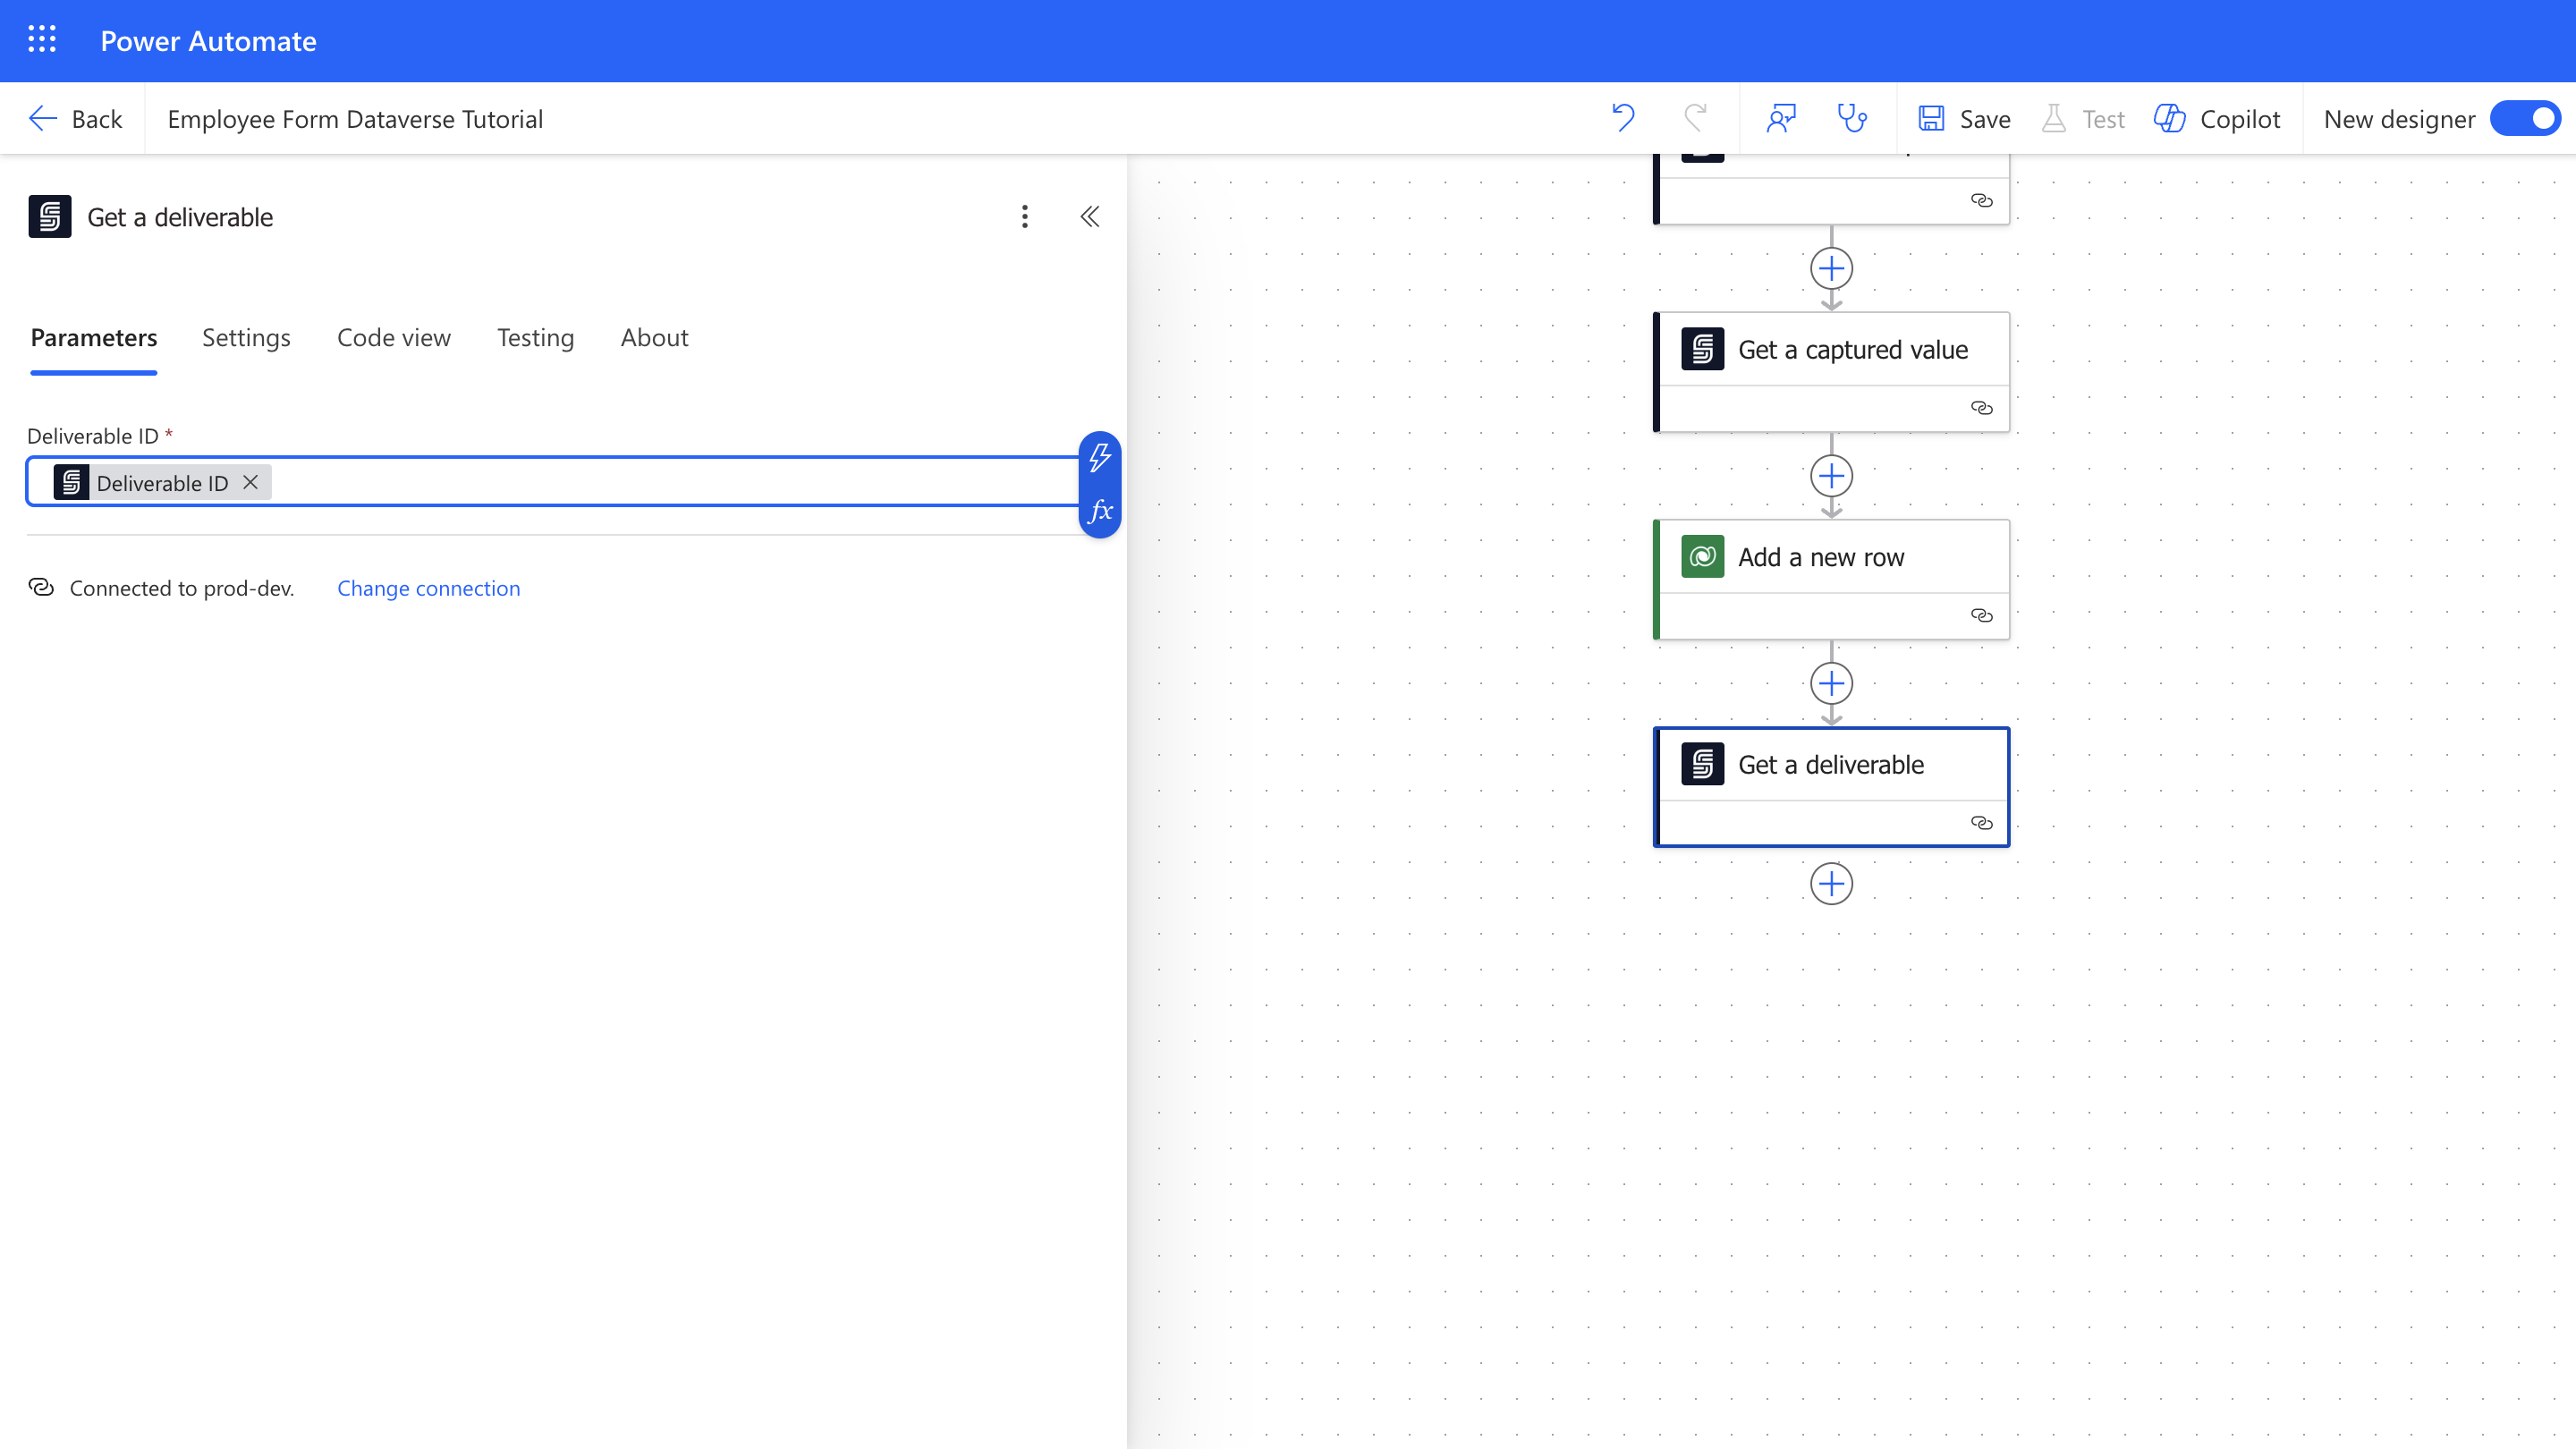
In SignatureAPI, the deliverable is a PDF containing the signed documents and the audit log. See an [example of a deliverable](/docs/integrations/power-automate/deliverables/audit-log). Retrieve the deliverable so you can save it later.
1. Add a **Get a deliverable** action from the **SignatureAPI** connector.
2. Set the **Deliverable ID** field to the **Deliverable ID** output of the previous **Wait for envelope** action.
Use the **Deliverable ID** from the **Wait for envelope** step, not from **Create an envelope**, as the latter is always null (the deliverable is not generated yet).
### Retrieve the signed contract
In SignatureAPI, the deliverable is a PDF containing the signed documents and the audit log. See an [example of a deliverable](/docs/integrations/power-automate/deliverables/audit-log). Retrieve the deliverable so you can save it later.
1. Add a **Get a deliverable** action from the **SignatureAPI** connector.
2. Set the **Deliverable ID** field to the **Deliverable ID** output of the previous **Wait for envelope** action.
Use the **Deliverable ID** from the **Wait for envelope** step, not from **Create an envelope**, as the latter is always null (the deliverable is not generated yet).
 ### Save the signed contract to OneDrive
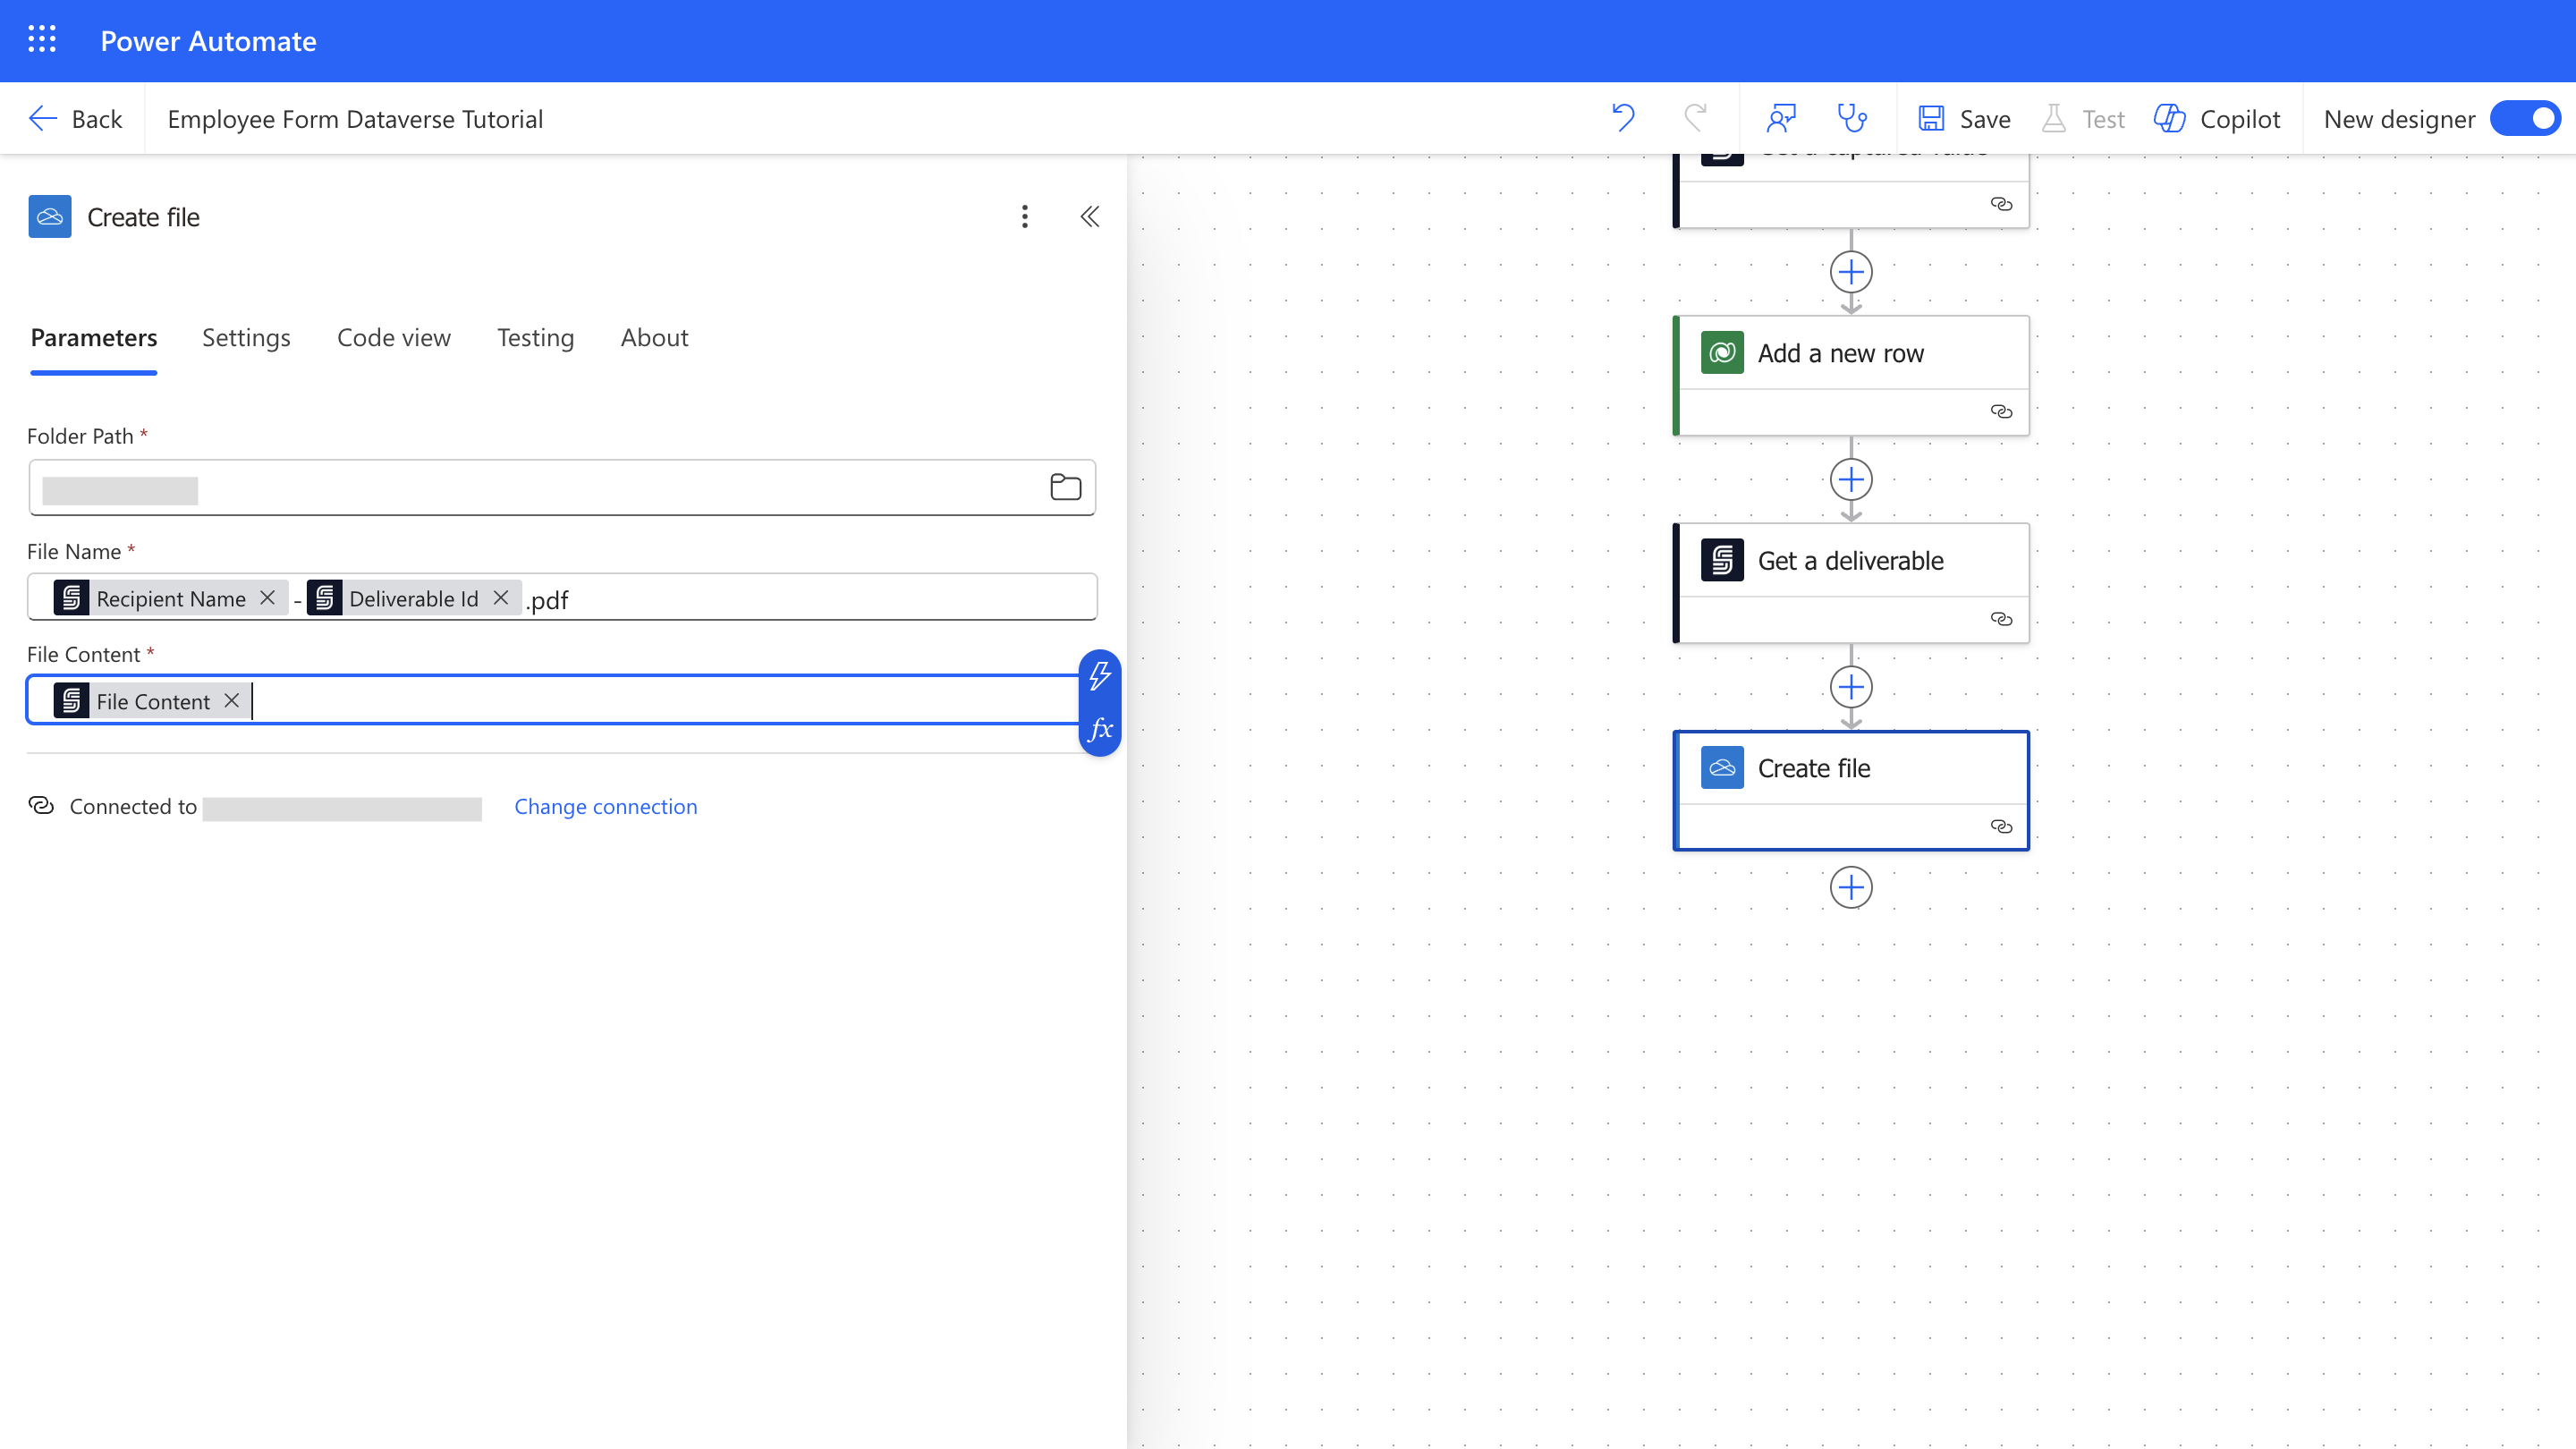
Now, save the signed contract to OneDrive.
1. Add **Create File** action from the **OneDrive** connector.
2. Set the **File Name** field to your desired signed document name. You can use dynamic content from previous steps. Make sure to end it with `.pdf`.
3. Set the **File Content** field to the **File Content** output of the **Get a deliverable** action.
### Save the signed contract to OneDrive
Now, save the signed contract to OneDrive.
1. Add **Create File** action from the **OneDrive** connector.
2. Set the **File Name** field to your desired signed document name. You can use dynamic content from previous steps. Make sure to end it with `.pdf`.
3. Set the **File Content** field to the **File Content** output of the **Get a deliverable** action.
 ### Notify HR that the contract was signed
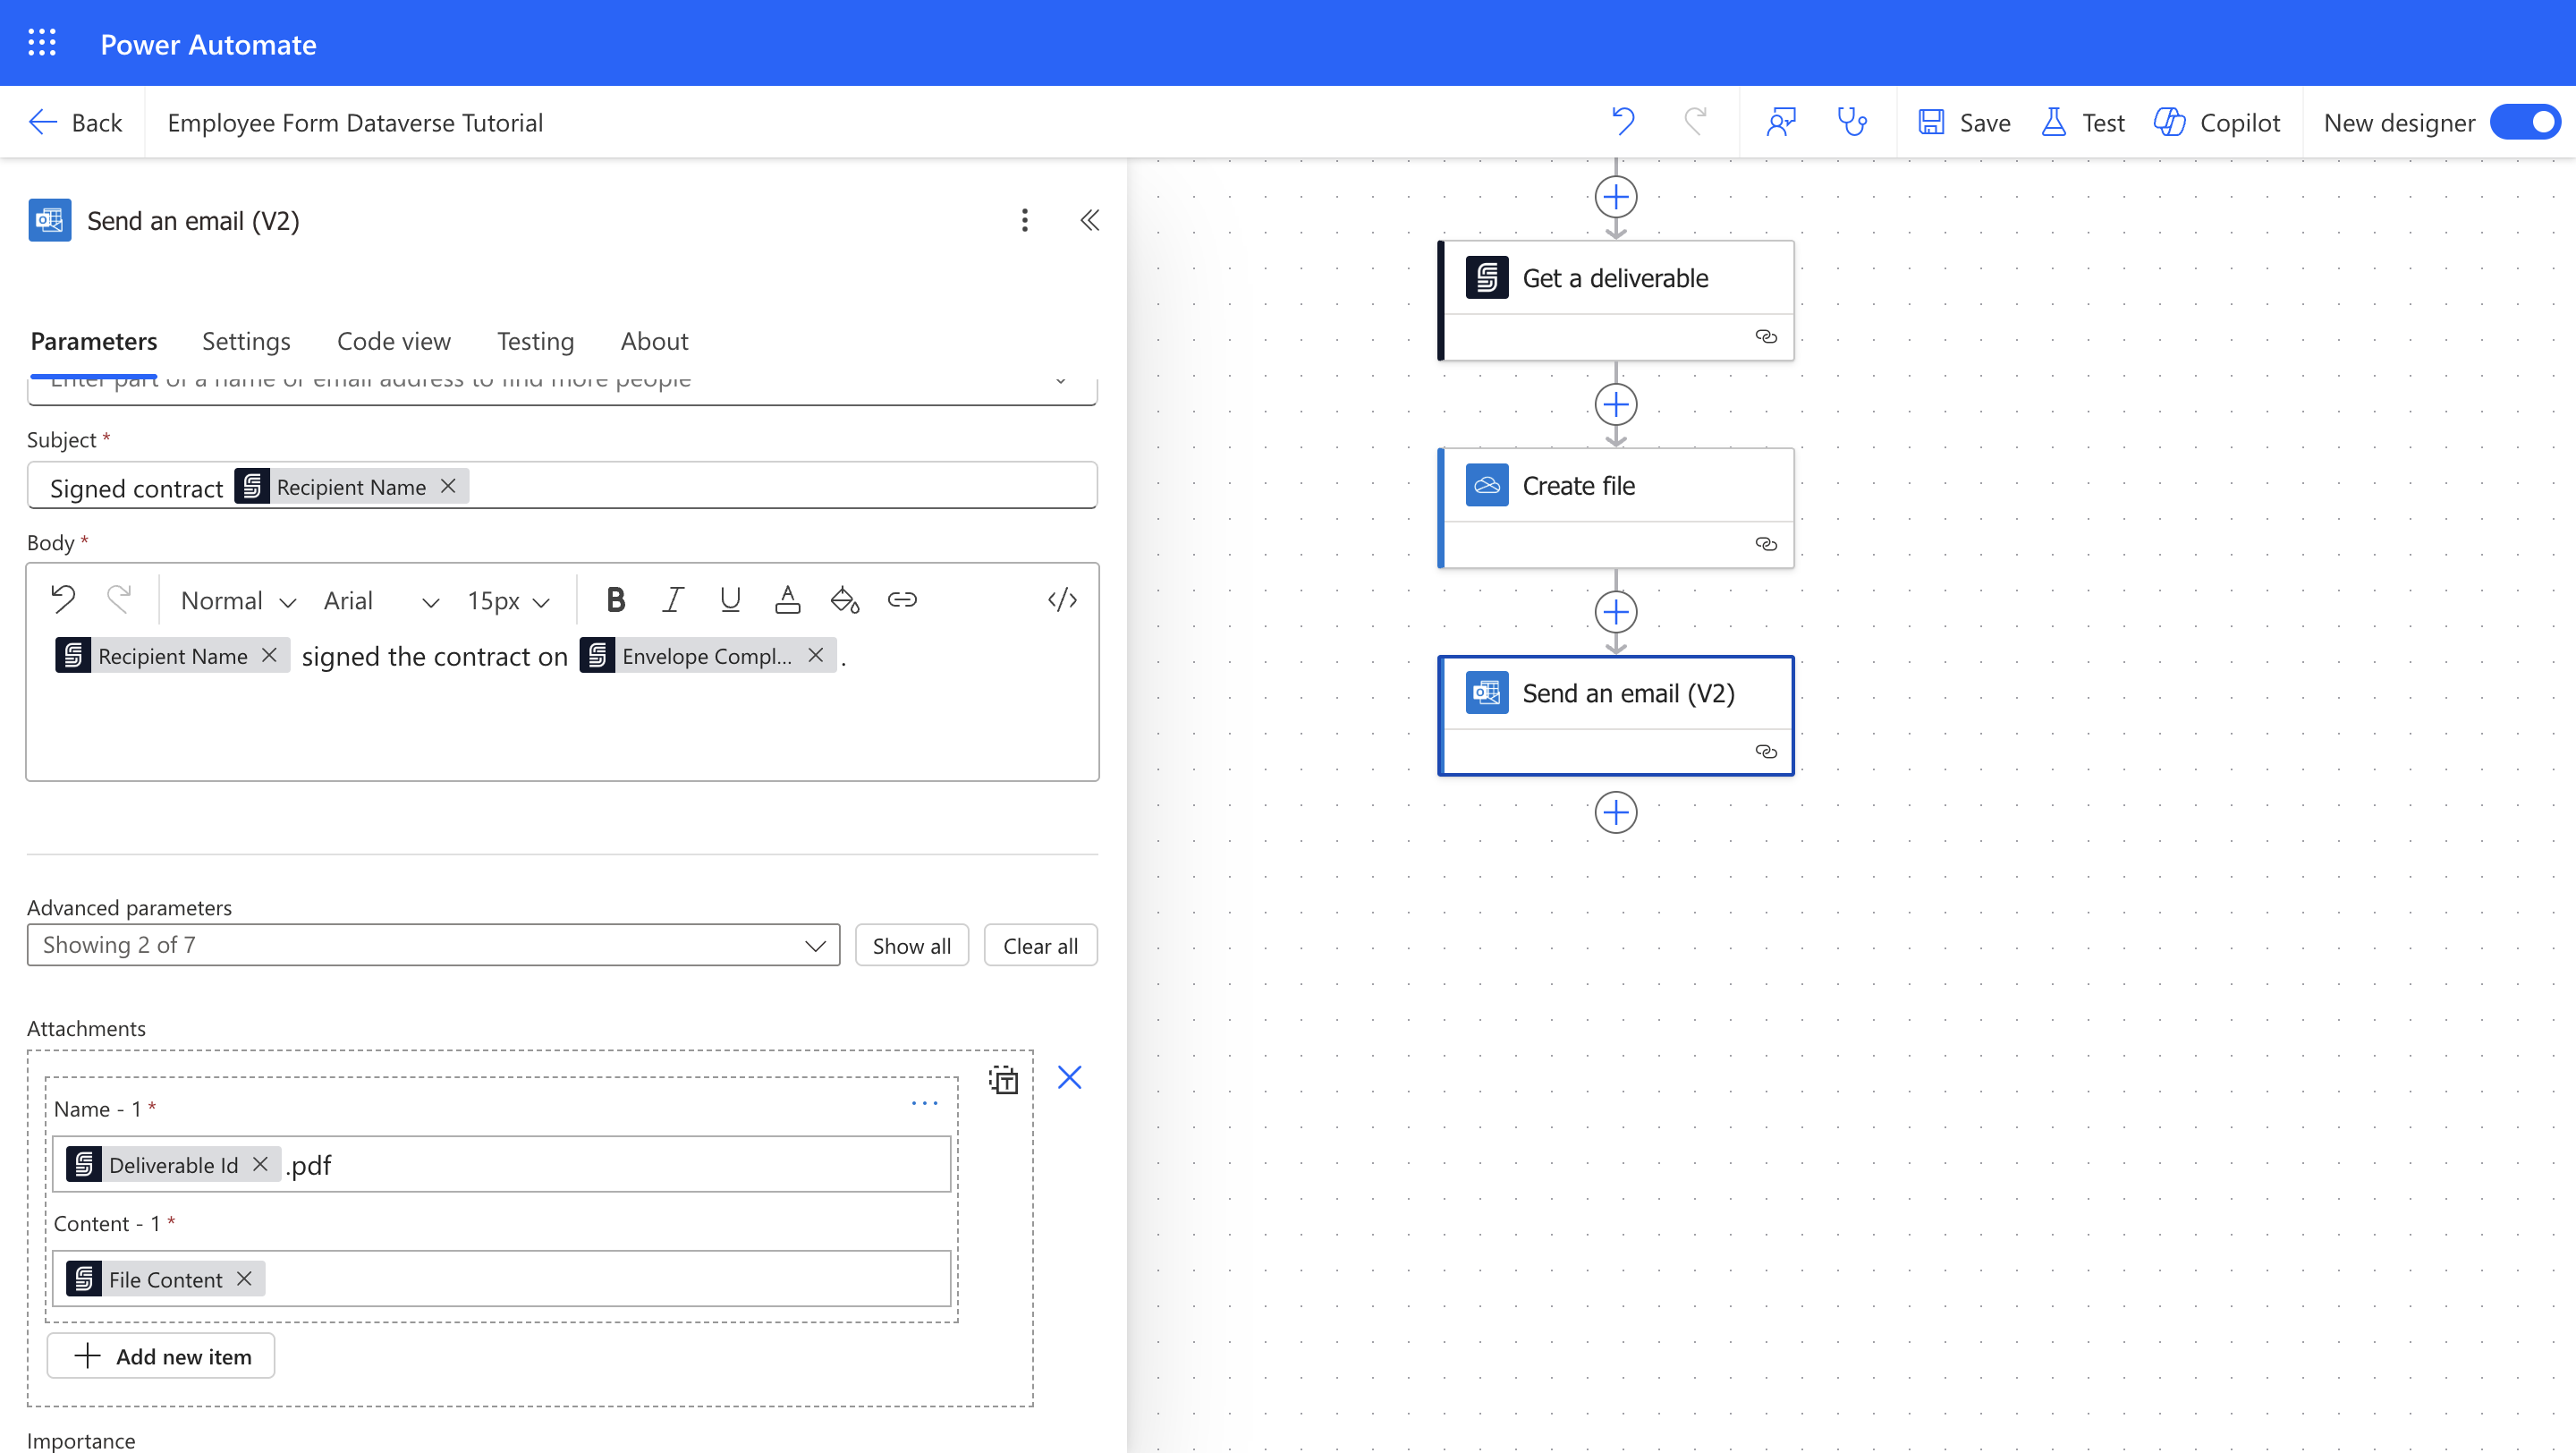
Finally, notify HR that the contract was signed and attach the signed document.
1. Add **Send an email (V2)** action from the **Outlook** connector.
2. Set the **To** field to the HR department email address.
3. Set the **Subject** and **Body** as you prefer, and use dynamic content from previous steps as needed.
4. Under **Attachments** in advanced parameters, set the attachment file name (ensure it ends with `.pdf`) and set the **Content** field to the **File Content** from the **Get a deliverable** action.
### Notify HR that the contract was signed
Finally, notify HR that the contract was signed and attach the signed document.
1. Add **Send an email (V2)** action from the **Outlook** connector.
2. Set the **To** field to the HR department email address.
3. Set the **Subject** and **Body** as you prefer, and use dynamic content from previous steps as needed.
4. Under **Attachments** in advanced parameters, set the attachment file name (ensure it ends with `.pdf`) and set the **Content** field to the **File Content** from the **Get a deliverable** action.
 ## Test Your Automation
Test the entire process end-to-end.
1. Save your Power Automate flow.
2. Submit a test response through your Microsoft Form.
3. Verify each step:
* The form is submitted successfully.
* The flow is triggered and the contract is sent to the employer.
* After the employer fills the salary amount and signs, the employee receives and signs the contract.
* A row is added to the Dataverse table with the employee details and captured salary amount.
* The signed contract is saved in OneDrive.
* HR receives an email notification with the signed contract attached.
## Conclusion
In this tutorial, you learned how to use SignatureAPI together with Microsoft Forms, Power Automate, OneDrive, and Dataverse to automate the employment contract process. You saw how to fill a document template, add signature and input fields, and send documents to recipients for signing.
You also learned how SignatureAPI captures additional data from recipients, tracks the status of the envelope, and provides a signed deliverable once the process is completed. The tutorial showed you how to automatically save signed contracts and employee details, streamlining your workflow.
With these steps, you can now use SignatureAPI to manage and automate other document signing processes in your organization.
## Keep Learning
* Learn about [document templates](/docs/integrations/power-automate/documents/templates).
* Learn about [other type of places](/docs/integrations/power-automate/places/place) like initials, dates, etc.
* Learn how to [customize your envelopes](/docs/integrations/power-automate/envelopes/envelope), set the language, and more.
* Learn more about [capturing signer input](/docs/integrations/power-automate/envelopes/captures).
**Happy Automating!**
## Test Your Automation
Test the entire process end-to-end.
1. Save your Power Automate flow.
2. Submit a test response through your Microsoft Form.
3. Verify each step:
* The form is submitted successfully.
* The flow is triggered and the contract is sent to the employer.
* After the employer fills the salary amount and signs, the employee receives and signs the contract.
* A row is added to the Dataverse table with the employee details and captured salary amount.
* The signed contract is saved in OneDrive.
* HR receives an email notification with the signed contract attached.
## Conclusion
In this tutorial, you learned how to use SignatureAPI together with Microsoft Forms, Power Automate, OneDrive, and Dataverse to automate the employment contract process. You saw how to fill a document template, add signature and input fields, and send documents to recipients for signing.
You also learned how SignatureAPI captures additional data from recipients, tracks the status of the envelope, and provides a signed deliverable once the process is completed. The tutorial showed you how to automatically save signed contracts and employee details, streamlining your workflow.
With these steps, you can now use SignatureAPI to manage and automate other document signing processes in your organization.
## Keep Learning
* Learn about [document templates](/docs/integrations/power-automate/documents/templates).
* Learn about [other type of places](/docs/integrations/power-automate/places/place) like initials, dates, etc.
* Learn how to [customize your envelopes](/docs/integrations/power-automate/envelopes/envelope), set the language, and more.
* Learn more about [capturing signer input](/docs/integrations/power-automate/envelopes/captures).
**Happy Automating!**