> ## Documentation Index
> Fetch the complete documentation index at: https://signatureapi-daf4ee54.mintlify.site/llms.txt
> Use this file to discover all available pages before exploring further.
# Automating Employment Contracts and Storing Data in Microsoft Dataverse with Microsoft Forms, SignatureAPI, and Microsoft Power Automate
> Automate employment contract signing with form data capture and store employee details in Microsoft Dataverse using SignatureAPI and Power Automate
## Overview
This tutorial demonstrates how to streamline the employment contract process by automatically sending, signing, and storing contracts. By integrating **Microsoft Forms** (for data collection), **OneDrive** (for storing contract PDF templates), the **SignatureAPI connector** (for electronic signatures with form inputs), and **Microsoft Dataverse** (for storing employee details from the form and signature completion), you can eliminate manual errors and delays in onboarding new employees.
### What You'll Learn
* How to trigger a flow with a new Microsoft Forms response.
* Retrieving and pre-filling a DOCX contract template from OneDrive.
* Creating and sending a signature envelope using SignatureAPI for two recipients.
* Capturing data from text input fields in the signature process.
* Monitoring the signing process and retrieving the signed document.
* Saving the signed contract, adding a row to a Dataverse table, and automatically notifying HR.
### The Problem
HR departments often struggle with manually handling contracts, causing delays in onboarding. Common issues include:
* **Slow processing** - manual tasks create delays.
* **Errors** - mistakes from manual data entry.
* **Tracking difficulty** - challenges in monitoring signing status.
### How Automation Helps
Automation simplifies this process by:
* Automatically sending contracts upon form submission.
* Using templates pre-filled with employee details.
* Using the SignatureAPI form to capture data from the signature process and then add a row to a Dataverse table.
* Tracking signature status and storing documents automatically.
* Informing HR instantly once contracts are signed.
## Requirements
Before starting, make sure you have:
* **Power Automate** - To build workflows.
* **SignatureAPI account** - For electronic signatures with form inputs.
* **Microsoft Forms** - For collecting employee information.
* **OneDrive** - For storing your DOCX templates.
* **Microsoft Dataverse** - For storing employee details from the form and signature completion.
* **Outlook** - For sending notifications (other email providers also work).
## Flow Overview
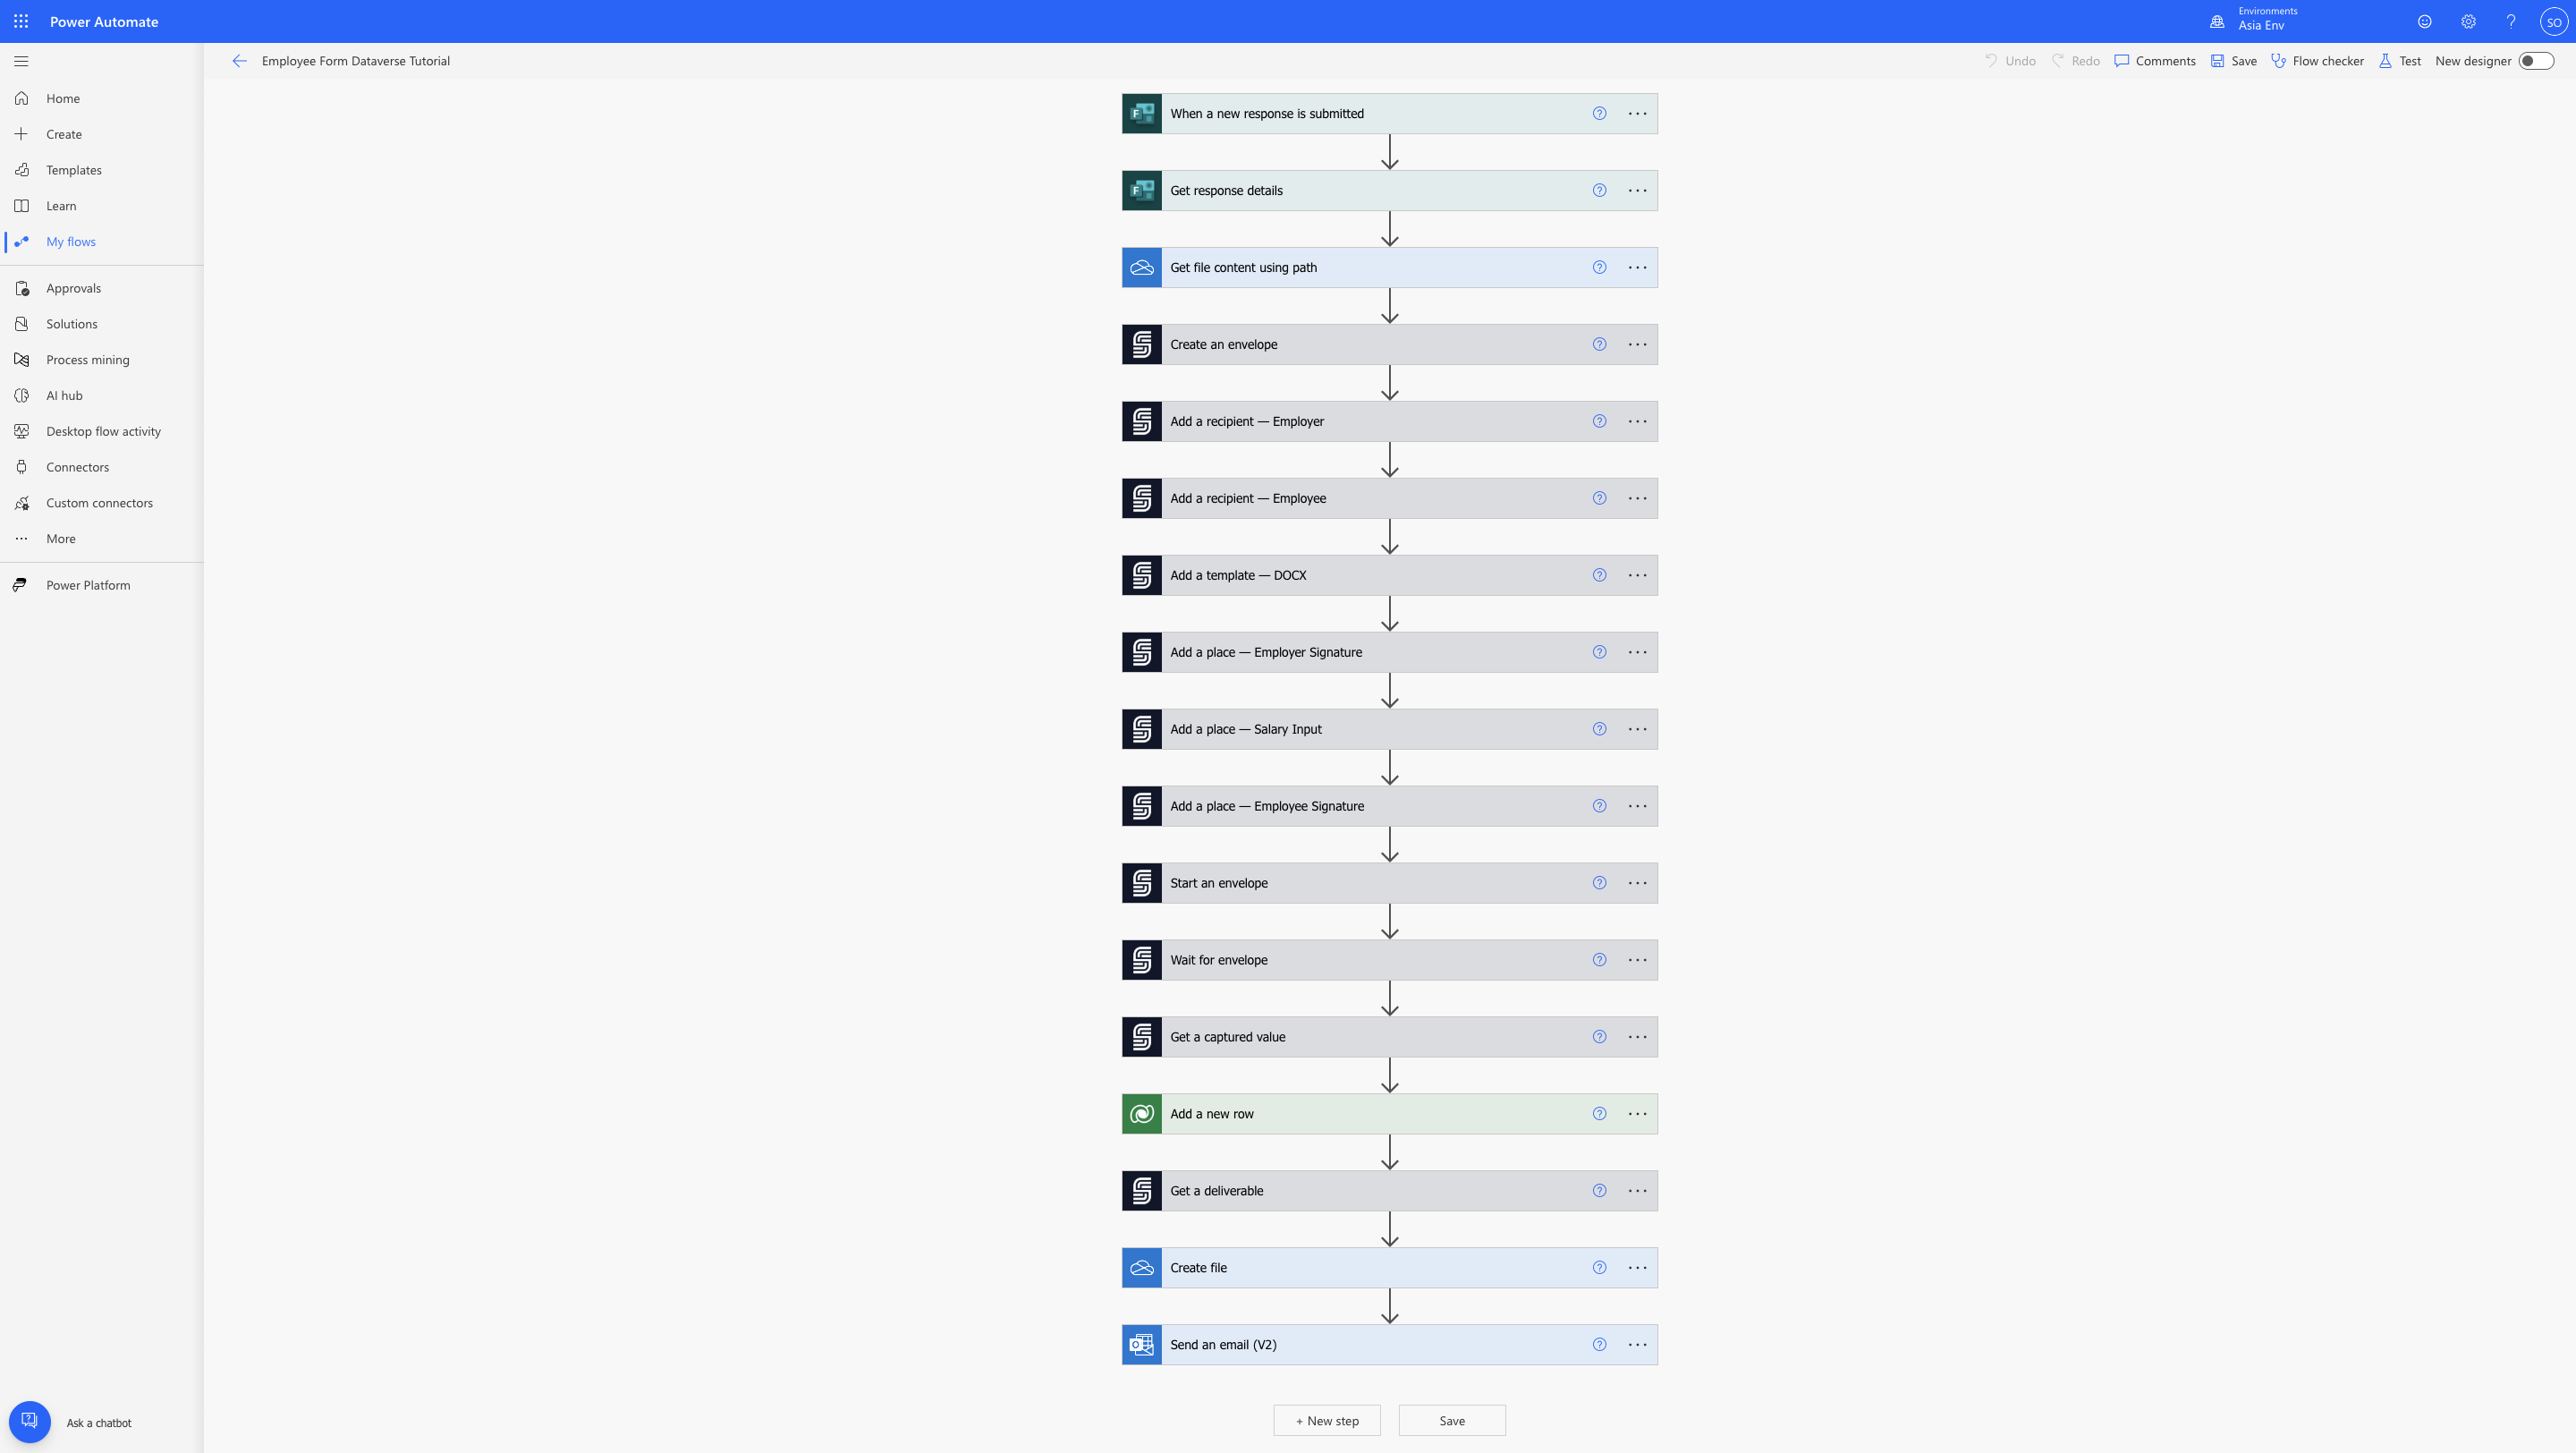
The automation process follows these steps:
1. **Trigger:** Microsoft Forms submission starts the flow.
2. **Data Retrieval:** Get employee details and fetch the contract template from OneDrive.
3. **Signature Process:** Create an envelope via SignatureAPI, add recipient details, and attach the DOCX.
4. **Monitoring:** Wait for the contract to be signed.
5. **Storage & Notification:** Save the signed document in OneDrive, add a row to a Dataverse table, and notify HR via email.
Here's what your final Power Automate flow will look like:
 ## Step-by-Step Tutorial
Follow these steps to automate your employment contract process using Microsoft Forms, Microsoft Dataverse, SignatureAPI, and Power Automate:
### Step 1: Prepare the Contract Template
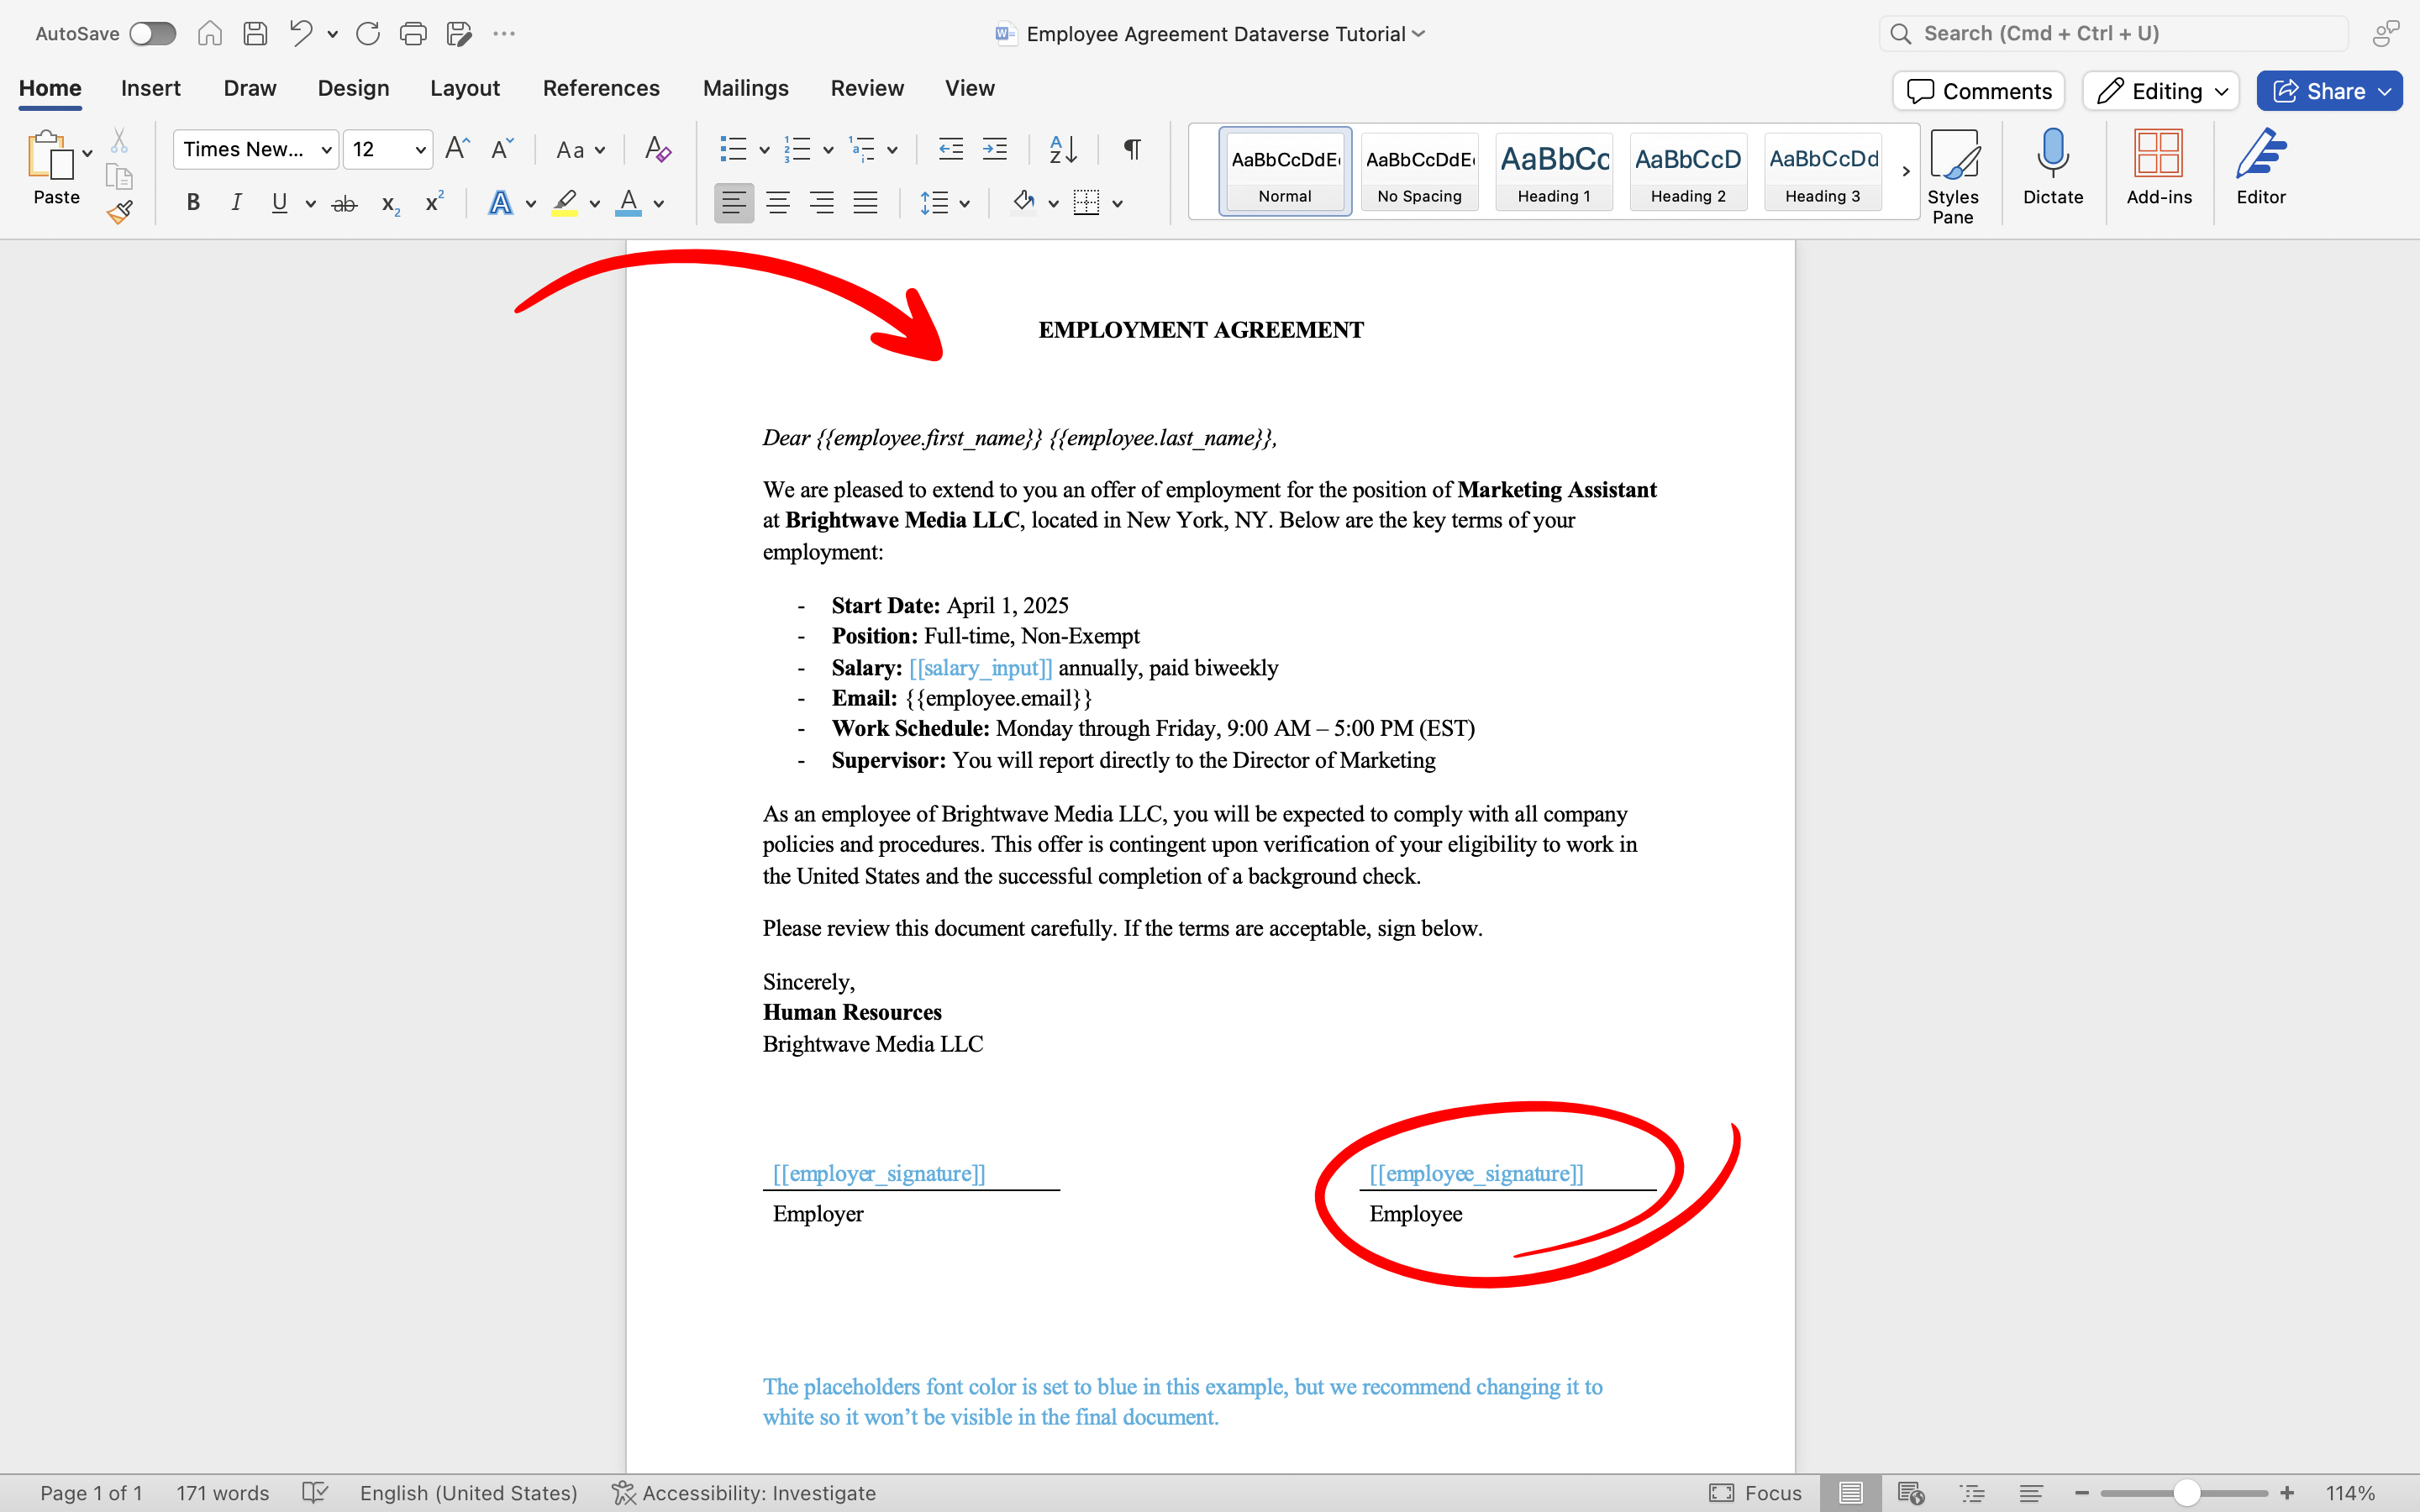
First, create or update your employment contract template by adding placeholders for dynamic fields (employee details), defining the employer and employee signature fields, and adding a place for the salary amount that the employer will fill during the signature process.
**To prepare your template:**
1. Open your existing employment contract document (DOCX format) in Microsoft Word.
2. Identify each place where employee details should be dynamically inserted (e.g., name, email).
3. Insert placeholders using **double curly brackets** around descriptive keys. Examples:
* Employee first name: `{{employee.first_name}}`
* Employee last name: `{{employee.last_name}}`
* Employee email: `{{employee.email}}`
4. Define the location for the employee signature clearly by inserting a signature placeholder using **double square brackets**, e.g.: `[[employee_signature]]`
5. Define the location for the employer signature clearly by inserting a signature placeholder using **double square brackets**, e.g.: `[[employer_signature]]`
6. Add a place for the salary amount that the employer will fill during the signature process, e.g.: `[[salary_input]]`
**Example placeholder usage in your document:**
> *Dear `{{employee.first_name}}` `{{employee.last_name}}`,*
> *This will be the salary amount you will receive per month: `[[salary_input]]`*
> *Employer Signature:*
> `[[employer_signature]]`
> *Employee Signature:*
> `[[employee_signature]]`
7. Save your template and upload it to **OneDrive** (or another preferred storage service).
**Important:** Ensure placeholder keys match exactly with what you'll use later in Power Automate. Keep your template simple and clear to avoid confusion during dynamic insertion.
## Step-by-Step Tutorial
Follow these steps to automate your employment contract process using Microsoft Forms, Microsoft Dataverse, SignatureAPI, and Power Automate:
### Step 1: Prepare the Contract Template
First, create or update your employment contract template by adding placeholders for dynamic fields (employee details), defining the employer and employee signature fields, and adding a place for the salary amount that the employer will fill during the signature process.
**To prepare your template:**
1. Open your existing employment contract document (DOCX format) in Microsoft Word.
2. Identify each place where employee details should be dynamically inserted (e.g., name, email).
3. Insert placeholders using **double curly brackets** around descriptive keys. Examples:
* Employee first name: `{{employee.first_name}}`
* Employee last name: `{{employee.last_name}}`
* Employee email: `{{employee.email}}`
4. Define the location for the employee signature clearly by inserting a signature placeholder using **double square brackets**, e.g.: `[[employee_signature]]`
5. Define the location for the employer signature clearly by inserting a signature placeholder using **double square brackets**, e.g.: `[[employer_signature]]`
6. Add a place for the salary amount that the employer will fill during the signature process, e.g.: `[[salary_input]]`
**Example placeholder usage in your document:**
> *Dear `{{employee.first_name}}` `{{employee.last_name}}`,*
> *This will be the salary amount you will receive per month: `[[salary_input]]`*
> *Employer Signature:*
> `[[employer_signature]]`
> *Employee Signature:*
> `[[employee_signature]]`
7. Save your template and upload it to **OneDrive** (or another preferred storage service).
**Important:** Ensure placeholder keys match exactly with what you'll use later in Power Automate. Keep your template simple and clear to avoid confusion during dynamic insertion.
 ### Step 2: Create the Microsoft Form
Create a Microsoft Form to collect necessary employee details (First Name, Last Name, Email Address).
1. Visit [Microsoft Forms](https://forms.office.com) and sign in.
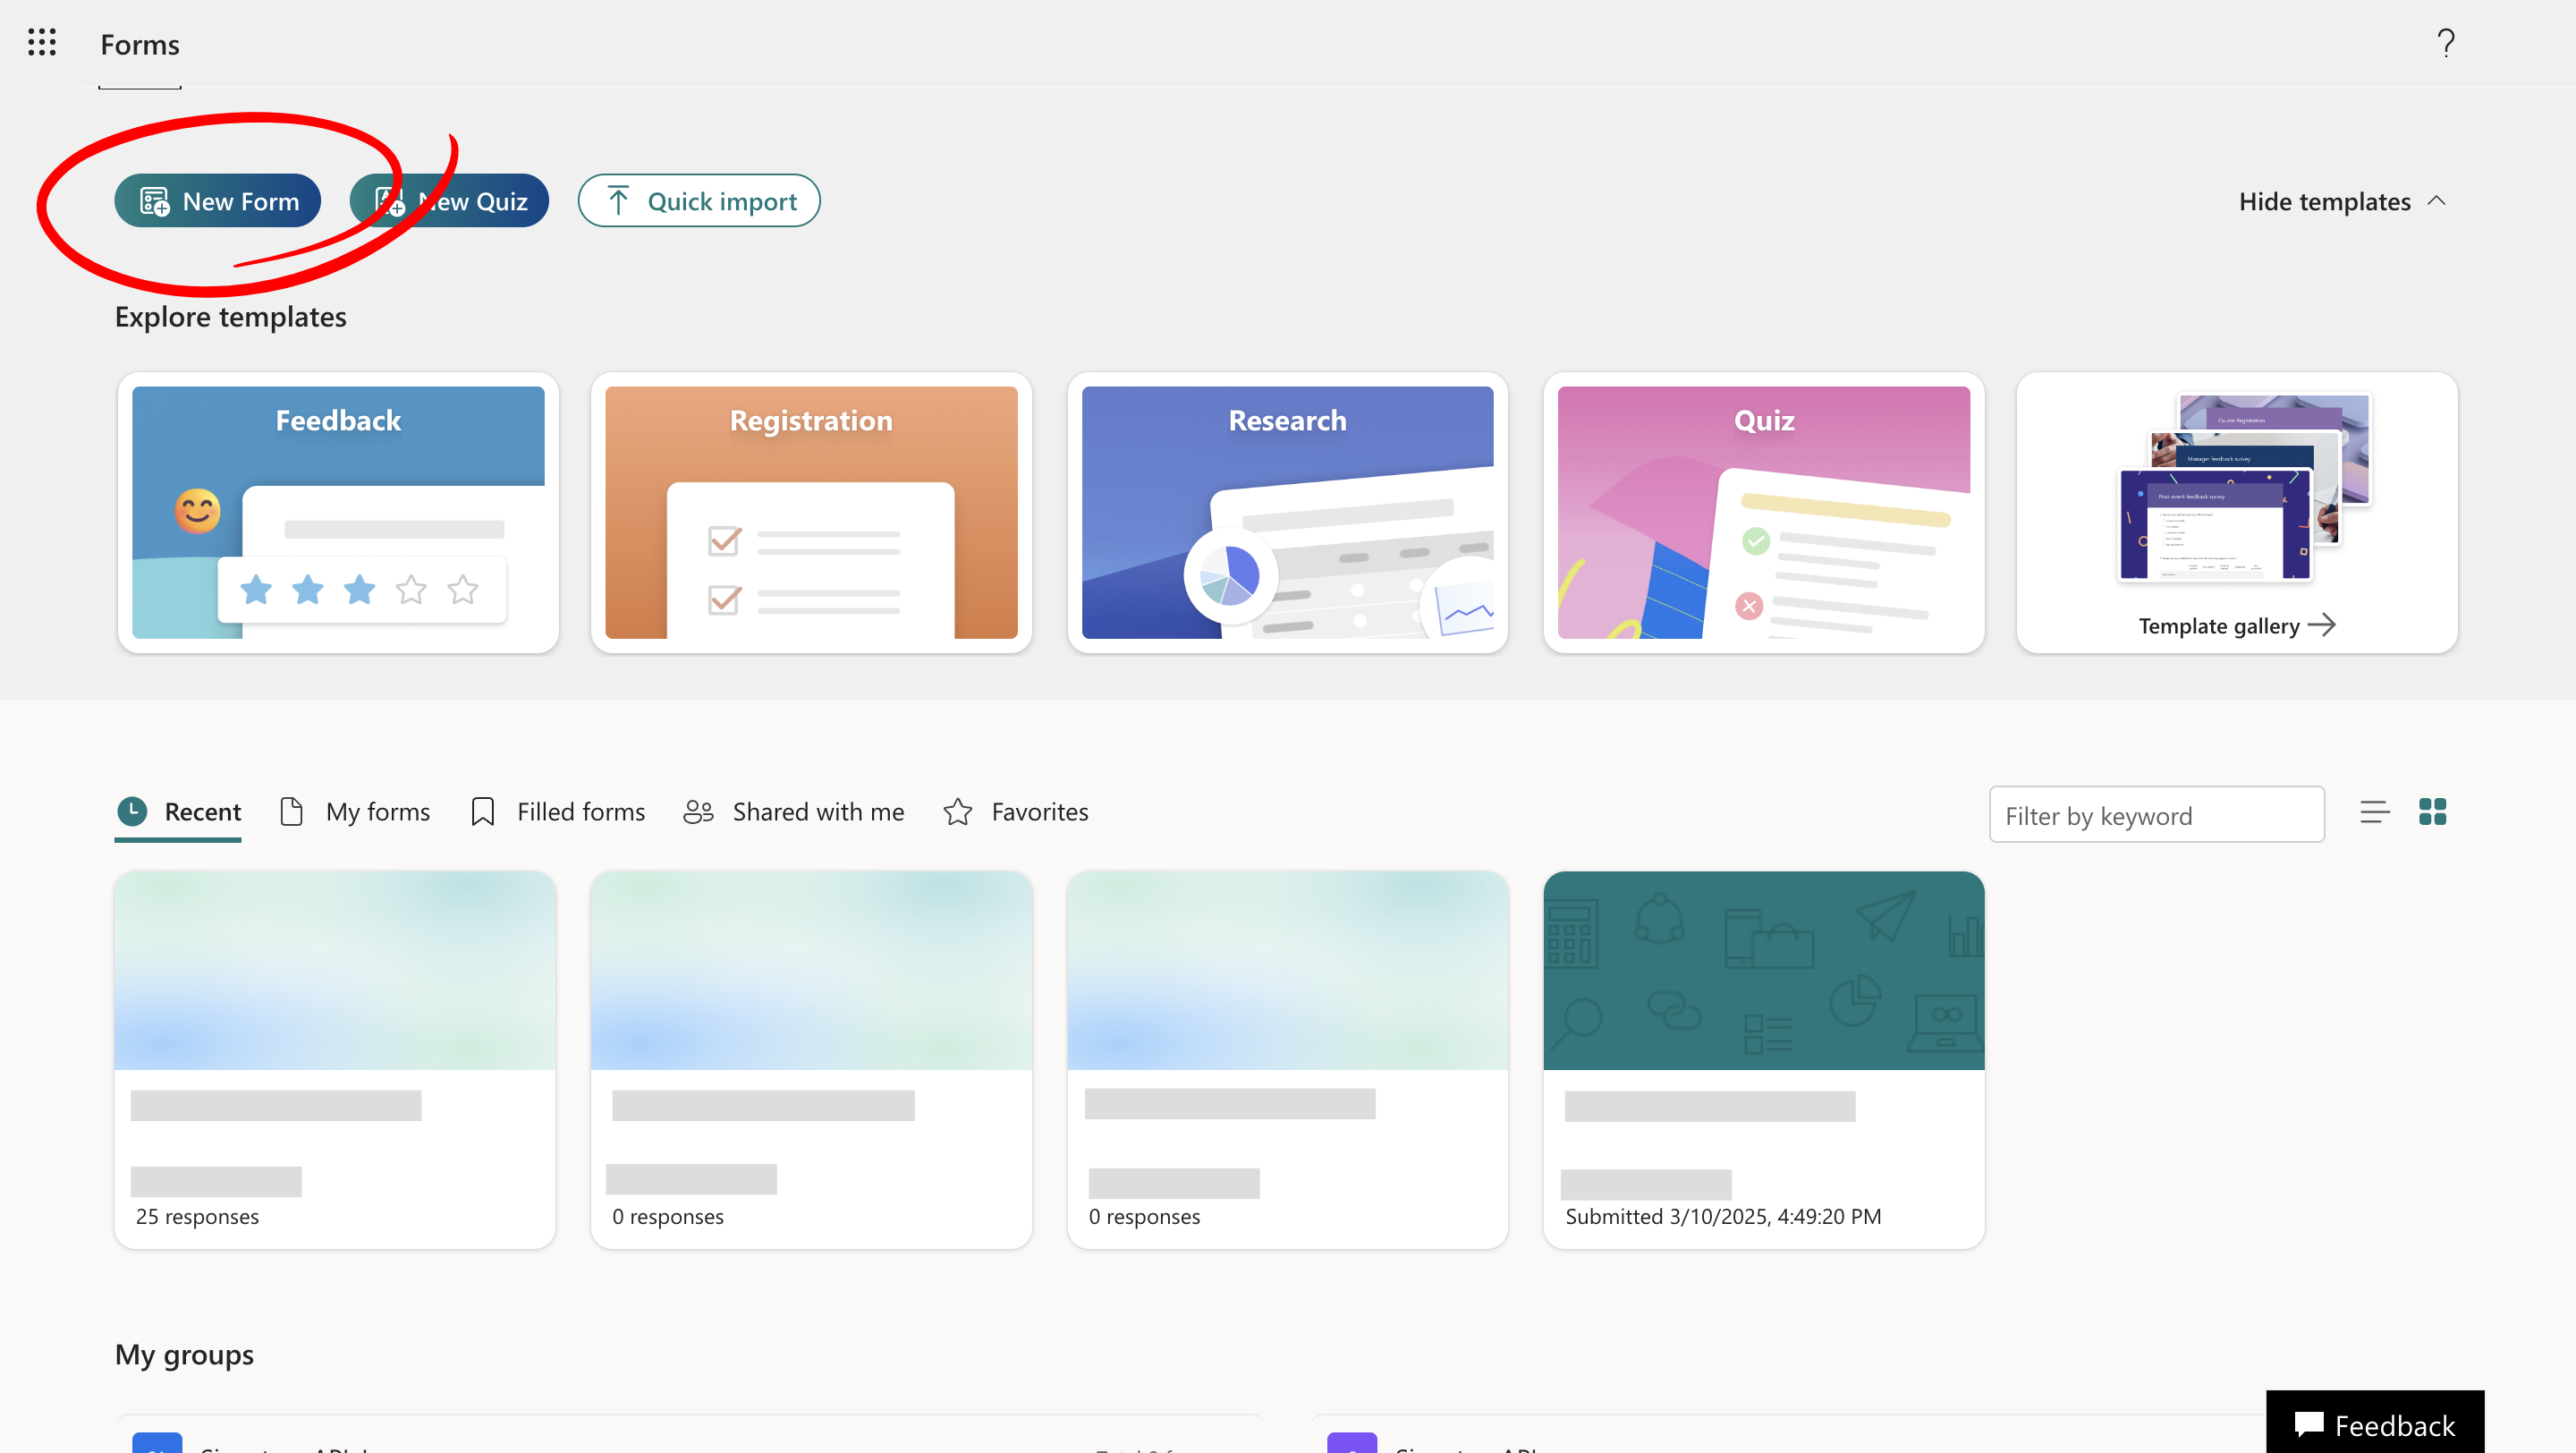
2. Click **New Form**.
### Step 2: Create the Microsoft Form
Create a Microsoft Form to collect necessary employee details (First Name, Last Name, Email Address).
1. Visit [Microsoft Forms](https://forms.office.com) and sign in.
2. Click **New Form**.
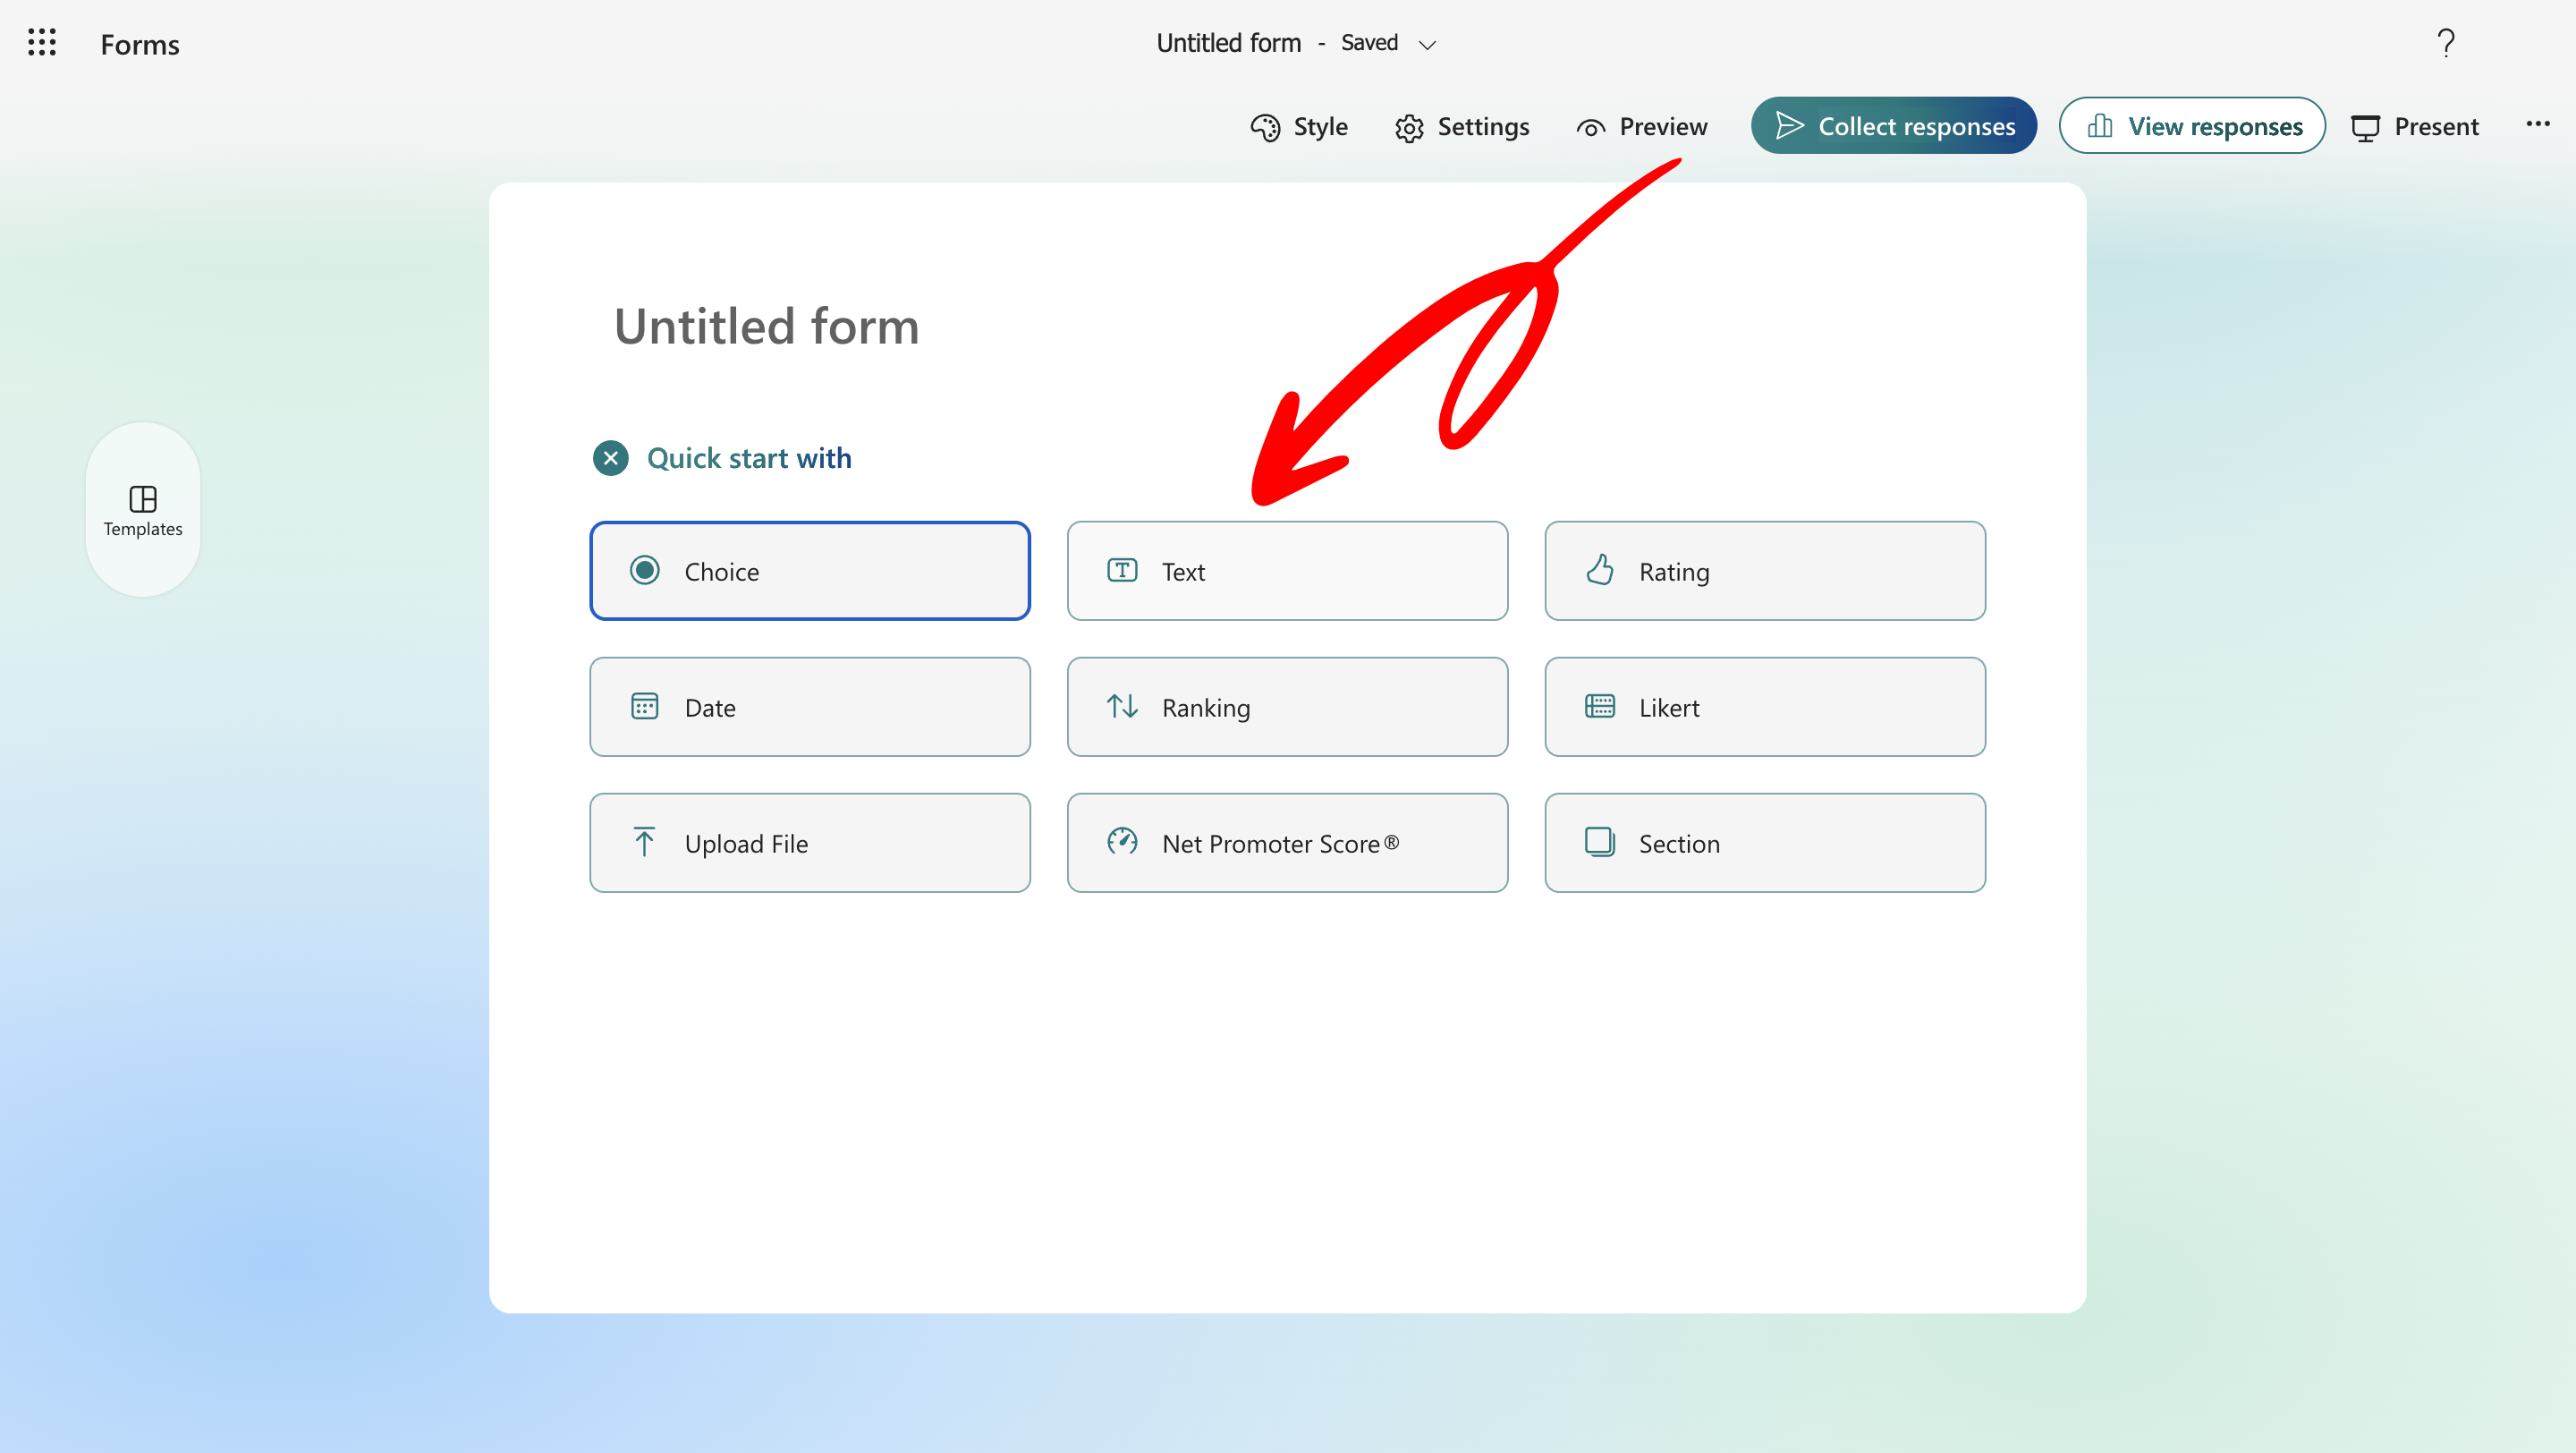
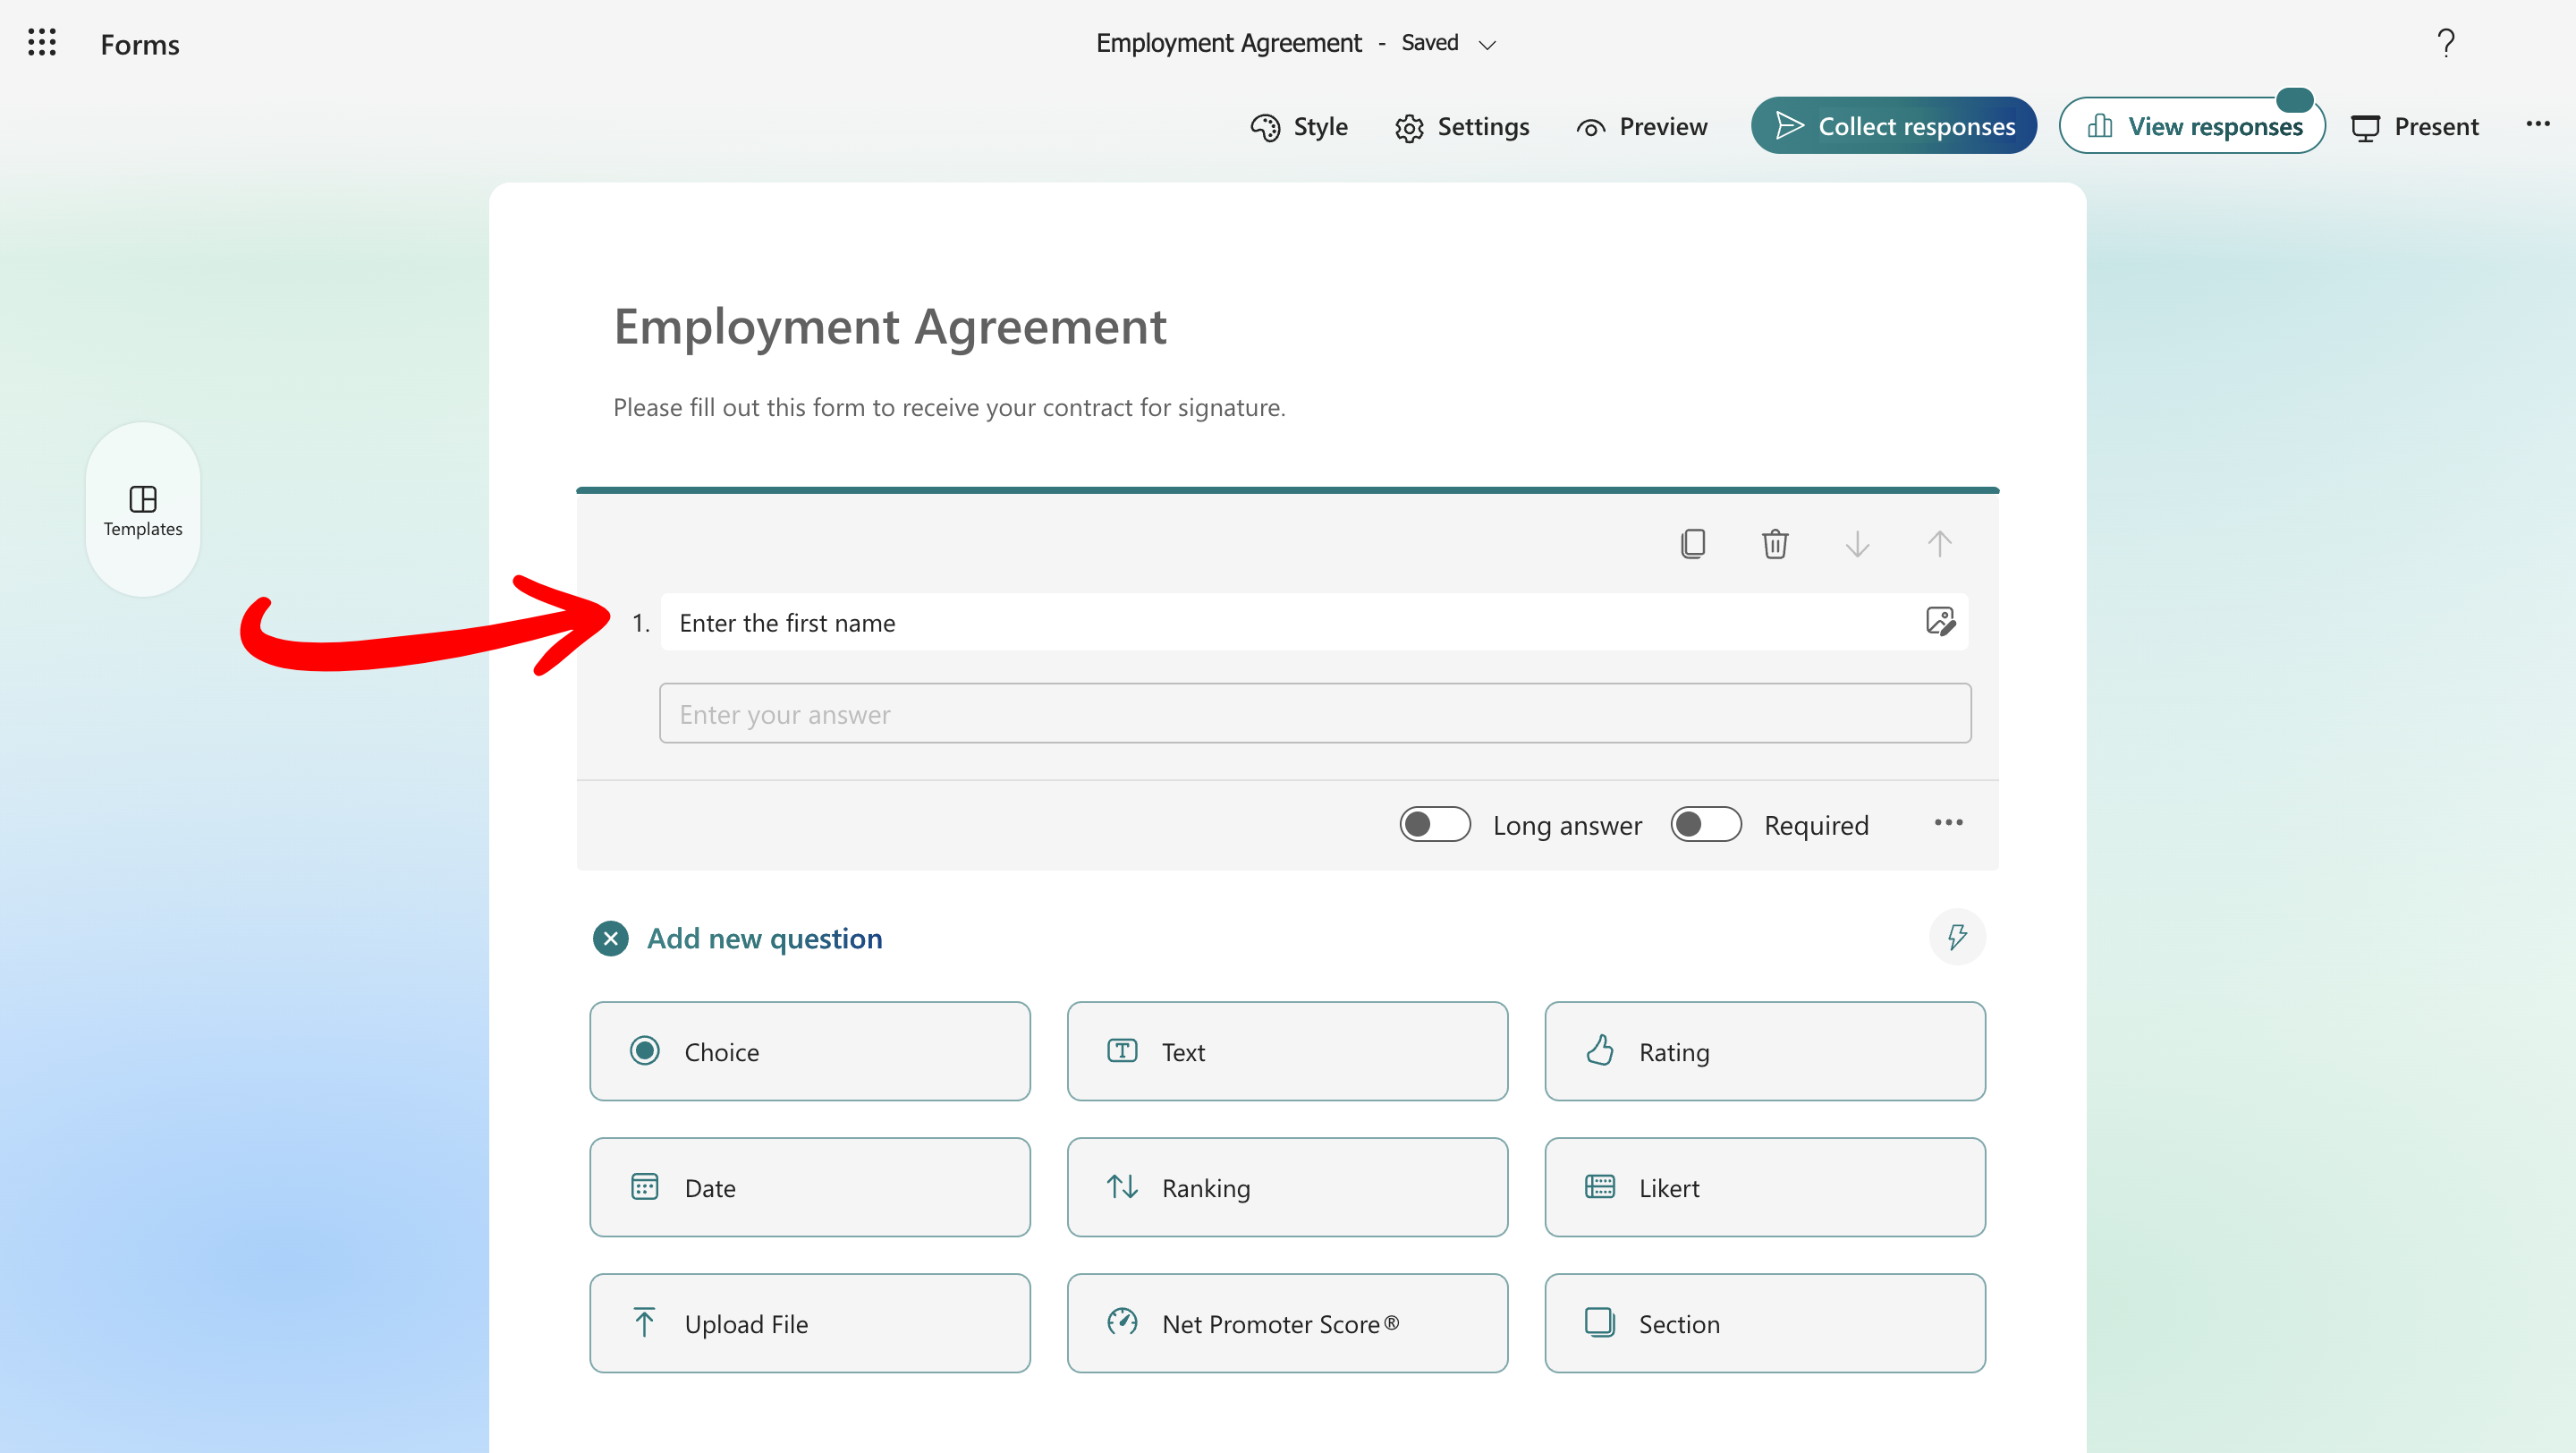
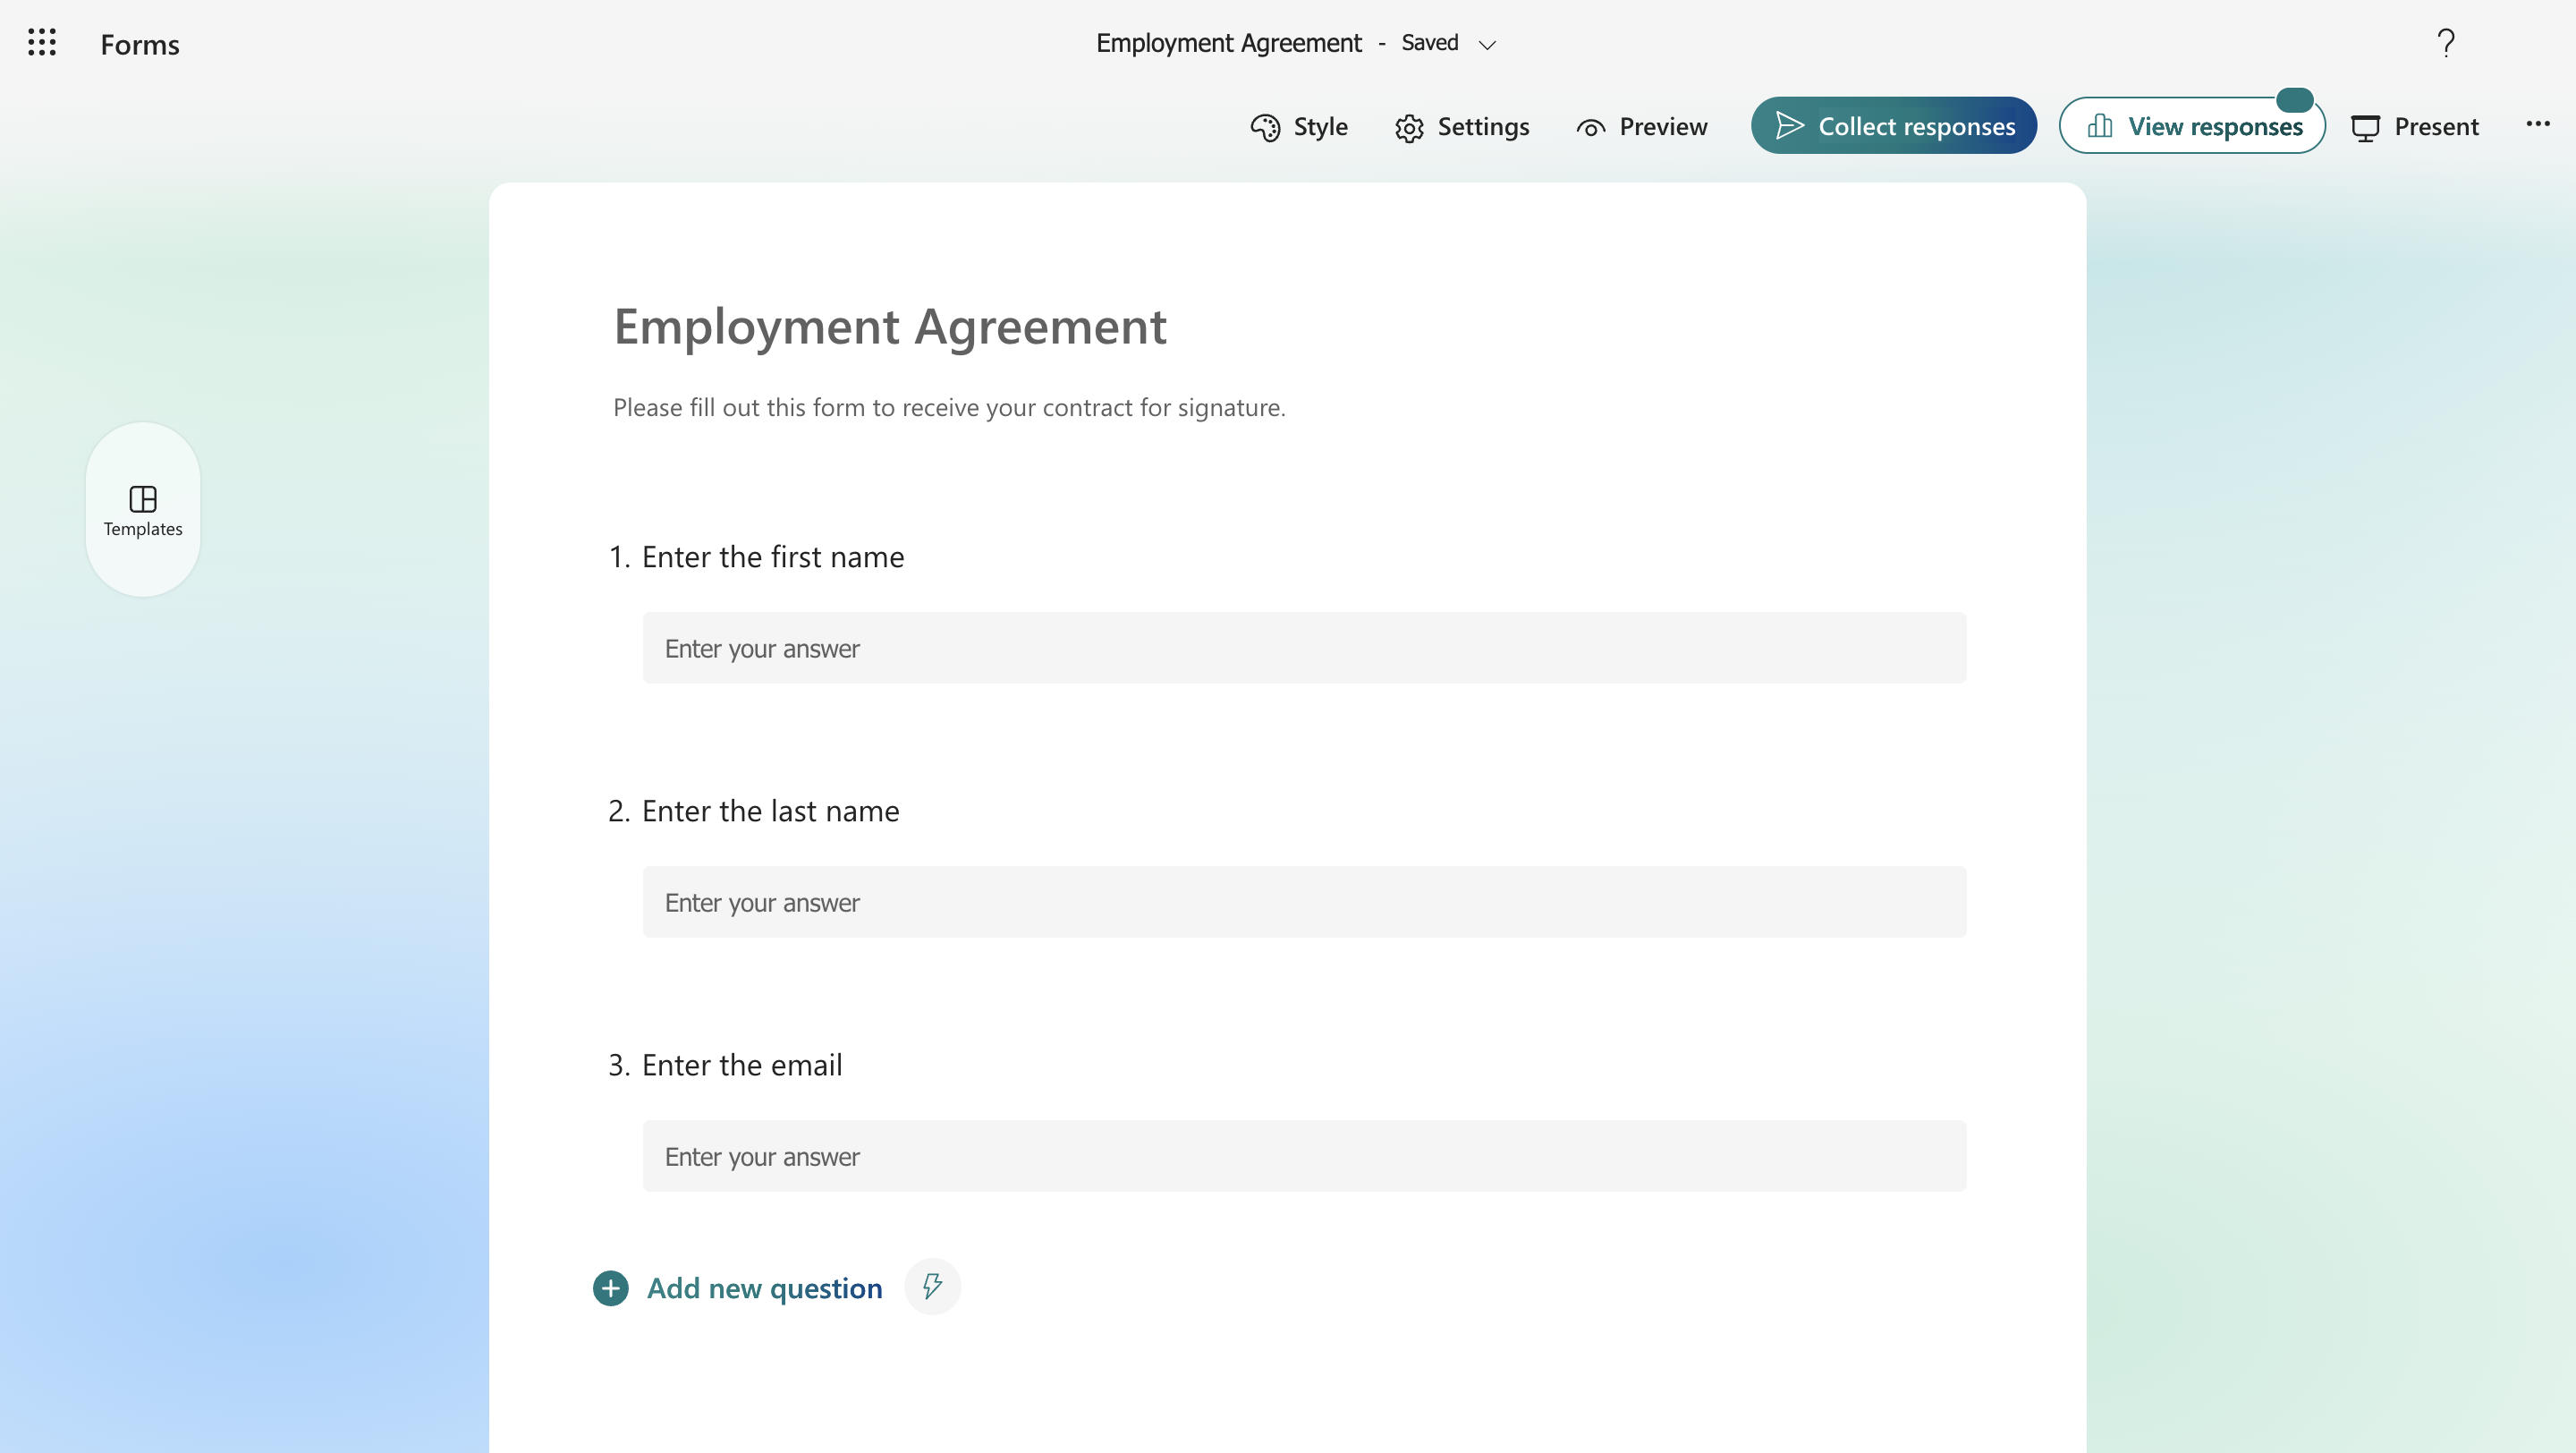
 3. Name the form and add the following required questions:
* **First Name** (Text, required)
* **Last Name** (Text, required)
* **Email Address** (Text, required)
3. Name the form and add the following required questions:
* **First Name** (Text, required)
* **Last Name** (Text, required)
* **Email Address** (Text, required)
 4. Save and publish your form.
 ### Step 3: Create the Dataverse Table
Create a Dataverse table to store the employee details from the form and signature completion.
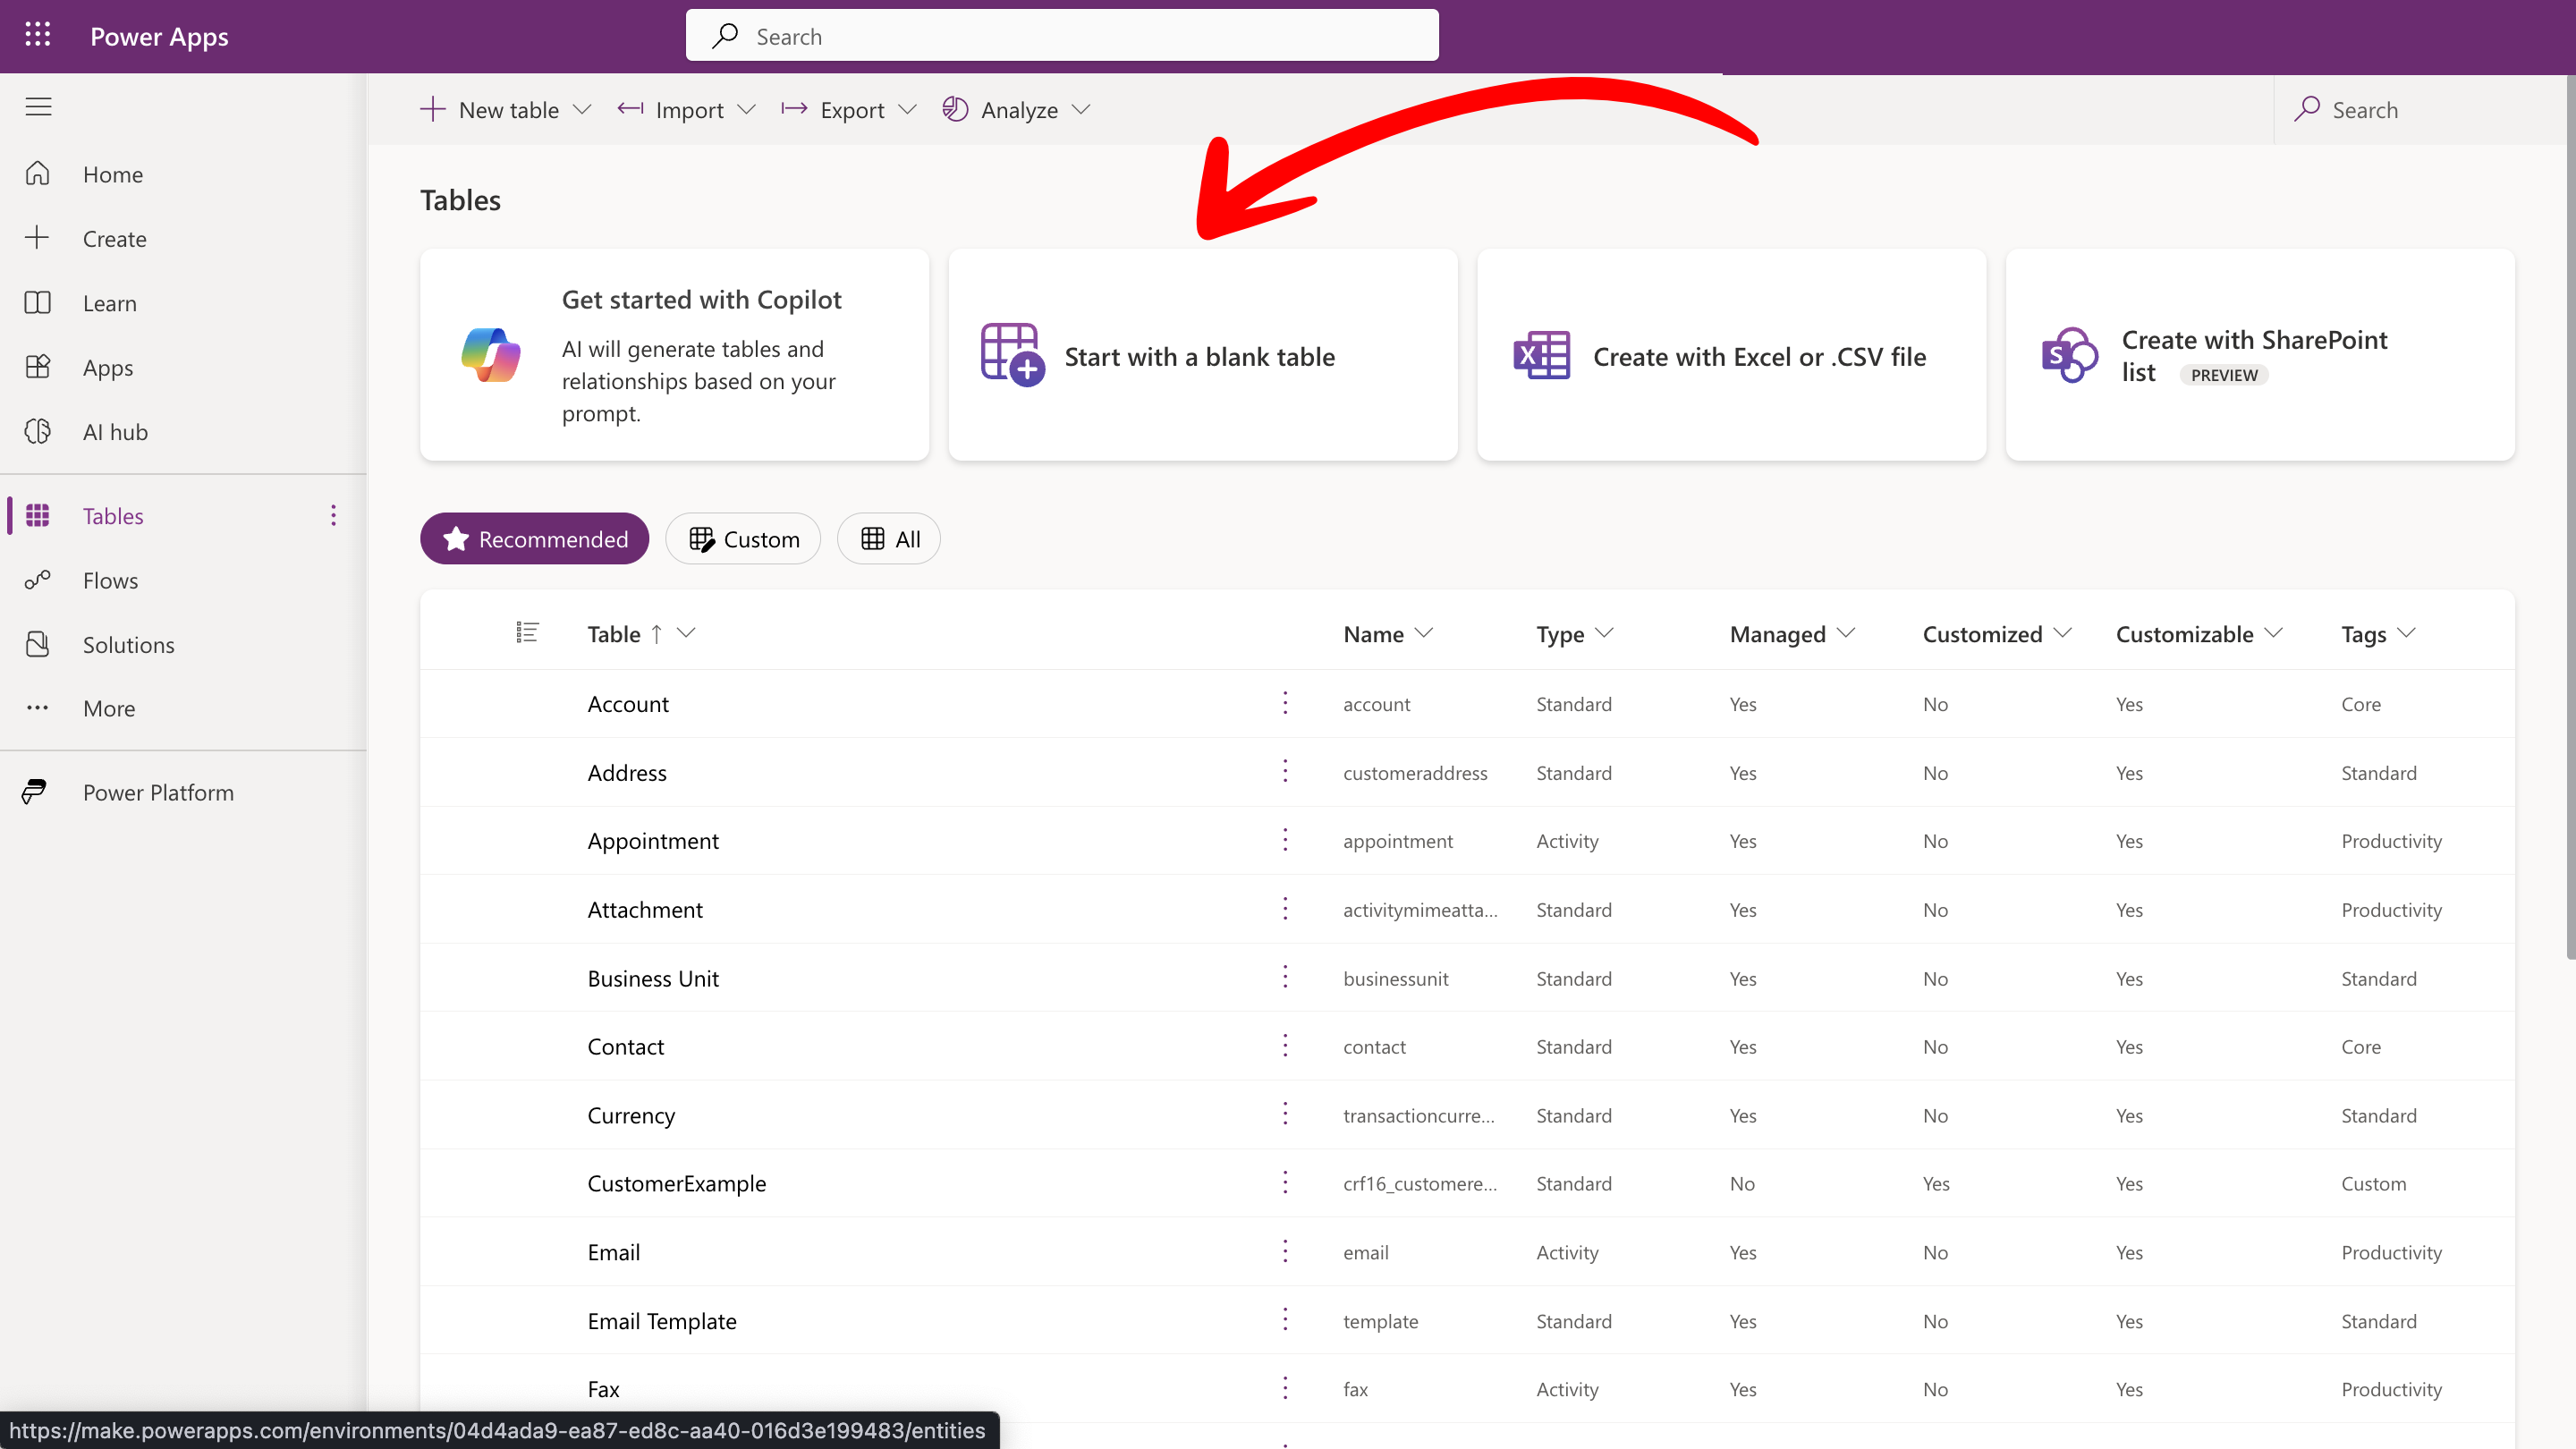
1. Go to [Power Apps](https://make.powerapps.com) and sign in.
2. From the left menu, click on **Tables**.
3. Click the **Start with a blank table** button.
### Step 3: Create the Dataverse Table
Create a Dataverse table to store the employee details from the form and signature completion.
1. Go to [Power Apps](https://make.powerapps.com) and sign in.
2. From the left menu, click on **Tables**.
3. Click the **Start with a blank table** button.
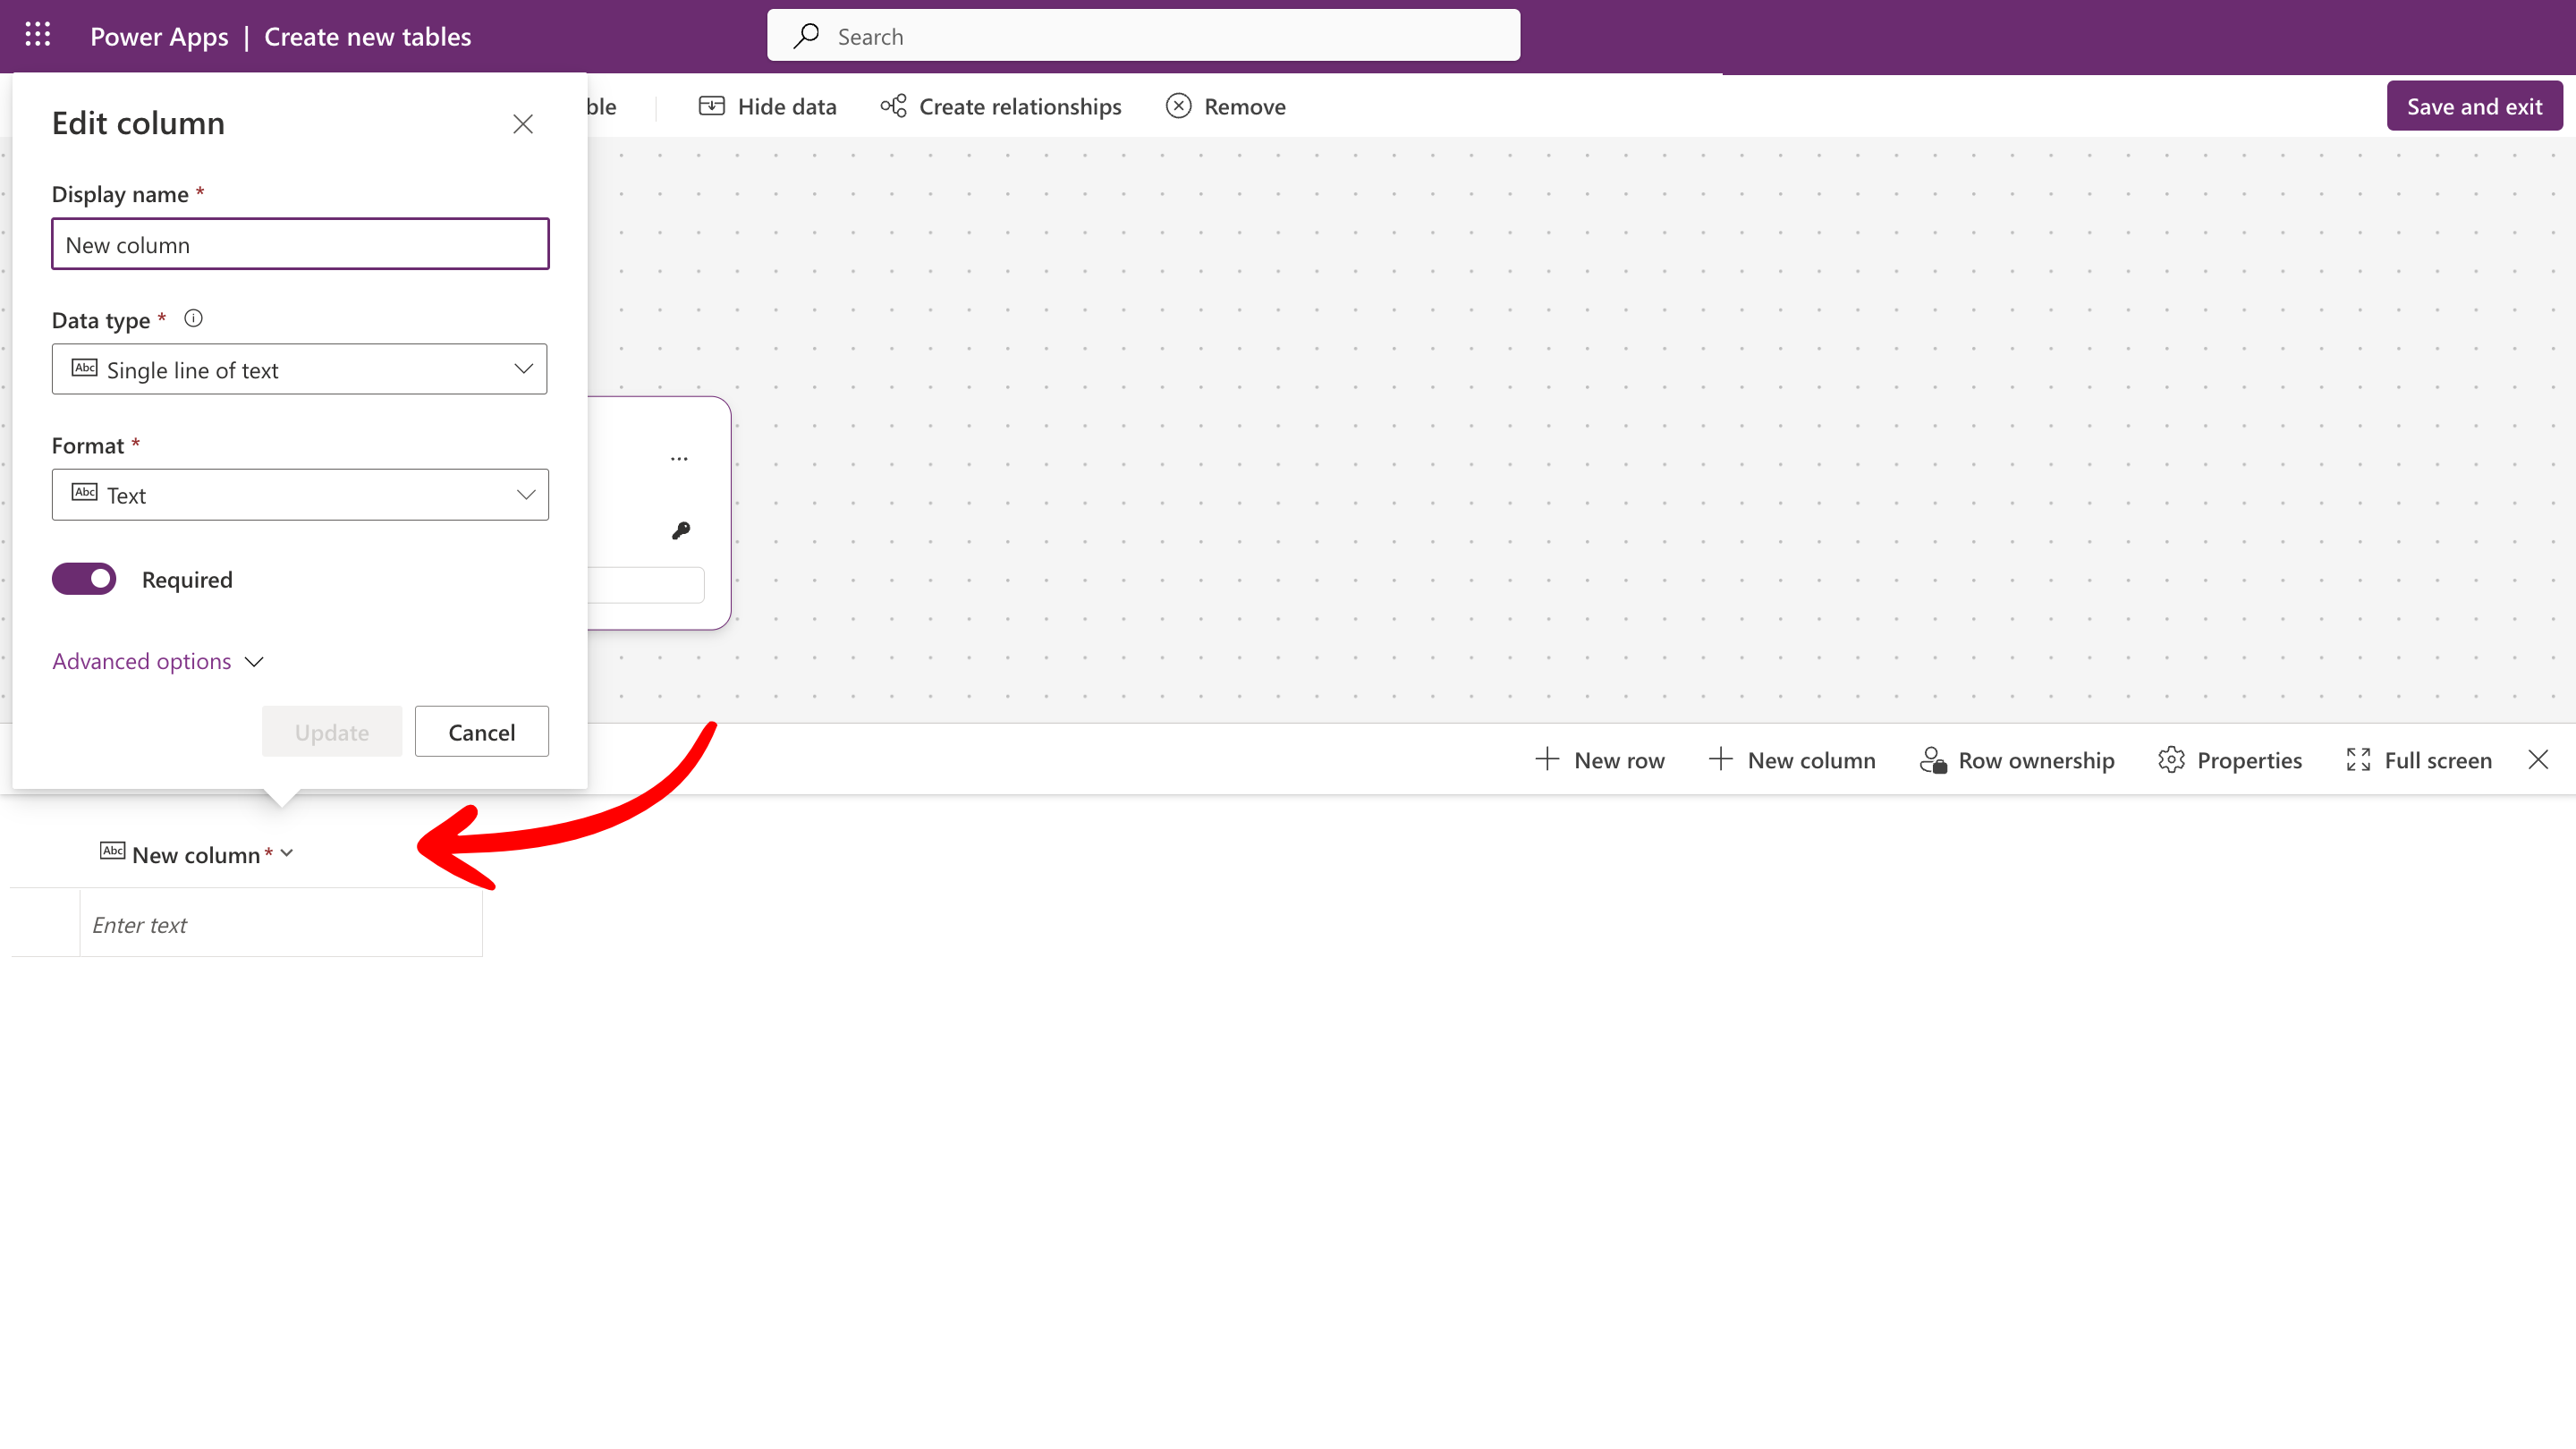
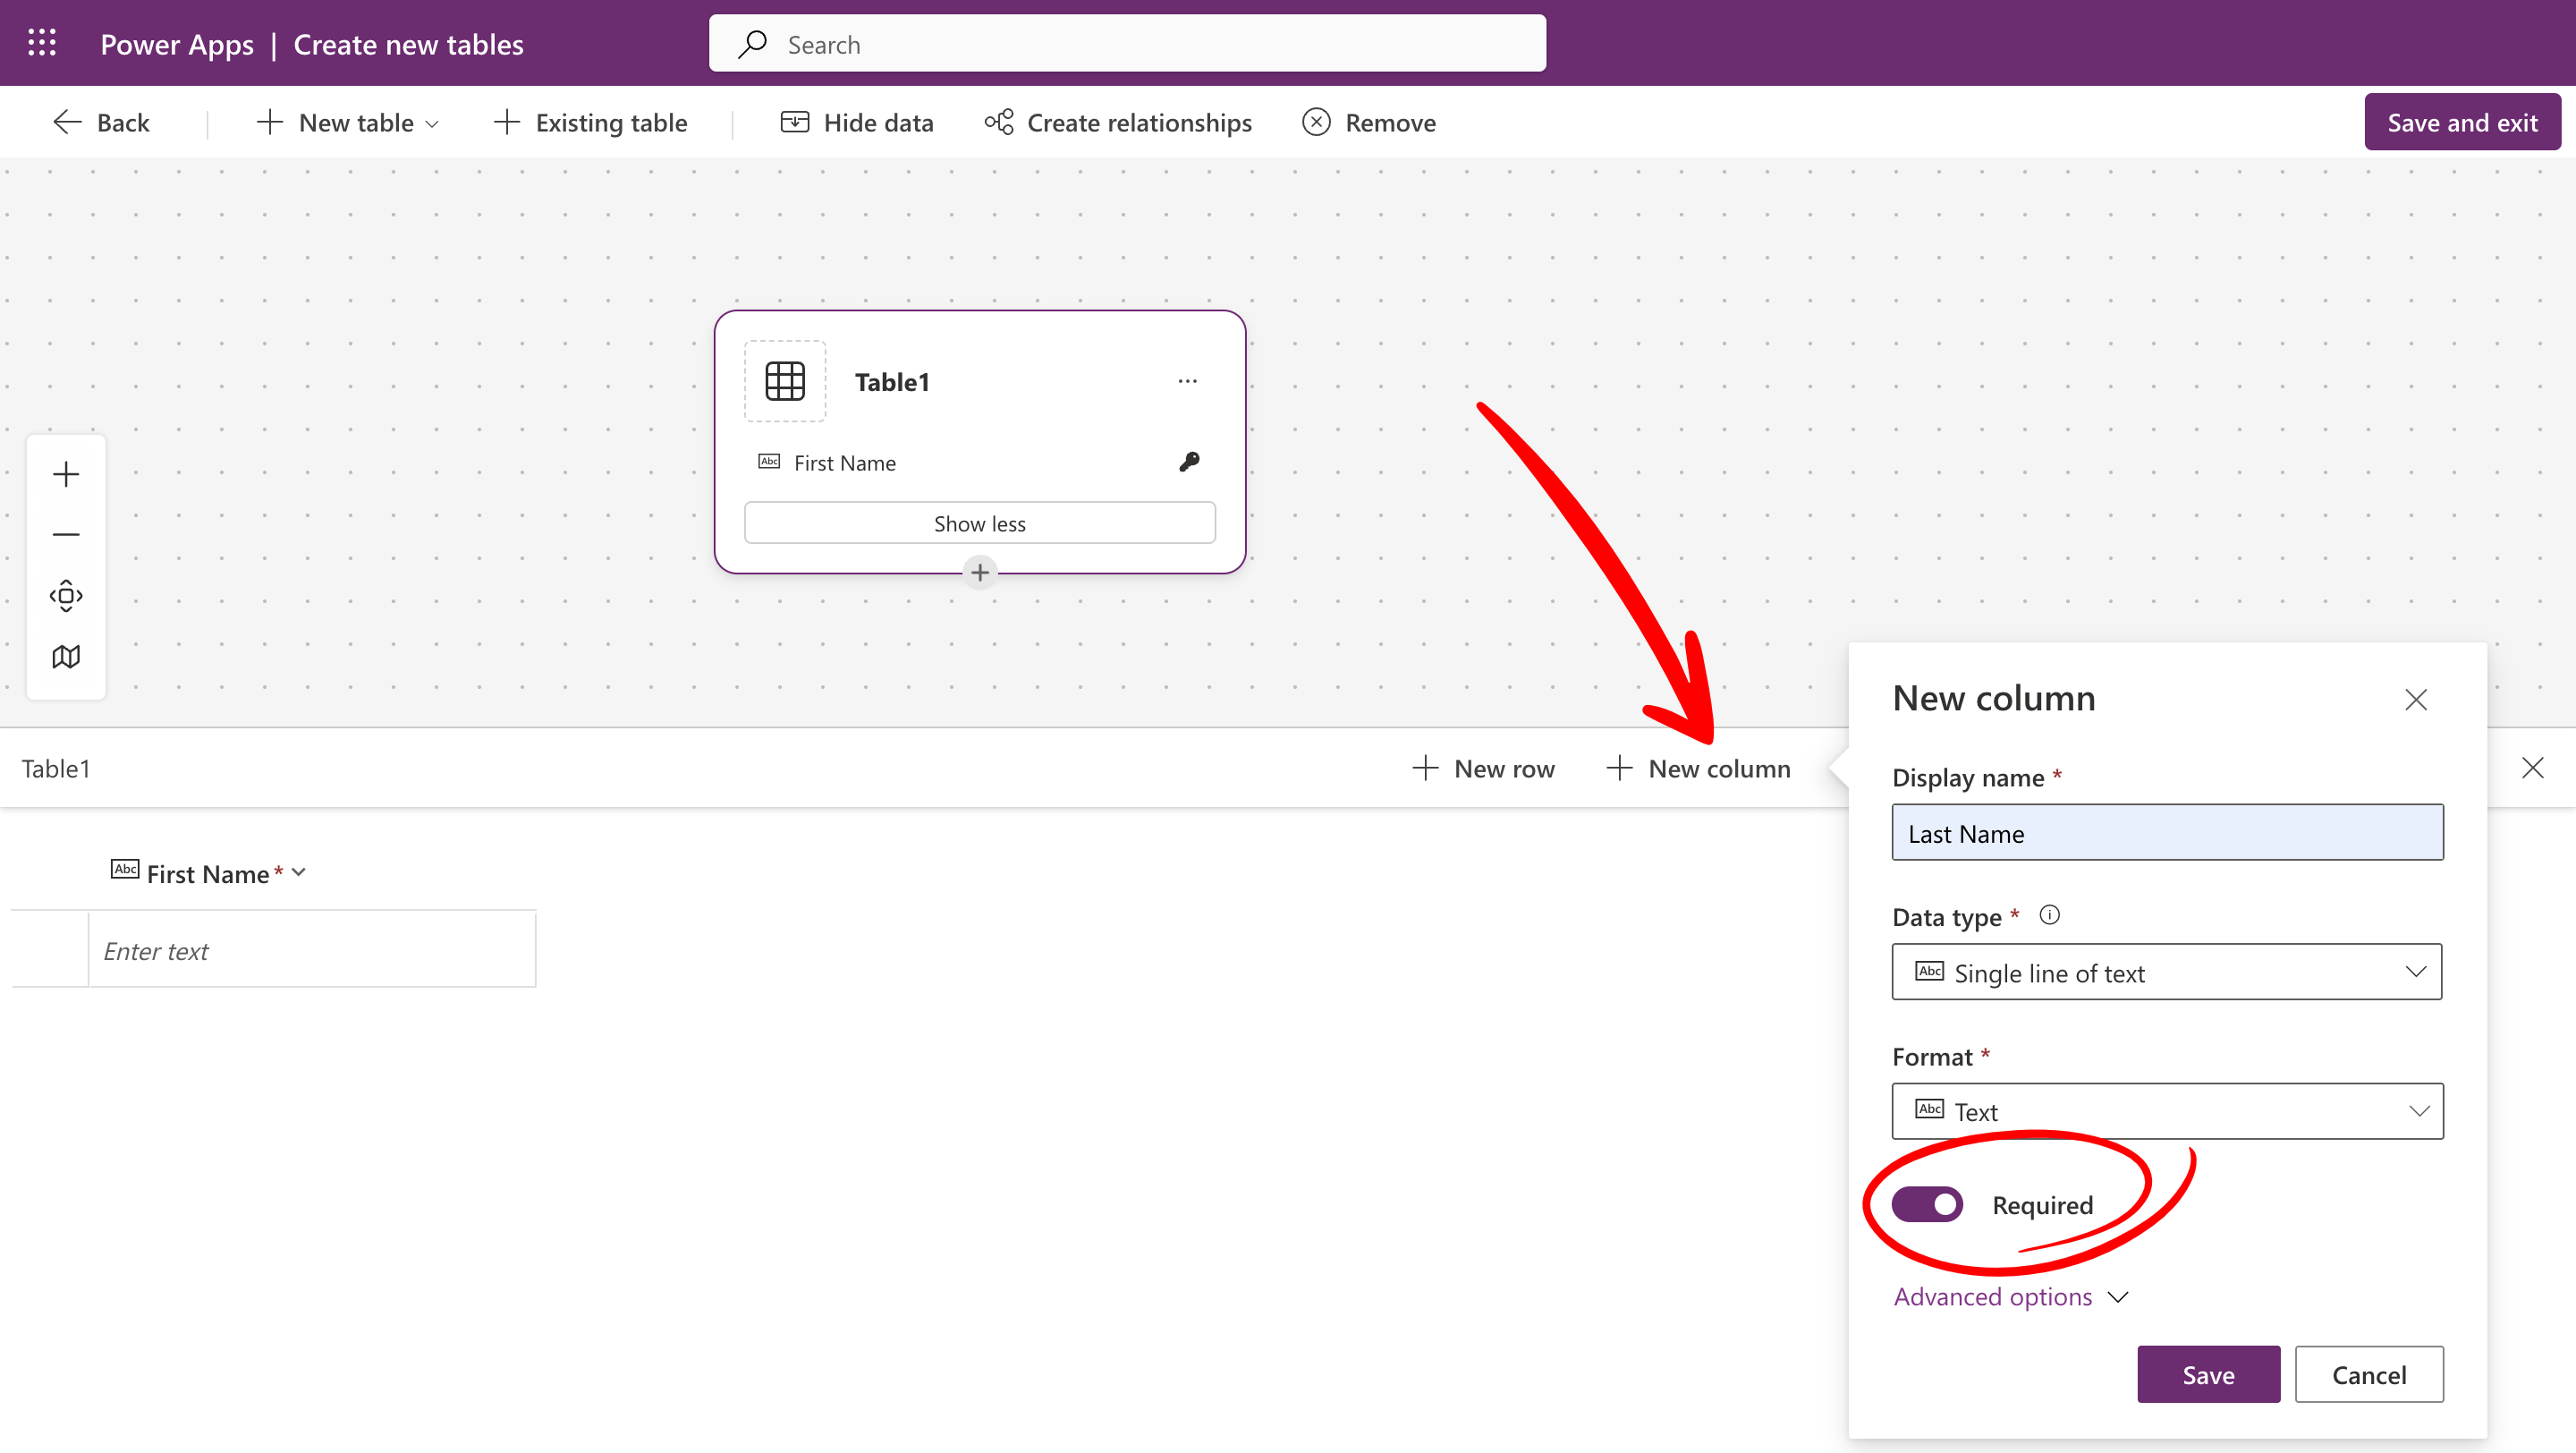
 4. Edit the New column and rename it to **First Name**. Click on the column name, then on **Edit column**, and rename it from the **Display name** field.
 5. Add the following columns:
* **Last Name** (Text)
* **Email Address** (Text)
* **Salary Amount** (Text)
* **Signature Completion** (Text)
5. Add the following columns:
* **Last Name** (Text)
* **Email Address** (Text)
* **Salary Amount** (Text)
* **Signature Completion** (Text)
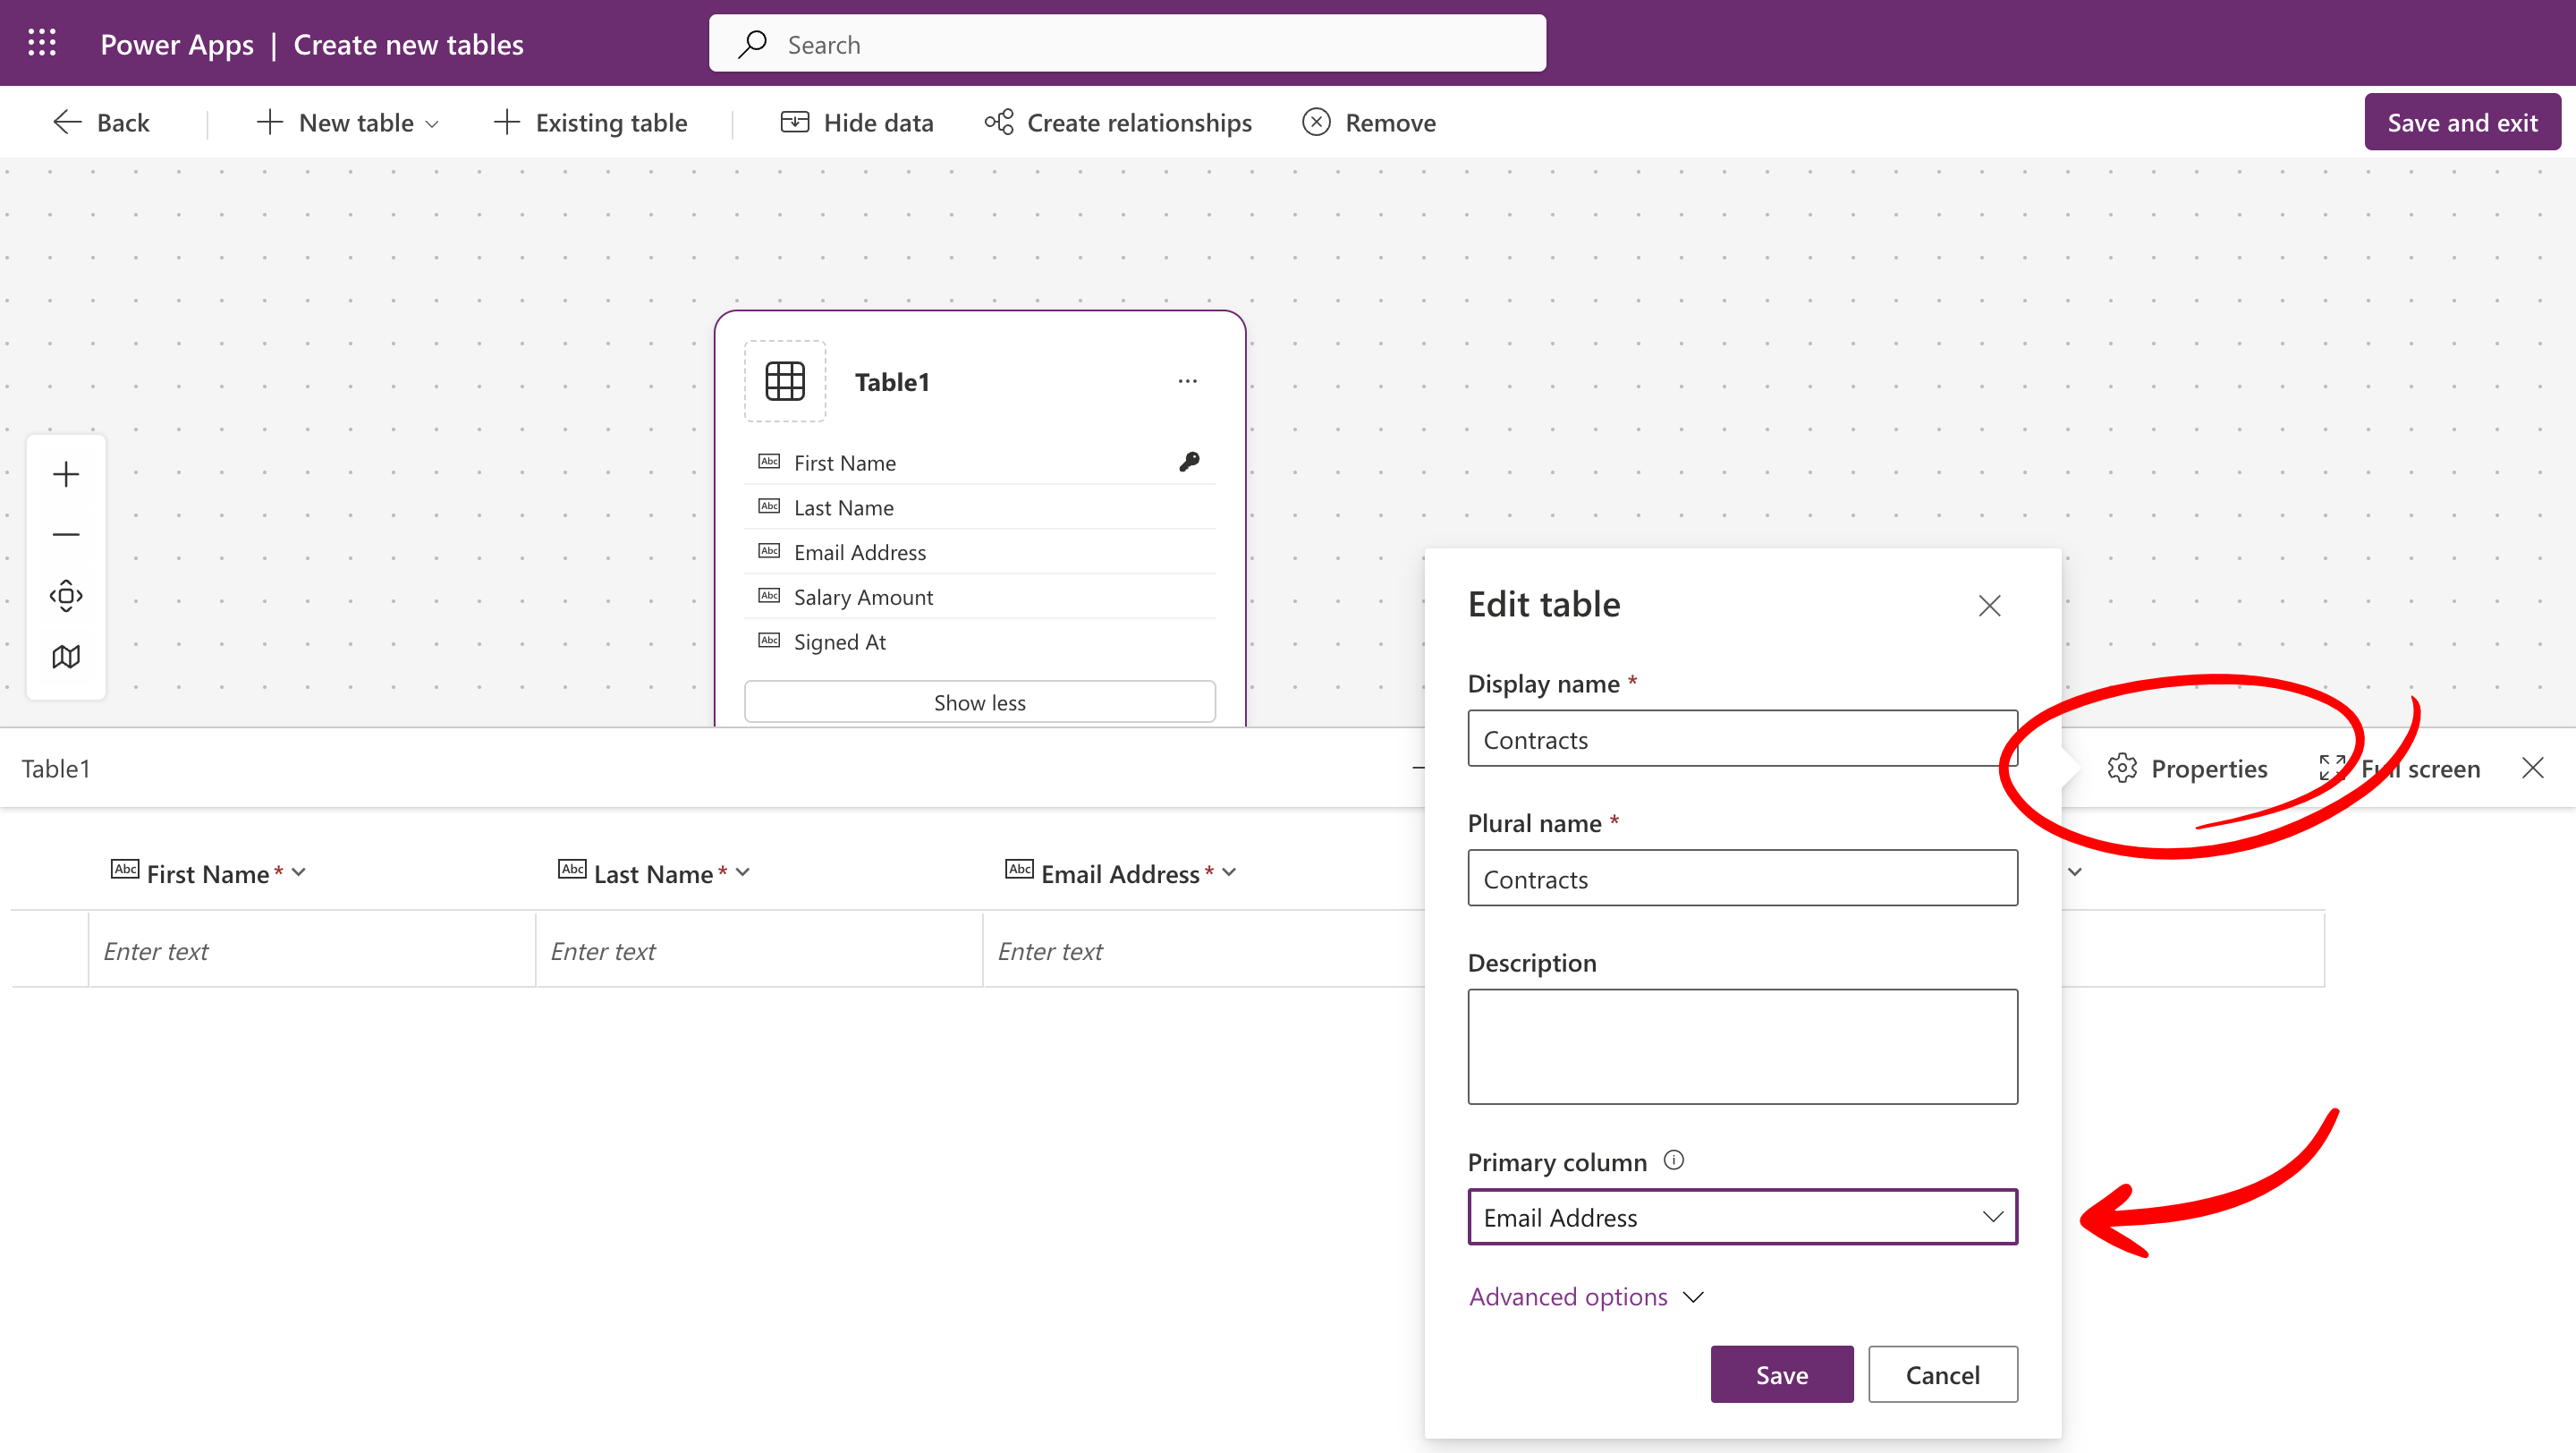
 6. Rename the table from the **Properties** button (e.g., **Employee Contracts**) and click on the **Save and exit** button.
 ### Step 4: Set Up the Power Automate Flow
Now, create the automated workflow in Power Automate, triggered whenever a form is submitted.
#### 4.1 Configure the Trigger
Set the flow trigger to run whenever your form is submitted.
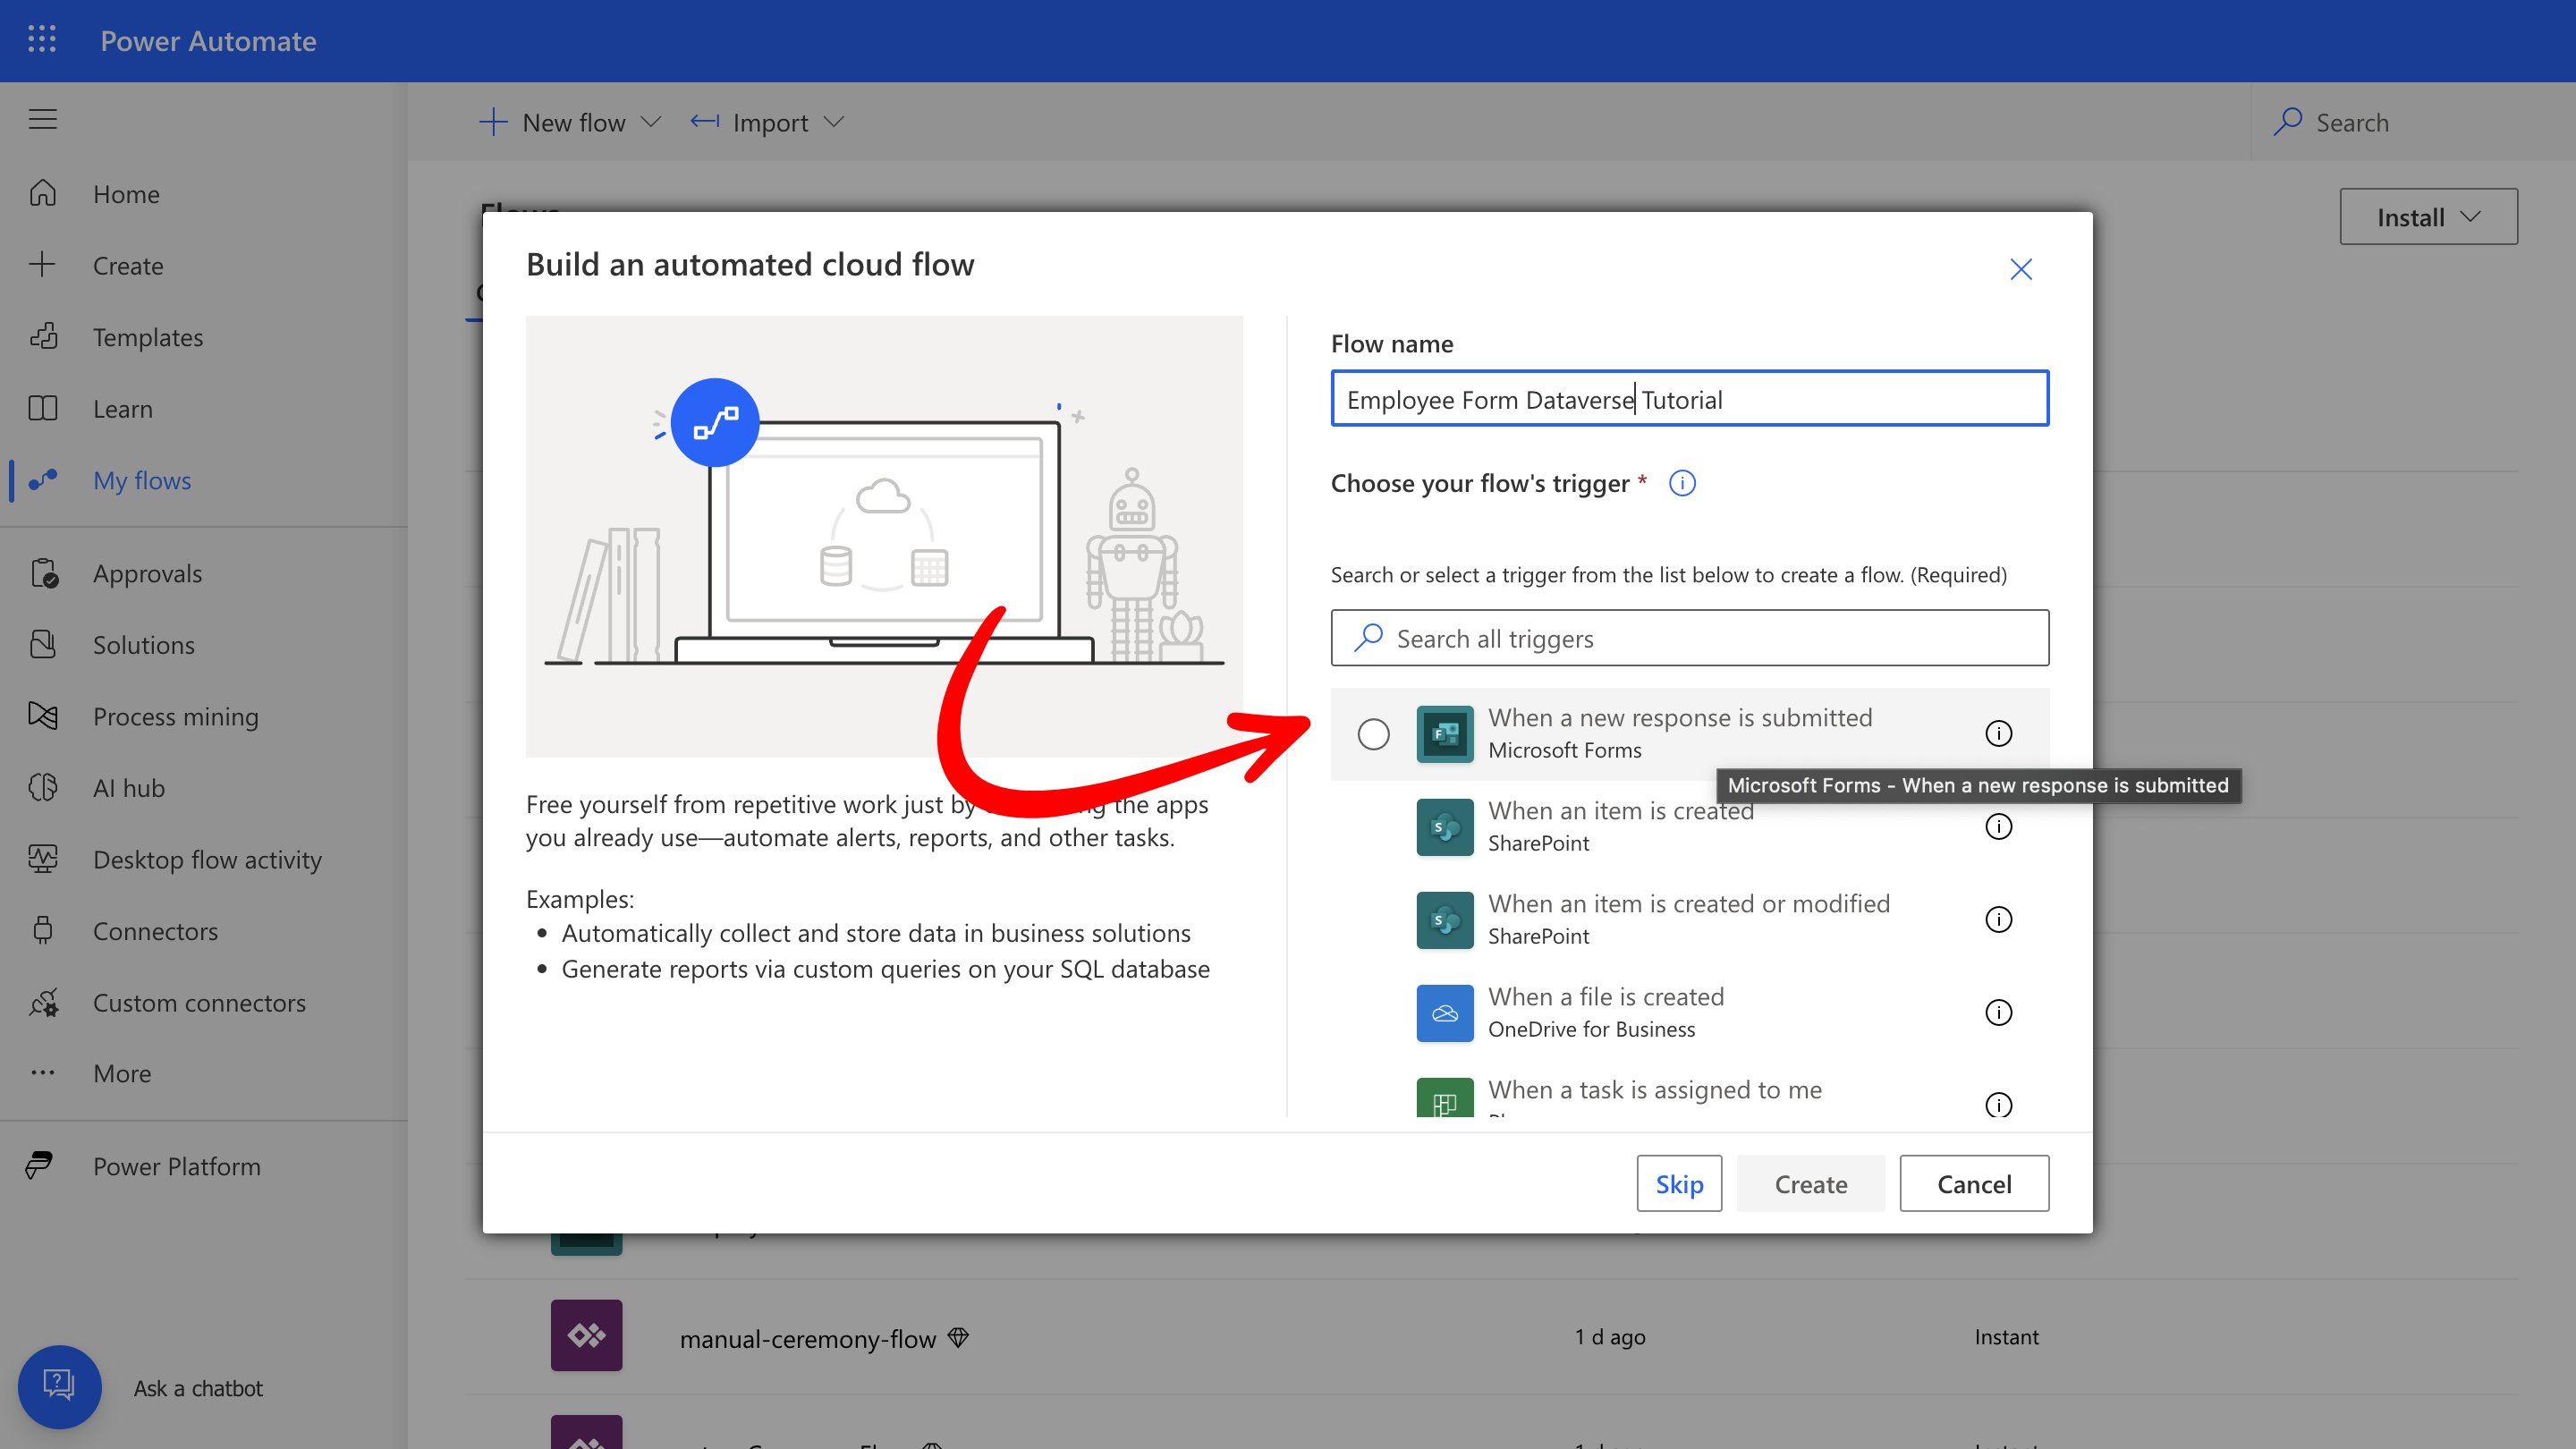
1. Go to **Power Automate** and select **Automated Cloud Flow**.
2. Choose the trigger **When a new response is submitted** (Microsoft Forms).
### Step 4: Set Up the Power Automate Flow
Now, create the automated workflow in Power Automate, triggered whenever a form is submitted.
#### 4.1 Configure the Trigger
Set the flow trigger to run whenever your form is submitted.
1. Go to **Power Automate** and select **Automated Cloud Flow**.
2. Choose the trigger **When a new response is submitted** (Microsoft Forms).
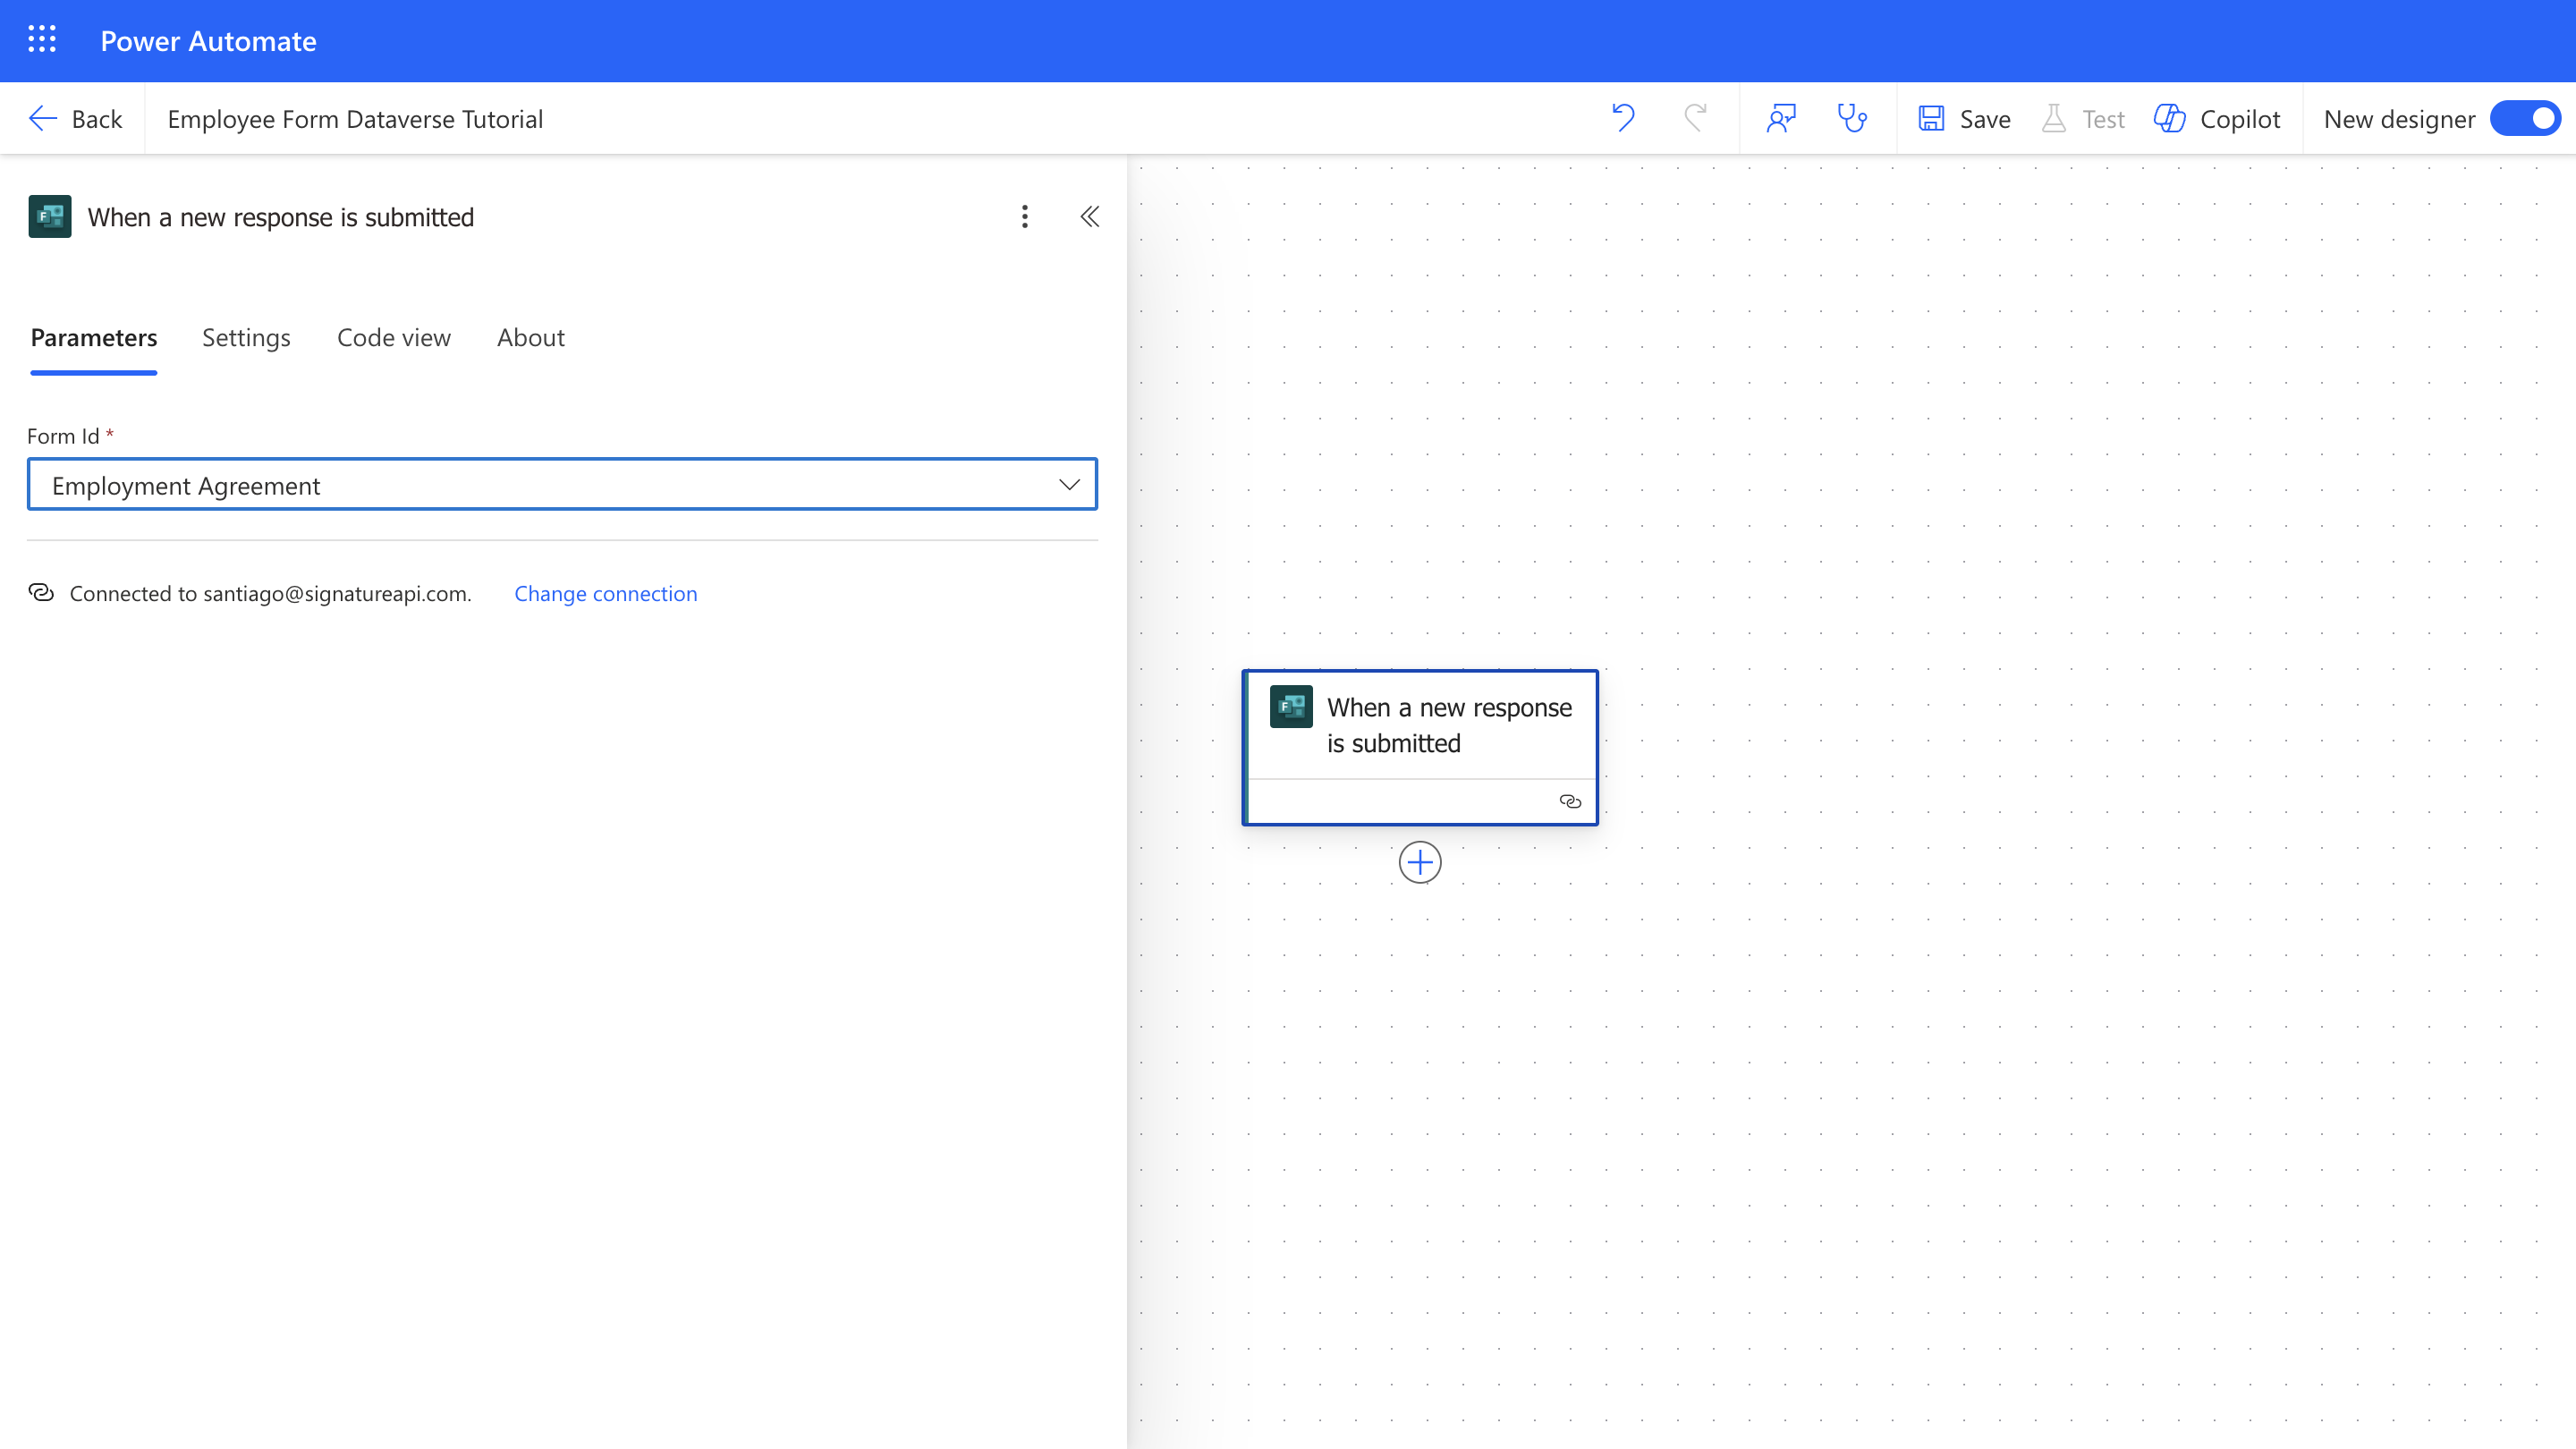
 3. Select the form you created earlier.
 #### 4.2 Retrieve Employee Details
Retrieve the employee details submitted through the form.
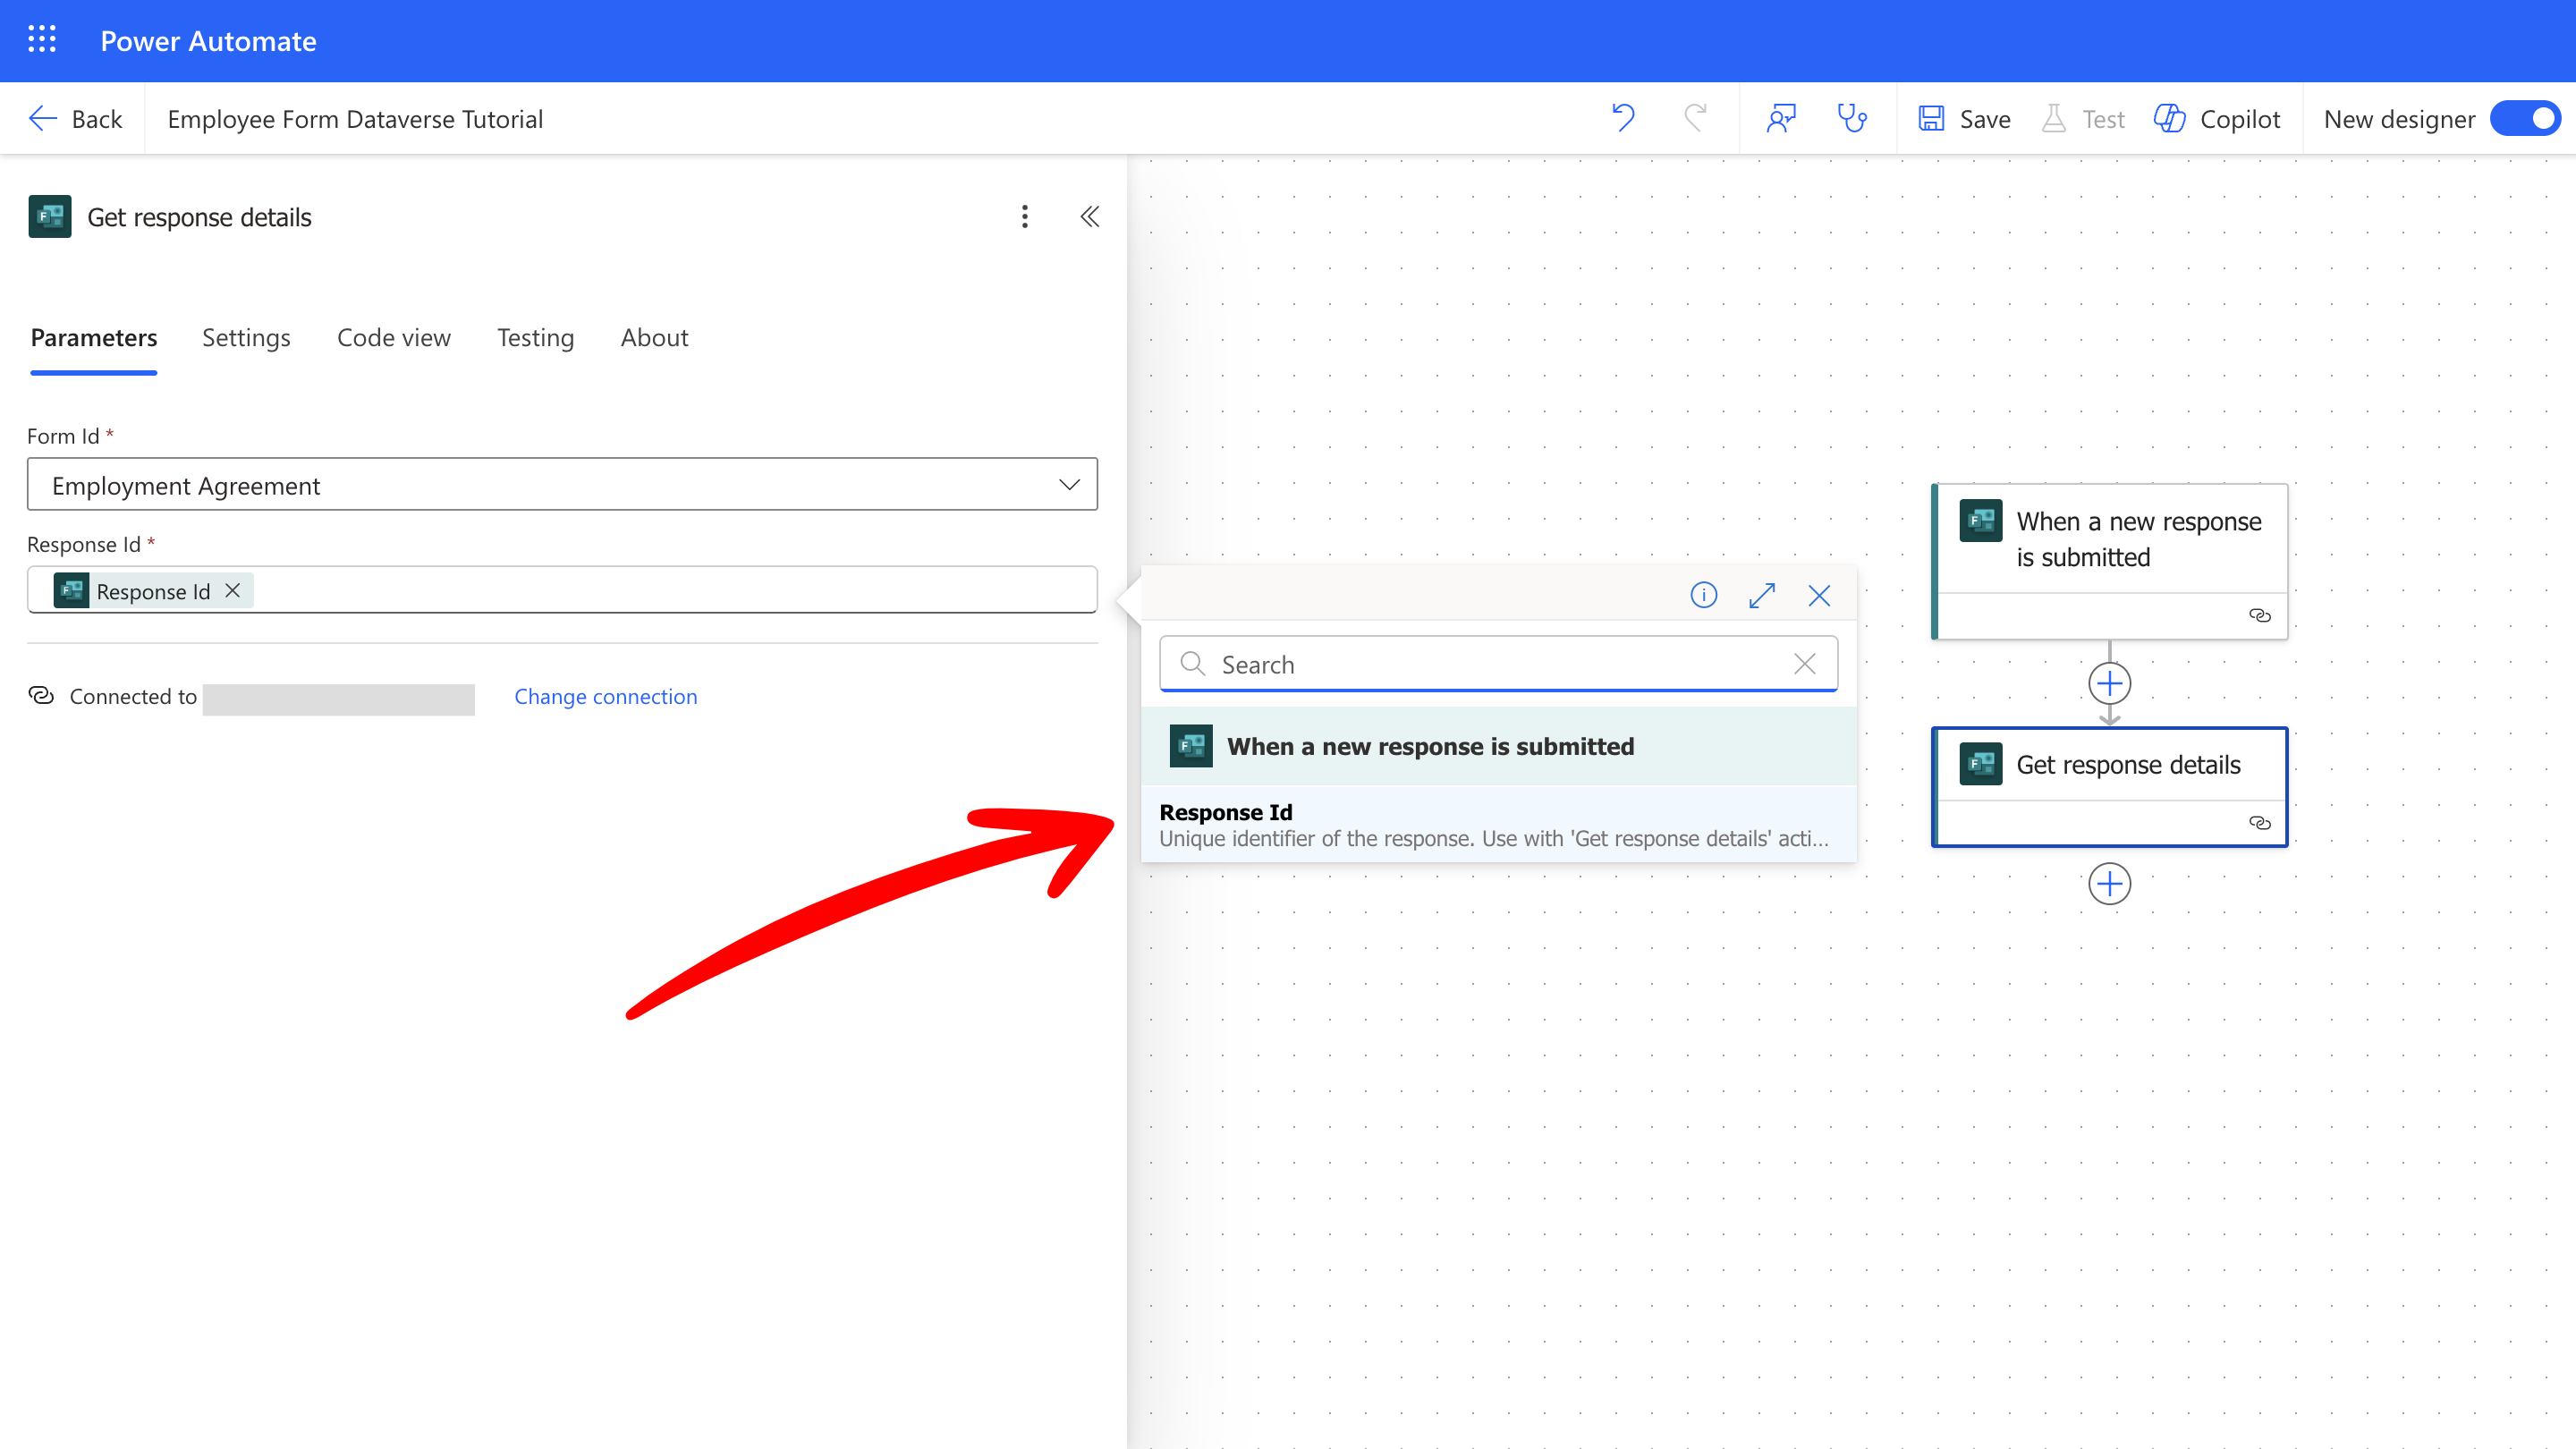
1. Add the action **Get response details**.
2. Select your form (**Form ID**) and the response (**Response ID**) using dynamic content.
#### 4.2 Retrieve Employee Details
Retrieve the employee details submitted through the form.
1. Add the action **Get response details**.
2. Select your form (**Form ID**) and the response (**Response ID**) using dynamic content.
 #### 4.3 Retrieve Contract Template from OneDrive
Fetch your employment contract template stored in OneDrive.
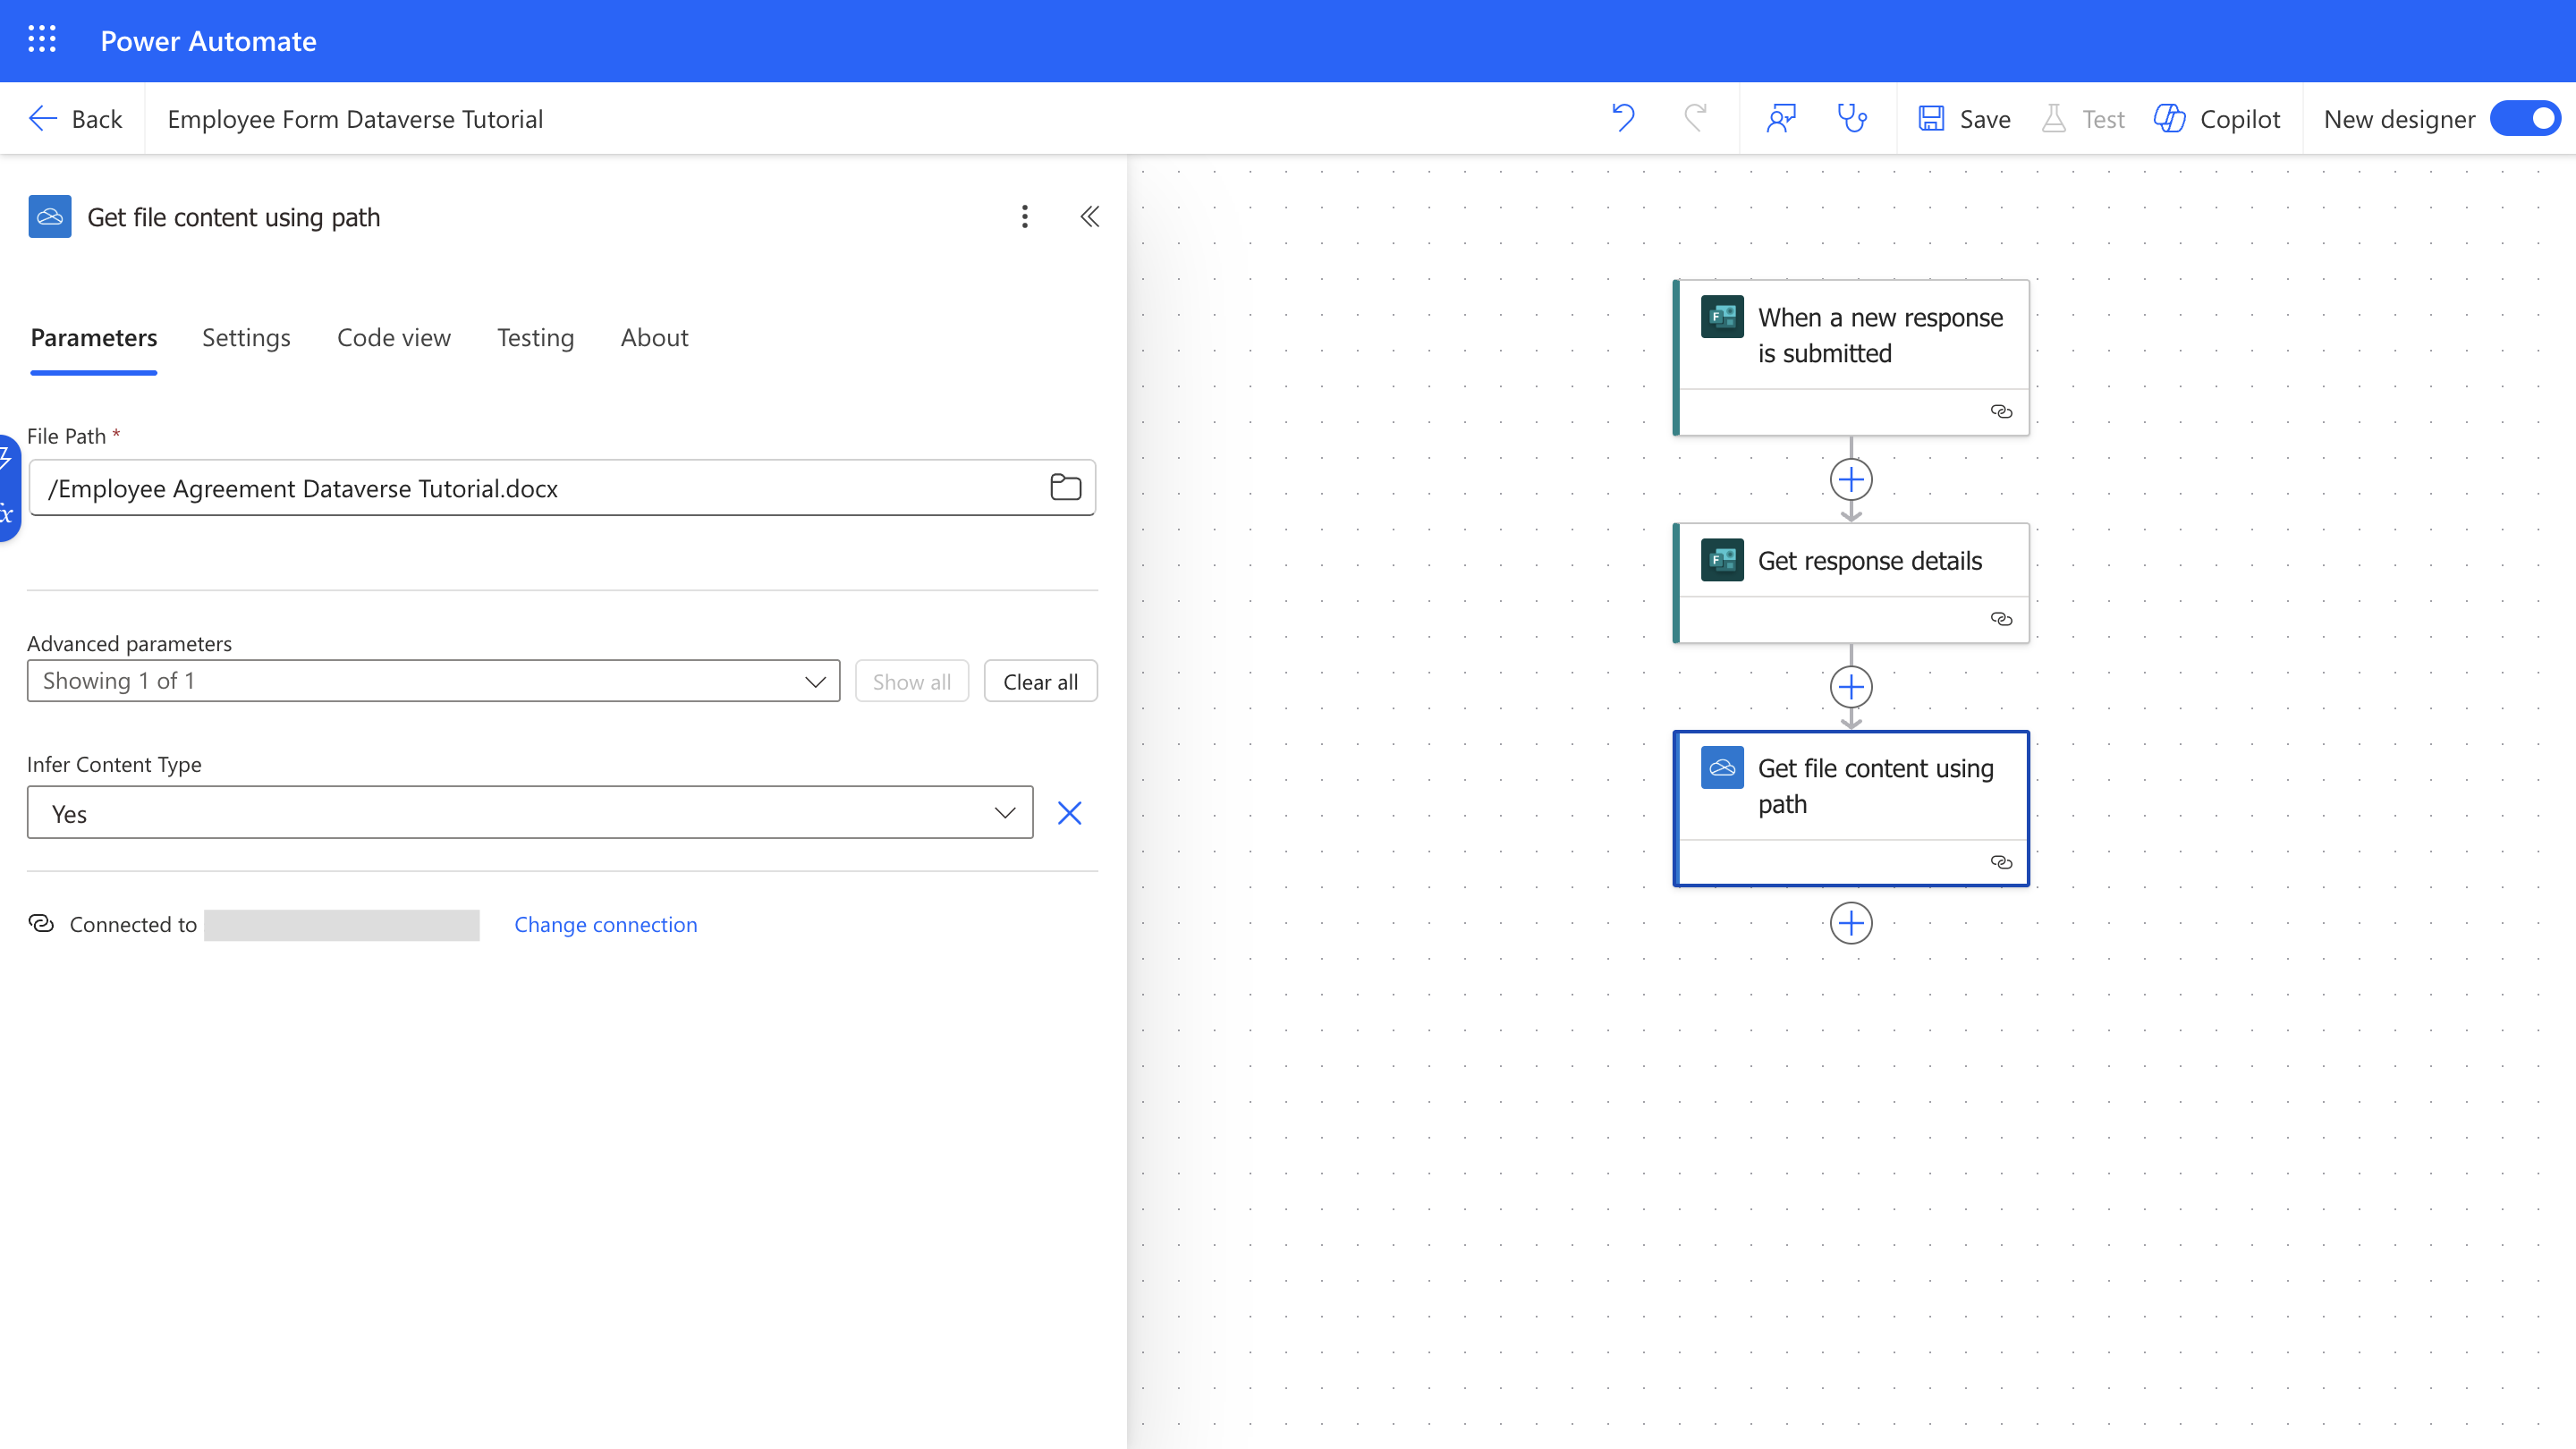
1. Add **Get File Content using Path** from the OneDrive connector.
2. Select the DOCX template stored in your OneDrive.
#### 4.3 Retrieve Contract Template from OneDrive
Fetch your employment contract template stored in OneDrive.
1. Add **Get File Content using Path** from the OneDrive connector.
2. Select the DOCX template stored in your OneDrive.
 ### Step 5: Set Up the Signature Process
In this step, you will configure SignatureAPI to create, send, and track the signature process.
#### 5.1 Create a SignatureAPI Envelope
Begin by creating an envelope to hold your contract and signature process.
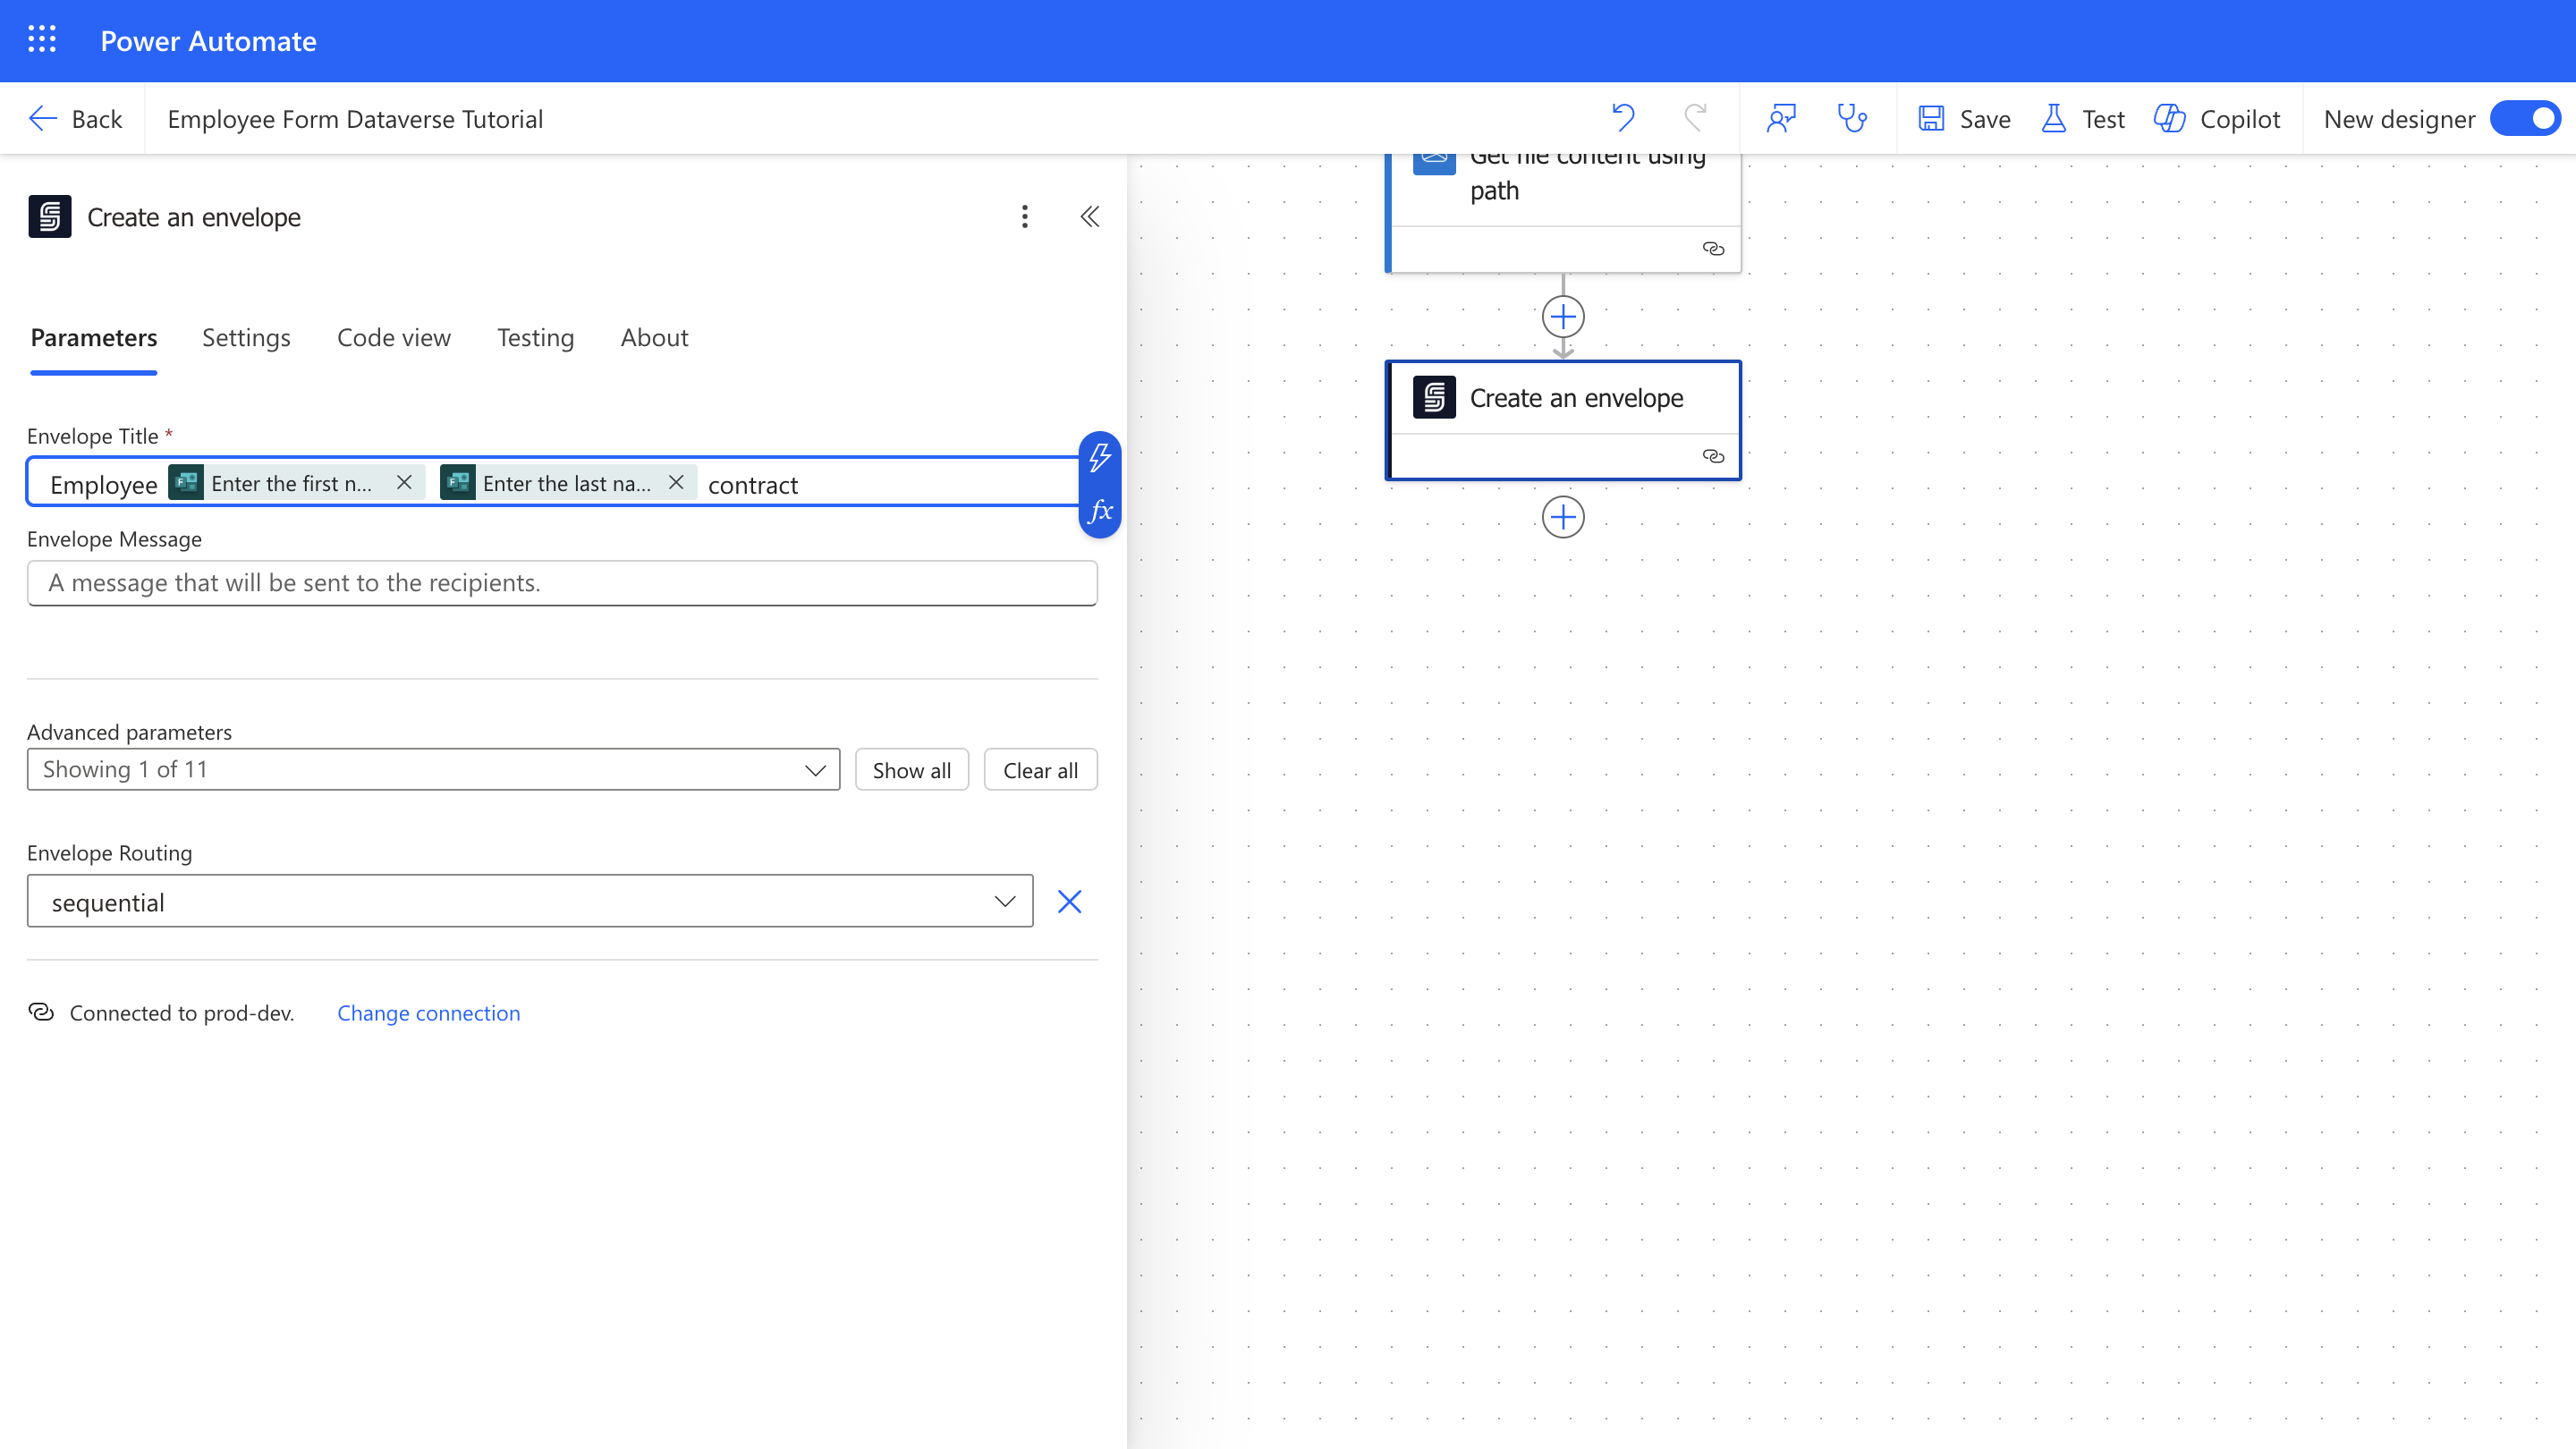
1. Add the **Create an Envelope** action (SignatureAPI connector).
2. If prompted, authenticate your connection using your SignatureAPI key from the [SignatureAPI Dashboard](https://dashboard.signatureapi.com/settings/api-keys).
3. Set an **Envelope Title** (e.g., employee name) and email message using dynamic content.
4. From the advanced parameters, select **Envelope Routing** and set it to **sequential**. This ensures the envelope is sent to the employer first, and then to the employee.
### Step 5: Set Up the Signature Process
In this step, you will configure SignatureAPI to create, send, and track the signature process.
#### 5.1 Create a SignatureAPI Envelope
Begin by creating an envelope to hold your contract and signature process.
1. Add the **Create an Envelope** action (SignatureAPI connector).
2. If prompted, authenticate your connection using your SignatureAPI key from the [SignatureAPI Dashboard](https://dashboard.signatureapi.com/settings/api-keys).
3. Set an **Envelope Title** (e.g., employee name) and email message using dynamic content.
4. From the advanced parameters, select **Envelope Routing** and set it to **sequential**. This ensures the envelope is sent to the employer first, and then to the employee.
 #### 5.2 Add the Recipient - Employer
Specify who will receive and sign the contract first.
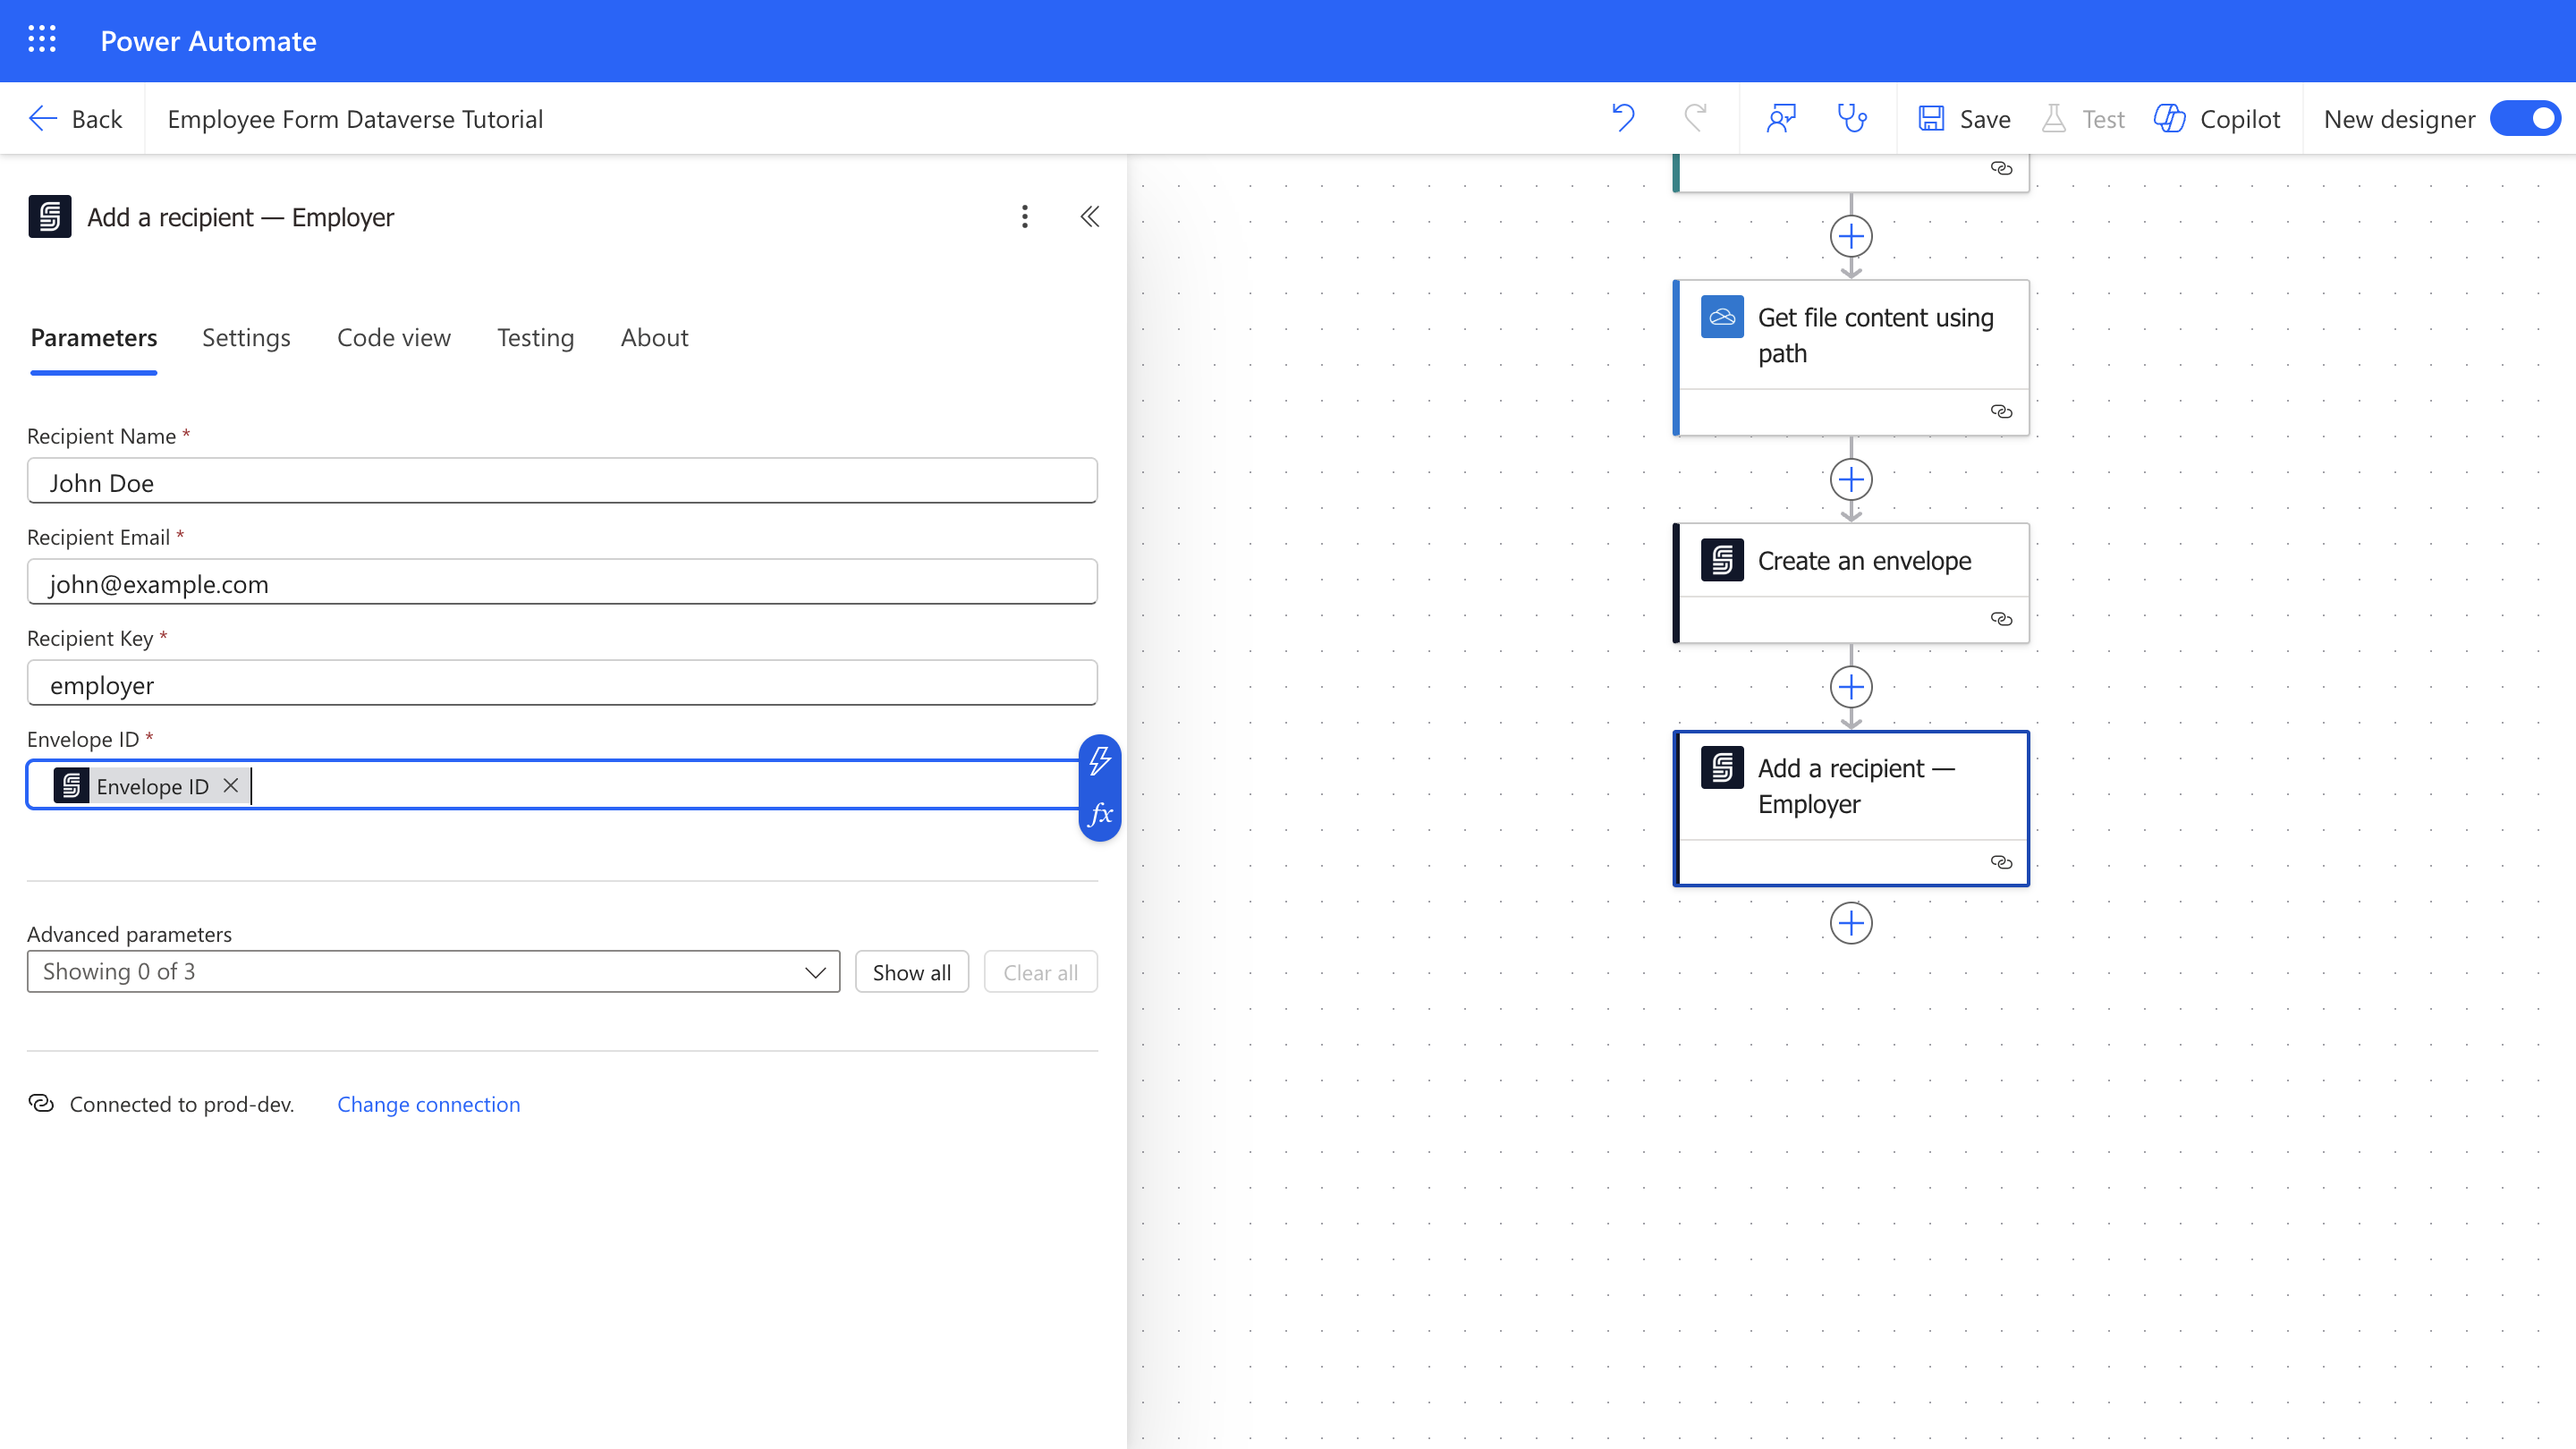
1. Add **Add Recipient** action and rename it to **Add Recipient - Employer**.
2. Set the **Recipient Name** and **Recipient Email** of the employer (e.g., "John Doe" and "[john.doe@example.com](mailto:john.doe@example.com)").
3. Set the employer **Recipient Key** (e.g., "employer"), matching your DOCX placeholders.
#### 5.2 Add the Recipient - Employer
Specify who will receive and sign the contract first.
1. Add **Add Recipient** action and rename it to **Add Recipient - Employer**.
2. Set the **Recipient Name** and **Recipient Email** of the employer (e.g., "John Doe" and "[john.doe@example.com](mailto:john.doe@example.com)").
3. Set the employer **Recipient Key** (e.g., "employer"), matching your DOCX placeholders.
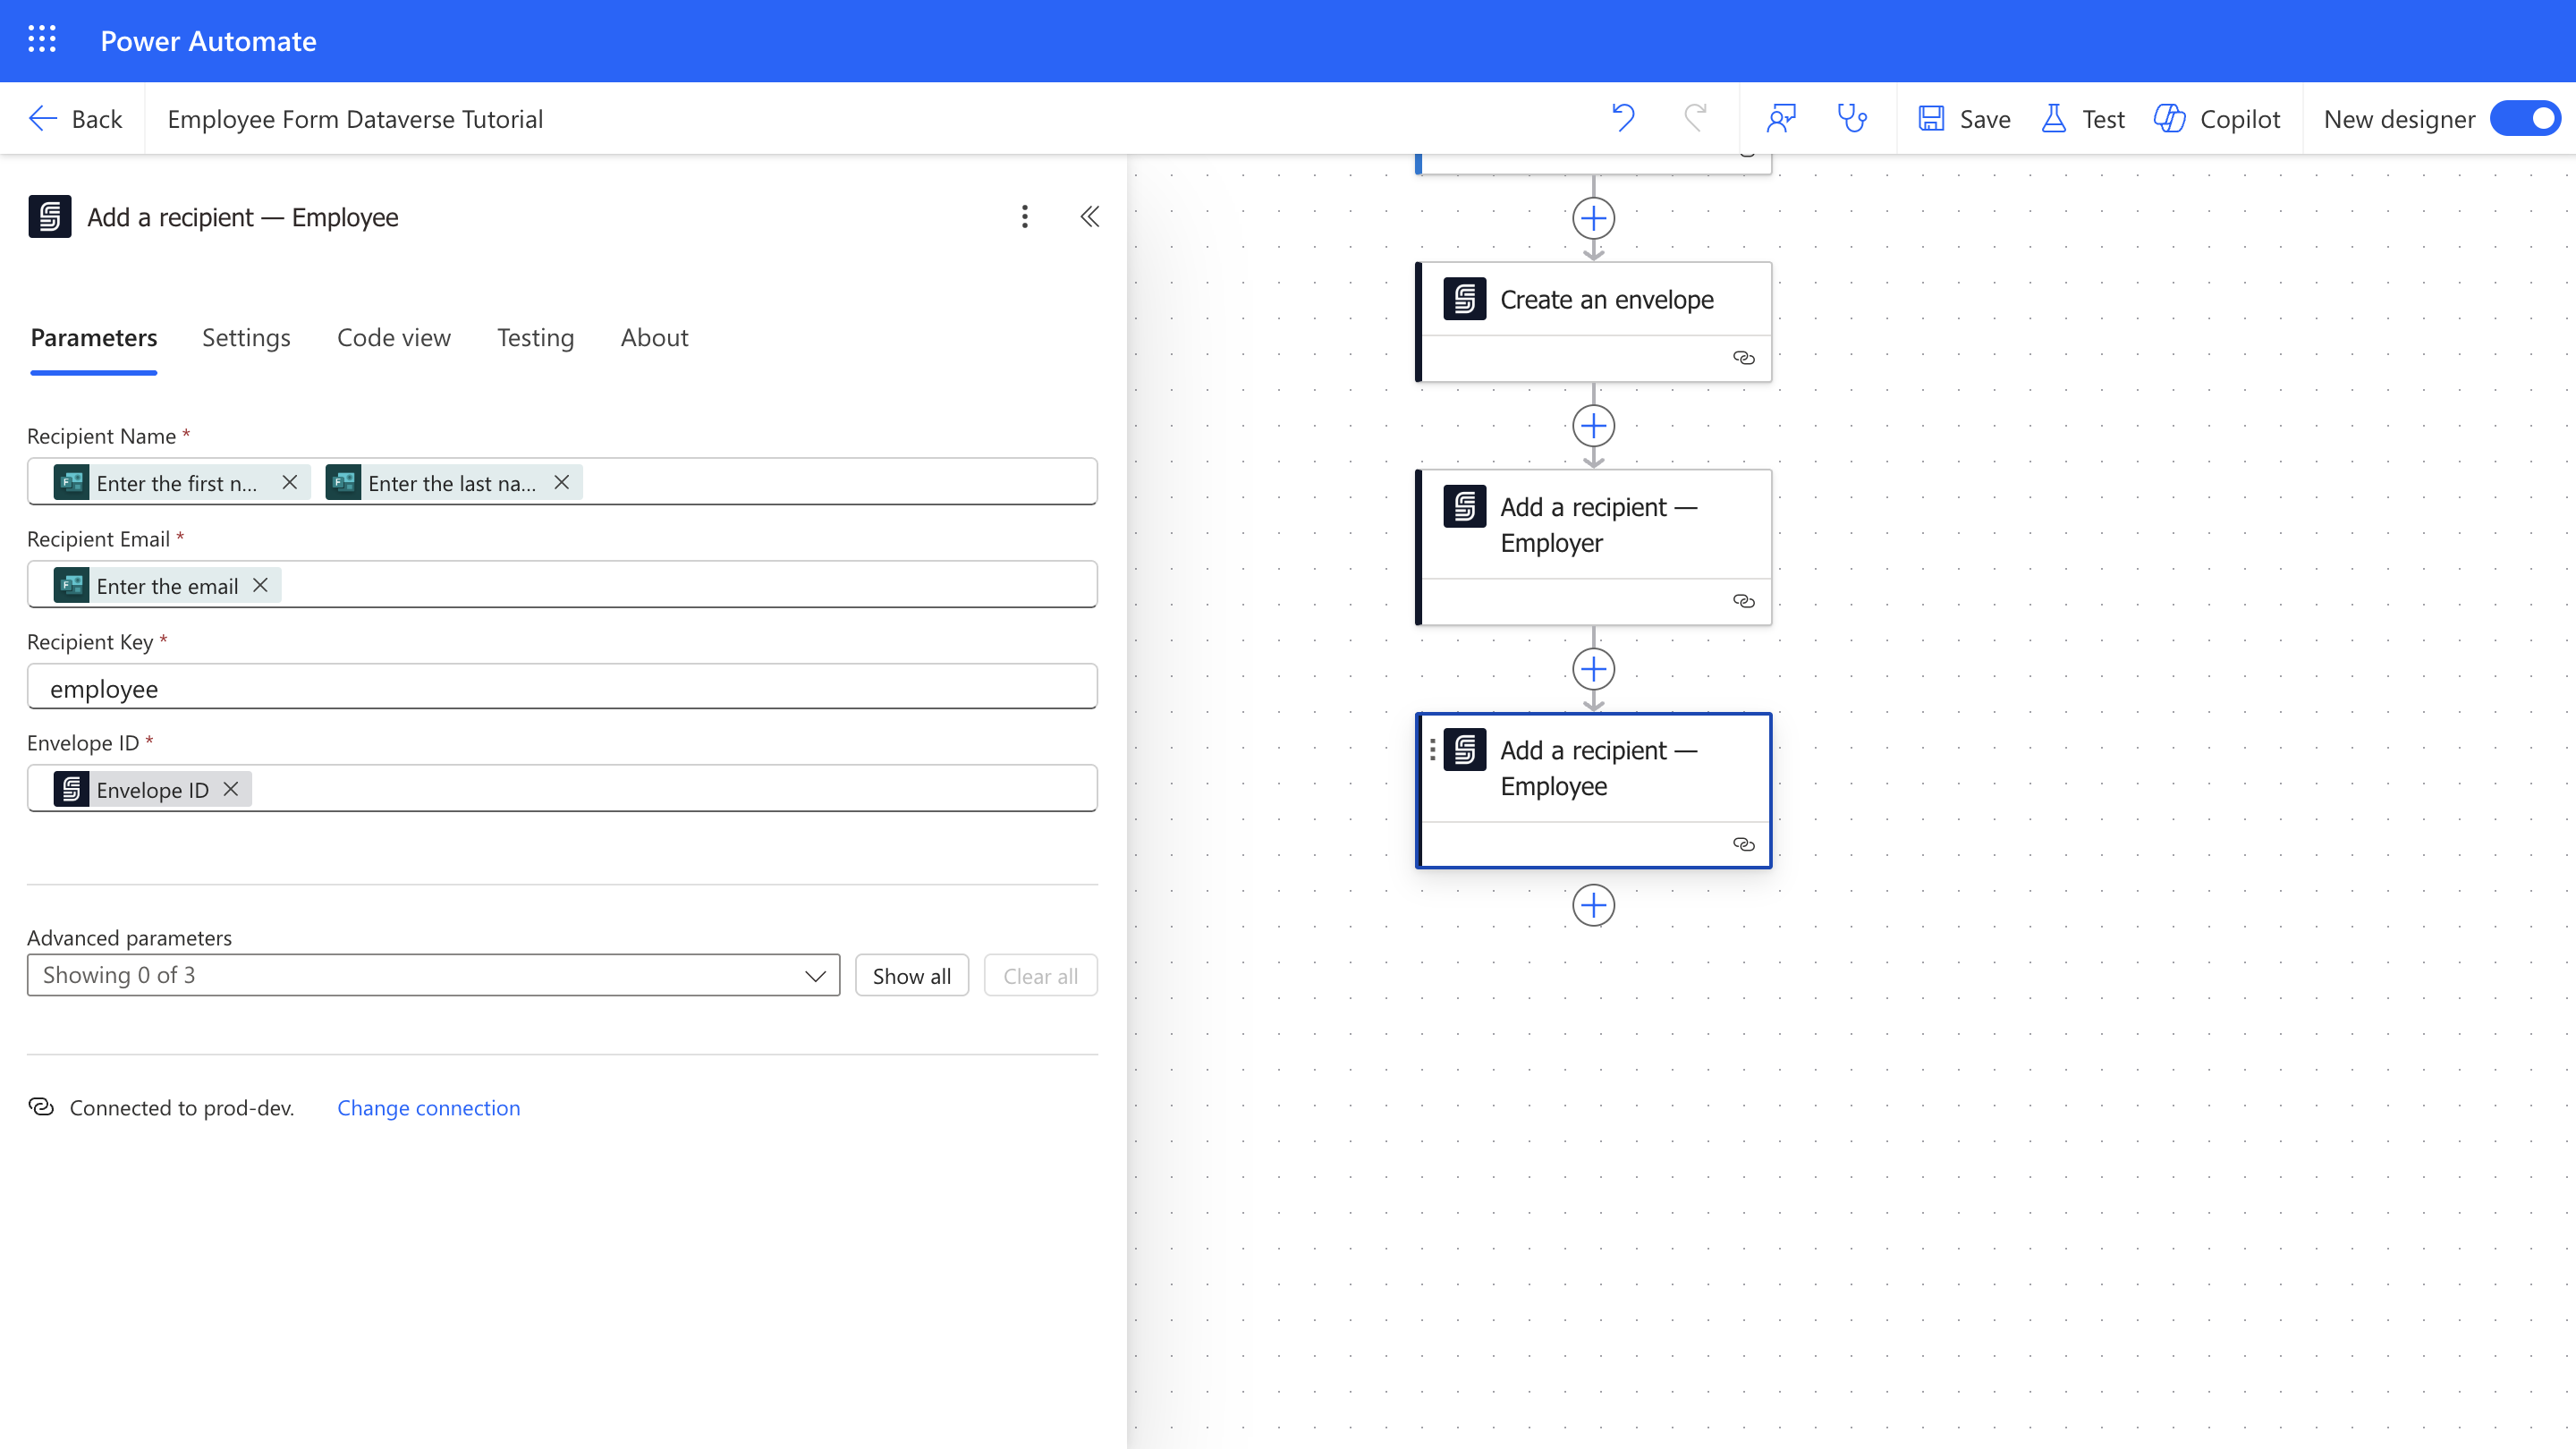
 #### 5.3 Add the Recipient - Employee
Specify the employee who will receive and sign the contract.
1. Add **Add Recipient** action and rename it to **Add Recipient - Employee**.
2. Set the **Recipient Name** and **Recipient Email** using form details (Dynamic Content).
3. Set the employee **Recipient Key** (e.g., "employee"), matching your DOCX placeholders.
#### 5.3 Add the Recipient - Employee
Specify the employee who will receive and sign the contract.
1. Add **Add Recipient** action and rename it to **Add Recipient - Employee**.
2. Set the **Recipient Name** and **Recipient Email** using form details (Dynamic Content).
3. Set the employee **Recipient Key** (e.g., "employee"), matching your DOCX placeholders.
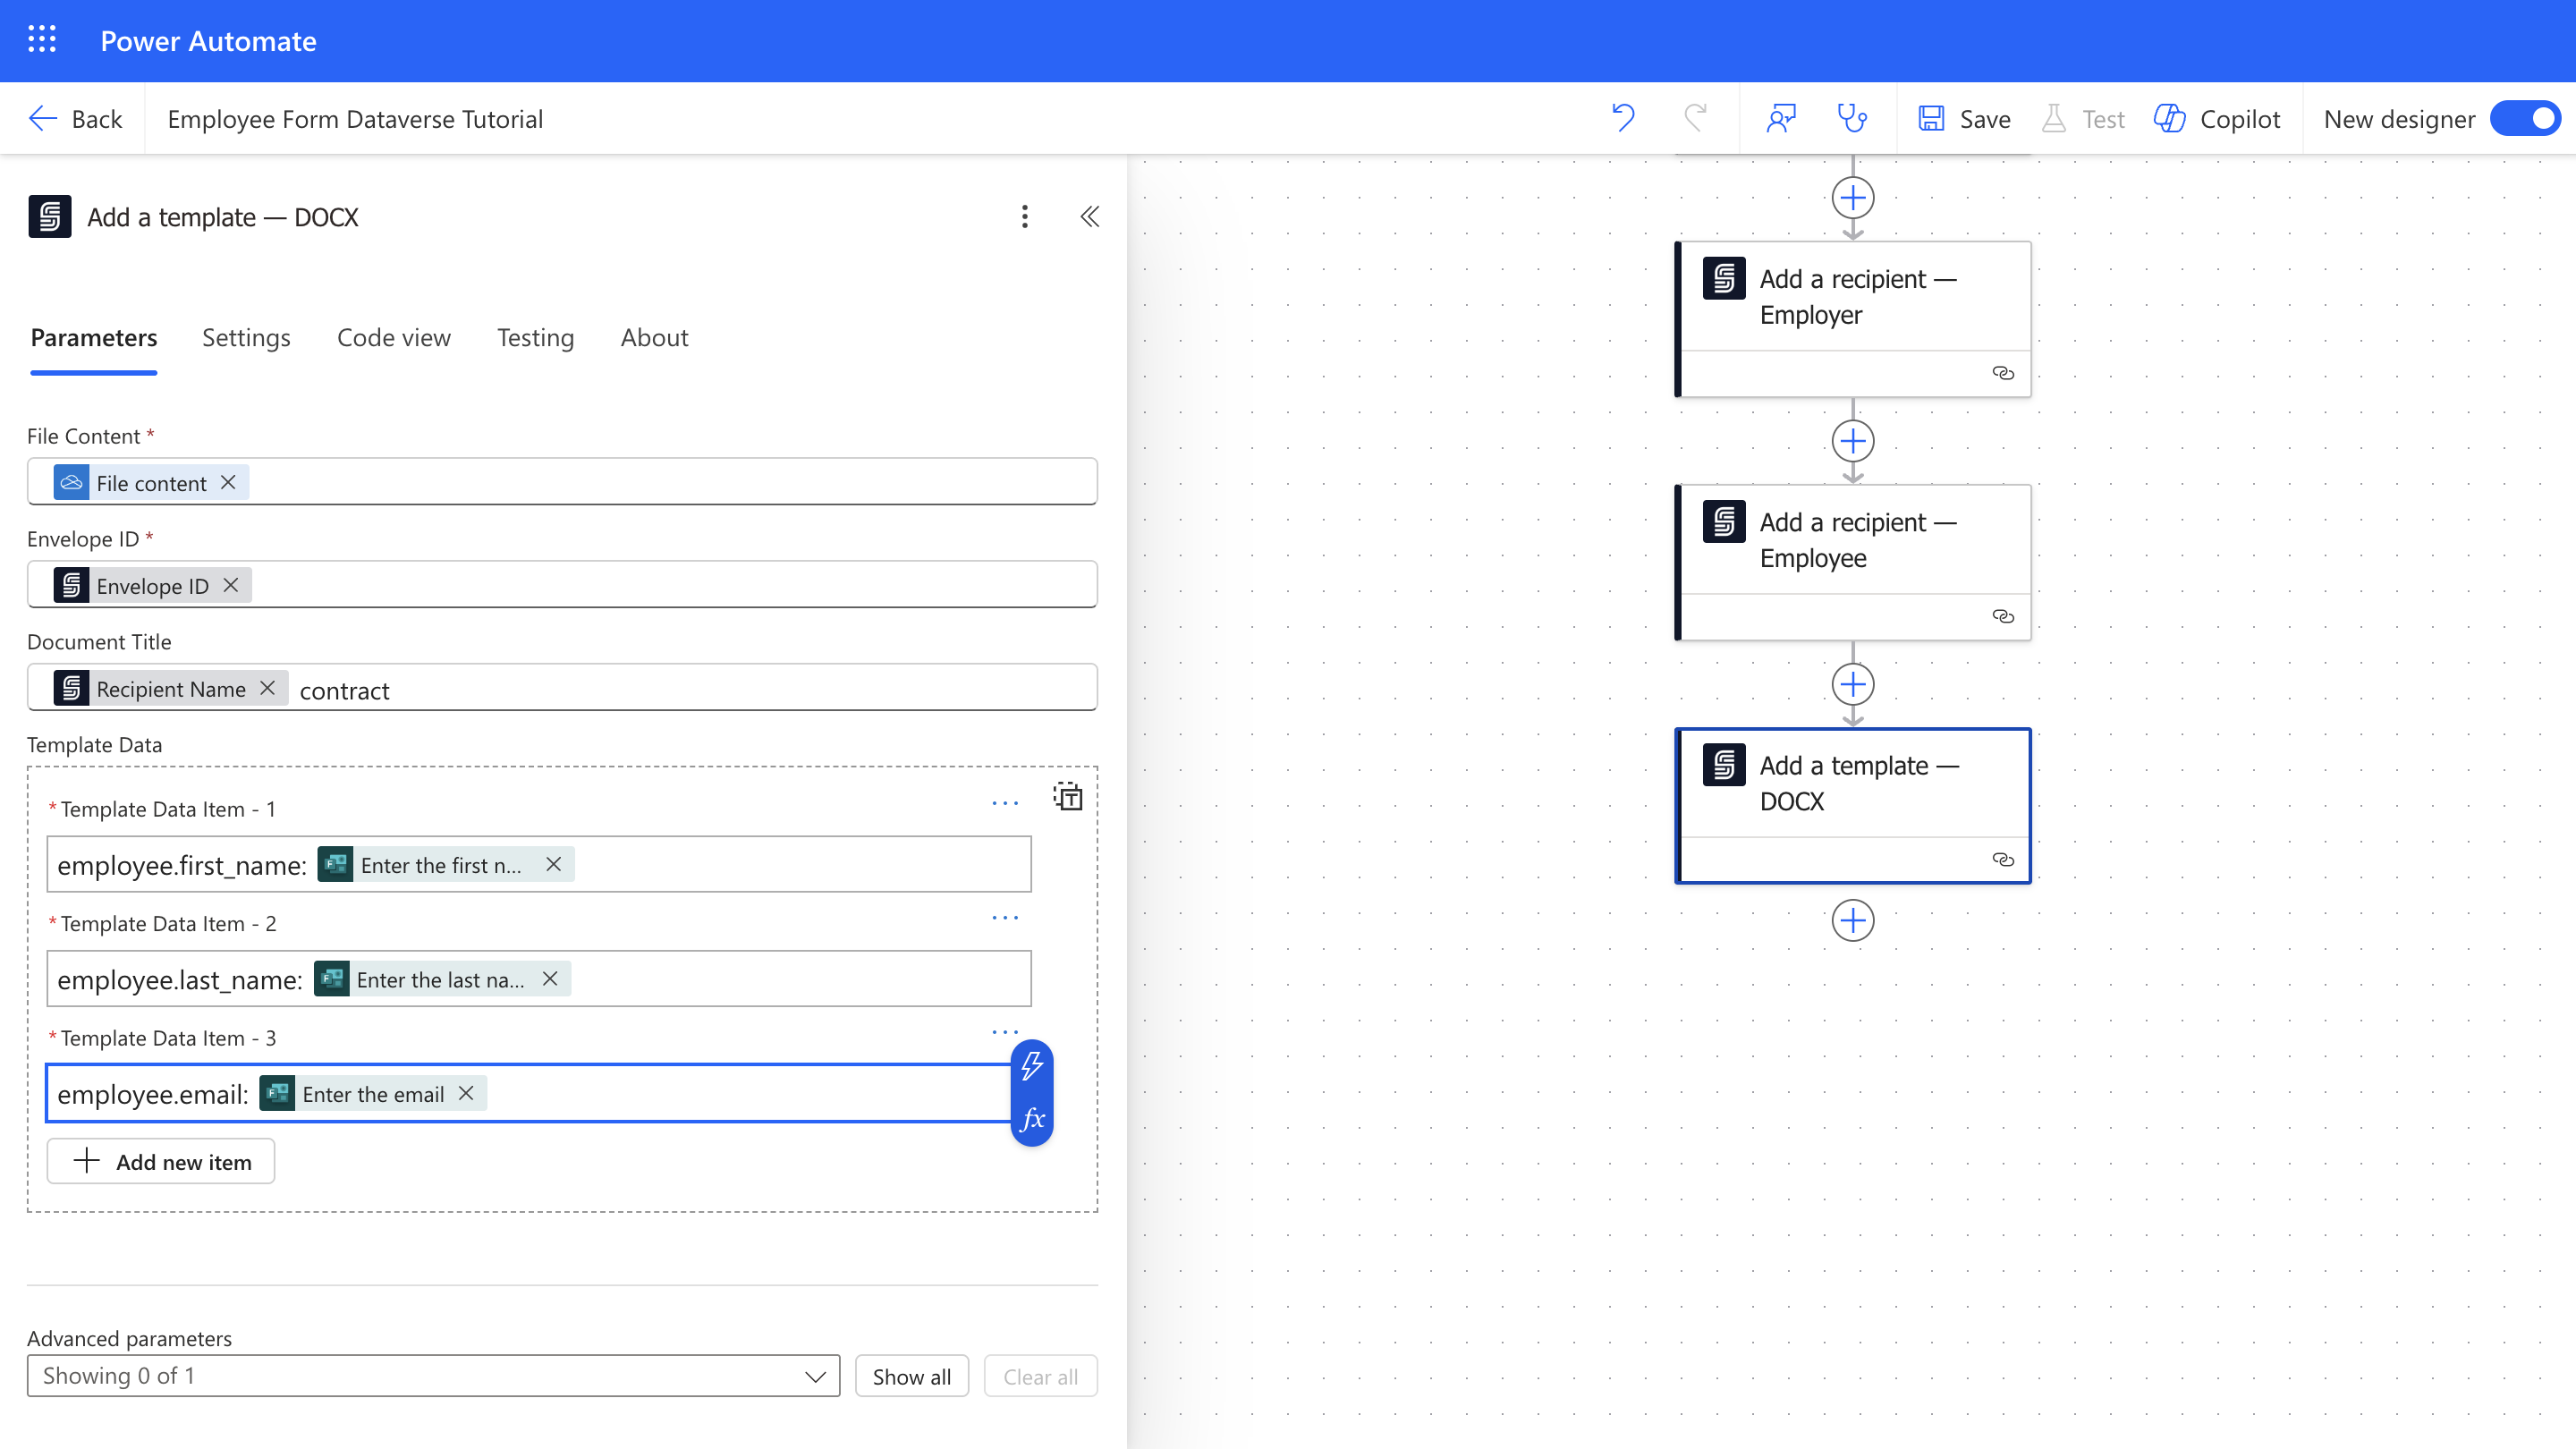
 #### 5.4 Attach the DOCX Contract Template
Attach your contract template to the envelope and populate it with employee details.
1. Add **Add a Template - DOCX** action.
2. Select **File Content** from the OneDrive action.
3. Set the **Document Title** (e.g., "Employment Contract").
4. Ensure your DOCX template uses placeholders (`{{employee.first_name}}`, `{{employee.last_name}}`, `{{employee.email}}`, etc.) and map each field to the corresponding dynamic content from your form.
#### 5.4 Attach the DOCX Contract Template
Attach your contract template to the envelope and populate it with employee details.
1. Add **Add a Template - DOCX** action.
2. Select **File Content** from the OneDrive action.
3. Set the **Document Title** (e.g., "Employment Contract").
4. Ensure your DOCX template uses placeholders (`{{employee.first_name}}`, `{{employee.last_name}}`, `{{employee.email}}`, etc.) and map each field to the corresponding dynamic content from your form.
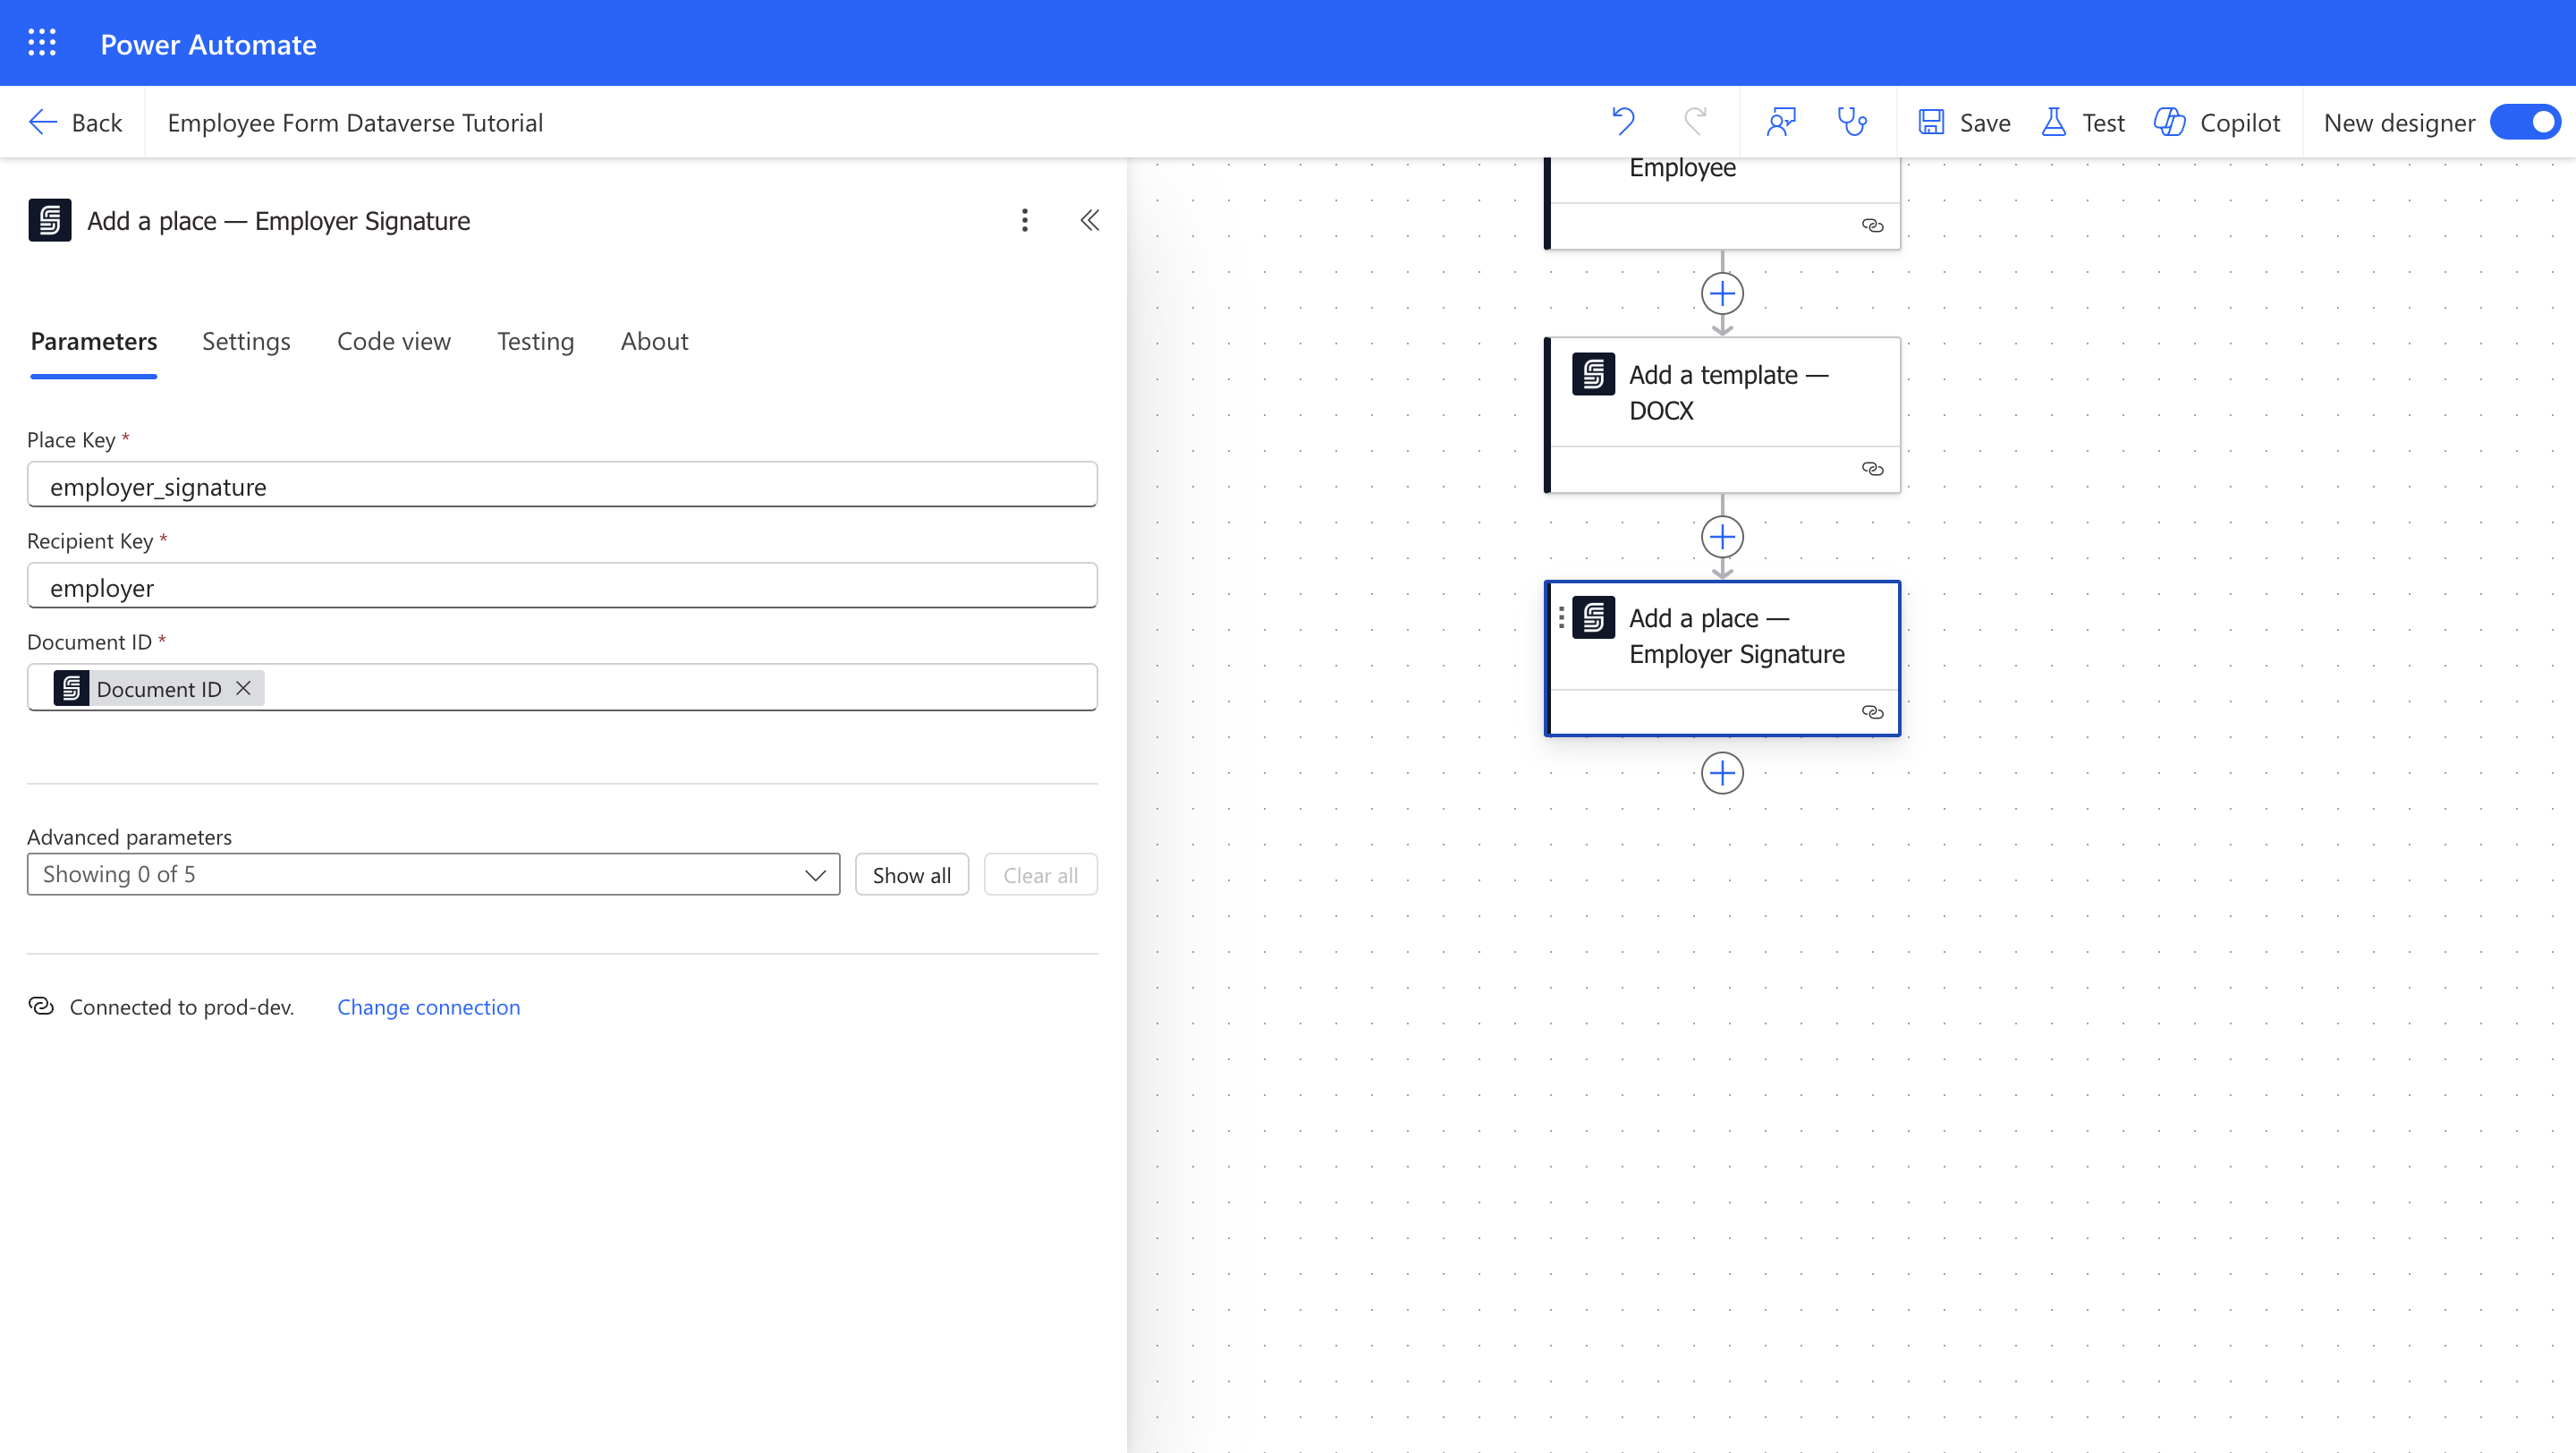
 #### 5.5 Define Signature Placement - Employer
Specify where the employer should sign on the document.
1. Add **Add a Place - Signature** action and rename it to **Add a Place - Employer Signature**.
2. Set the **Document ID** using dynamic content.
3. Use the placeholder (e.g., `[[employer_signature]]`) from your DOCX template.
4. Set the **Recipient Key** using the **Add Recipient - Employer** action from the dynamic content.
#### 5.5 Define Signature Placement - Employer
Specify where the employer should sign on the document.
1. Add **Add a Place - Signature** action and rename it to **Add a Place - Employer Signature**.
2. Set the **Document ID** using dynamic content.
3. Use the placeholder (e.g., `[[employer_signature]]`) from your DOCX template.
4. Set the **Recipient Key** using the **Add Recipient - Employer** action from the dynamic content.
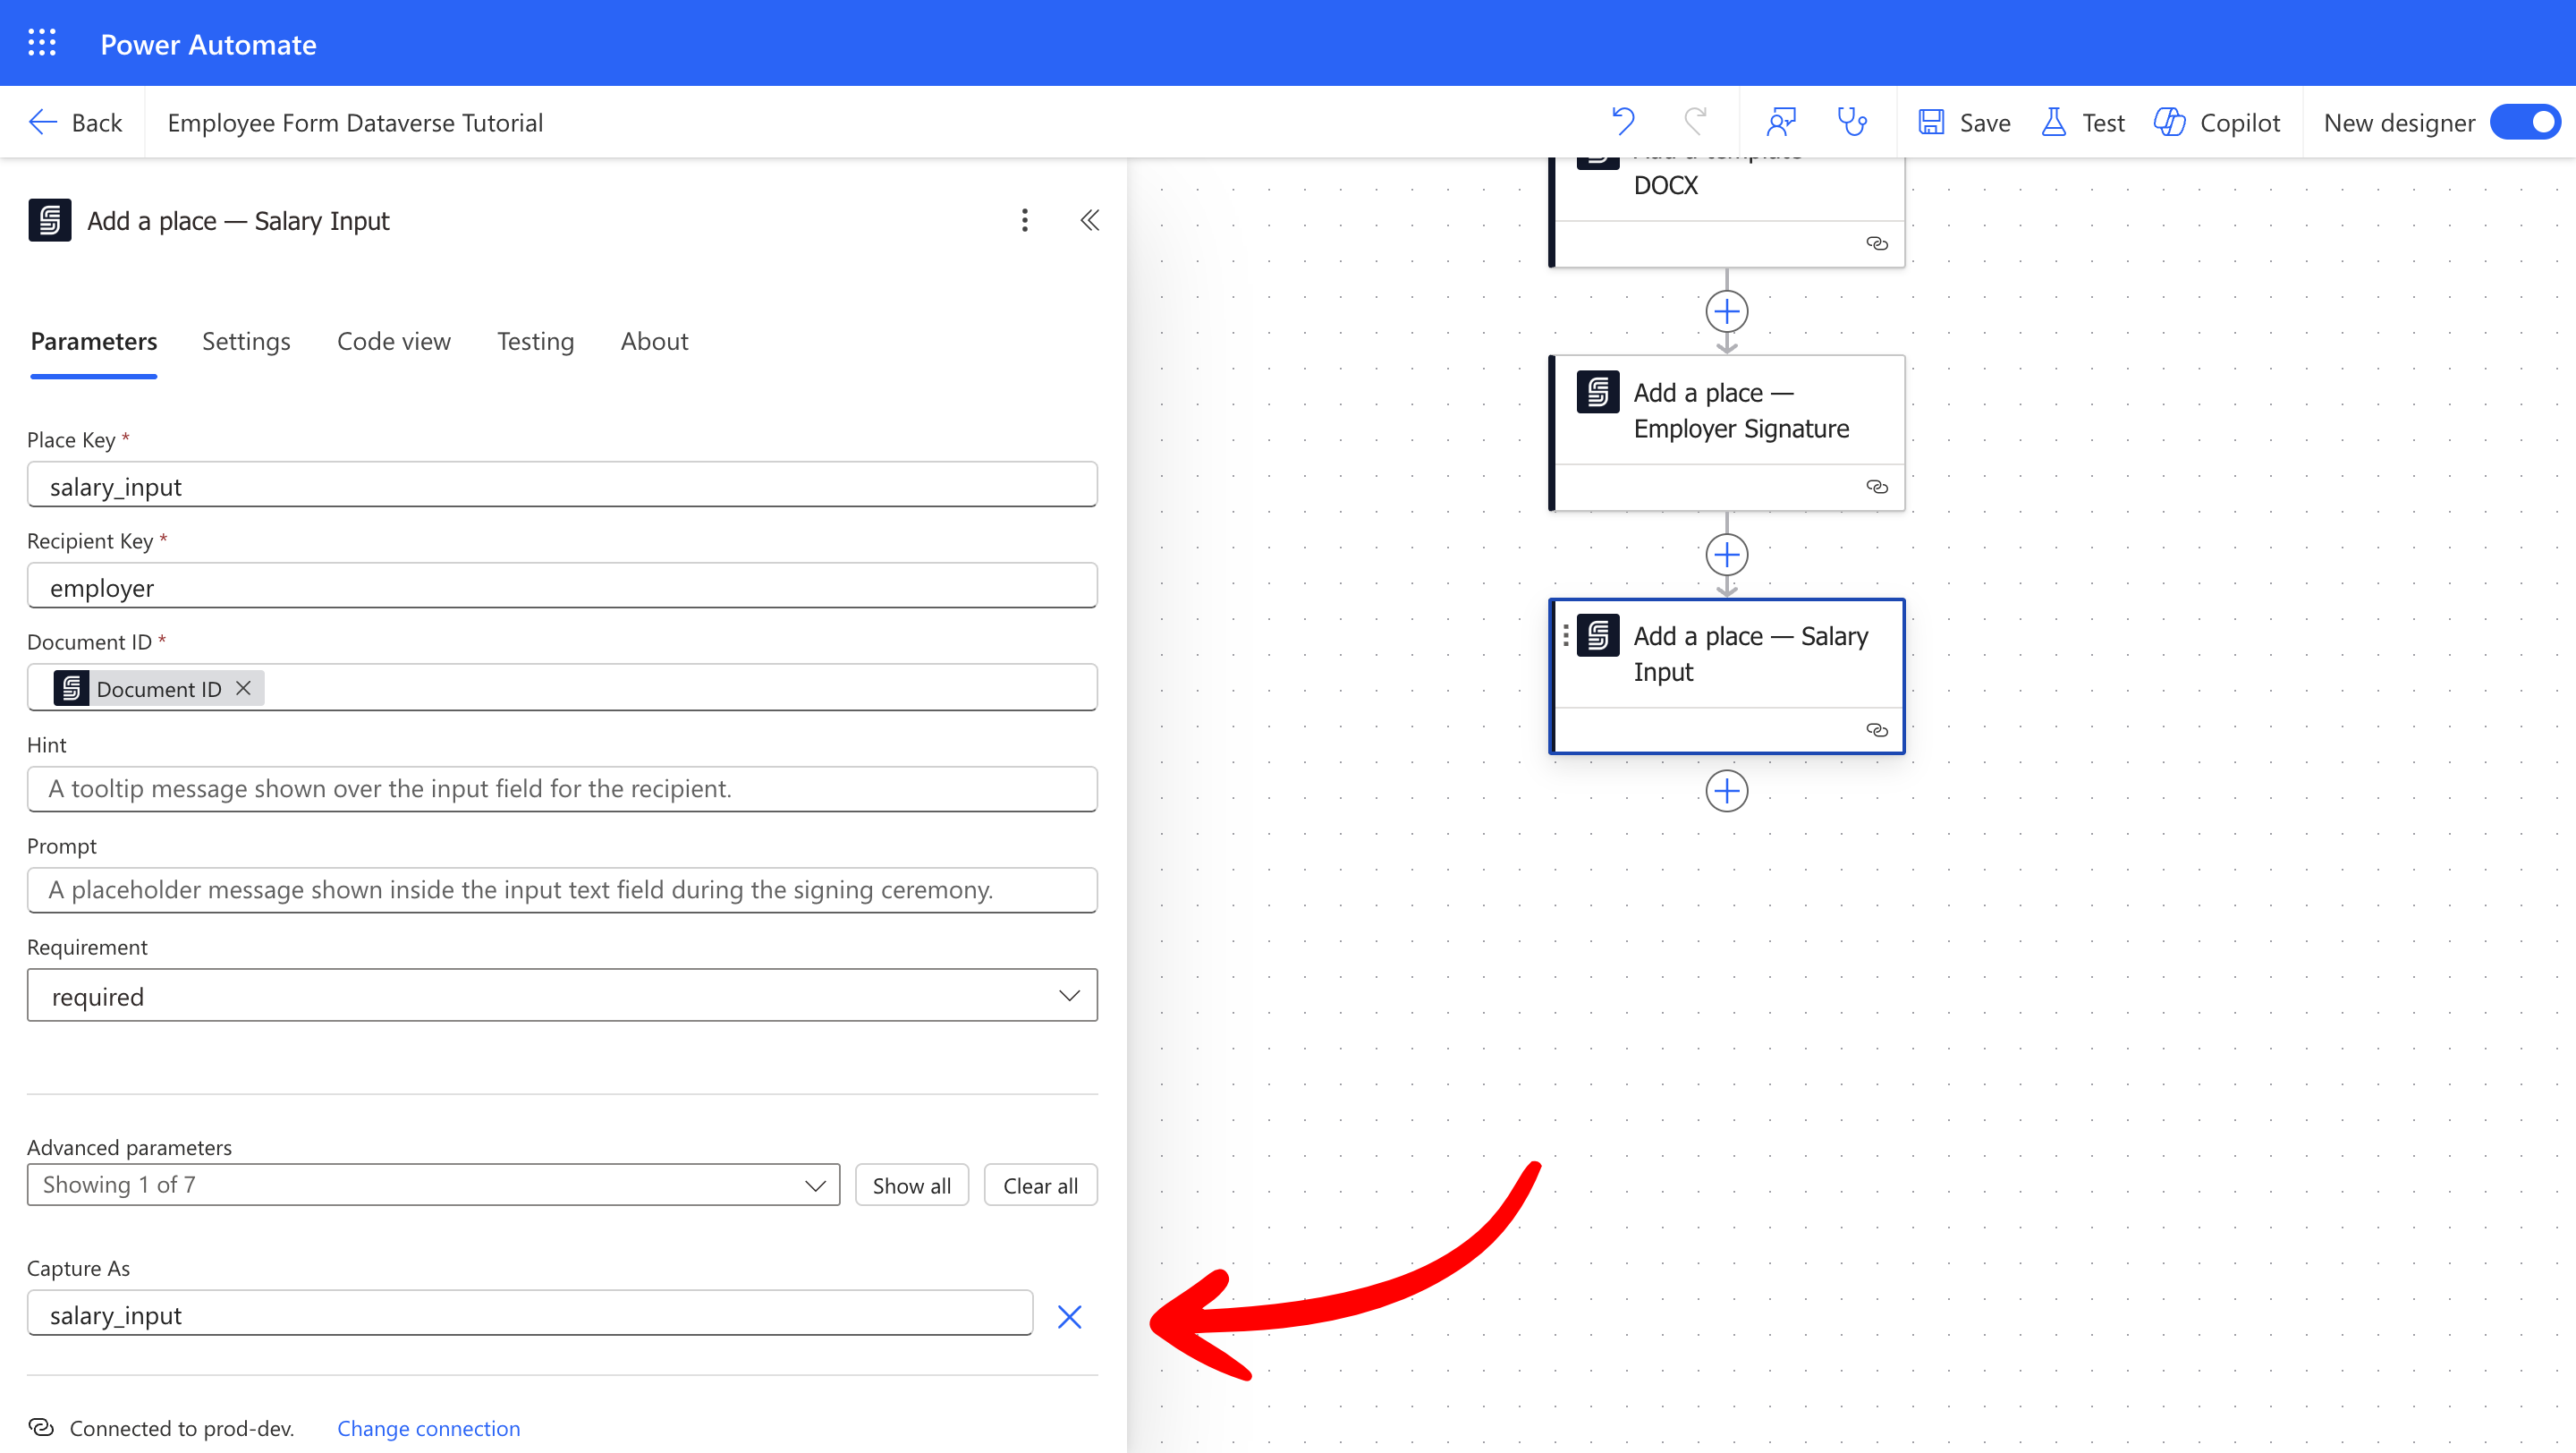
 #### 5.6 Define Text Input Placement - Salary Input
Specify where the employer should fill the salary amount.
1. Add **Add a Place - Text Input** action and rename it to **Add a Place - Salary Input**.
2. Use the placeholder (e.g., `[[salary_input]]`) from your DOCX template.
3. Set the **Recipient Key** using the **Add Recipient - Employer** action from the dynamic content. This ensures the salary amount is defined and completed in the signature process by the employer.
4. From the advanced parameters, set **Capture As** to `salary_input`. This ensures that the salary amount is captured as text, allowing you to retrieve it later in the flow.
#### 5.6 Define Text Input Placement - Salary Input
Specify where the employer should fill the salary amount.
1. Add **Add a Place - Text Input** action and rename it to **Add a Place - Salary Input**.
2. Use the placeholder (e.g., `[[salary_input]]`) from your DOCX template.
3. Set the **Recipient Key** using the **Add Recipient - Employer** action from the dynamic content. This ensures the salary amount is defined and completed in the signature process by the employer.
4. From the advanced parameters, set **Capture As** to `salary_input`. This ensures that the salary amount is captured as text, allowing you to retrieve it later in the flow.
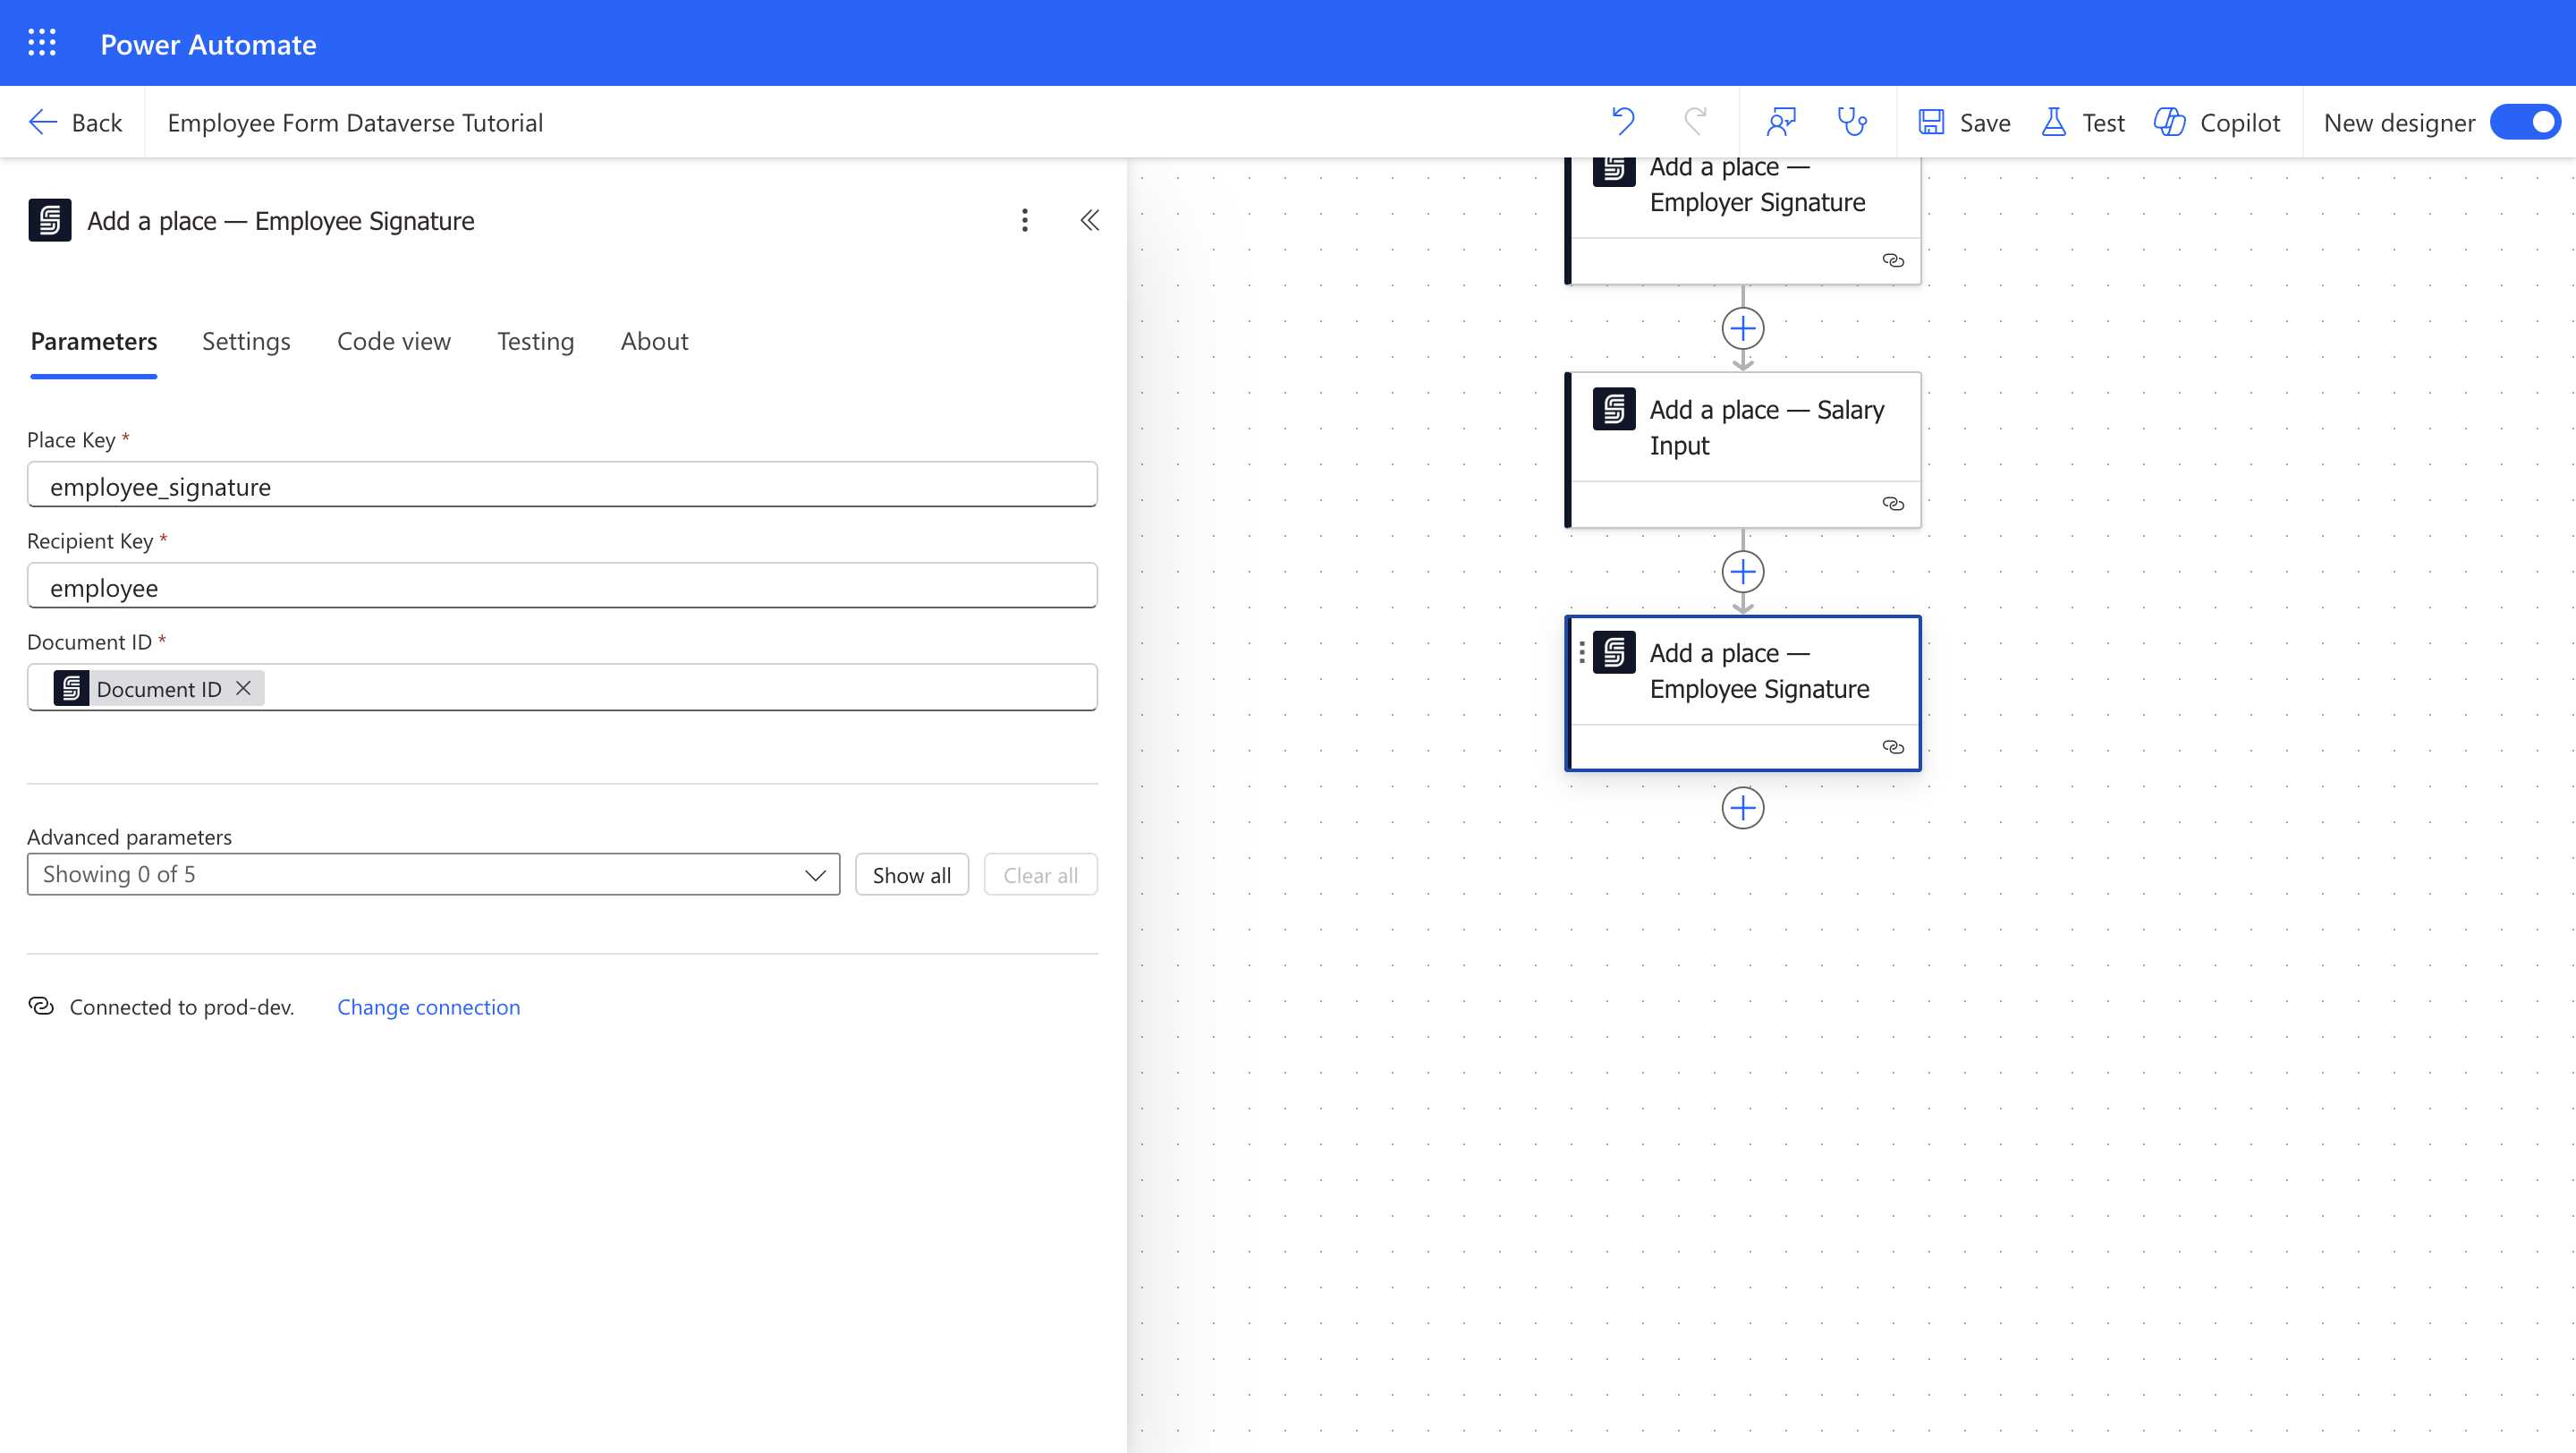
 #### 5.7 Define Signature Placement - Employee
Specify where the employee should sign on the document.
1. Add **Add a Place - Signature** action and rename it to **Add a Place - Employee Signature**.
2. Use the placeholder for the **Place Key** (e.g., `[[employee_signature]]`) from your DOCX template.
3. Set the **Document ID** using dynamic content.
4. Set the **Recipient Key** using the **Add Recipient - Employee** action from the dynamic content.
#### 5.7 Define Signature Placement - Employee
Specify where the employee should sign on the document.
1. Add **Add a Place - Signature** action and rename it to **Add a Place - Employee Signature**.
2. Use the placeholder for the **Place Key** (e.g., `[[employee_signature]]`) from your DOCX template.
3. Set the **Document ID** using dynamic content.
4. Set the **Recipient Key** using the **Add Recipient - Employee** action from the dynamic content.
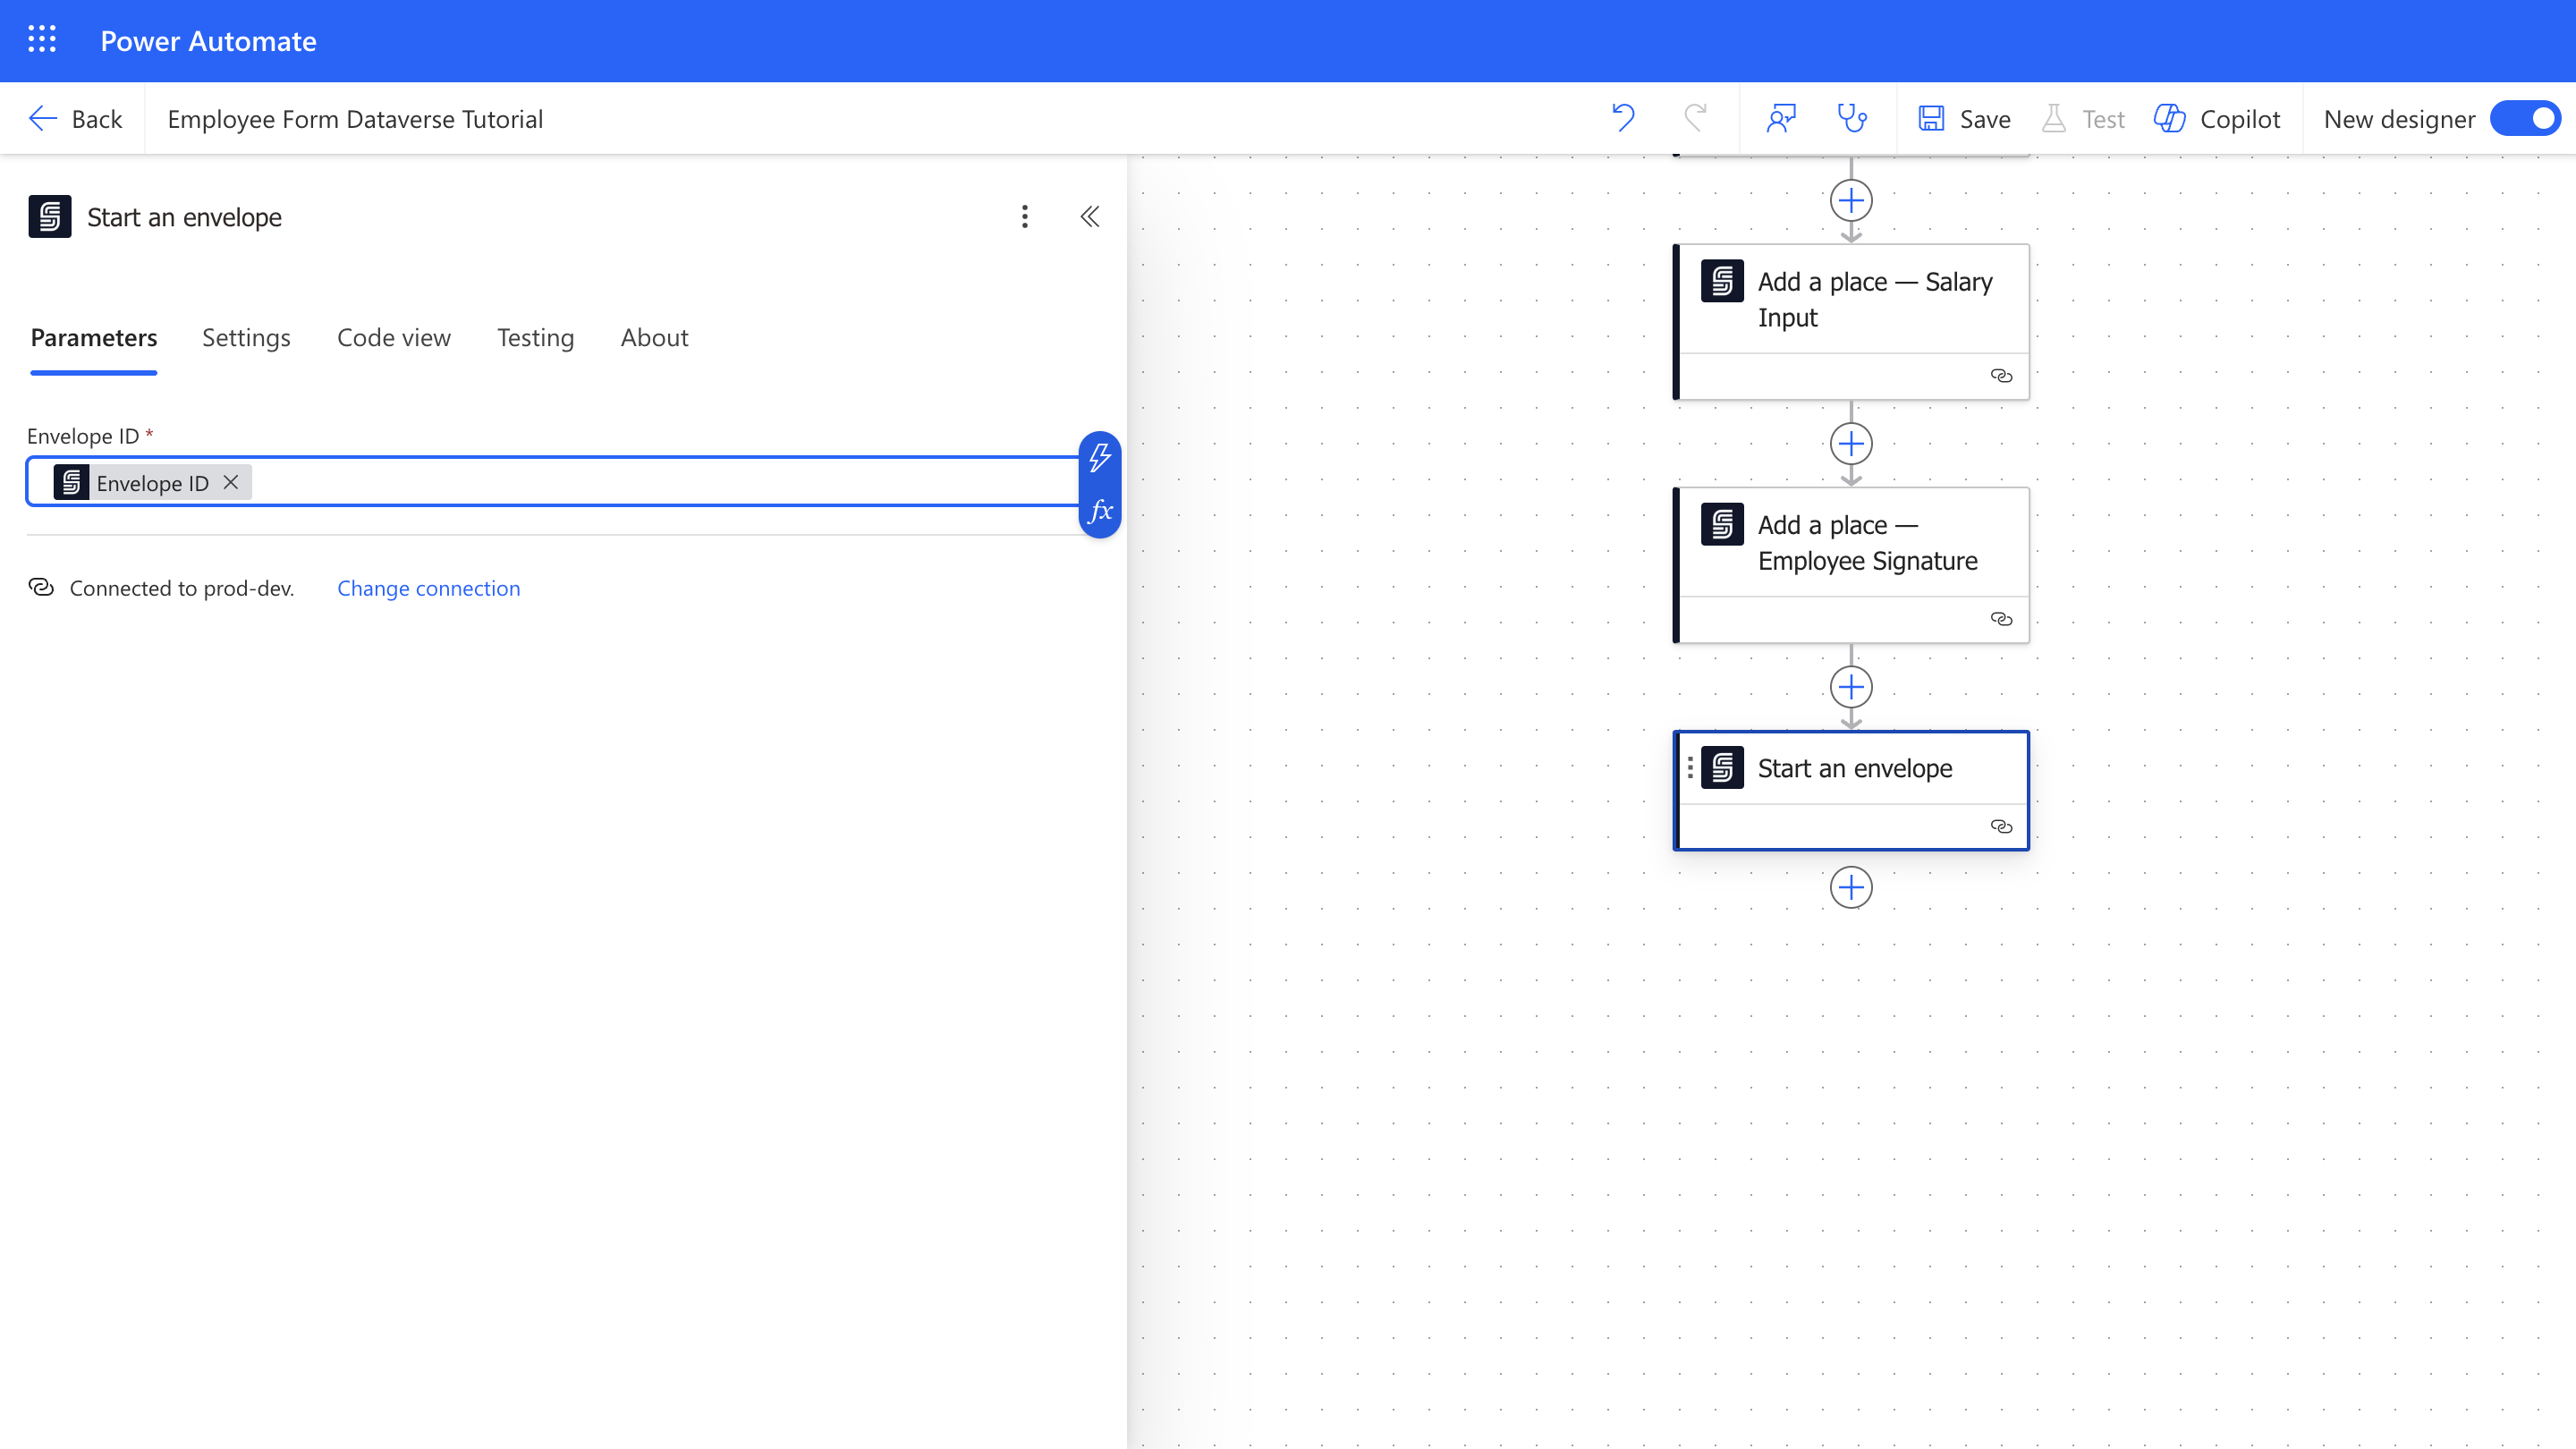
 #### 5.8 Start the Signing Process
Trigger the sending of your envelope for signing.
1. Add **Start Envelope** action.
2. Set the **Envelope ID** using the dynamic content from the **Create an Envelope** action.
#### 5.8 Start the Signing Process
Trigger the sending of your envelope for signing.
1. Add **Start Envelope** action.
2. Set the **Envelope ID** using the dynamic content from the **Create an Envelope** action.
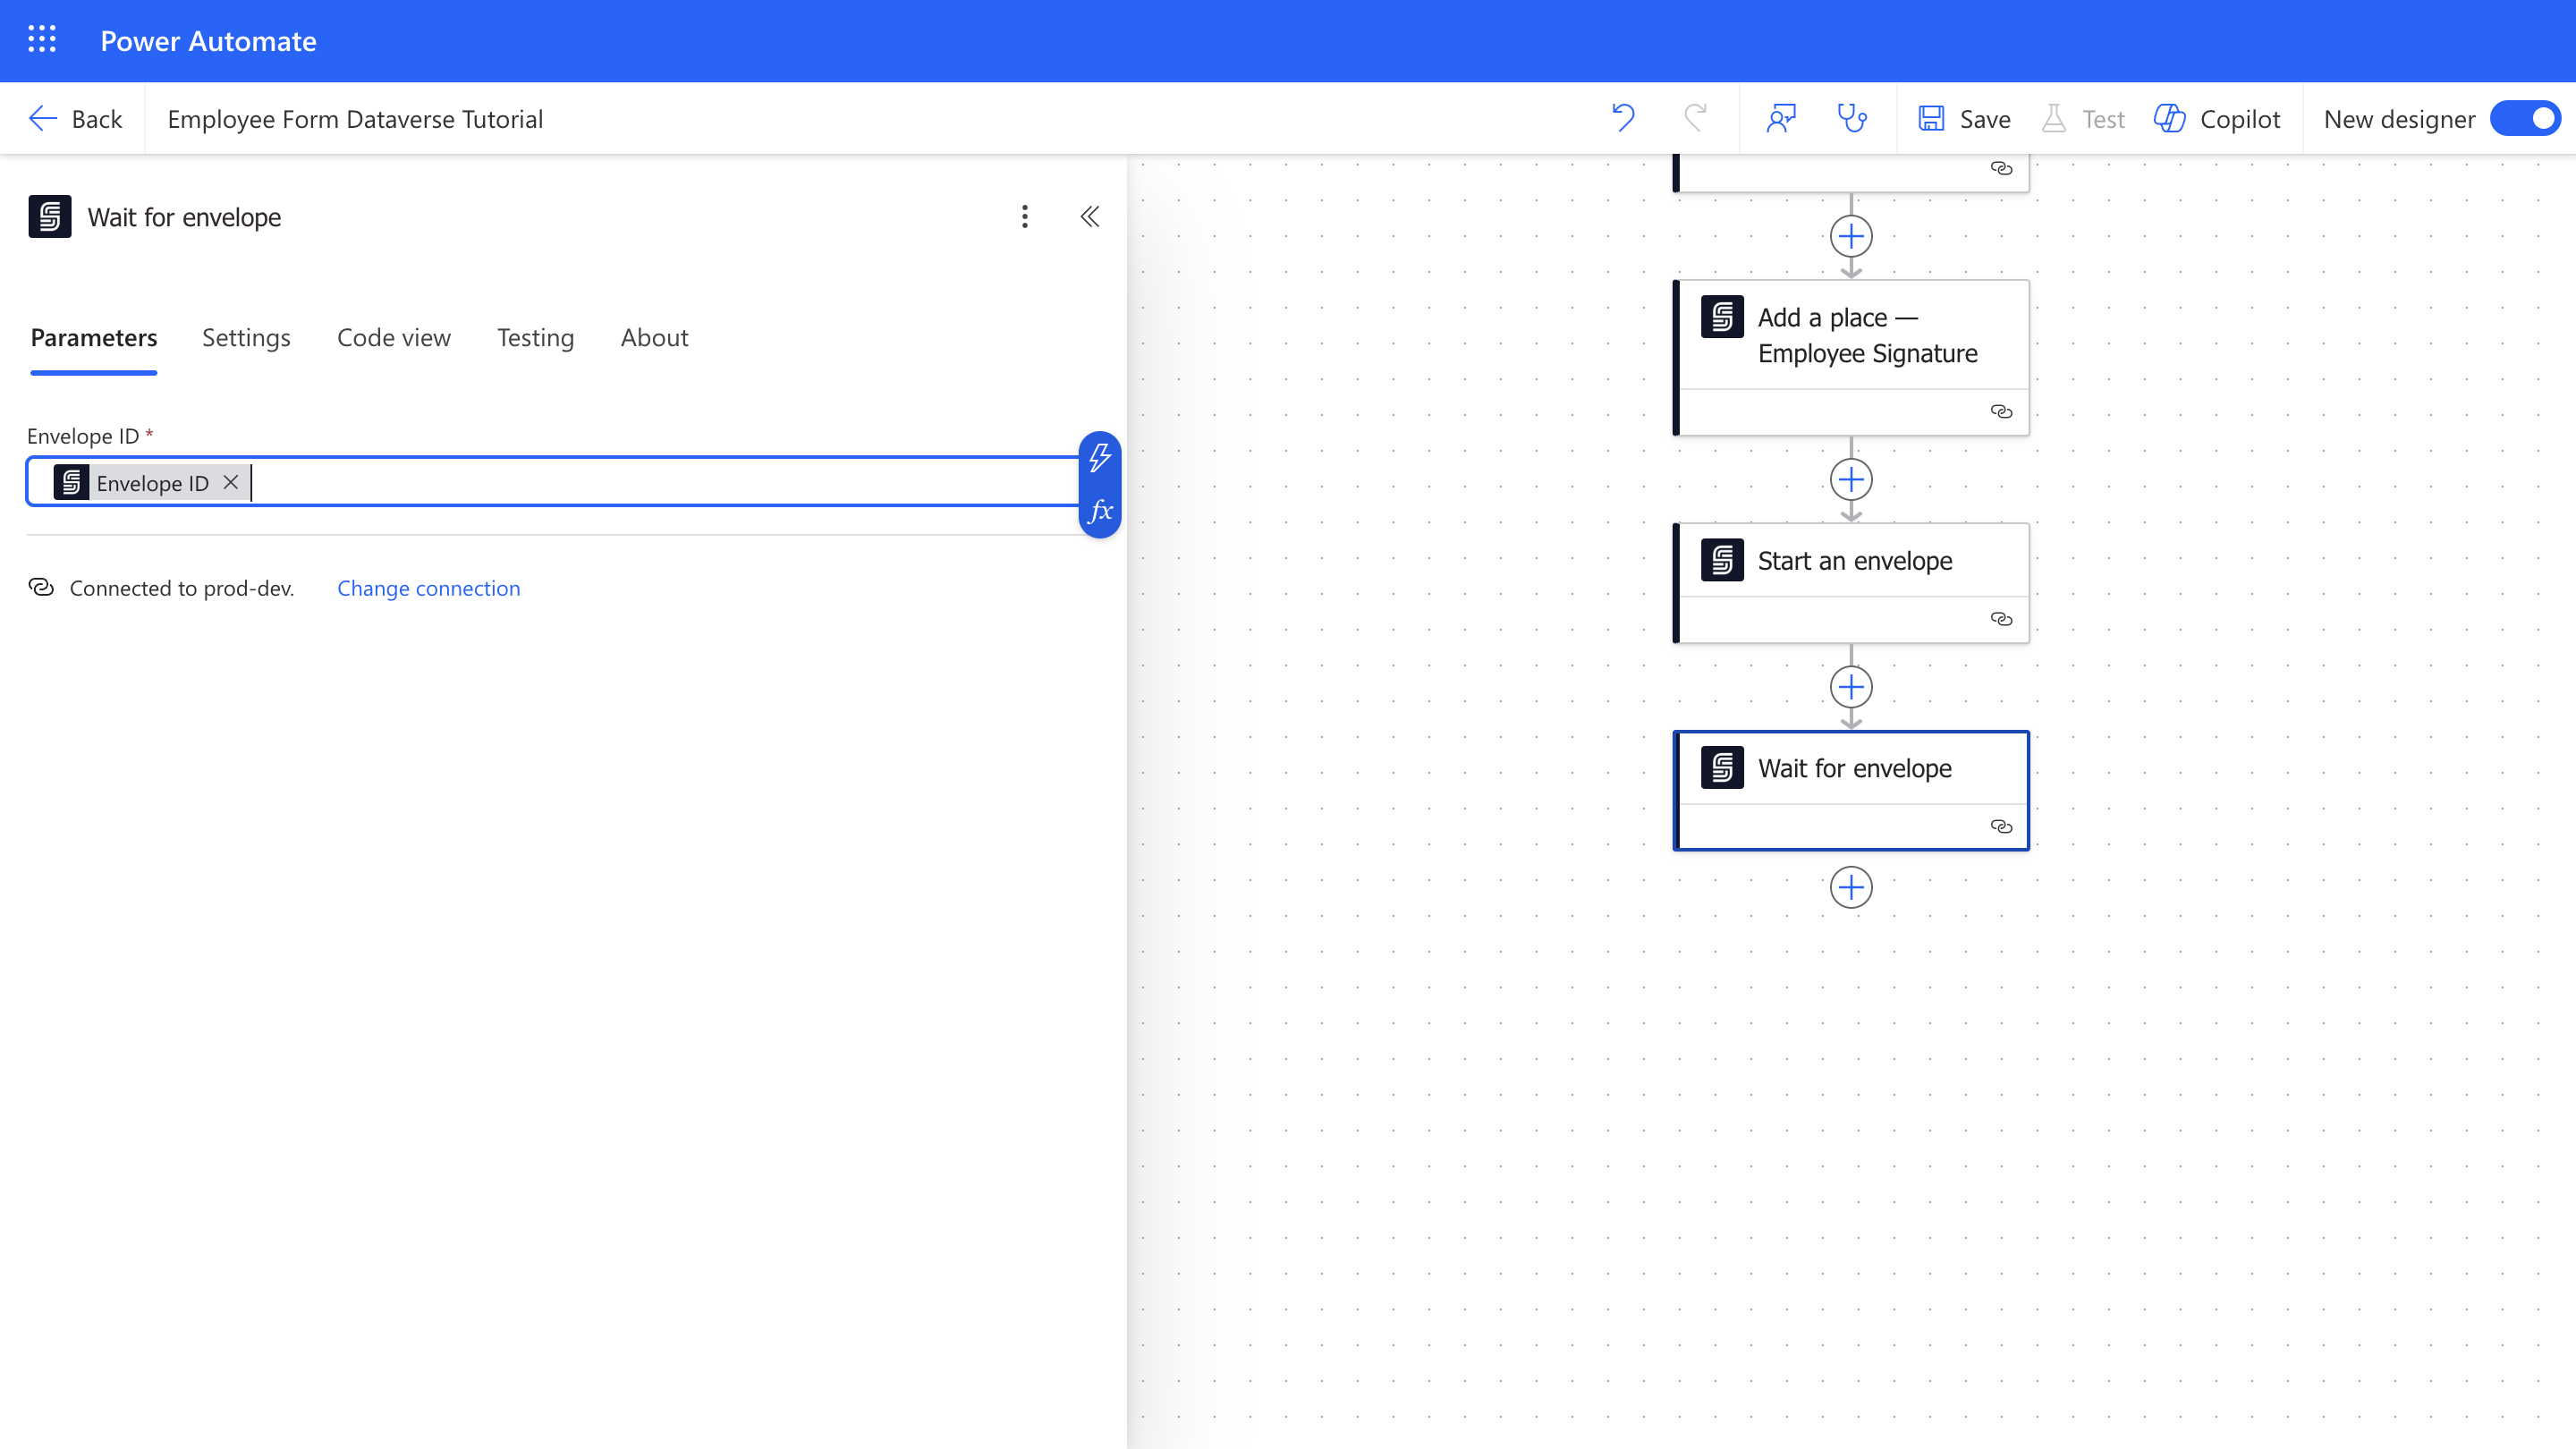
 ### Step 6: Monitor and Finalize the Contract
Configure your flow to wait for the signing to complete, retrieve the signed contract, store the data, and notify HR.
#### 6.1 Wait for Signature Completion
Pause the flow until both parties have signed the contract.
1. Add **Wait for Envelope Completion** action.
2. Set the **Envelope ID** using the dynamic content from the **Create an Envelope** action.
### Step 6: Monitor and Finalize the Contract
Configure your flow to wait for the signing to complete, retrieve the signed contract, store the data, and notify HR.
#### 6.1 Wait for Signature Completion
Pause the flow until both parties have signed the contract.
1. Add **Wait for Envelope Completion** action.
2. Set the **Envelope ID** using the dynamic content from the **Create an Envelope** action.
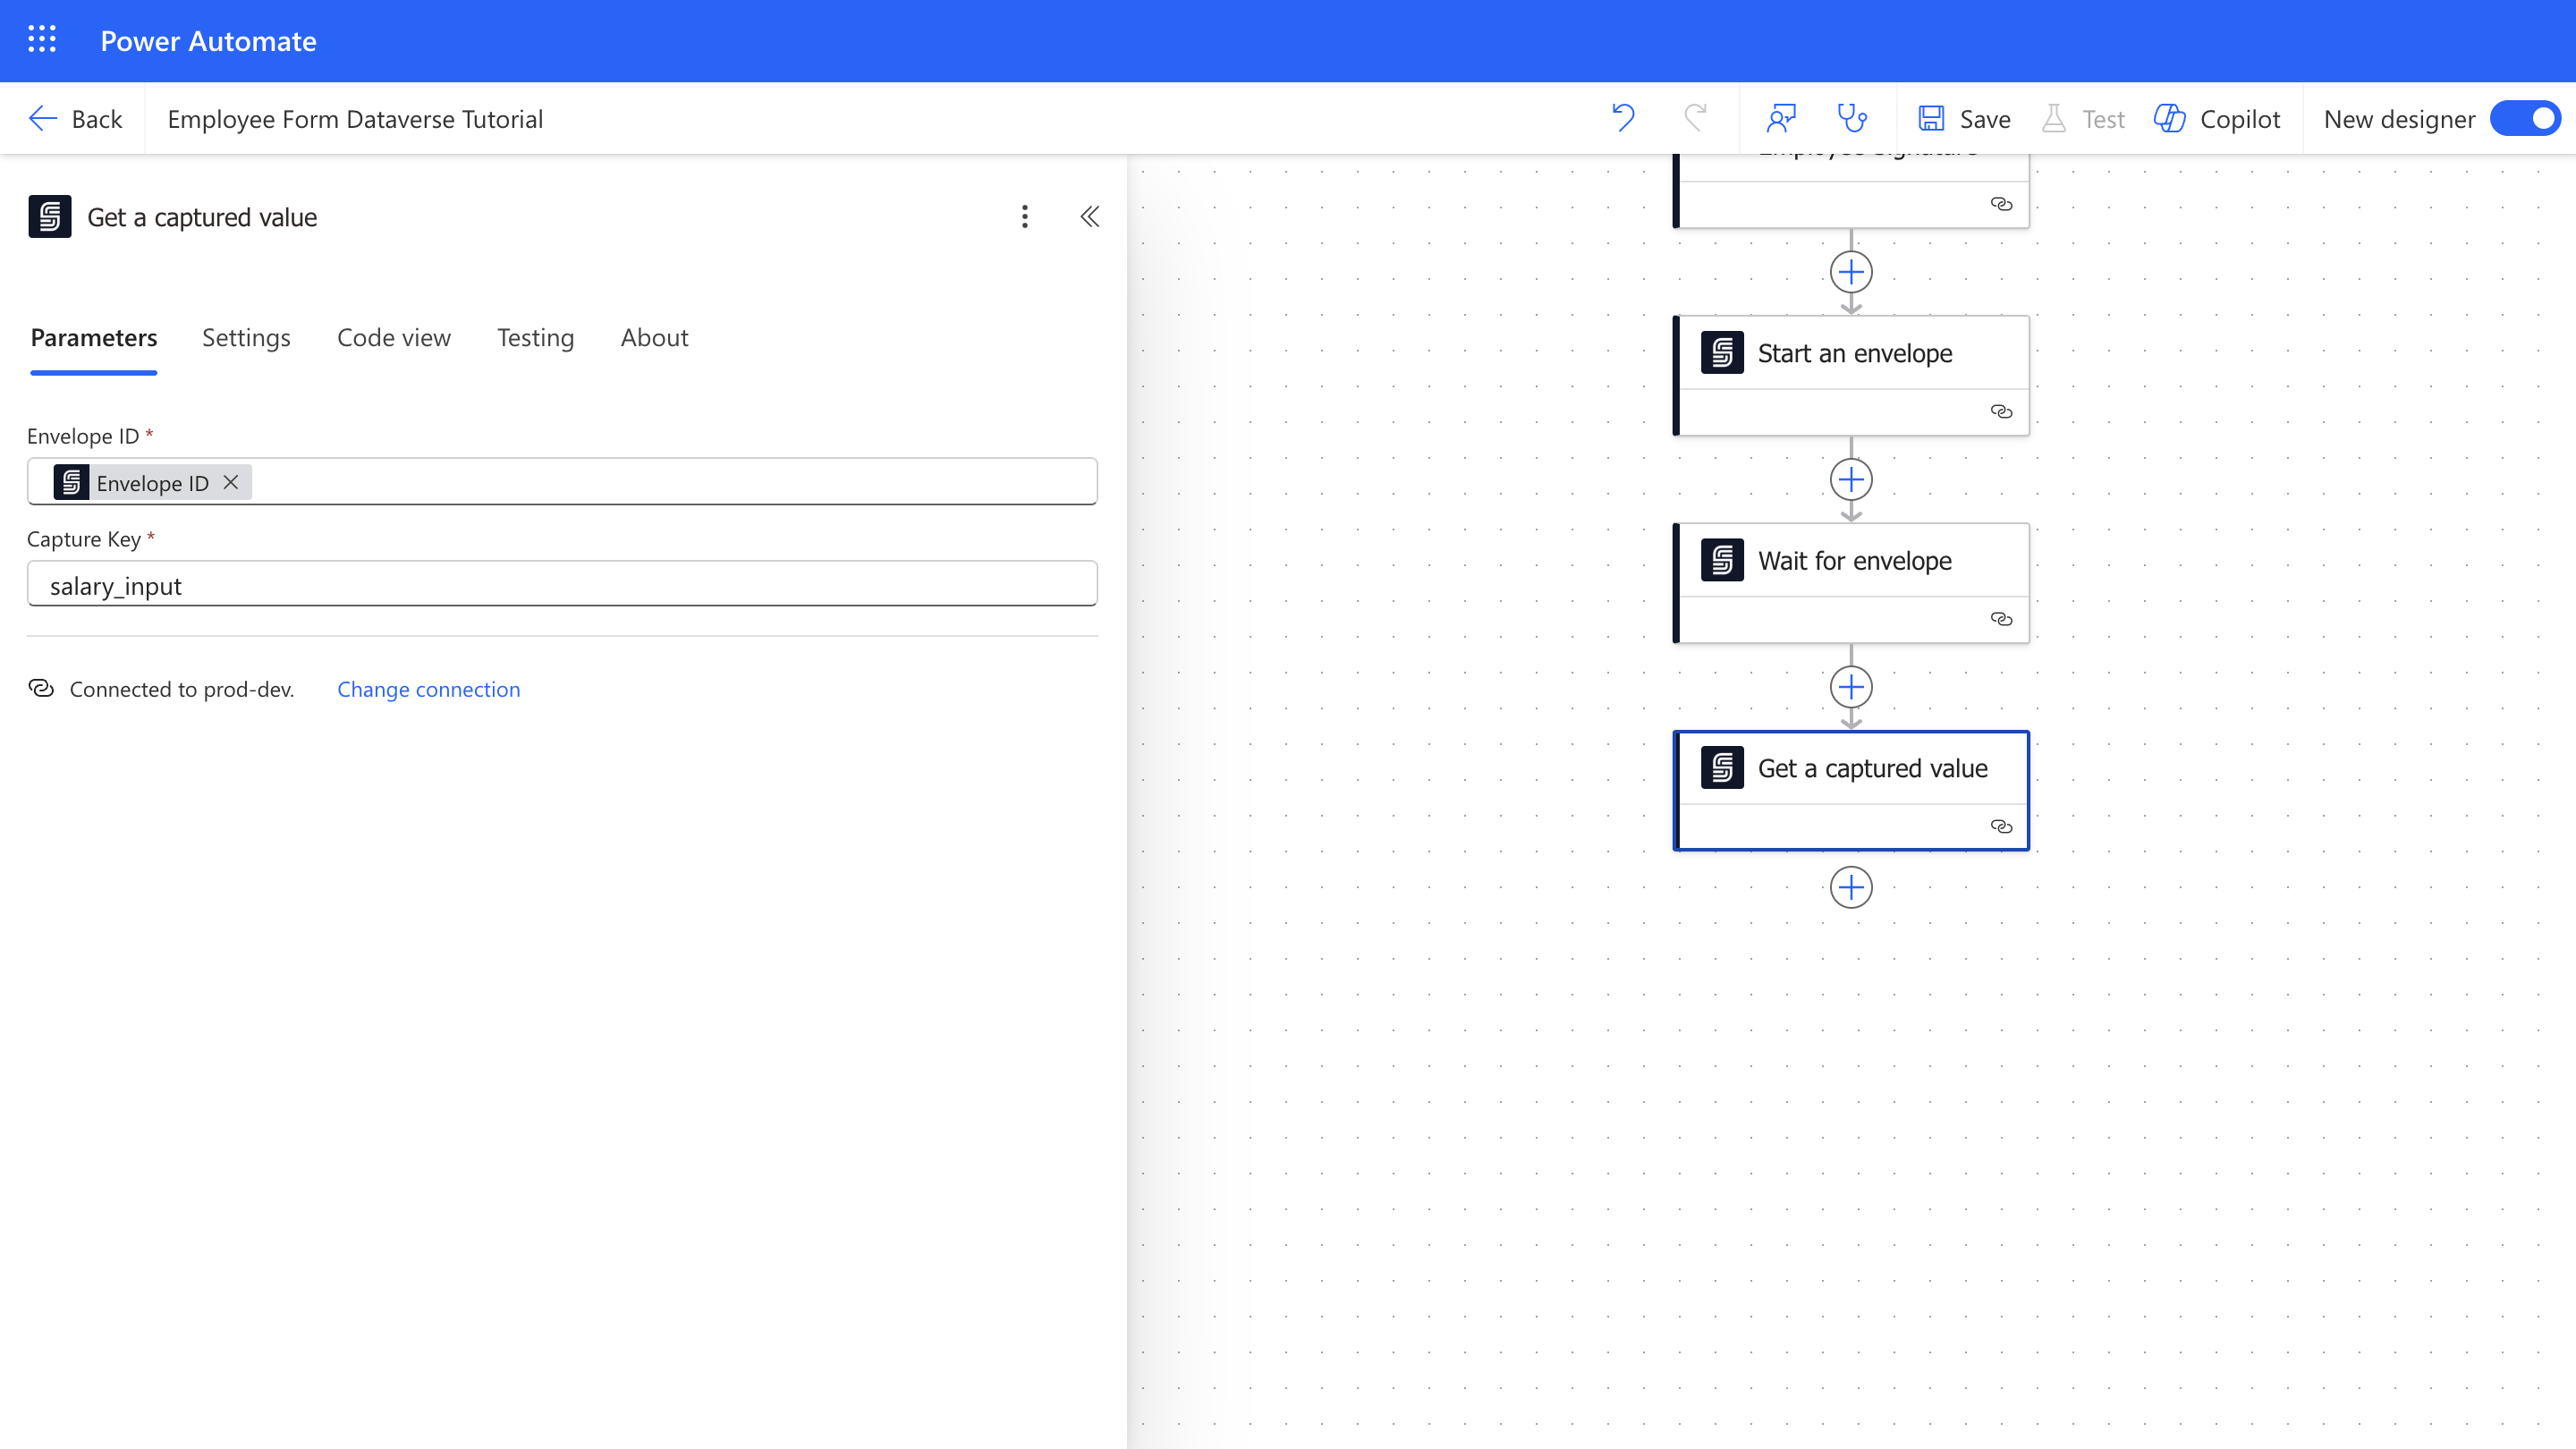
 #### 6.2 Get Captured Value
Once signed, automatically retrieve the captured salary value.
1. Add **Get a captured value** action from the SignatureAPI connector.
2. Set the **Envelope ID** using the dynamic content from the **Create an Envelope** action.
3. Select the correct **Captured Key**, which must match the one defined earlier (`salary_input`) to retrieve the salary amount filled by the employer.
#### 6.2 Get Captured Value
Once signed, automatically retrieve the captured salary value.
1. Add **Get a captured value** action from the SignatureAPI connector.
2. Set the **Envelope ID** using the dynamic content from the **Create an Envelope** action.
3. Select the correct **Captured Key**, which must match the one defined earlier (`salary_input`) to retrieve the salary amount filled by the employer.
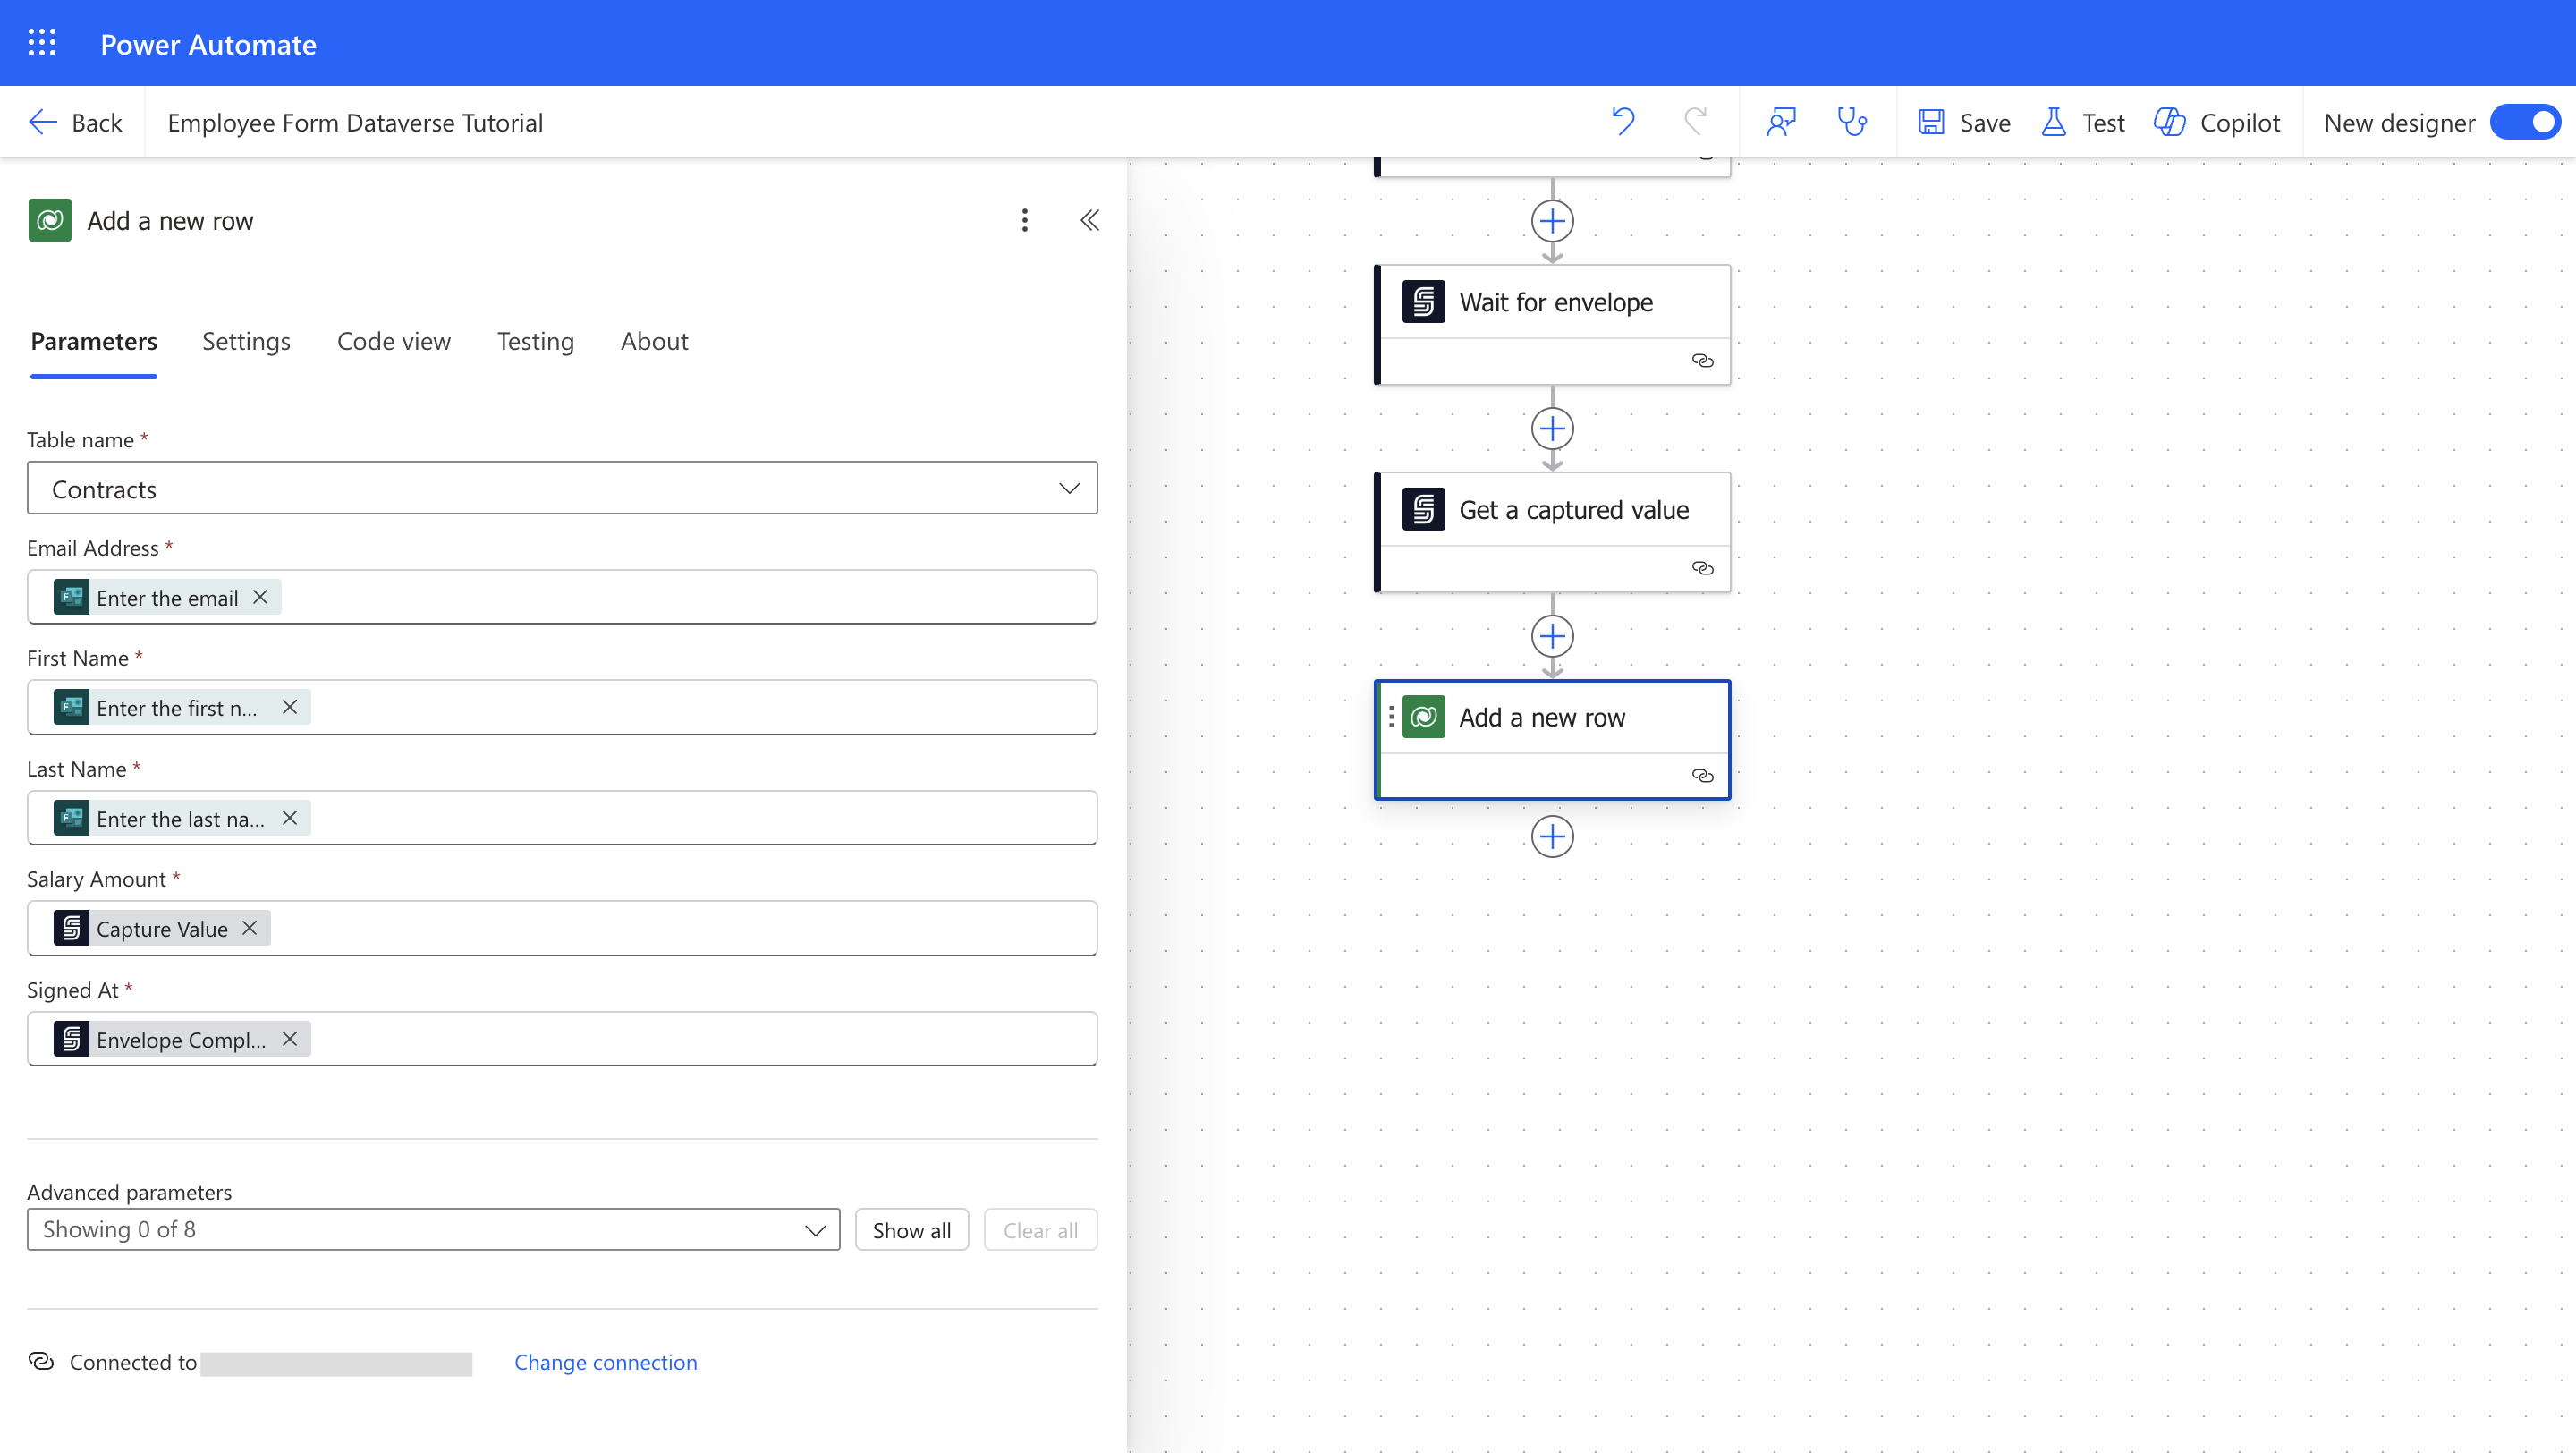
 #### 6.3 Add a Row to Dataverse
Add a row to the Dataverse table with the employee details and the captured salary amount.
1. Add **Add a new row** action from the Dataverse connector.
2. Select the correct **Dataverse Table**, which must match the one you created earlier.
3. From the **Advanced parameters**, select the **Fields** to map to the employee details and the captured salary amount from the dynamic content.
* Set **First Name**, **Last Name**, and **Email Address** from the form response details.
* Set **Salary Amount** from the captured value from the **Get a captured value** action.
* Set **Signature Completion** from the **Wait for Envelope Completion** action.
#### 6.3 Add a Row to Dataverse
Add a row to the Dataverse table with the employee details and the captured salary amount.
1. Add **Add a new row** action from the Dataverse connector.
2. Select the correct **Dataverse Table**, which must match the one you created earlier.
3. From the **Advanced parameters**, select the **Fields** to map to the employee details and the captured salary amount from the dynamic content.
* Set **First Name**, **Last Name**, and **Email Address** from the form response details.
* Set **Salary Amount** from the captured value from the **Get a captured value** action.
* Set **Signature Completion** from the **Wait for Envelope Completion** action.
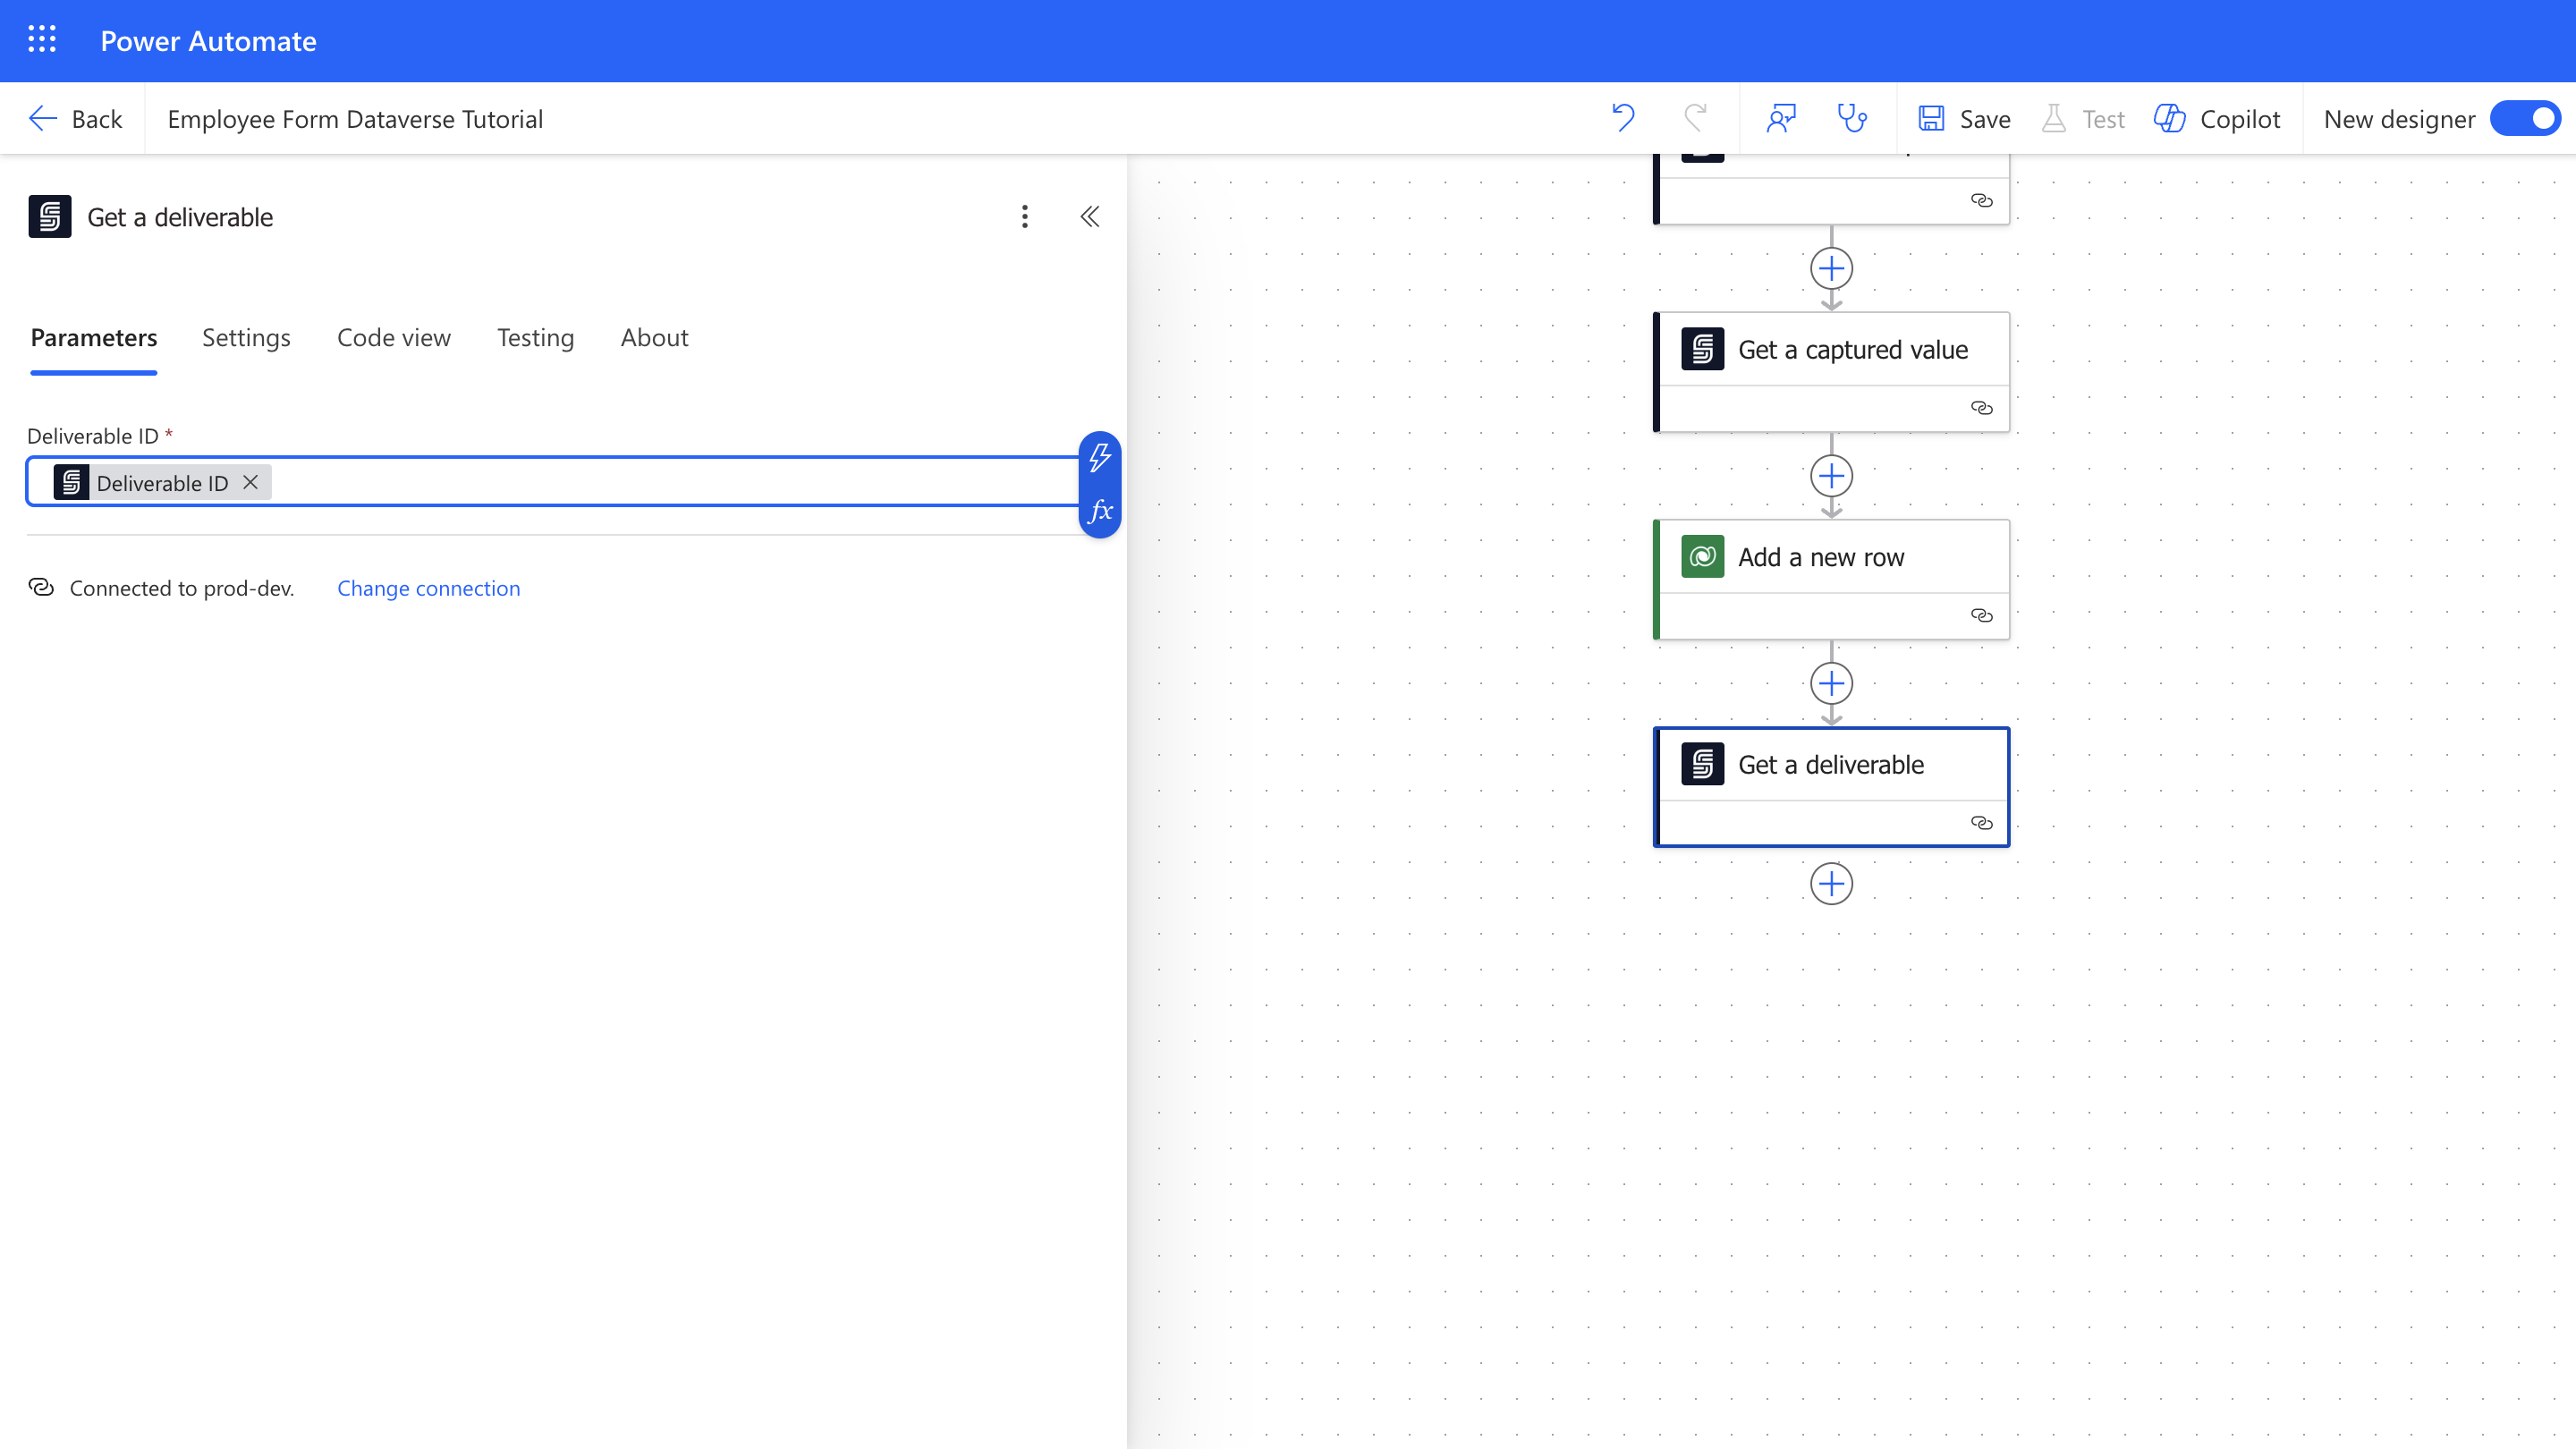
 #### 6.4 Retrieve the Signed Contract
Retrieve the completed document.
1. Add **Get a Deliverable** action.
2. Select the correct **Deliverable ID** using dynamic content.
#### 6.4 Retrieve the Signed Contract
Retrieve the completed document.
1. Add **Get a Deliverable** action.
2. Select the correct **Deliverable ID** using dynamic content.
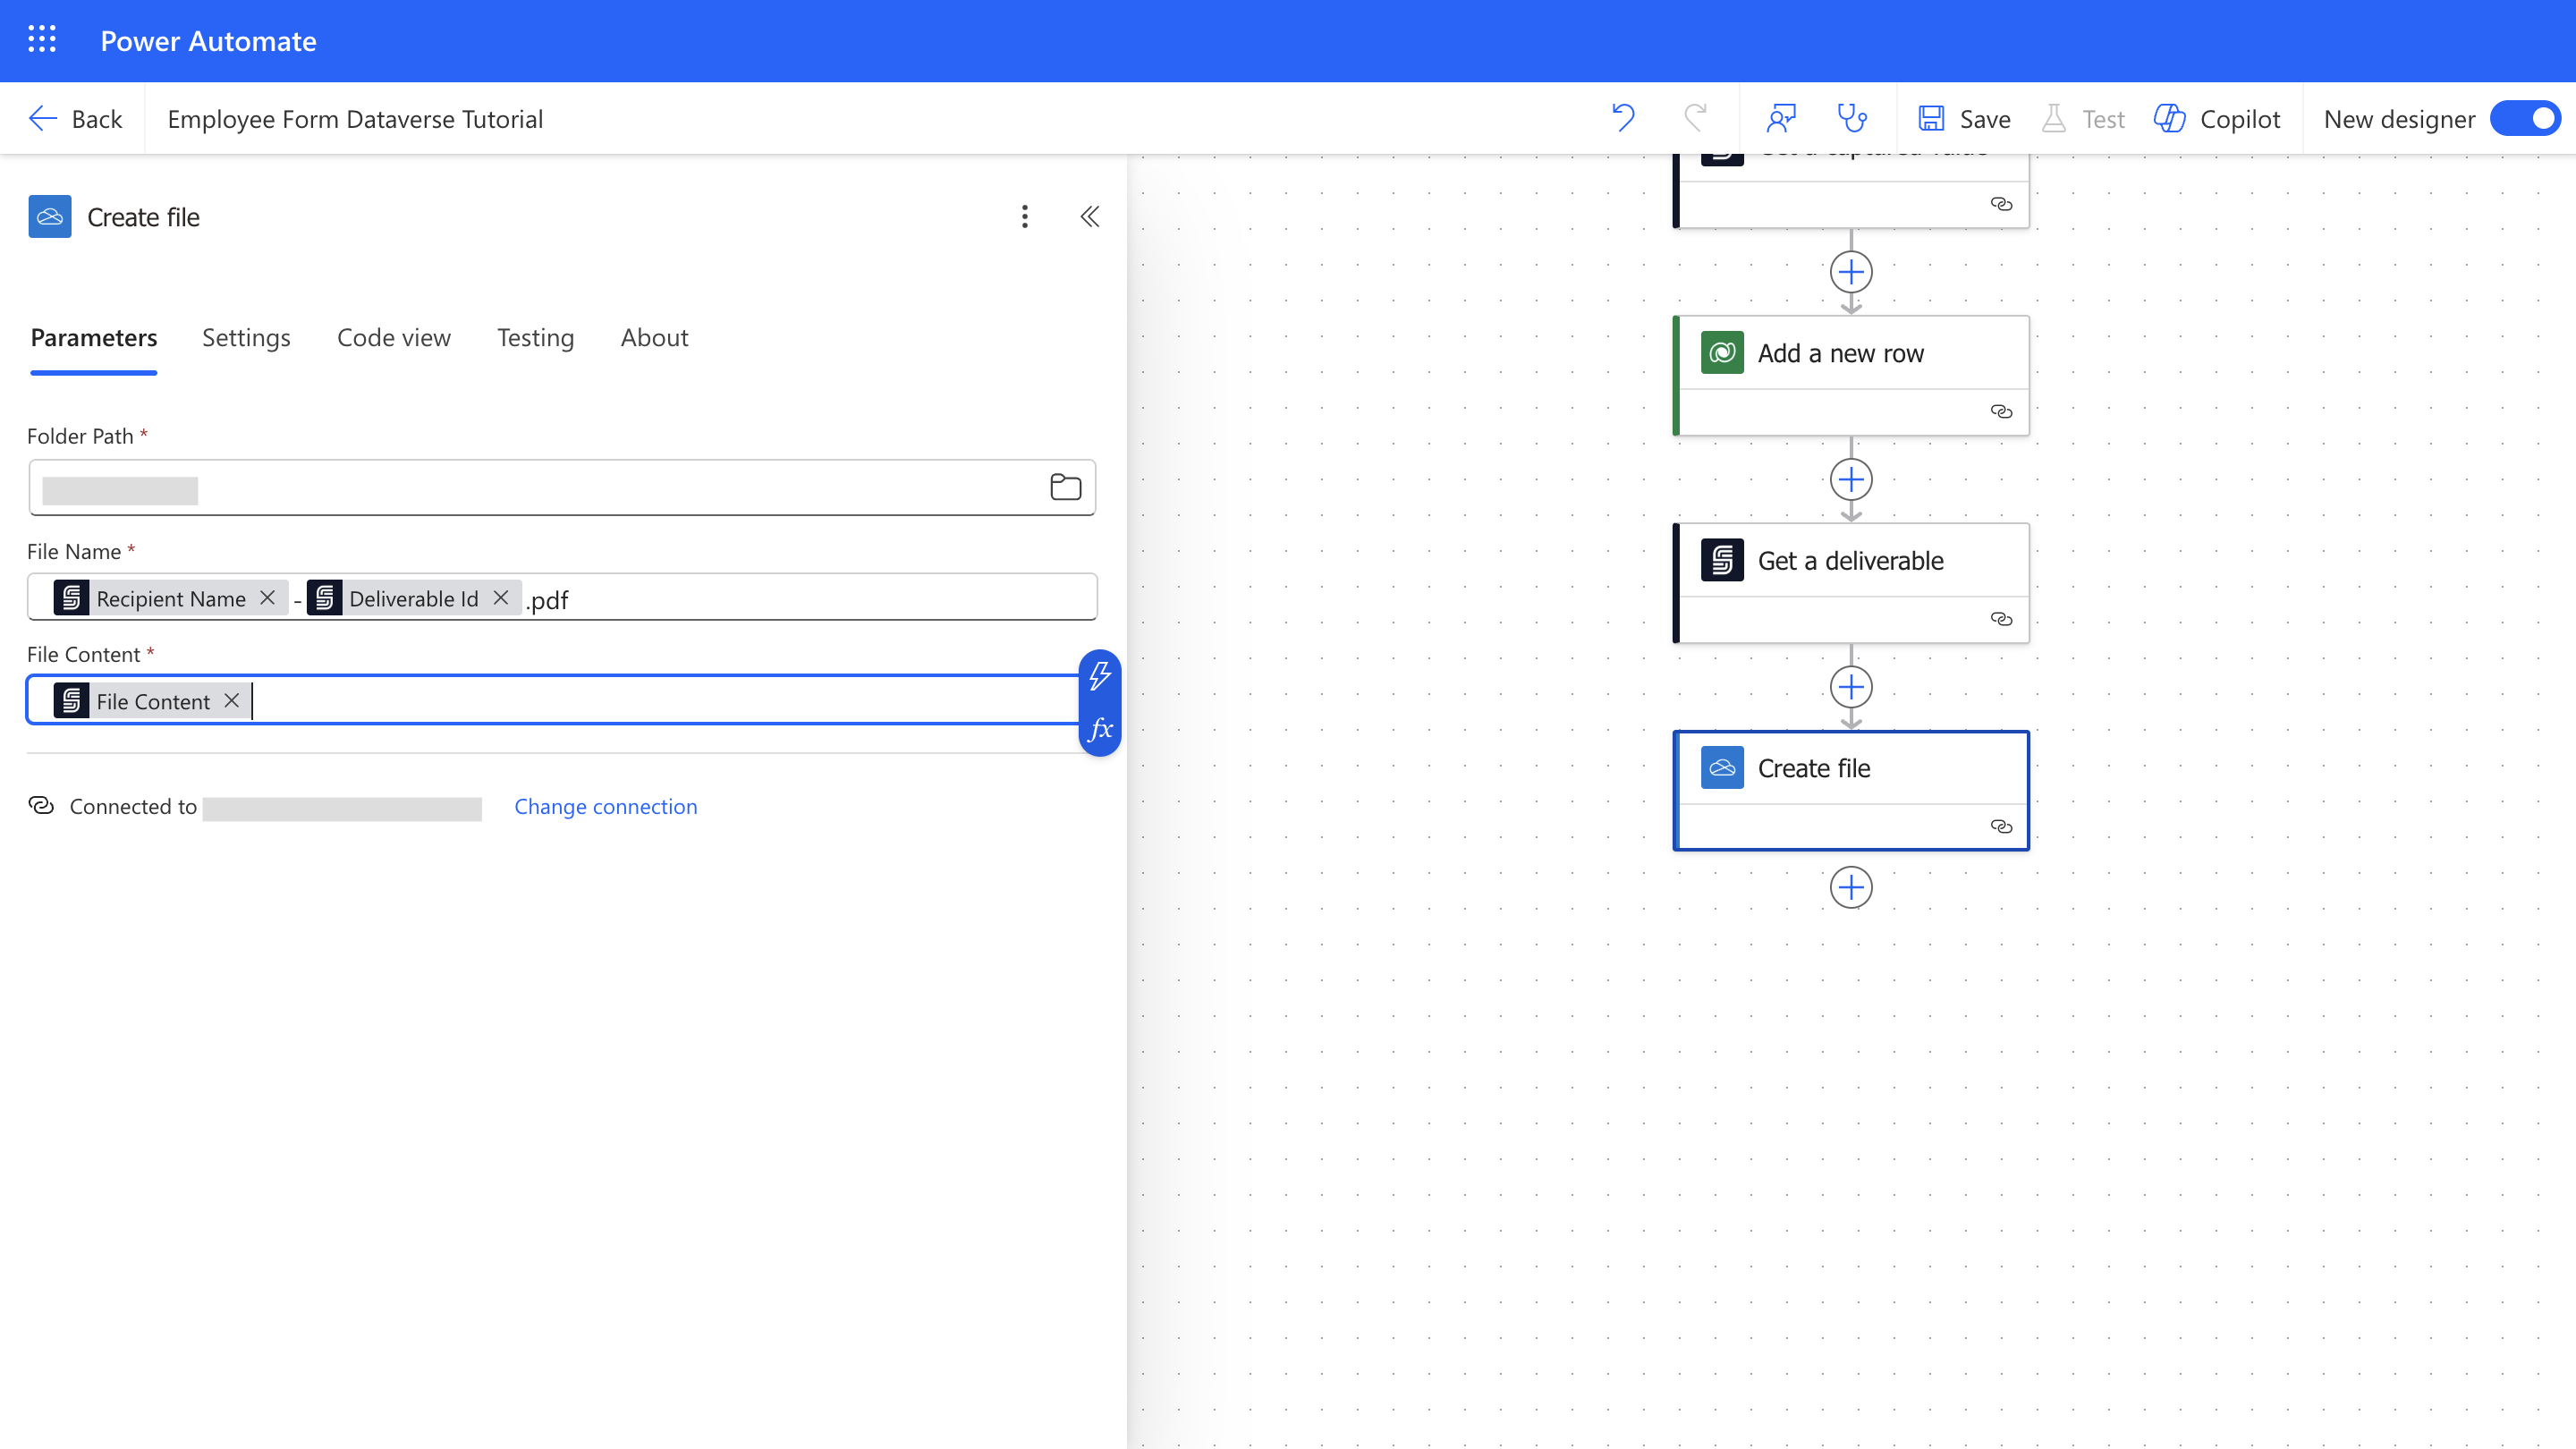
 #### 6.5 Save the Signed Contract to OneDrive
Save the signed document for record-keeping.
1. Add **Create File** action (OneDrive connector).
2. Set the folder path and filename (ending in `.pdf`).
3. Map **File Content** from the deliverable.
#### 6.5 Save the Signed Contract to OneDrive
Save the signed document for record-keeping.
1. Add **Create File** action (OneDrive connector).
2. Set the folder path and filename (ending in `.pdf`).
3. Map **File Content** from the deliverable.
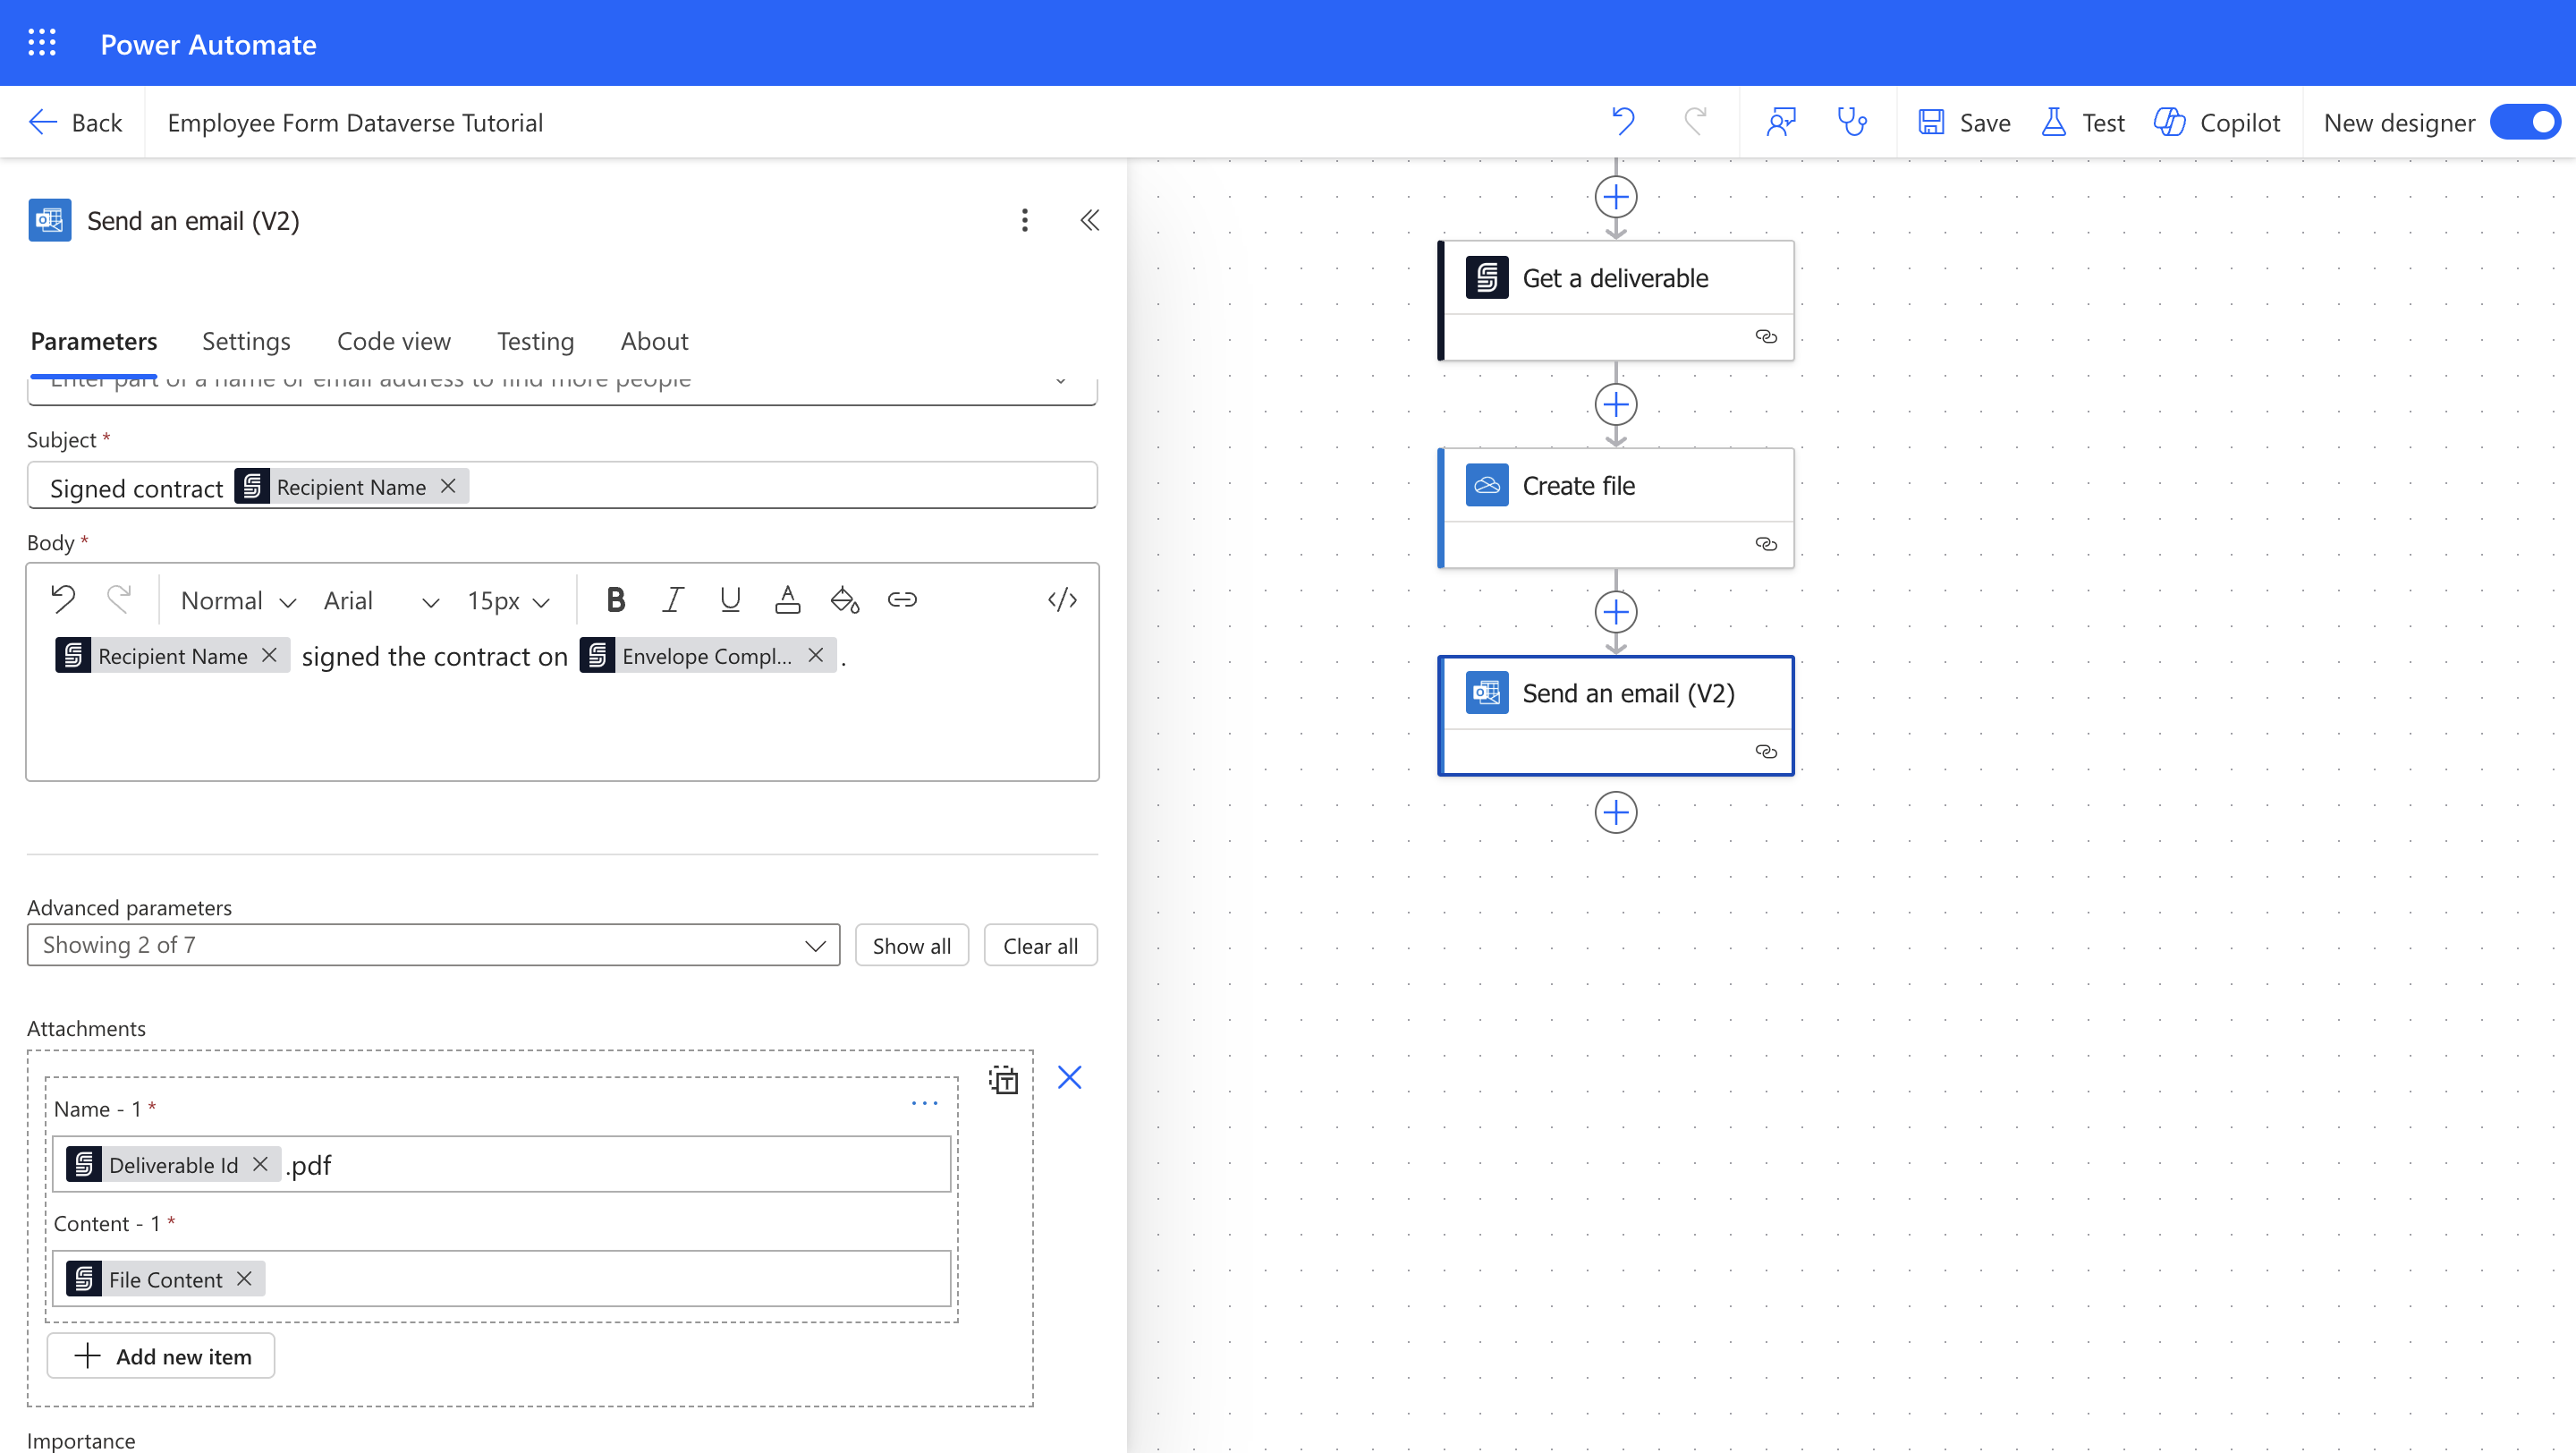
 #### 6.6 Notify HR via Email
Automatically inform HR that the contract has been signed and saved.
1. Add **Send an Email** action (Outlook connector).
2. Configure the email recipient (HR), subject, and message.
3. Attach the signed contract file from dynamic content. Use the **File Content** from the **Get a Deliverable** action, and set the filename (ending in `.pdf`).
#### 6.6 Notify HR via Email
Automatically inform HR that the contract has been signed and saved.
1. Add **Send an Email** action (Outlook connector).
2. Configure the email recipient (HR), subject, and message.
3. Attach the signed contract file from dynamic content. Use the **File Content** from the **Get a Deliverable** action, and set the filename (ending in `.pdf`).
 ### Step 7: Test Your Automation
Finally, test the entire process end-to-end.
1. Save your Power Automate flow.
2. Submit a test response through your Microsoft Form.
3. Verify the following:
* The form is submitted successfully.
* The flow is triggered and the contract is sent to the employer.
* After the employer fills the salary amount and signs the contract, the employee receives the contract and signs it.
* A row is added to the Dataverse table with the employee details and the captured salary amount.
* The signed contract is saved successfully in OneDrive.
* HR receives an email notification with the signed contract attached.
*Use the following checklist:*
* [ ] Contract sent successfully.
* [ ] Employer fills the salary amount and signs the contract.
* [ ] Employee receives and signs the contract.
* [ ] A row is added to the Dataverse table with the employee details and the captured salary amount.
* [ ] Signed document stored correctly in OneDrive.
* [ ] HR receives email notification with attachment.
## Troubleshooting & FAQ
### Common Issues:
* **API Key Errors:** Ensure your SignatureAPI key is correct and authenticated.
* **Dynamic Content Mapping:** Double-check that placeholder naming in your DOCX file matches exactly with dynamic content mappings.
* **File Access Issues:** Verify permissions and file paths in OneDrive.
### Frequently Asked Questions:
* *What if the contract isn't sent?*
Check your SignatureAPI dashboard for errors and verify recipient details.
* *Can I adapt this for other document types?*
Yes, this method is adaptable for any automated document-signing workflow.
* *What if the Dataverse row is not added?*
Verify that the Dataverse table columns match the fields you configured in the flow, and confirm that the captured key matches the one defined in the text input place.
## Best Practices & Security
* Always securely manage API keys.
* Regularly check flow runs in Power Automate for any errors.
* Document any flow or template changes for future reference.
## Additional Resources
* [SignatureAPI Documentation](https://signatureapi.com/docs)
* [Microsoft Forms Help](https://support.microsoft.com/forms)
* [Microsoft Dataverse Documentation](https://www.microsoft.com/en-us/power-platform/dataverse)
* [Power Automate Community](https://powerusers.microsoft.com/t5/Microsoft-Power-Automate/ct-p/MPACommunity)
## Conclusion
By completing this tutorial, you have successfully automated the process of sending, signing, and managing employment contracts with data stored in Microsoft Dataverse. This workflow frees your HR team from repetitive tasks and ensures new employees have a smooth onboarding experience.
**Happy Automating!**
### Step 7: Test Your Automation
Finally, test the entire process end-to-end.
1. Save your Power Automate flow.
2. Submit a test response through your Microsoft Form.
3. Verify the following:
* The form is submitted successfully.
* The flow is triggered and the contract is sent to the employer.
* After the employer fills the salary amount and signs the contract, the employee receives the contract and signs it.
* A row is added to the Dataverse table with the employee details and the captured salary amount.
* The signed contract is saved successfully in OneDrive.
* HR receives an email notification with the signed contract attached.
*Use the following checklist:*
* [ ] Contract sent successfully.
* [ ] Employer fills the salary amount and signs the contract.
* [ ] Employee receives and signs the contract.
* [ ] A row is added to the Dataverse table with the employee details and the captured salary amount.
* [ ] Signed document stored correctly in OneDrive.
* [ ] HR receives email notification with attachment.
## Troubleshooting & FAQ
### Common Issues:
* **API Key Errors:** Ensure your SignatureAPI key is correct and authenticated.
* **Dynamic Content Mapping:** Double-check that placeholder naming in your DOCX file matches exactly with dynamic content mappings.
* **File Access Issues:** Verify permissions and file paths in OneDrive.
### Frequently Asked Questions:
* *What if the contract isn't sent?*
Check your SignatureAPI dashboard for errors and verify recipient details.
* *Can I adapt this for other document types?*
Yes, this method is adaptable for any automated document-signing workflow.
* *What if the Dataverse row is not added?*
Verify that the Dataverse table columns match the fields you configured in the flow, and confirm that the captured key matches the one defined in the text input place.
## Best Practices & Security
* Always securely manage API keys.
* Regularly check flow runs in Power Automate for any errors.
* Document any flow or template changes for future reference.
## Additional Resources
* [SignatureAPI Documentation](https://signatureapi.com/docs)
* [Microsoft Forms Help](https://support.microsoft.com/forms)
* [Microsoft Dataverse Documentation](https://www.microsoft.com/en-us/power-platform/dataverse)
* [Power Automate Community](https://powerusers.microsoft.com/t5/Microsoft-Power-Automate/ct-p/MPACommunity)
## Conclusion
By completing this tutorial, you have successfully automated the process of sending, signing, and managing employment contracts with data stored in Microsoft Dataverse. This workflow frees your HR team from repetitive tasks and ensures new employees have a smooth onboarding experience.
**Happy Automating!**